i would also take the fenders off. thing to note:
get the front on on jack stands, get the wheels off ,
taking off the fenders will first require removal of the lower valance, and removal of the front fender supports and water shields.
you can then lowering the bumper or remove it, then the removal of the front grill so you can take apart the headlight buckets.
you can leave the hood and hood latch, and center support in front of the radiator support.
once all those parts are removed you can remove the 2 lower bolts on the fender by the doors, there is also a bolt in front of the doors(open the doors to get to it)
the fenders are not super heavy they are maybe 50 pounds i had no problems taking them off and moving them around just be careful not to damage them.
once the fenders are off, evaluate the hardware and how bad it is, just like tomahawk said keep track of the shims.
i would recommend a AMK body bolt hardware kit and replace everything that is in bad shape. its expensive though.
with the fenders off and the the front end lightened

next pop off your shock tower supports and take the caps off. pull off the shock tower covers with the rubber suspension stopper(these usually rust out no fear they are available in reproduction.
next remove the front shocks at this point your ready to get the springs out, but first i would disconnect the soft brake lines and cap the hardlines so you don't leak dot 3 all over the place and start removing paint.
pop off the tierod ends on both sides so the spindles are free. now you have the spindles just attached to the upper and lower suspension arms. and they are free to move.
for the sake of lightening the parts pull off the calipers and brake pads make sure you mark them Left and right. ok you are now 1 spring and 6 bolts away, 2 strut rods and mabey a front rollbar away from the front suspension being on the floor.
next the fun of using a spring compressor and getting the front spring out. nows a good time to think about lowering your car with a new 620lb front spring. (its easier to put the 620 back in since the spring is much shorter then OEM.
pull off the sway bar if you have one. now is a good time to think about upgrading the stock sway to a thicker one.
ok springs out, next mark the inner nut for the strut rods, try not to move them so the caster won't shift around too much when you RE ready to assemble. Loosen the front nuts on the strut rods and loosen the 4 nuts on the lower suspension arms, now you can slide out the strut rods toward the back of the car,
so at this point the upper and lower suspension arms will be attached to the spindles and the chassis, 8 nuts and 2 cam bolt and WOOHOO the suspension is on the floor.
now is the time you want to think about cleaning everything up making it look new and replacing hardware.
AMK to the rescue here.
i'll put together some photos to help you from when i did my front end on my 72.
puting everything together with new parts will be much less frustrating when the time comes.
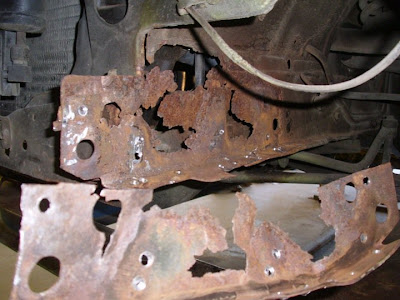
This is the area I'd be concerned about:
When I had my accident, the front bumper bracket on both sides broke off, and the rust found underneath was horrible. The area I've circled is the exact area where i had virtually no metal left.
This is what my driver's side front frame rail looked like after the bumper brackets were removed, the undercoating sanded off, and a majority of the rust removed:
So definitely go over that area very closely.
ah the horrible memories,
one thing to clarify, you could do this with the fenders installed, however it will make things a bigger PITA and you could damage the fenders. also when your feeding the upper arms into the shock tower you will able to get your hand inside the engine bay to get the nuts on.
plus with everything exposed you can see anything bad that might be lurking under all the undercoat and grime. also if your aprons are in good shape and the rails are in good shape, you could take it a step further and using a wire brush get off all the loose junk then use a drill with a disc on it and sand everything and get ready to repaint everything and make it look awesome.