


I don't know how i managed it but the A/C box came out without removing the dash. I removed the glove box door followed by the liner. Took plenty of pictures. Removed the vacuum motor to the right and disconnected all the vacuum lines. Lifted the hood and removed the 3 nuts. Going back into the car i eased the box forward and pulled the bottom left toward me and upwards so the side and bottom were at a raised angle. I eased to the right slightly and the box came away from the heater motor. I then pulled down gently and removed the box from behind the dash pulling the left hand side down first.
I still have to remove the heater motor but that can wait till i have sorted the A/C box out. When i remove the motor i will take out the dash but that won't be till the end of summer.
The main reason for removing the A/C box was to replace the heater core as it was leaking. Secondly as the A/C had been disconnected by PO i wanted to check the A/C core out. Finally i wanted to check the condition of the A/C box.
Today has been a good and productive day with some pleasant surprises with only one difficulty.
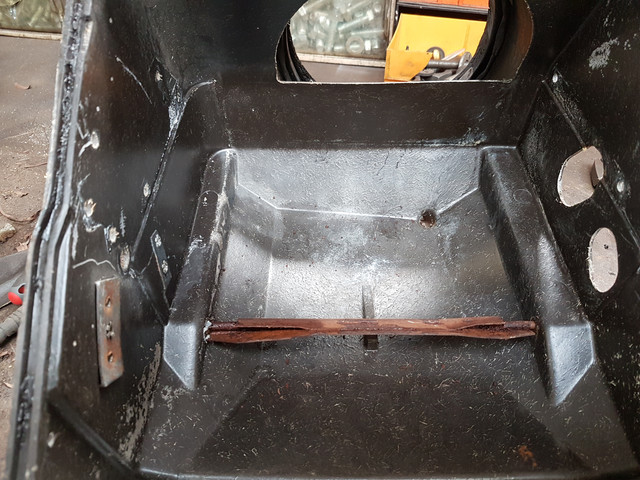
The only difficult bit was a rusted bar inside the flap inside the heater core section. I had to pry each end apart to where the spot weld is and then put it through the parts washer and blow it dry. Then sprayed liberally with easing oil and it finally came out with some persuasion. Rewashed the bracket and dryed it. Then rubbed down the bar that slots throught it. Gently pushed the rod backwards and forward a couple of dozen times till enough rust had been dislodged. Left the rod in the bracket and put into the vice and closed up the bracket. Checked the rod still moved freely and took it out.
All the metal parts have now been sent off to be derusted and recoated.
I knew the heater core was leaking and it does look pretty rough with several places leaking by the state of the core. Theres a radiator specialist 5 minutes walk away so i may ask his opinion of best way to go. Either recore or replace with a new brass one.
The A/C core looks okay i think. It has a few dented fins
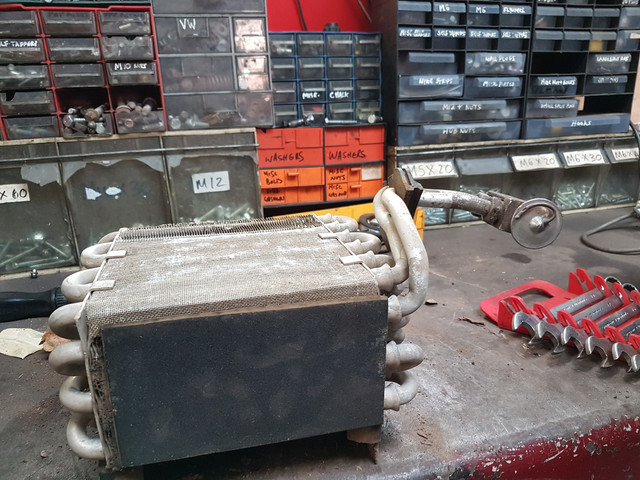
The A/C core will be sent off for testing in the hope there are no leaks.
The biggest surprise was the condition of the A/C box itself. There is a smal hairline crack in the box arounf a inch long. I will gouge that out deeper and fill with resin. The only other damage is the at the bottom where the piece sticks out that attaches to the drain hose that runs through the firewall. That piece that goes inside the hose has snapped off. I will reattach the broken piece using resin and a fibreglass sheet and more resin over the top. Sand it smooth and it should be good to go.
I will not get the 2 vacuum motors tested. I will replace those as i dont really want to be pulling the dash out again if they fail once it goes back. I want to also replace the thermostaic de-icing swith if they are available. When it all goes back together i will use all screws and bolts that came out but i will buy new spring retainer washers.
I am not sure what the PO was thinking when he put a bung in the drain hose. It certainly didnt do the system any favours when he/she did it.
So the plan now is repair the A/C BOX. Buy a seal kit and fit the seals refit the heater core and A/C core once repaired/renewed. Buy new vacuum motors and thermostatic de-icing switch or refurb it then fit them. The new vacuum lines are here already which will also be fitted. I also need to buy the firewall seal and check valve.
As i have recently finished all mechanical jobs after 2 years i am going to drive the car now the summer is here so the dash will not be removed and blower motor overhauled until October. When the dah and steering column comes out in October i will bare metal the inteior. Use a acid etch primer and then spray the interior grabber lime. At the same time the dash will be stripped bare metal and sprayed along with all the interior trim. I ordered a can of SEM paint from NPD. I will get it color matched at a local paint shop.
I still have to remove the heater motor but that can wait till i have sorted the A/C box out. When i remove the motor i will take out the dash but that won't be till the end of summer.
The main reason for removing the A/C box was to replace the heater core as it was leaking. Secondly as the A/C had been disconnected by PO i wanted to check the A/C core out. Finally i wanted to check the condition of the A/C box.
Today has been a good and productive day with some pleasant surprises with only one difficulty.
The only difficult bit was a rusted bar inside the flap inside the heater core section. I had to pry each end apart to where the spot weld is and then put it through the parts washer and blow it dry. Then sprayed liberally with easing oil and it finally came out with some persuasion. Rewashed the bracket and dryed it. Then rubbed down the bar that slots throught it. Gently pushed the rod backwards and forward a couple of dozen times till enough rust had been dislodged. Left the rod in the bracket and put into the vice and closed up the bracket. Checked the rod still moved freely and took it out.
All the metal parts have now been sent off to be derusted and recoated.
I knew the heater core was leaking and it does look pretty rough with several places leaking by the state of the core. Theres a radiator specialist 5 minutes walk away so i may ask his opinion of best way to go. Either recore or replace with a new brass one.
The A/C core looks okay i think. It has a few dented fins
The A/C core will be sent off for testing in the hope there are no leaks.
The biggest surprise was the condition of the A/C box itself. There is a smal hairline crack in the box arounf a inch long. I will gouge that out deeper and fill with resin. The only other damage is the at the bottom where the piece sticks out that attaches to the drain hose that runs through the firewall. That piece that goes inside the hose has snapped off. I will reattach the broken piece using resin and a fibreglass sheet and more resin over the top. Sand it smooth and it should be good to go.
I will not get the 2 vacuum motors tested. I will replace those as i dont really want to be pulling the dash out again if they fail once it goes back. I want to also replace the thermostaic de-icing swith if they are available. When it all goes back together i will use all screws and bolts that came out but i will buy new spring retainer washers.
I am not sure what the PO was thinking when he put a bung in the drain hose. It certainly didnt do the system any favours when he/she did it.
So the plan now is repair the A/C BOX. Buy a seal kit and fit the seals refit the heater core and A/C core once repaired/renewed. Buy new vacuum motors and thermostatic de-icing switch or refurb it then fit them. The new vacuum lines are here already which will also be fitted. I also need to buy the firewall seal and check valve.
As i have recently finished all mechanical jobs after 2 years i am going to drive the car now the summer is here so the dash will not be removed and blower motor overhauled until October. When the dah and steering column comes out in October i will bare metal the inteior. Use a acid etch primer and then spray the interior grabber lime. At the same time the dash will be stripped bare metal and sprayed along with all the interior trim. I ordered a can of SEM paint from NPD. I will get it color matched at a local paint shop.
