


- Joined
- Jan 7, 2019
- Messages
- 19
- Reaction score
- 6
- Location
- NC
- My Car
- 1972 Mach 1
[url=https://ibb.co/gyGp1P1][img]https://i.ibb.co/R21mnBn/Sexy-cars.jpg[/img][/url]
Two out of three of the mounting holes in my instrument cluster bezel were completely broken off. My first attempt at repair several years ago was to try welding random plastic pieces to it using a soldering iron. Now that I am restoring all of the dash and everything behind it, I discovered that my method failed and both pieces had mostly broke again. This was likely due to the melting of plastics only being superficial. Obviously I needed a better method or to just give up on it and get a new one for approximately $90.
While digging around on the internet researching dashboard repair, I found one guy who was fixing a motorcycle fairing using ABS glue. Now, I know as much as the next guy that glue glues things together. But what if something was completely missing? You can make anything useful out of glue, right? Wrong! This guy was missing a mounting bracket that had been torn off. He used clay to make an impression of an intact bracket, placed it where he needed it, and filled it with glue as an experiment. What he got was a rough but brand new bracket.
Fascinating! Turns out that ABS glue is not so much a glue per se. It's really a solvent (acetone and such) that melts plastic and makes a weld, kinda like model glue. But better than that, it has lots of ABS plastic dissolved in it that will become part of the weld and fill in gaps in your sloppy ABS piping project at home. That being that case, the stuff is able to be cast. And best of all, automotive plastic is mostly ABS.
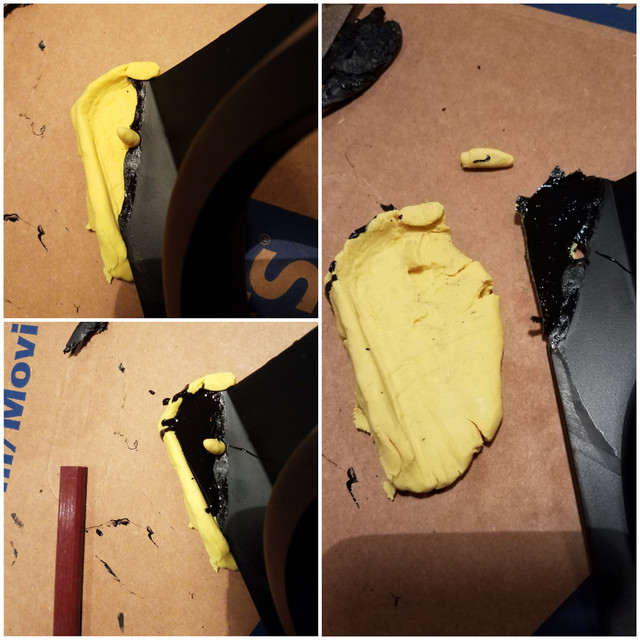
My research tells me (correct me if I'm wrong) that ABS welded with ABS glue has about 95% of the strength of the original. I thought I would give it a try as I had nothing to lose and the repair would never be seen as it hides under the dash pad. I used play dough for my mold since I had some laying about. Turns out that one of the good things about play dough is that it's water soluble and can be washed out of all of the nooks and crannies it might get stuck in.
So, here's my attempt...
And finished product...
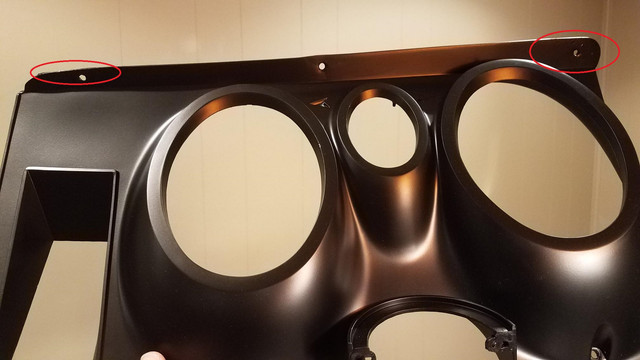
Both circled areas were gone.
Then I went completely nuts.
Ding around the tach gage...filled.
Center dash panel ductwork torn off of mounting brackets...backed it up with tape, filled with glue, new plastic now welded around old bracket rivets.
Big crack in center dash panel...gooped with glue (from behind), pressed ordinary window screen into it, gooped another layer once it was dry. Will never crack again.
I glued everything that I could!
What I learned...
1- ALWAYS clean part(s) first with ABS cleaner. It comes in a nice pack with the glue. Use a cotton swab or a cloth or the swab that comes in the can (a bit unwieldy). This removes old paint and starts the melting process. In fact, you can weld two pieces of ABS together with just acetone, once you apply enough to make the parts a bit goopy (that is a technical term).
2- The repair will need sanded if it is to be seen. Textured panels are tough. Repair from behind. I had a couple of holes to fill in my center console. I put tape on the outside (textured side), and filled from behind. Once it was kind of dry I poked it with a screw driver giving it a little texture. Looks passable.
3- Work in layers. The acetone needs to evaporate. That can take longer than it takes for the surface to skin over making it get sort of trapped. If poured on thickly (like I did in the example above) it will appear to "breathe" once a light skin forms and the acetone evaporating fills in behind it until it escapes. It's a little unnerving :chin: . It will also end up swiss-cheesy like as bubbles form inside because of the trapped gas.
4- It's going to be a bit swiss-cheesy regardless. No matter how much you fill and sand and repeat, it will never be flush or untextured. I guess that ABS is likely swiss-cheesy (I swear that's a thing) anyway, but on a really small scale that's not normally noticeable due to injection molding and casting makes bigger bubbles. Also, your borders will never sand flush because (I'm guessing here) the evaporating acetone will melt the adjoining plastic and collapse it's little micro-bubbles causing the border to shrink a little tiny bit. It makes a little shiny ring around your repair. Simple fix is to use a little putty after the first sanding.
5- Have lots of cotton swabs and toothpicks for applying glue and poking it into tight places.
Well, that's all I know. I hope this help others.
While digging around on the internet researching dashboard repair, I found one guy who was fixing a motorcycle fairing using ABS glue. Now, I know as much as the next guy that glue glues things together. But what if something was completely missing? You can make anything useful out of glue, right? Wrong! This guy was missing a mounting bracket that had been torn off. He used clay to make an impression of an intact bracket, placed it where he needed it, and filled it with glue as an experiment. What he got was a rough but brand new bracket.
Fascinating! Turns out that ABS glue is not so much a glue per se. It's really a solvent (acetone and such) that melts plastic and makes a weld, kinda like model glue. But better than that, it has lots of ABS plastic dissolved in it that will become part of the weld and fill in gaps in your sloppy ABS piping project at home. That being that case, the stuff is able to be cast. And best of all, automotive plastic is mostly ABS.
My research tells me (correct me if I'm wrong) that ABS welded with ABS glue has about 95% of the strength of the original. I thought I would give it a try as I had nothing to lose and the repair would never be seen as it hides under the dash pad. I used play dough for my mold since I had some laying about. Turns out that one of the good things about play dough is that it's water soluble and can be washed out of all of the nooks and crannies it might get stuck in.
So, here's my attempt...
And finished product...
Both circled areas were gone.
Then I went completely nuts.
Ding around the tach gage...filled.
Center dash panel ductwork torn off of mounting brackets...backed it up with tape, filled with glue, new plastic now welded around old bracket rivets.
Big crack in center dash panel...gooped with glue (from behind), pressed ordinary window screen into it, gooped another layer once it was dry. Will never crack again.
I glued everything that I could!
What I learned...
1- ALWAYS clean part(s) first with ABS cleaner. It comes in a nice pack with the glue. Use a cotton swab or a cloth or the swab that comes in the can (a bit unwieldy). This removes old paint and starts the melting process. In fact, you can weld two pieces of ABS together with just acetone, once you apply enough to make the parts a bit goopy (that is a technical term).
2- The repair will need sanded if it is to be seen. Textured panels are tough. Repair from behind. I had a couple of holes to fill in my center console. I put tape on the outside (textured side), and filled from behind. Once it was kind of dry I poked it with a screw driver giving it a little texture. Looks passable.
3- Work in layers. The acetone needs to evaporate. That can take longer than it takes for the surface to skin over making it get sort of trapped. If poured on thickly (like I did in the example above) it will appear to "breathe" once a light skin forms and the acetone evaporating fills in behind it until it escapes. It's a little unnerving :chin: . It will also end up swiss-cheesy like as bubbles form inside because of the trapped gas.
4- It's going to be a bit swiss-cheesy regardless. No matter how much you fill and sand and repeat, it will never be flush or untextured. I guess that ABS is likely swiss-cheesy (I swear that's a thing) anyway, but on a really small scale that's not normally noticeable due to injection molding and casting makes bigger bubbles. Also, your borders will never sand flush because (I'm guessing here) the evaporating acetone will melt the adjoining plastic and collapse it's little micro-bubbles causing the border to shrink a little tiny bit. It makes a little shiny ring around your repair. Simple fix is to use a little putty after the first sanding.
5- Have lots of cotton swabs and toothpicks for applying glue and poking it into tight places.
Well, that's all I know. I hope this help others.