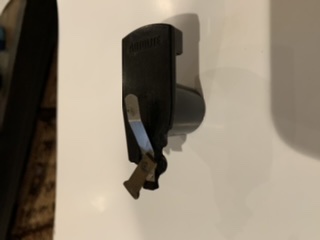
351C Q-code reassembled, ready to start it up

7173Mustangs.com

Help Support 7173Mustangs.com:

This site may earn a commission from merchant affiliate links, including eBay, Amazon, and others.
Joined
Jun 14, 2019
Messages
552
Reaction score
165
Location
Coachella Valley (Palm Springs)
My Car
1973 Convertible, 351 4v CJ, C6, Mach 1 Decor options, power: steering, brakes and windows, a/c, Rally Pac gauges, Deluxe interior.
[url=https://ibb.co/ZVjjKXW][img]https://i.ibb.co/zrMMbxG/s-l1600-2.jpg[/img][/url]
Background:  got the car in June '19 and it started (on the first try, every time!) and ran, but with some underhood issues (leaky radiator and p/s pump).  Removed pump and sent it out to be rebuilt, replaced radiator, fuel filter, battery tray and in the "while you're at it" category, upgraded the alternator and replaced the water pump.  Also, switched the mechanical points for Pertronix 1 (using the original coil).

Along the way... a few bolts got broke removing the water pump and the engine was pulled to rebore the holes.  I mention that mainly to let you know everything had been drained and disconnected.

Almost unbelievably, it took until January to get the *right* p/s pump back but once I did, I've been reassembling everything and refilled the vital fluids.  Cranked (with the coil wire detached) several times to check for leaks and squeaks.  All good.  Not really expected a start on the first try, I was not disappointed.  Turns over great, but not even a little life in the engine.

Question:  what should I do to give starting the car a serious try?  Do I need a booster sprayed down the carb?  Other than changing the fuel filter leading to the fuel pump at the engine, nothing was changed in the fuel supply -- and 7 months ago I still had at least two gallons of gas in the tank.  All new fluids (well, except for brakes.  Otherwise:  oil, coolant & p/s).

Since the fuel lines were empty for so long, do I need to prime the carb?  Any others tips & tricks, or is there a checklist for "Your first startup after major work"?

Thanks y'all - ya been the best so far.

 
Turns over great, but not even a little life in the engine.

Question:  what should I do to give starting the car a serious try?  
OK .........because we don't know ALL THE THINGS YOU DID/other things not mentioned as you detailed/painted and "replaced wires for petronix" I WOULD first confirm if you have spark. 1) primary at the coil and 2) secondary for the plugs. Then IF SO confirm if you have fuel in the carb (after sitting).

OTHERS would just spray starting fluid in the carb and crank ! If it fires you have spark. Then it would be making sure fuel is flowing and GOOD. (gas does go bad you know).

Personally I think you are over thinking it.....unless I did REAR your post correctly. IT DIDN"T START !! Anyway I think you will be fine. Don't throw parts at it. Don't THINK you need to buy anything. IF IT RAN BEFORE - it would now if you didn't make a mistake. Could be as easy as missing a wire!

Mark

P.S. Please show use what you did, what you are dealing with. It's funny, you can make a car run with a WIRE to coil from the battery and starting fluid. When you ADD an modern electronic component it takes TWO "and you have to know it works". Man do I like points !

 
Turns over great, but not even a little life in the engine.

Question:  what should I do to give starting the car a serious try?  
OK .........because we don't know ALL THE THINGS YOU DID/other things not mentioned as you detailed/painted and "replaced wires for petronix"  I WOULD first confirm if you have spark. 1) primary at the coil and 2) secondary for the plugs.      Then IF SO confirm if you have fuel in the carb (after sitting).

OTHERS would just spray starting fluid in the carb and crank !  If it fires you have spark.  Then it would be making sure fuel is flowing and GOOD.  (gas does go bad you know).

Personally I think you are over thinking it.....unless I did REAR your post correctly.  IT DIDN"T START !!  Anyway I think you will be fine.  Don't throw parts at it.  Don't THINK you need to buy anything.  IF IT RAN BEFORE - it would now if you didn't make a mistake.  Could be as easy as missing a wire!

Mark

P.S.  Please show use what you did, what you are dealing with.  It's funny, you can make a car run with a WIRE to coil from the battery and starting fluid.  When you ADD an modern electronic component it takes TWO "and you have to know it works".    Man do I like points !
I have experienced a bad Pertronix magnet ring before. The magnets can be damaged or the pickup is too far away. Or the distributor may need to be rotated a little.

But confirm you have fuel first.

 
I added three gallons of gas and that brought the gauge to 1/4 full. And all this time I just thought it didn't work - ha!

I’ve been going through everything, retesting connections, configurations, etc. Finding the rotor in this shape was a huge surprise because I’d replaced it when I put in the Pertronix I electronic points. Replaced it with a new one, but that wasn’t the issue.

So far: electrical tests with a meter on the coil show a good ground (0 ohms) but checking voltage, only gets 8.9 at the coil in near-start key position. Pertronix doc says that indicates a resistor, ballast resistor or bad ground. In multiple other discussions it’s been assured there’s not a ballast resistor (or otherwise) so not sure where to look next.

Hanging it up for the night.

By the way -- looked back at the old points/condensor setup. The ground wire from the coil had been split, but by the time I got the car, the 3rd wire went nowhere. Random question: what might have that been for?


Last edited by a moderator:
I’ve been going through everything, retesting connections, configurations, etc. Finding the rotor in this shape was a huge surprise because I’d replaced it when I put in the Pertronix I electronic points. Replaced it with a new one, but that wasn’t the issue.

So far: electrical tests with a meter on the coil show a good ground (0 ohms) but checking voltage, only gets 8.9 at the coil in near-start key position. Pertronix doc says that indicates a resistor, ballast resistor or bad ground. In multiple other discussions it’s been assured there’s not a ballast resistor (or otherwise) so not sure where to look next.

Hanging it up for the night.

8.9V with wire connected to + side of the coil and key in RUN?  That's the expected value.  Not the recommended method for measuring voltage at that point: best to remove wire from coil and then measure: 12V.  The reason being that most systems, including points, don't like power to the coil with the engine not running.  The first method has the resistor wire in use in the underdash harness, which reduces voltage.
Well, now that's interesting.  Per the Pertronix instructions, turn the key to past On (Run) but just short of engaging the starter.  You can hear the solenoid click into place and just a fraction more, the starter engages.

 
You will check the obvious I am sure I just want to caution you on one item.

We have all poured or squirted gas in carb to get it started. I just learned this week that my millionaire neighbor was working on one of his cars. He was pouring gas in car from a bottle and backfire and the gas ended up on him. He died in the hospital. He has two buildings full of cars that are probably 6,000 sq. ft each. He was a butt hole and never ever saw any of his cars. He tried to by some of mine but I would not sell. 

Also I spent a week in Augusta Georgia at the burn center with my mom. She spilled hot coffee on her legs and had to be at the burn center for a week. You stay there in a dorm type setting. During that week I saw burn victims come in that had been doing things I had done in the past.

One was pouring gas in carb and backfire and had severe burns.

Another was squirting lighter fluid on grill and also got burns.

Man was getting his motor home ready for he and wife to go cross country. He had replaced radiator hoses and had put an old piece of vinyl flooring under the motor home to lay on. He had the engine running for a while and got it heated up and slid under the vehicle to look for any leaks. One of the hoses blew off and the boiling hot coolant went all over him and with him on the vinyl he got cooked. He did not live.

It being the July 4 holiday there were several fireworks burn victims. 

We have all seen the idiots on Gas Monkey garage pouring gas in carb and it catch on fire and they throw in the floor and have big fire. 

I almost burnt my 73 Mach 1 down on the side of the road. During gas shortage I ran out. Close to my Sisters home walked over and got lawn mower gas and went back and put in tank. When I poured in carb I splashed it into air cleaner that was ram air. When cranked it backfired and of course was blazing. I pulled my jacket off and smothered the fire but jacket was trashed. 

So I decided to come up with a safer way that you can do anywhere. The issue with using an open cup or gas can is if it backfires the vapors in the container go off and boom big problem. 

If you take a water bottle or coke bottle and wash it out take a razor blade and cut a slit in the lid and screw it back on. Not a hole just a slit. You can squirt gas from the slit but if it backfires the flame will not go into the bottle. Always keep a 5 gallon bucket of water close by and fire extinguisher. 

If you had the distributor out I would bring to TDC and check to see if rotor is in right spot. Also make sure you did not put the wires on in the reverse direction. 

I do not like to use starting fluid. It is tough on an engine more of an explosion than a burn. If when you are cranking and it backfires just stop there and figure out what is wrong. Continuing to crank will not fix the problem.

 
Have you verified spark at the plug by watching one spark when you crank?

FAST.

You have Fuel

You have Air

You need Spark

You need Timing at the correct time

If you didn’t remove distributor your Timing should be good enough to start.

Pertronix install is easy. I use a relay to provide the full 12 volts it likes. For your testing purposes only, you can run a hot wire directly from battery to pertronix. I put a butt connector on this jumper near the battery to turn off the ignition.

I’ve seen the voltage drop too low when going through our 50 year old wires. Eliminate this potential problem first.

 
You will check the obvious I am sure I just want to caution you on one item.

We have all poured or squirted gas in carb to get it started. 
I only mentioned that because I was curious if there was something in particular needed because the engine block had been removed and the all the hoses and lines detached, so left empty.

If everything is working as expected, I wouldn't expect I'd need to.

 
The Ford Service Manual has a lengthy list of tests for when the car won't start in the troubleshooting section. Some of them require special gizmos, such as a remote starter, but I'll be working my way through them as best I can.

 
The Ford Service Manual has a lengthy list of tests for when the car won't start in the troubleshooting section.  Some of them require special gizmos, such as a remote starter, but I'll be working my way through them as best I can.
You can get a remote starter at any auto parts store. Generally about $15. I honestly can't imagine not having one when doing diagnostics. 

IMO, this is a decent flowchart for diagnosing a no-start condition.

https://www.ifitjams.com/starting.htm

 
You still have not said if you actually have spark at the plug. This should be first step.
Well, um, now it's first on the list.  Wanted to eliminate all the overlooked possibilities first, such as discovering that messed up rotor.

 
The Ford Service Manual has a lengthy list of tests for when the car won't start in the troubleshooting section.  Some of them require special gizmos, such as a remote starter, but I'll be working my way through them as best I can.
You can get a remote starter at any auto parts store. Generally about $15. I honestly can't imagine not having one when doing diagnostics. 

IMO, this is a decent flowchart for diagnosing a no-start condition.

https://www.ifitjams.com/starting.htm
And one of those inline spark checking tools. Good for for finding a weak plug or wire, too.

 
You mention Pertronix in this post.  I lost a ton of time with mine passing all the 12v tests and my car not running.

Start with the trusty old point breaker system.  I finally did that and mine runs great.  I could not get the Pertronix to even start after a while due to all the variation in the timing on the mount plate.  I put the point breaker plate back in with new points and condensor and it has not missed a start or a beat while running.

Pertronix was returned for refund.( look at my post on Countdown to Start day.)

kcmash

 
This is why you should run a new, dedicated 12V power source to the pertronix. I do this. Never a problem. Installed lots of them. My racecar has had the same pertronix in for 17 years. Never touched it.

 
Use Hemikiller's flowchart, it's a good one. Start at the top and work your way through it. Do not assume that one of the items is good and you can skip it, that will be the one that is causing the problem. Do not skip any steps, even though you are certain it is good.

Unless you are an accomplished mechanic, with all the necessary diagnostic tools and experience, never add goodies like an electronic ignition or fuel injection before the first startup and all of the initial bugs are worked out. Start it with the original points and a good carburetor, get it running good, then add goodies one at a time.

I prime the carburetor by adding a couple of ounces of gas into the fuel bowls, through the vent tubes, before the first startup. That way if it doesn't start I don't have to wonder if it's a fuel delivery problem. Like David said, pouring gas into the carburetor while cranking it is a recipe for disaster. Do you watch any of the car build shows on TV? Half of the time the engine doesn't start on first try.

 
Last edited by a moderator:
Alrighty then. No, I did not have spark at the plug.

Taking my cue from Don C and 73 Pony, I’m removing the only ignition item changed in this project: the switch to Pertronix 1 and going back to points and condenser. Now I need to know how to put it back together - lol...

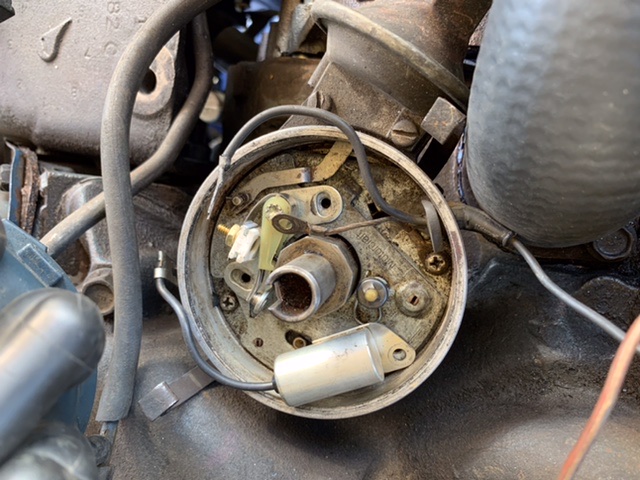
1) there’s a wire coming from the inside distributor housing, appears to be for grounding the breaker plate(?). Where does it go, to the condenser or points? In the photo, I’m referencing the bare wire attached near the grommet laying loose on the points.

2) and just because I don’t want to have to come back and ask again, the ground wire from the coil and the condenser wire attach where?

I wouldn’t have thunk it’d be this hard just to locate a correct photo to guide me — but is. The drawings and b&w photos in the shop manual are not helpful.

And let this be your reminder: takes LOTS of pictures, before and after. In my smug naivety in the beginning, I didn’t.


Back
Top