Thinking of shaving the drip rails on my car...anyone done this or have any pics of it done so I can see what it looks like??? I know it's kind of a PITA, but I think it may be one of those things that would be worth the effort in the end. A nice clean, subtle mod that not everyone would even pick up on.
You are using an out of date browser. It may not display this or other websites correctly.
You should upgrade or use an alternative browser.
You should upgrade or use an alternative browser.
shaved drip rails
- Thread starter Obsidian11
- Start date


Help Support 7173Mustangs.com:
This site may earn a commission from merchant affiliate
links, including eBay, Amazon, and others.
- Joined
- Nov 23, 2010
- Messages
- 7,334
- Reaction score
- 417
- Location
- Escondido, Ca.
- My Car
- 71 Mustang Mach 1
72 Mustang Mach 1 (parts car)
I say go for it. Shaved drip rails would look hot. It would take the car to next level.
Don65Stang
Well-known member
There's some pics & video of the high end build mustang that was done in north Alabama. Extreemly cool car but I didn't save the link. It's on this forum and others. Ultra modern 71 and highly customized white Mach 1. They shaved the drip rails on it as well.
Someone on here I'm sure will have the link.
Someone on here I'm sure will have the link.
- Joined
- Dec 24, 2010
- Messages
- 2,888
- Reaction score
- 45
- Location
- U.S.A.
- My Car
- 1972 Q code Mach 4spd
2004 350z
2005 Corvette
1971 Camaro SS/RS
It's not really a PITA..It's just a matter of if you have the body work metal skill & knowledge to do it CORRECTLY.. done incorrectly it can be a costly mistake. If your not up to the task it would be worth while to have a pro WHO HAS DONE THIS JOB BEFORE perform it for you.Thinking of shaving the drip rails on my car...anyone done this or have any pics of it done so I can see what it looks like??? I know it's kind of a PITA, but I think it may be one of those things that would be worth the effort in the end. A nice clean, subtle mod that not everyone would even pick up on.
VintageUpgrades
Well-known member
- Joined
- Aug 15, 2010
- Messages
- 81
- Reaction score
- 1
- Location
- Houston,Tx
- My Car
- Mustang Restoration..65-73
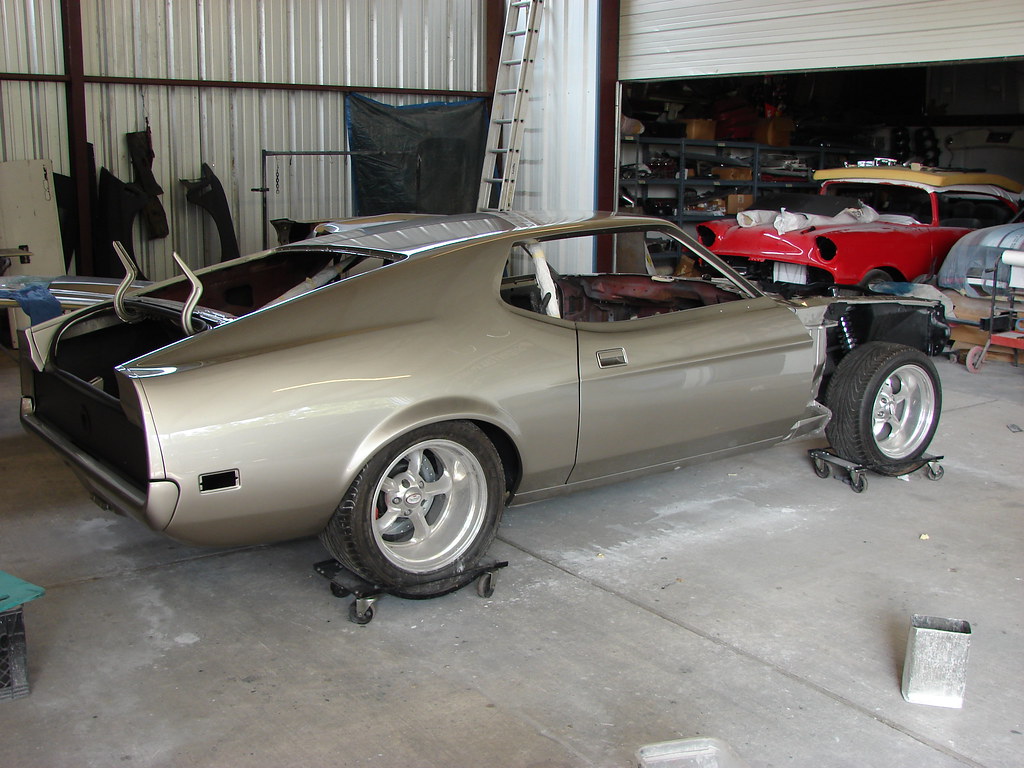
Here is a fastback with no rails.

Sold! I'm doing it! Thant looks sweet!
Next question...Anyone got any links to tutorials on this??? I'm not at all scared to do it...been doing bodywork for half my life at this point, just don't want to tackle it without completely researching the "right way" to do it first.
Thanks!
Next question...Anyone got any links to tutorials on this??? I'm not at all scared to do it...been doing bodywork for half my life at this point, just don't want to tackle it without completely researching the "right way" to do it first.
Thanks!
- Joined
- Jan 26, 2011
- Messages
- 807
- Reaction score
- 3
- Location
- Hawaii
- My Car
- 1971 Mach 1 Completed
1972 Mach 1 Future Project
1972 Mach 1 Doner Parts Car
1973 302 Current Project
That's an awesome look Mitch! Thanks for posting the pics! I too am sold on the look Obsidian71, so post your experience when done.
Thanks,
DJ
Thanks,
DJ
- Joined
- Jul 5, 2010
- Messages
- 6,685
- Reaction score
- 386
- Location
- Grand Rapids, MI
- My Car
- 73 Convertible
Just a suggestion... When you start working on this start a thread with progress photos while you're doing the job. You can inspire others and get good feedback from some of the experienced body guys as well as ideas from the rest.Sold! I'm doing it! Thant looks sweet!
Next question...Anyone got any links to tutorials on this??? I'm not at all scared to do it...been doing bodywork for half my life at this point, just don't want to tackle it without completely researching the "right way" to do it first.
Thanks!
VintageUpgrades
Well-known member
- Joined
- Aug 15, 2010
- Messages
- 81
- Reaction score
- 1
- Location
- Houston,Tx
- My Car
- Mustang Restoration..65-73
NO, just remember that the roof is welded on at the drip rails. Cutting them off requires adding a strip of metal the length of the cut. Find a salvage yard with some 80s or 90s Fords with drip rails and have them cut a section. Cut the welds and see how it was done. You will see what areas need to be strengthened.Next question...Anyone got any links to tutorials on this???
Thanks!
http://www.goolsbycustoms.com/
I believe this is what you were referring to Don... This car was actually at a little town on the AL/TN line for a high school band fundraiser. Beautiful job on the car.
Bessemer is outside of Birmingham.
Here's the Mustang:
http://www.goolsbycustoms.com/projects/project-pegasus-1971-ford-mustang/
I believe this is what you were referring to Don... This car was actually at a little town on the AL/TN line for a high school band fundraiser. Beautiful job on the car.
Bessemer is outside of Birmingham.
Here's the Mustang:
http://www.goolsbycustoms.com/projects/project-pegasus-1971-ford-mustang/
Last edited by a moderator:
- Joined
- Feb 6, 2011
- Messages
- 309
- Reaction score
- 1
- Location
- cardington,ohio
- My Car
- 71 (M CODE) MACH 1 NOW BBF
Its funny this should come up now. They just had a piece on doing it to a cougar on the show GEARZ on the speed channel this past Sunday. Heck on TV he had it done in about 5 minutes.
- Joined
- Jul 19, 2011
- Messages
- 4,829
- Reaction score
- 19
- Location
- Pittsburgh, PA
- My Car
- 1973 Mach 1 Q code 4 speed
1973 Chevelle 454 SS
2005 Magnum RT
2008 Colorado
If I remember right you need to be extra carefull where the roof meets the top of the windshield. I ran into factory solder there.
Thanks for all the input...lookin like it'll turn into when I did my 1st roof chop on my '54 F-100...me with a sawzall, and a few friends standing around saying WTF!!! that one turned out ok, so I'm sure I'll figure out a way to make this work. I'm probably about 2-3 months away from trying it though, working now on scraping all the factory seam sealer and undercoating from the bottom of the car, then it's on to the fun stuff. I'll be sure to post lots of pics and descriptions of how I'm doing it here.
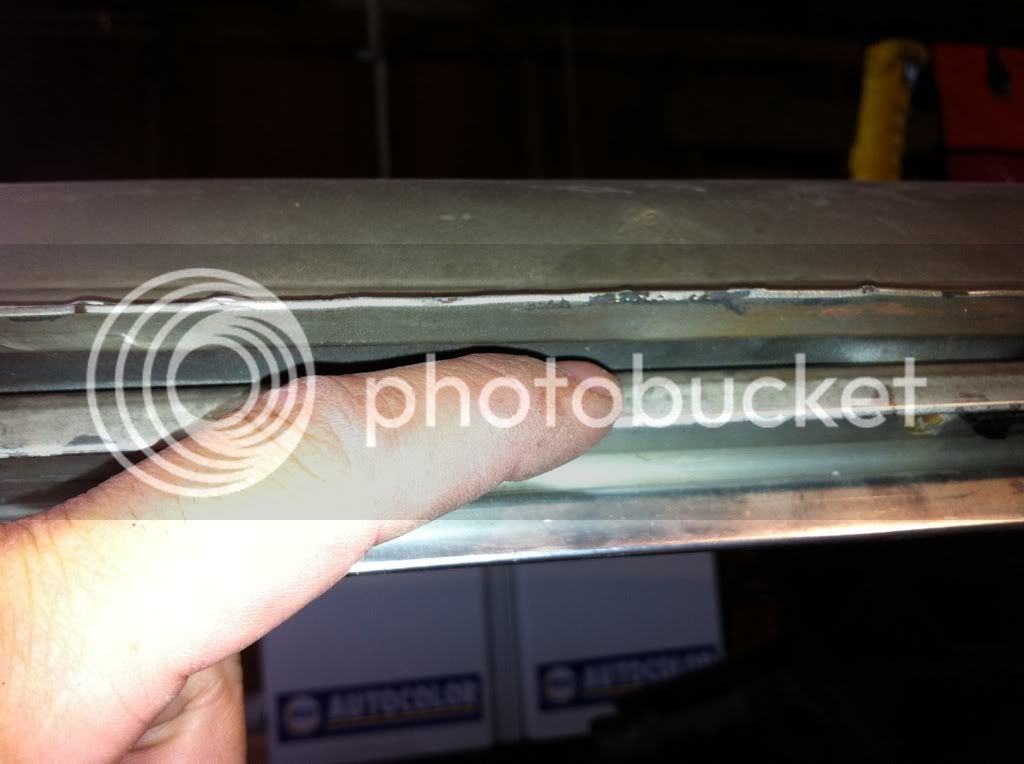
Ok...about to start cutting?!?!? Anyone know what to do here where there will end up being a gap between the weatherstrip channel and where the "new" roof edge will end? My best initial guess is to weld a length of 1/8 steel rod to the edge after I get the lip cut off and welded up. Also, any suggestions on the small lip in the sheetmetal right above the drip rail...flatten it out or keep it as a simple body line??? I'm thinking of flattening it.
Last edited by a moderator:
- Joined
- Dec 24, 2010
- Messages
- 2,888
- Reaction score
- 45
- Location
- U.S.A.
- My Car
- 1972 Q code Mach 4spd
2004 350z
2005 Corvette
1971 Camaro SS/RS
You need to flatten the body line with a flat spoon ..You may be able to also flatten the 1/4" lip that holds the drip rail on..If you can, then there's the metal you need to fill your gap. To make it easier you can use a propane torch with a very small tip to LIGHTLY heat the edge & roof line for bending /flattening..Best if you have an extra set of hands so one person heats while the other hammers dollys the metal.Ok...about to start cutting?!?!? Anyone know what to do here where there will end up being a gap between the weatherstrip channel and where the "new" roof edge will end? My best initial guess is to weld a length of 1/8 steel rod to the edge after I get the lip cut off and welded up. Also, any suggestions on the small lip in the sheetmetal right above the drip rail...flatten it out or keep it as a simple body line??? I'm thinking of flattening it.
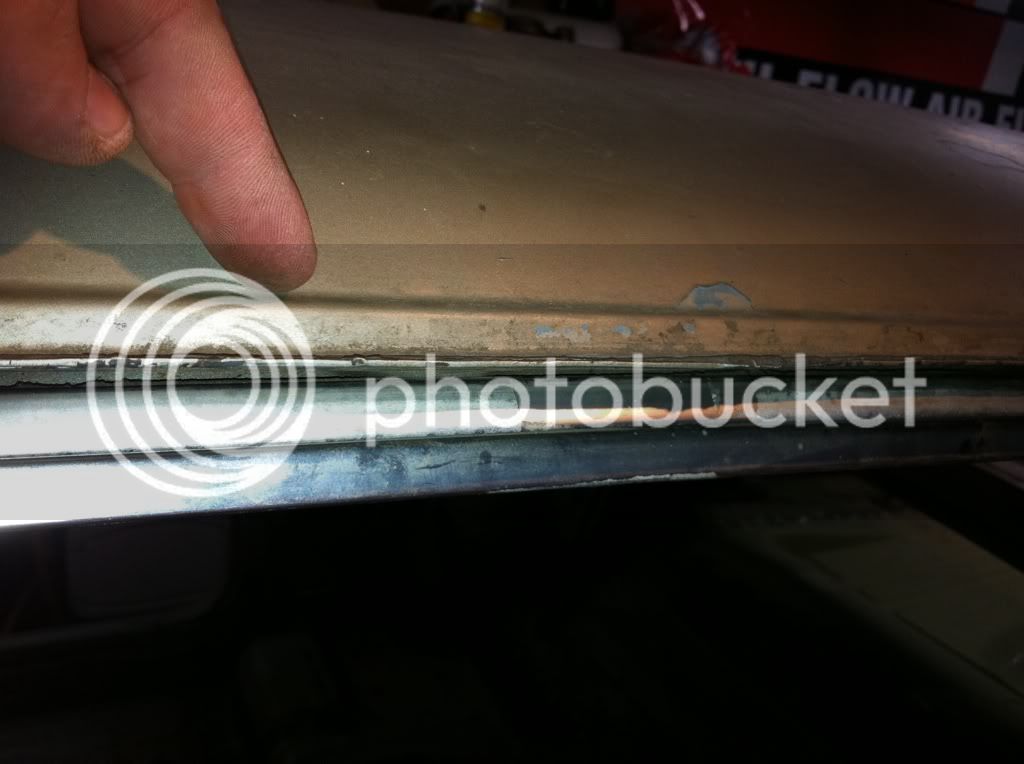
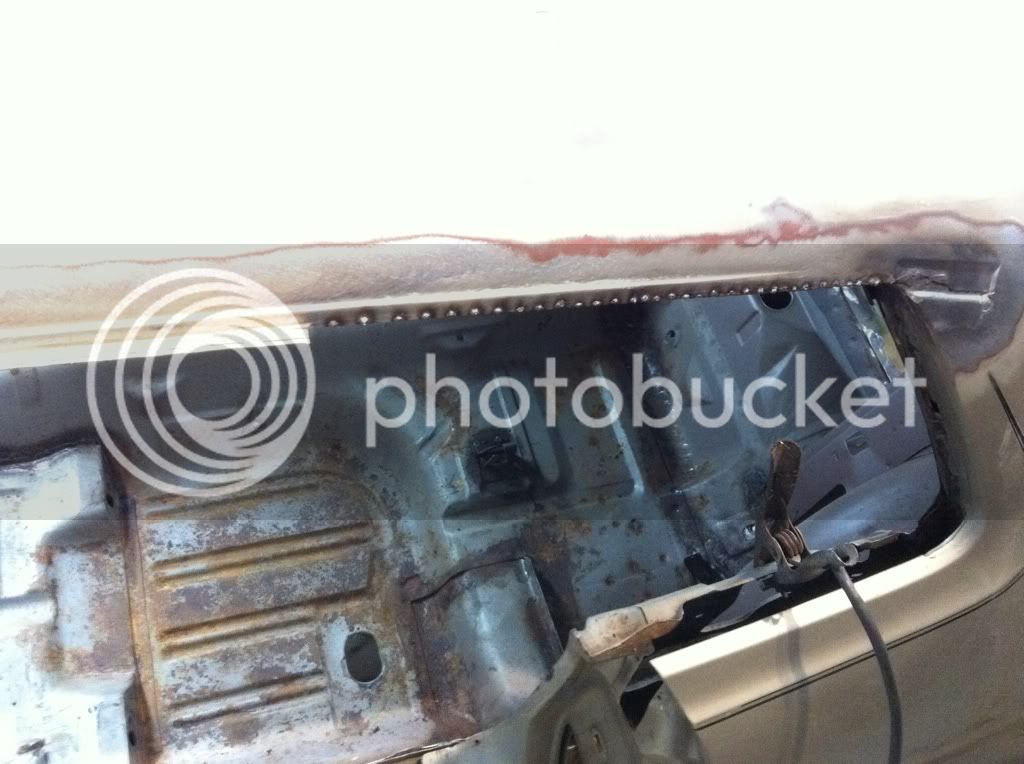
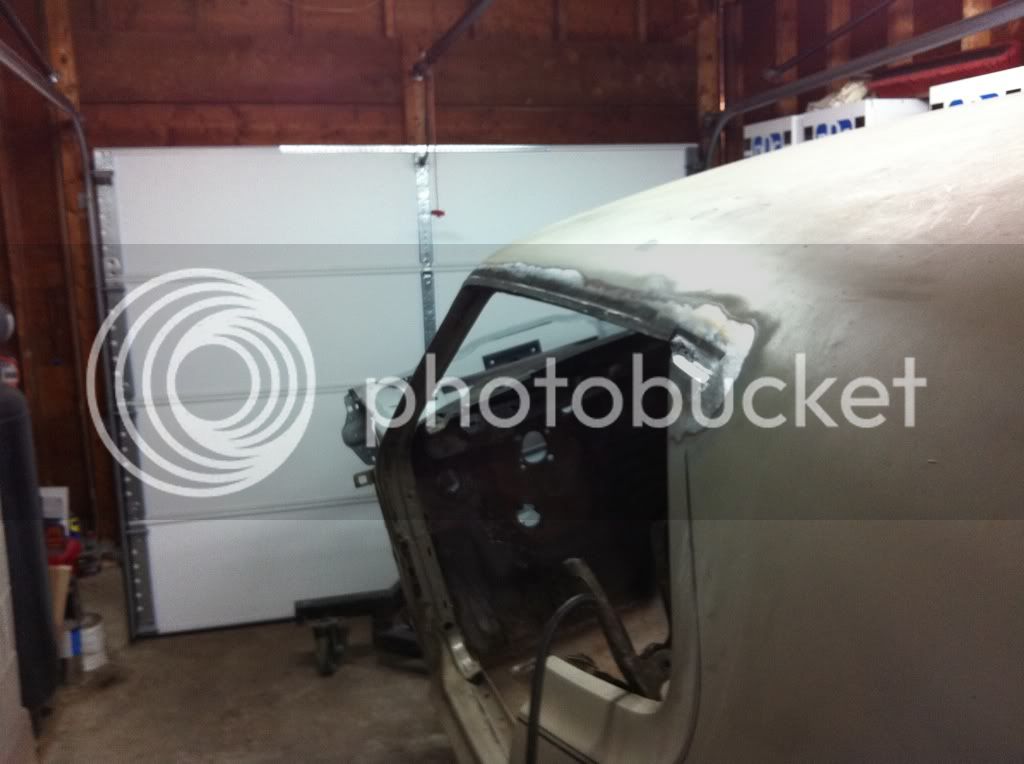
Ok...so after some long hard thought, I decided to keep the small body line above the drip rail :huh:...then changed my mind after I saw the way it looked all done! Back to square 1, nothin like a little trial & error to keep you on your toes ")
Anyway, here's some pics of what I did in case someone wants to shave theirs and keep the body line.
Should've went with my instincts and lost the line in the first place!
Anyway, here's some pics of what I did in case someone wants to shave theirs and keep the body line.
Should've went with my instincts and lost the line in the first place!
- Joined
- Dec 24, 2010
- Messages
- 2,888
- Reaction score
- 45
- Location
- U.S.A.
- My Car
- 1972 Q code Mach 4spd
2004 350z
2005 Corvette
1971 Camaro SS/RS
Yep..agreed..Dosn't give the right effect with the roof body line still in place.Should've went with my instincts and lost the line in the first place!
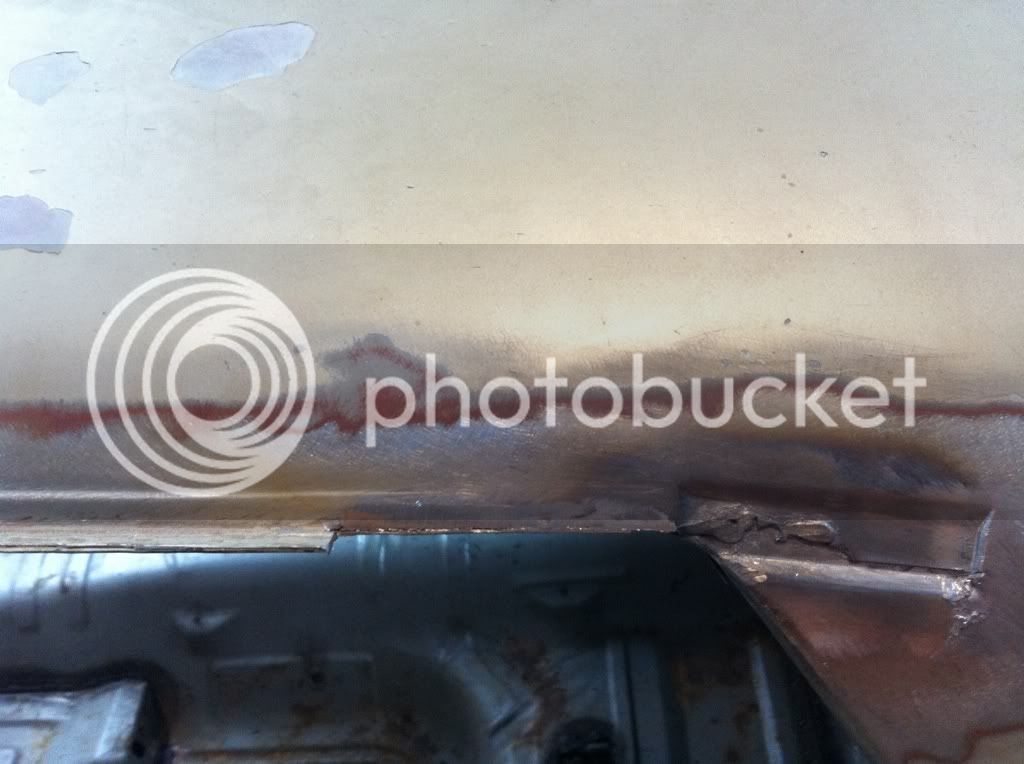
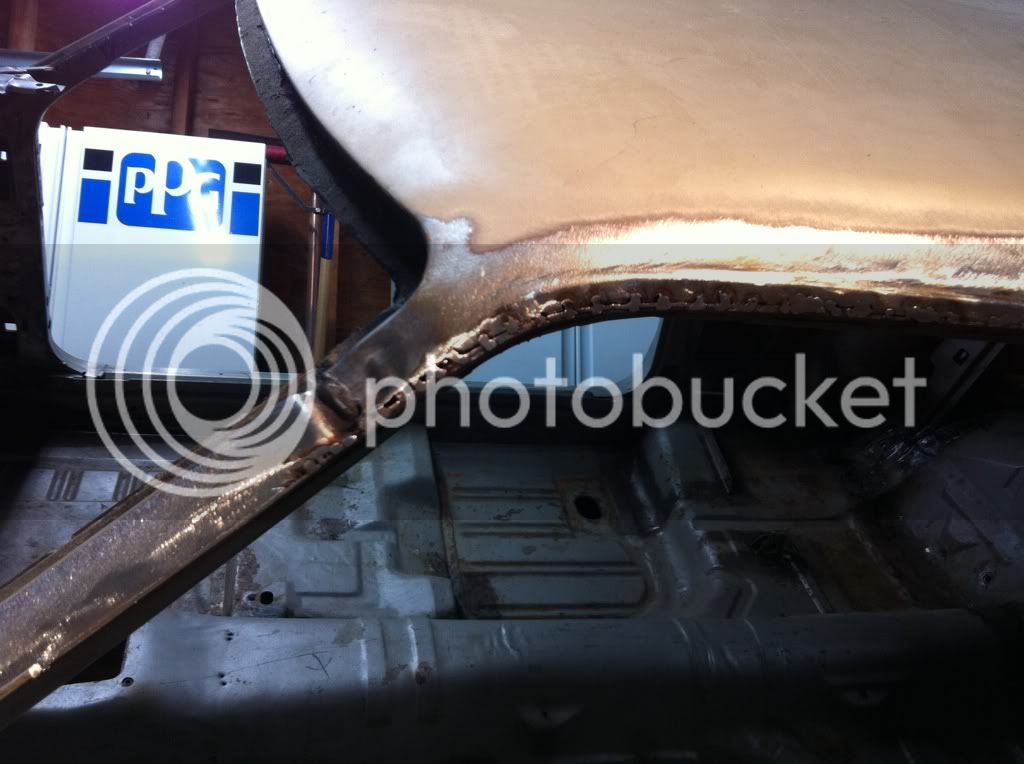
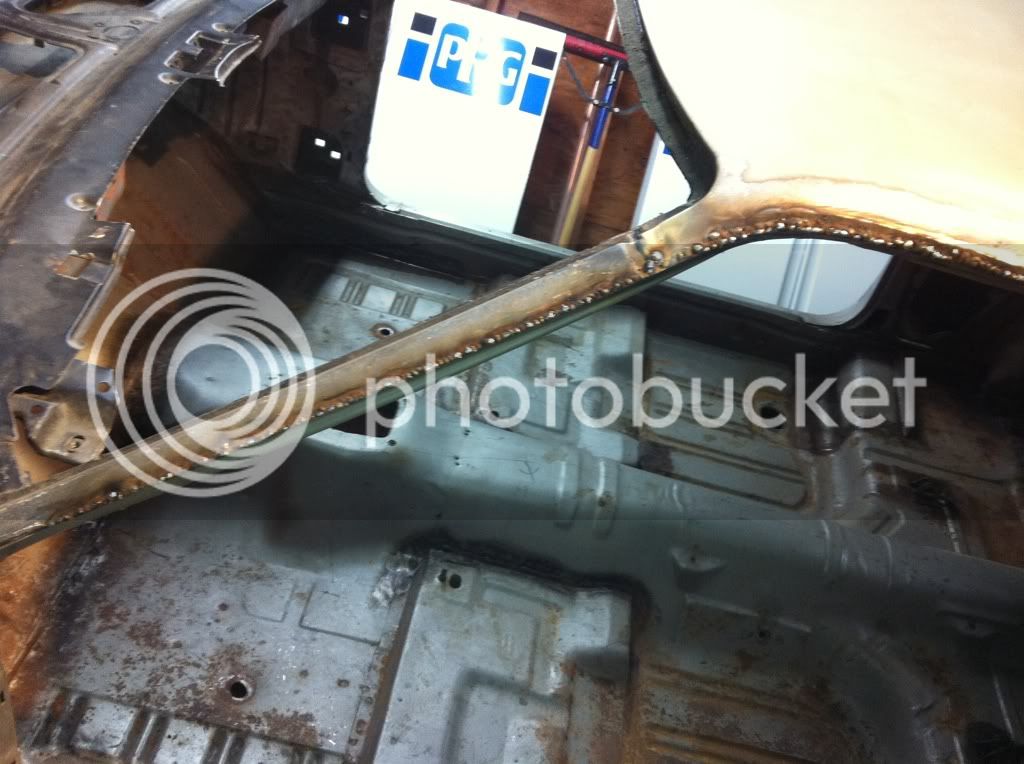
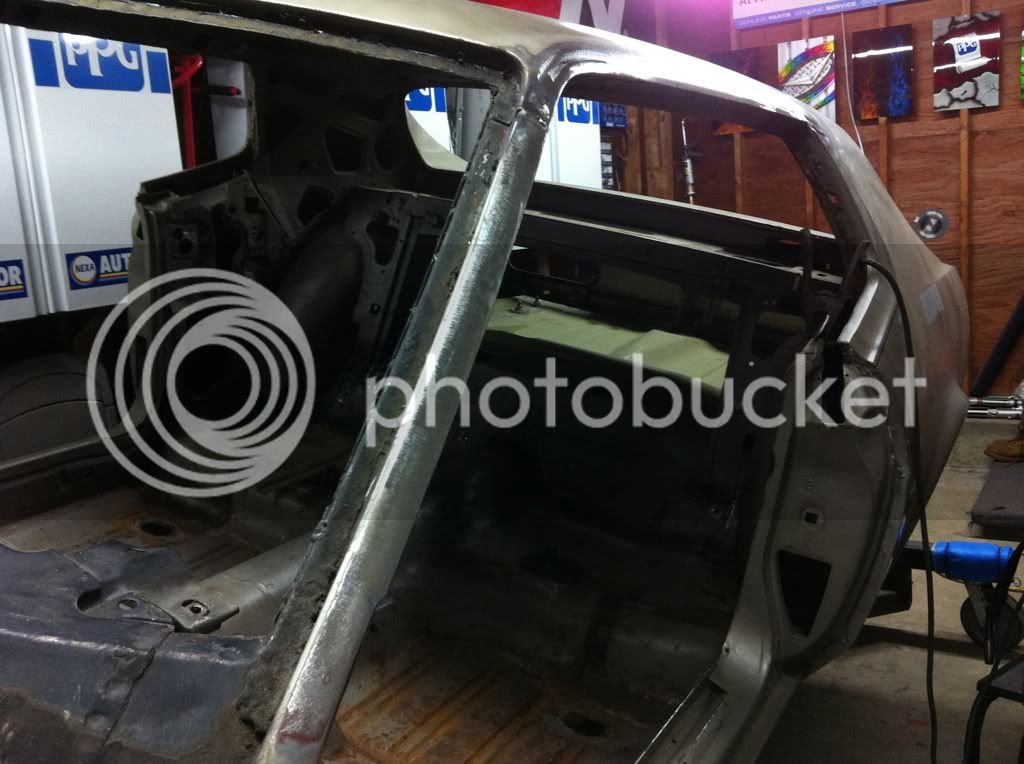
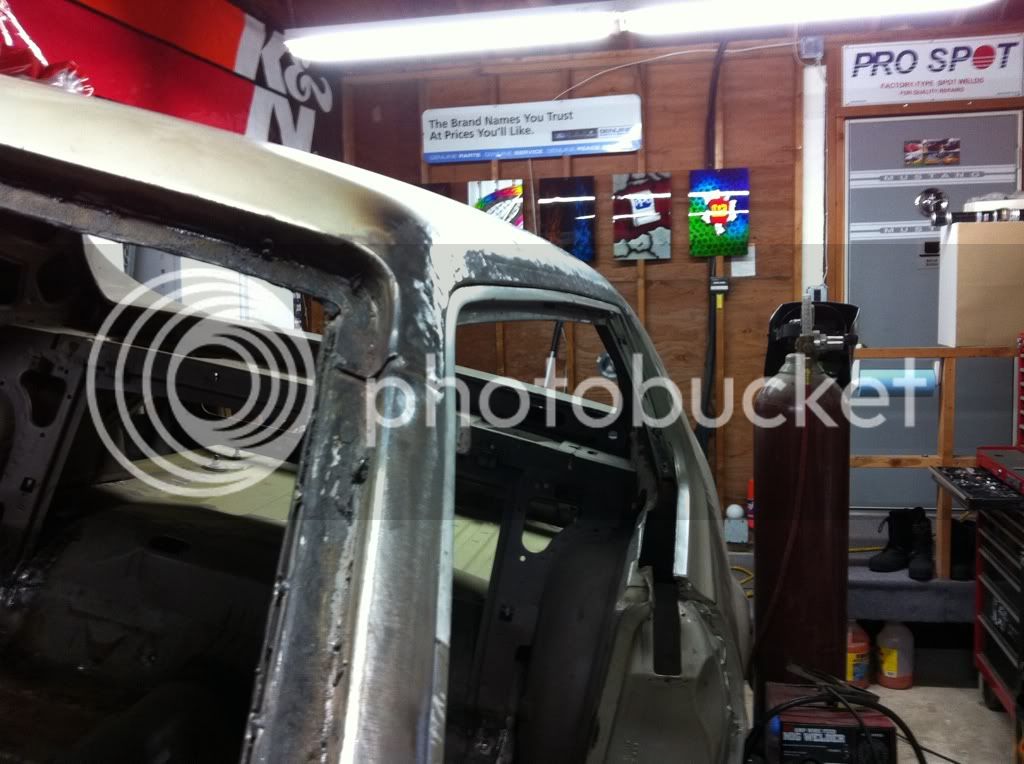
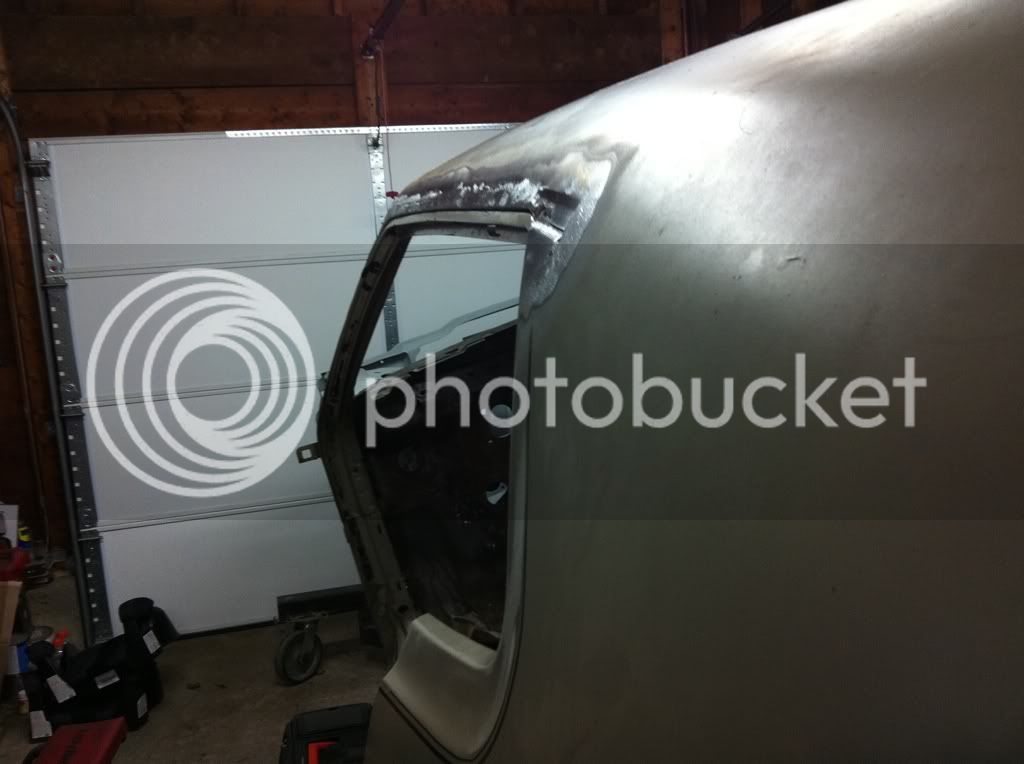
Ok, so I was up until almost 2am, but I got it all taken care of I still need to fill in the bootom edge with some strips to fill the gap shown above between the weatherstrip channel and the roof edge, but the body line is flattened and it's all tacked into place. In the next few days I'll make the filler strips, weld it all up solid, and grind everything clean. It looks a hell of a lot better already, even unfinished than it did with the line still there! The most difficult part was re-shaping the roof skin in the front corner. This had to be done because when I cut everything back this time I cut that edge back about 1/4" so that when it's all done, the roof edge will follow the same contour as the weatherstrip channel. In that corner the channel normally sits in a bit from the edge of the drip rail. Now, when all is finally said and done, the weatherstrip channel will have a nice, flush look across the length of the roof. I plan on doing a more detailed "tutorial" on all this when I do the passenger side since now I actually know what I'm doing
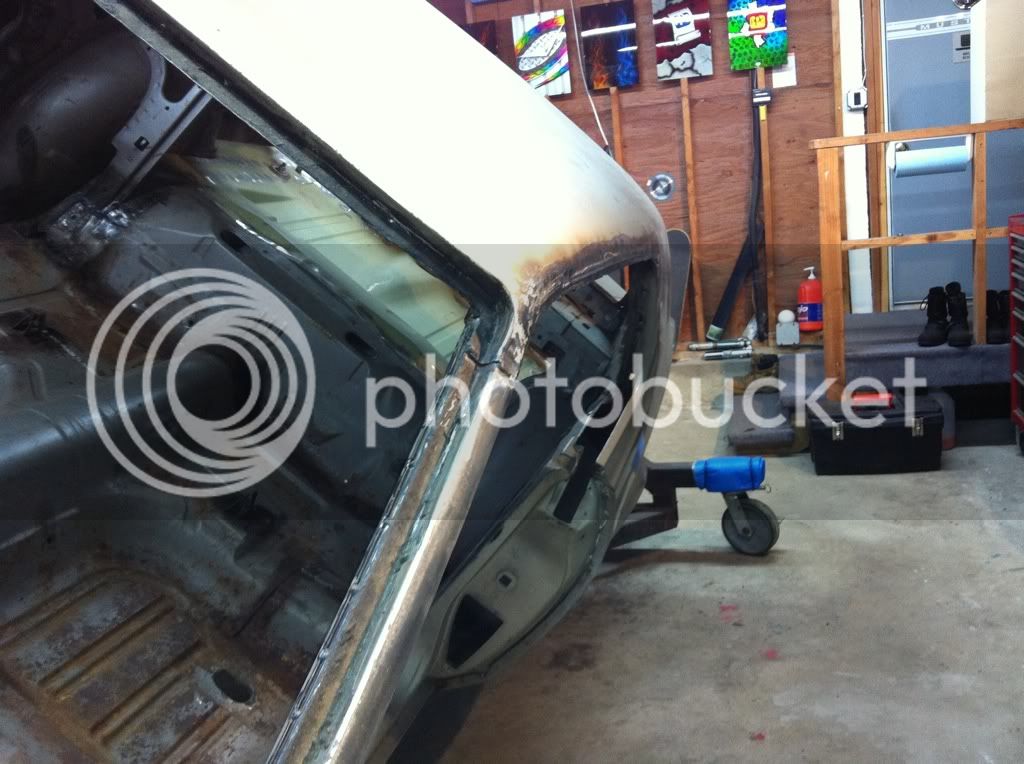
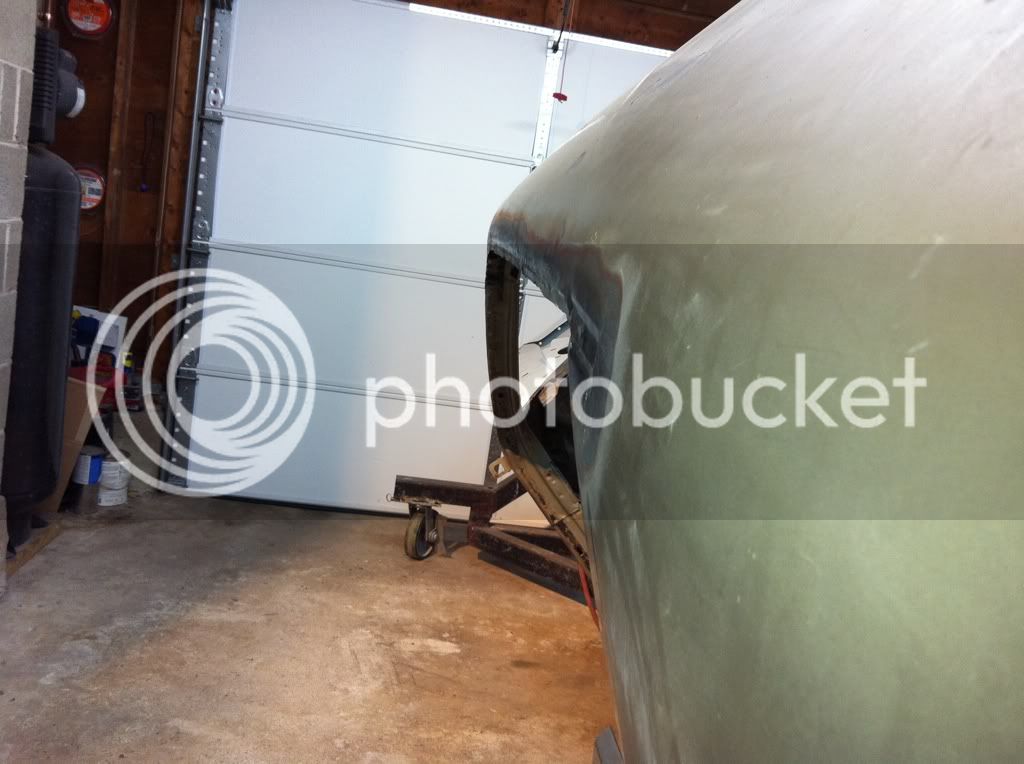
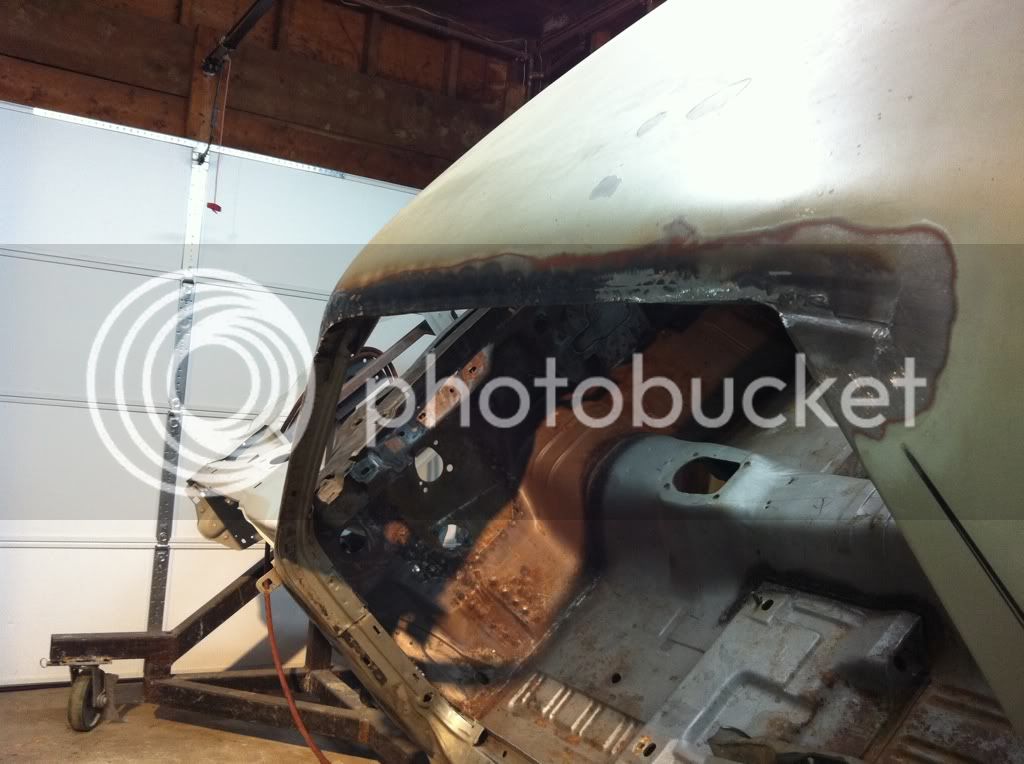
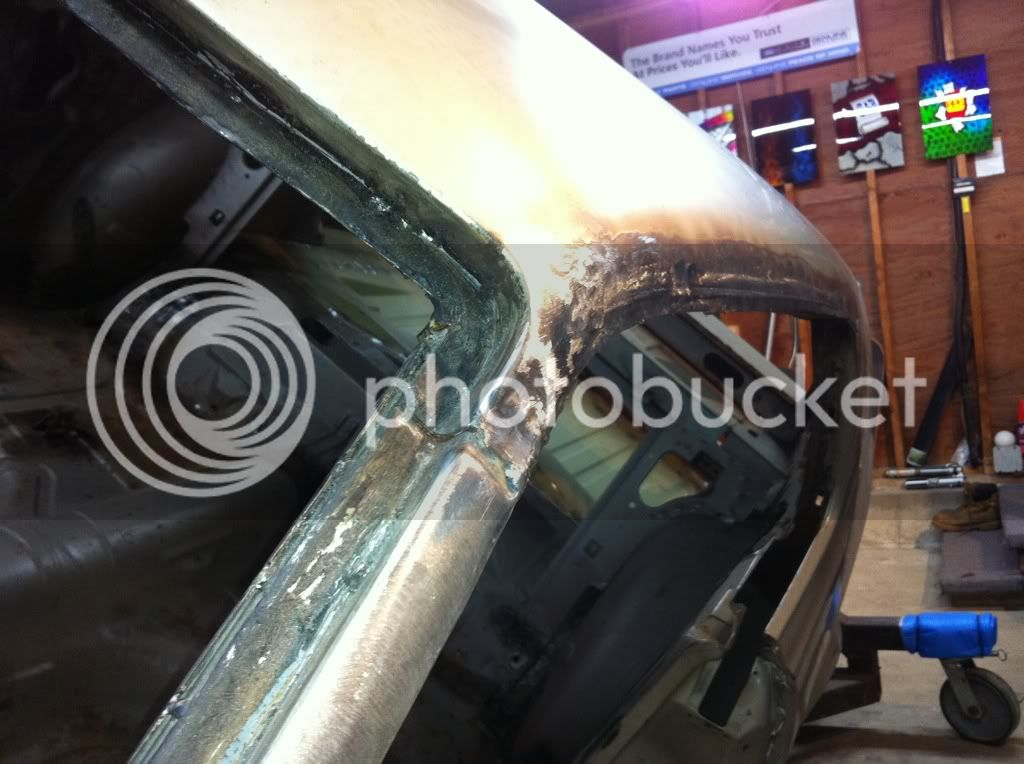
I still need to fill in the bootom edge with some strips to fill the gap shown above between the weatherstrip channel and the roof edge, but the body line is flattened and it's all tacked into place. In the next few days I'll make the filler strips, weld it all up solid, and grind everything clean. It looks a hell of a lot better already, even unfinished than it did with the line still there! The most difficult part was re-shaping the roof skin in the front corner. This had to be done because when I cut everything back this time I cut that edge back about 1/4" so that when it's all done, the roof edge will follow the same contour as the weatherstrip channel. In that corner the channel normally sits in a bit from the edge of the drip rail. Now, when all is finally said and done, the weatherstrip channel will have a nice, flush look across the length of the roof. I plan on doing a more detailed "tutorial" on all this when I do the passenger side since now I actually know what I'm doing
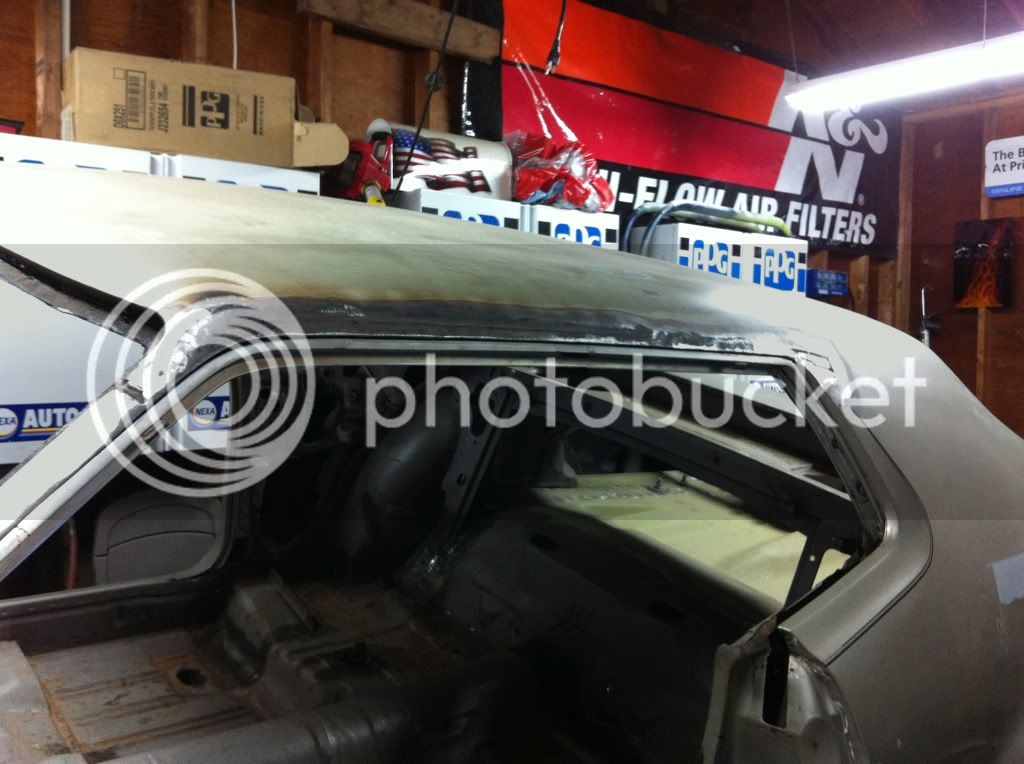
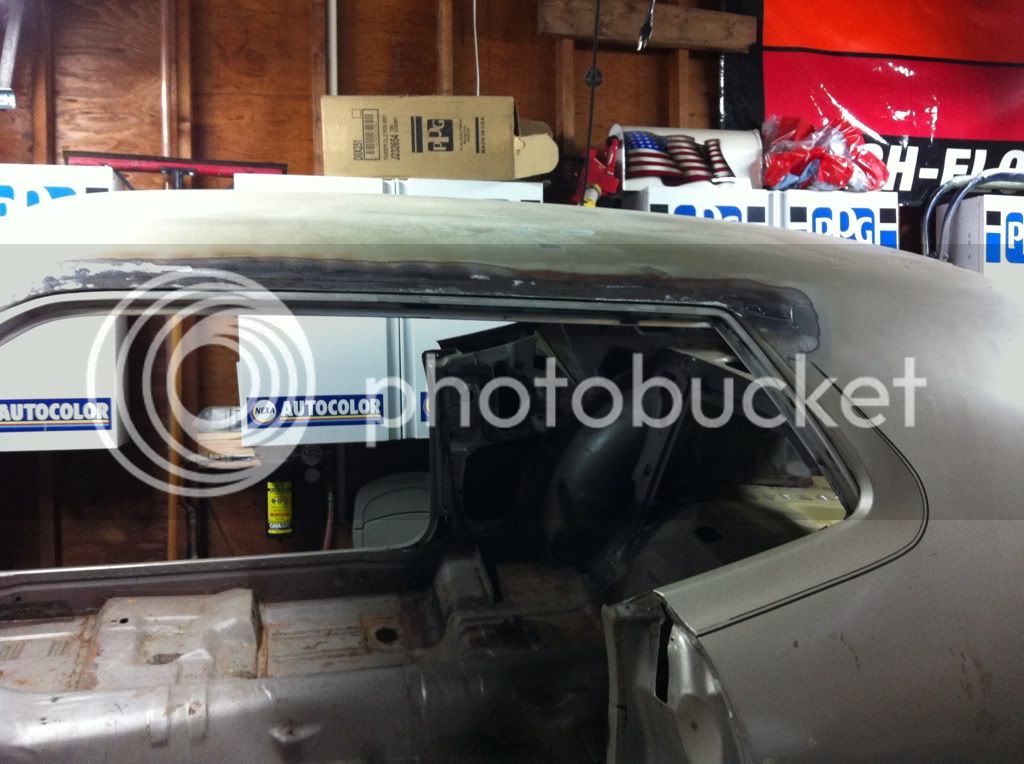
Ok, the driver side is now complete less a few minor tweaks and to fill in the area below the weatherstrip channel so it's flat instead of having a recess. I'm doing that to make sure there is something solid for the channel to seal against since there's no more rail to catch the water. Here's a few pics...looks MUCH better than leaving the body line on there! Hopefully I'll get to the pass side in the next week or so and I plan to take lots of pics from start to finish of what I do and post them here.
Similar threads
- Replies
- 29
- Views
- 1K
- Replies
- 5
- Views
- 1K
- Replies
- 10
- Views
- 1K
- Replies
- 8
- Views
- 425
Latest posts
-

-

-
 Parts For Sale 1973 Mustang Tilt Steering Column, Re conditioned, $800.
- Latest: 72MustangSprint
-
Wanted to tell you all About Mustang Fact Sheets at OD magazine
- Latest: 68cobraJetnotch
-

-
