Fabrice's 429CJ 71 project

7173Mustangs.com

Help Support 7173Mustangs.com:

This site may earn a commission from merchant affiliate links, including eBay, Amazon, and others.
@Vinnie, oooh peleaaaase, not that!!

For your own safety I will not reveal on this respectable forum what you are thinking of doing.

I told you already, I have 4 (likely more) years to teach you the donts when it comes to our beloved classic Mustangs! :D

 
Nice Job of making one good looking reservoir out of two not so good looking.

PS: on my end I may do something similar to fix my old working reservoir with a piece of the one we bought.

 
Last edited by a moderator:
@tony-muscle

[Nice Job of making one good looking reservoir out of two not so good looking.]

Thx Tony, you know like no other how they were looking! Plastic is certainly a pain to work with but you can bring them back to a durable and acceptable finish.

oh and btw, I have not finished to play with it yet but I have managed to unlock the pump out of the casing... sooo I may restore the broken one and keep it in case the good one breaks on me at some point.

 
Another dog weather weekend passed, so been again been busy with details...


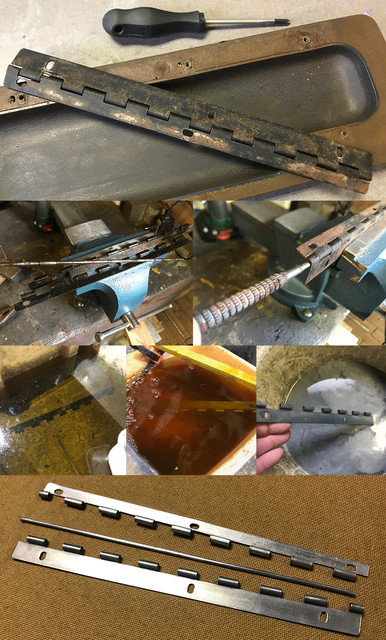
As the rubbery console armrest could not open and close smoothly due to corrosion. I've restored the hinge. Removing the axle without damaging it wasn't that easy as it was really stuck, no matter the penetrating oil I've spent on it. But eventually at the end of the weekend got it back as new and it now pivots as expected.


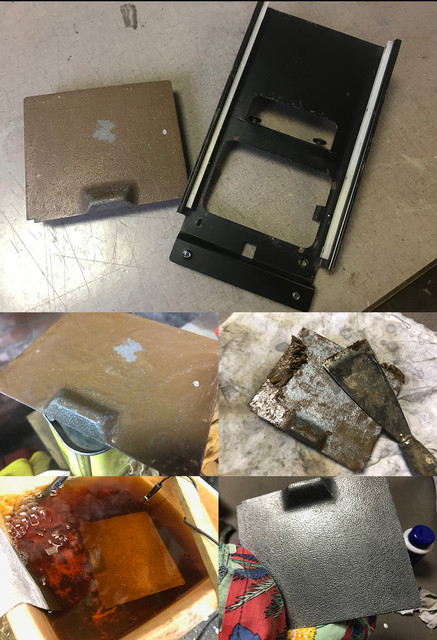
The next patient was the ashtray drawer. While the rail/frame was taking a bath to remove the rust that was popping up here and there, handled the drawer cover first. made of zamak and with uneven cracked paint, I went for paint stripper as I didn't want to add anymore damage to the grain surface by sanding it. Couple of hours later. The cover regained some youth. I'll prime/paint it once I know what I want for my interior..


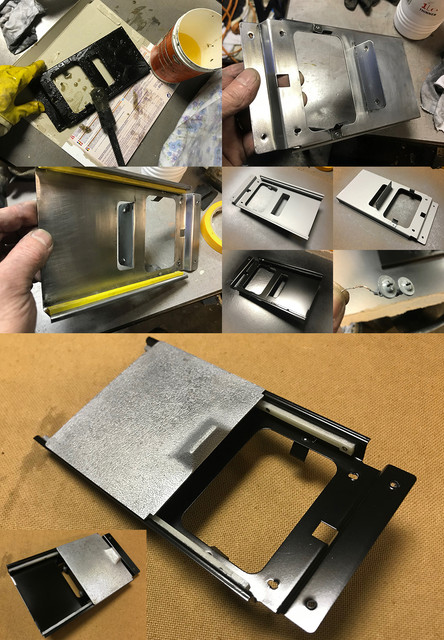
In paralel with the drawer, the rail had to be restored too. While the previous acid bath had removed all the rust, it is covered in some kind of coating and my paint stripper did not do much to it, so had to use elbow oil to help the process. Once I got it to an acceptable result, masked the plastic rails (resisted to remove them as I do not have such little rivets in house and there was no sign of corrosion around them). Then, as it was pouring outside, sprayed with door open alternated with heat gun between layers. The original hardware, at least the flat head screws that I cannot find over here, were meanwhile also restored and by the end of the day, ended up with a drawer unit good as new. With the ashtray repop that I have, that should look pretty ok! :)


This past Sunday, just before rain came back, freed the panel from the press it stayed into for past 2 weeks and was happy to see that the bottom that was more than wavy regained its nice straight original line.

A quick test on the door showed a nice overal fit. Still not decided on what I'll do later on. I know at least I only need to fix the vinyl crack at the elbow recess and could reuse the panel as is, may I'd go for the original route.


I've made some stinky smoke too! :) Fixed the main crack and 2 others that I've discovered while busy on the inside. As the plastic is weak by design there, also added a reinforcing layer in the inside to make sure it won't crack again. Then did a bit of inspiration, using american wallnut wood and natural leather to see how I could marry original and noble materials (horrible lighting on the pict). Just the touch of them is so much better that this cheapo plastic.

As I need to focus on the 73 first to free the garage for the 71, I've placed back the half restored console parts into the car and will return to them once I know what I'll do with the interior... Need do some designs/material choices some time this year for this.

So yeah, not a very thrilling weekend, but glad these details are now done.

To be continued.

 
Last edited by a moderator:
Well done, as always Fabrice.

Those screws can be hard to find, even when you know the right name for them: truss head screws. I found one local hardware store that has them. I don't have a clue what they would translate to.

 
I haven't posted as I used to lately for different reasons.

First we had some storm coming our way and needed prep a bit the house, then my T-bird got wind damage (drove in high winds and front lights covers were ripped off it)

so gave it some love (and replaced the damaged parts with my 91 parts) for the rest I've been busy on the 73, as I need first to get it done to be able to continue on the 71 inside.

But as this weekend was a dog weather AGAIN, I could not work on the 73, so I went back to details.

There was some offer on E-bay for a non working clock (which I don't have), that came with the clock cover that is damaged and full of holes on the 71, the harness also missing on the 71 and the top console cover, which is was cut in 1/2 in my 73.

So bought it and got it last week as it would fix multiple problems/missing parts.
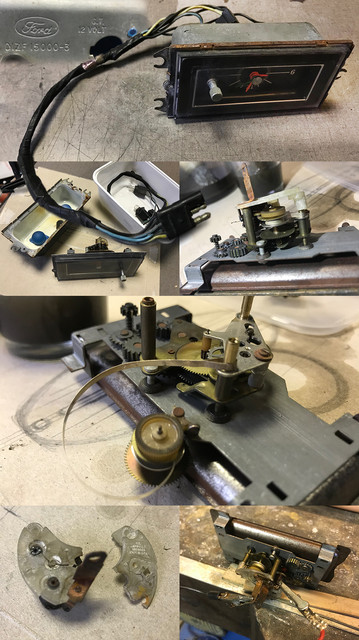


I've started of course looking at the clock first, as it has a GT stamp, I knew right away that I was looking at a hopeless case. But me being me, I needed try anyway! :)

So put everything apart and found out the expected: the coils got hot and eventually shorted everything. The plastic holding them, the feed and more gears supposed to be inline

was broken in 3 pieces. melted it all in one piece, realigned everything, soldered the broken wires, de-rusted a bit the gears, oiled them and as I expected: busted. No circuit, too much corrosion. As I planned a quartz alternative, I had wasted enuff time, so moved on to what really mattered to me: the parts that will be mixed with another mechanism (which I'm currently seeking)
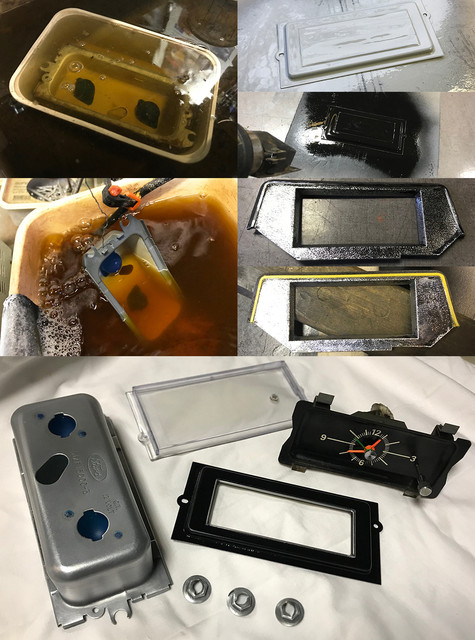


De-rusted, removed the ugly paint that was on the plastics, plated the cover, cleaned up the dial, plated the hardware...

and ended up with good as new parts.
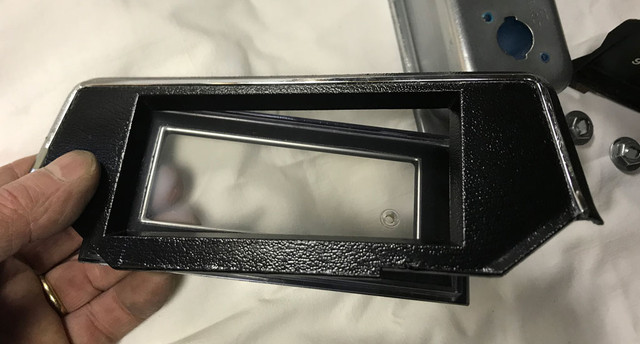


After I gave it some love the clock cover ended up pretty ok. But because 2 of the plastic rods behind were broken and glued back badly at some point,

I have find some plastic rods and melt them on the back so I can mark this one done.
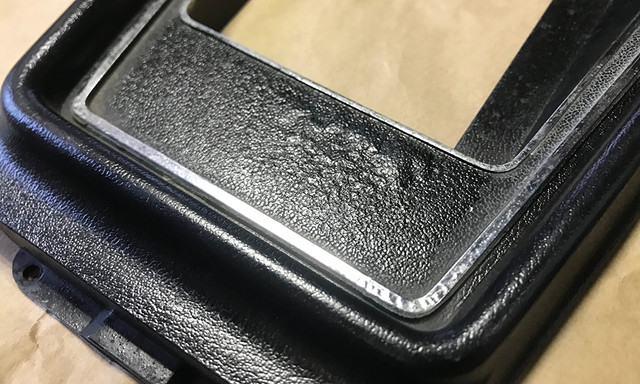


The top console, that was of course not lighted on E-bay same way, showed the classic corrosion lifting the alumnium deposit... and had also 2 cracks, that i've repaired and worked away on the grain side with a thin layer of bondo applied with fingers.

Someone also sprayed some cheapo rubbery primer at some point and needed to remove all that before I could be busy trying to make it look good again...


The bubbly part went off easy, but it took me a while to get rid of the entire region to obtain a seamless blend with the rest.

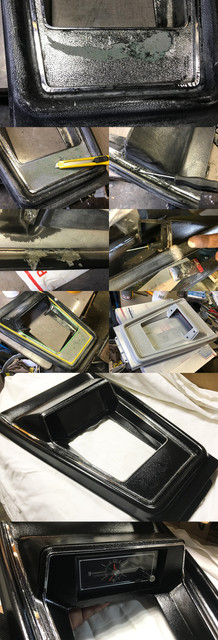
Removing the bubble also answered my question about how I would be able restore the grain. Turns out the plastic has and keeps the grain. hence why it took a while to gently scratch the aluminium film away without damaging the plastic. As 50% was still sticking nicely, it was a patience game to get it done.

Removing the rubbery primer was also a source of fun (not). The thickness that was sprayed was insane.

Eventually, at the end of the day, I was happy to have all looking I wanted looking pretty good. As said above, next will be to merged a quartz 12v mechanism in this clock, may be custom 3d print some gears to keep the knob functional for the arrows... No rush as its all details. I'll post on this when and if I come to it.

Anyway, I will probably not post much (or nothing) on this thread in coming weeks, (may be couple of months) as I want the 73 back on the road and have the garage free for the 71. Unless of course if this dog weather keeps ruining my plans.

To be continued...

 
As always your patience yields great results. You removed the aluminum deposit on the console insert the same as I do when I rework them. Razor knife around the base of the shown chrome areas and peel it off.

If you need a new lid for the console Daniel Carpenter does make them and they fit and look just like the original. They only come in black so will have to paint. I have used several of them. 

I have never found a great way to fix the foam that gets worn on top on the lid.

 
I'm suffering withdrawal, need more updates!

 
I'm suffering withdrawal, need more updates!
I've spent lots of time saving what needed be saved on the 71 in past 2 years at the expense of not being able to have my 73 back on the road.

Now that I need the space in my tiny garage for the 429 to work on it properly, I finally must focus on my 73, which is good,

so that may be, may be I can hope about driving it this summer... and then resume the work on the 71.

As I do not plan to make and maintain another dedicated thread for the 73 and this one not being updated,

one might think I'm in some kind of corona isolation doing nothing.

The opposite is true, my weekends are Mustangs only as usual, simply not documented! :)

As Arny says: I'll be back :)

 
@midlife

Sorry for not being active on this thread and on the site in general during past weeks.

I'm fine! While covid has killed or crippled many businesses, mine is going super strong atm and have little to no time to even check the site.

Finding my way on my phone via this new forum software doesn't really help either, just discovered your reply just now!

As about the updates, as said, i'm now with reduced avail time, focussed on my 73. All goes smooth! Smooth is also where I am atm on it, sanding 600, and after I will have sprayed all from in to outside, I can finish wet 1200 sanding it and bring it to the painter. I have lost some time redoing things that I thought were ok, but were not. So had some minor weldings to do on doors, acid treat them, protect them inside. Repainted many parts, removed and polished all roof rails that were having some scratches and replaced damaged ones by used ones etc.. Also updated the software of the EFI... 

So yeah, all ok, still having my Mustang only weekends and making lots of progress! I hope I'll be back on the 71 in a not too far future 🙂

I'll be back don't worry! I'll try to post some picts of what I did during past weeks...

 
Ahaha, sorry guys!

It's not like I've been "un-mustangly" for past months, far from that! I've been busy on the 73 each and every weekends! 
So thought, I'd push a quick update on what I've been doing... Done tons more, but you'll get the idea...

rails_etc.jpg

All trims, roof rails etc... full of scratches and dents have been sanded for raw 120 grid where needed down to 600 wet to finally be polished.

Body work:
A tons of work was needed, from fixing bad repair over entire length of a front fender via de-rusting and patching doors, fixing many little things over the entire car body. 
So the idea is to deliver the car to paintshop ready for masking, painted from within. The prices per hour at bodyshops around here are too insane to even be considered anyway.

As the car has been repaired, welded here and there over the years and many places were quickly primed for corrosion attacks, basically everything was in need of finishing work. Of course with my lack of space, this means work in steps vs paint all in one pass. Which is now done.
Entire car has all been test painted in steps / parst and after all the many masking hours en redos, once all the surfaces were pleasing my eyes, I have started the tedious work to fine wet sand the car down to 2500.

valance.jpg

Here for instance the rear valance, first thought a quick fix on older paint would do... yeah right.

bodyrepairandpaint.jpg.df67ad0d3719aa4e857397389cc1d0d3.jpg

So each and every bits of the body has been test painted, corrected if needed and of course I've found details I couldn't let as is, so I've let again the welding machine do some massages. The car being painted in 2 different greens did not speed up the process :)

paintingsanding_repeat.jpg

Basically its been weekends with lots and lots of sanding. Surprised I still have skin on my hands!

fromwithin.jpg

good_enuff.jpg

At some point, the lack of space driving me crazy, I have decided to handle the rear myself so I could set back some big parts.
So this will not be painted by painter ( paint has been mixed and same will be used for the rest)
Good enough :)


Last edited by a moderator:

Latest posts

Back
Top