cudak888: 1971 M-code "Soylent Green" - 2024: Help me measure the frame!

7173Mustangs.com

Help Support 7173Mustangs.com:

This site may earn a commission from merchant affiliate links, including eBay, Amazon, and others.
Just to refresh your memory here's pics how I had my car setup to measure. The long steel bar with threaded rods (pointers) is the datum line speced out in the chart-you set it by using 2 known good points (x-6 and x6 1/2 on the chart ) This should help you (you can see how far out the rear rail measurement is that work was done by a supposed top notch restoration shop ) Also those rods and such all came from home depot in the electrical section-they use them to hang / setup conduit

FYI, the Amazon el-cheapo tram gauge - unsurprisingly - turned out to be a piece of junk. Shouldn't even exist.

I'm going to try to replicate your setup using T-slot. Should be a nice way to keep it square and accurate while also having some nice T-slot left over when I'm done.

-Kurt
 
FYI, the Amazon el-cheapo tram gauge - unsurprisingly - turned out to be a piece of junk. Shouldn't even exist.

I'm going to try to replicate your setup using T-slot. Should be a nice way to keep it square and accurate while also having some nice T-slot left over when I'm done.

-Kurt
Good deal, Support the car if you can with 4 blocks etc at the 4 corners of the rockers on the pinch welds making sure its level front to back and side to side- that's where you start. Also another great tram bar can be made from the leg of a tripod.
 
Good deal, Support the car if you can with 4 blocks etc at the 4 corners of the rockers on the pinch welds making sure its level front to back and side to side- that's where you start. Also another great tram bar can be made from the leg of a tripod.

It already is very close to level front to back per a laser level checked at the framerails, but only to the point of accuracy where I'm reasonably sure the unibody isn't twisting across from corner to corner. It is not to a point of accuracy I'm comfortable enough assuming the rear framerails at the floorpan are both level enough to take measurements from them to a level plane below them (i.e., compensating for the slope of the driveway; it's lower on the passenger side).

This is why I plan to build the T-slot frame, but first plan to measure if there is any slight angle in the car. I can do this with a straightedge (probably the T-slot with offsets to clear the mufflers) between the rear framerails. If it's angled a bit, I'll built the T-slot frame at the 7.44" baseline floor-to-leaf spring center eyelet distance, but will angle the T-slot frame to match the slope of the car. If, after this, a point set to 7.44" on the T-slot perfectly matches the forward leaf spring mounts on both sides, I know the frame and the car will be on the same plane.

At that point, I'll measure to the left rear leaf mount center to verify the 51.34" length, and then up 11.74" inches*. I don't expect it to be exact given the tolerances of these cars, but if it's within reason, I'll match the right to the left.

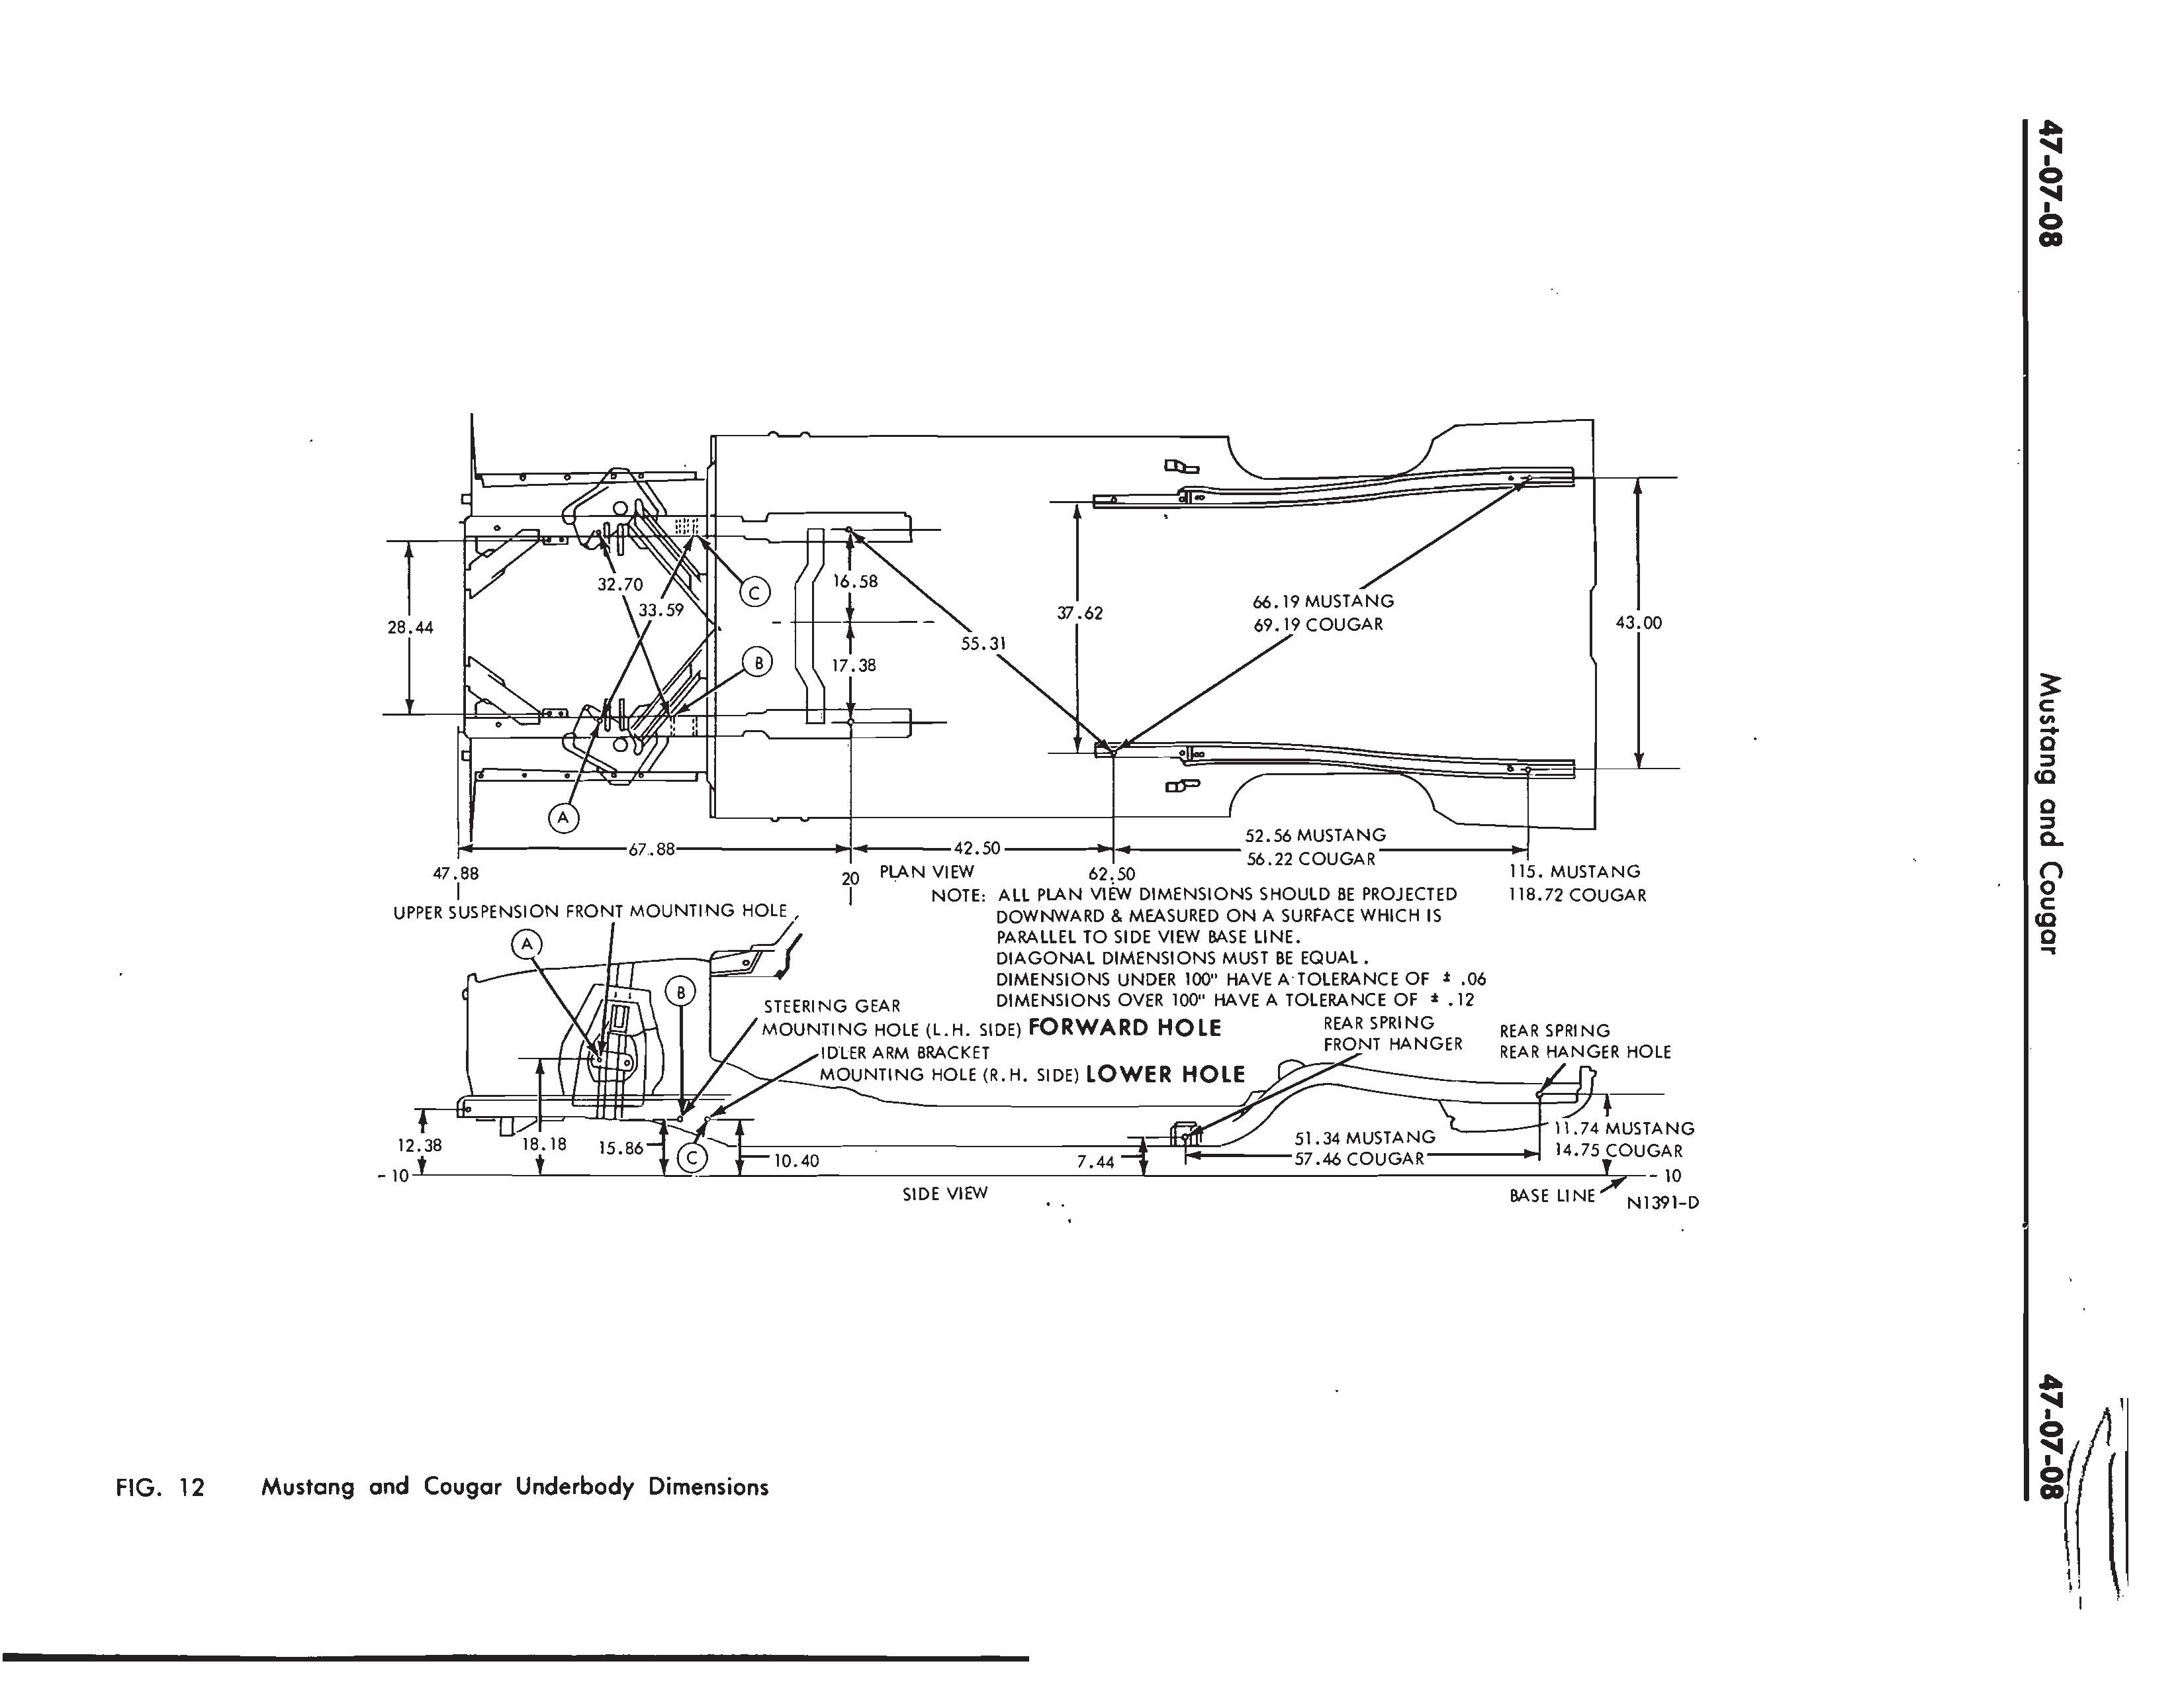
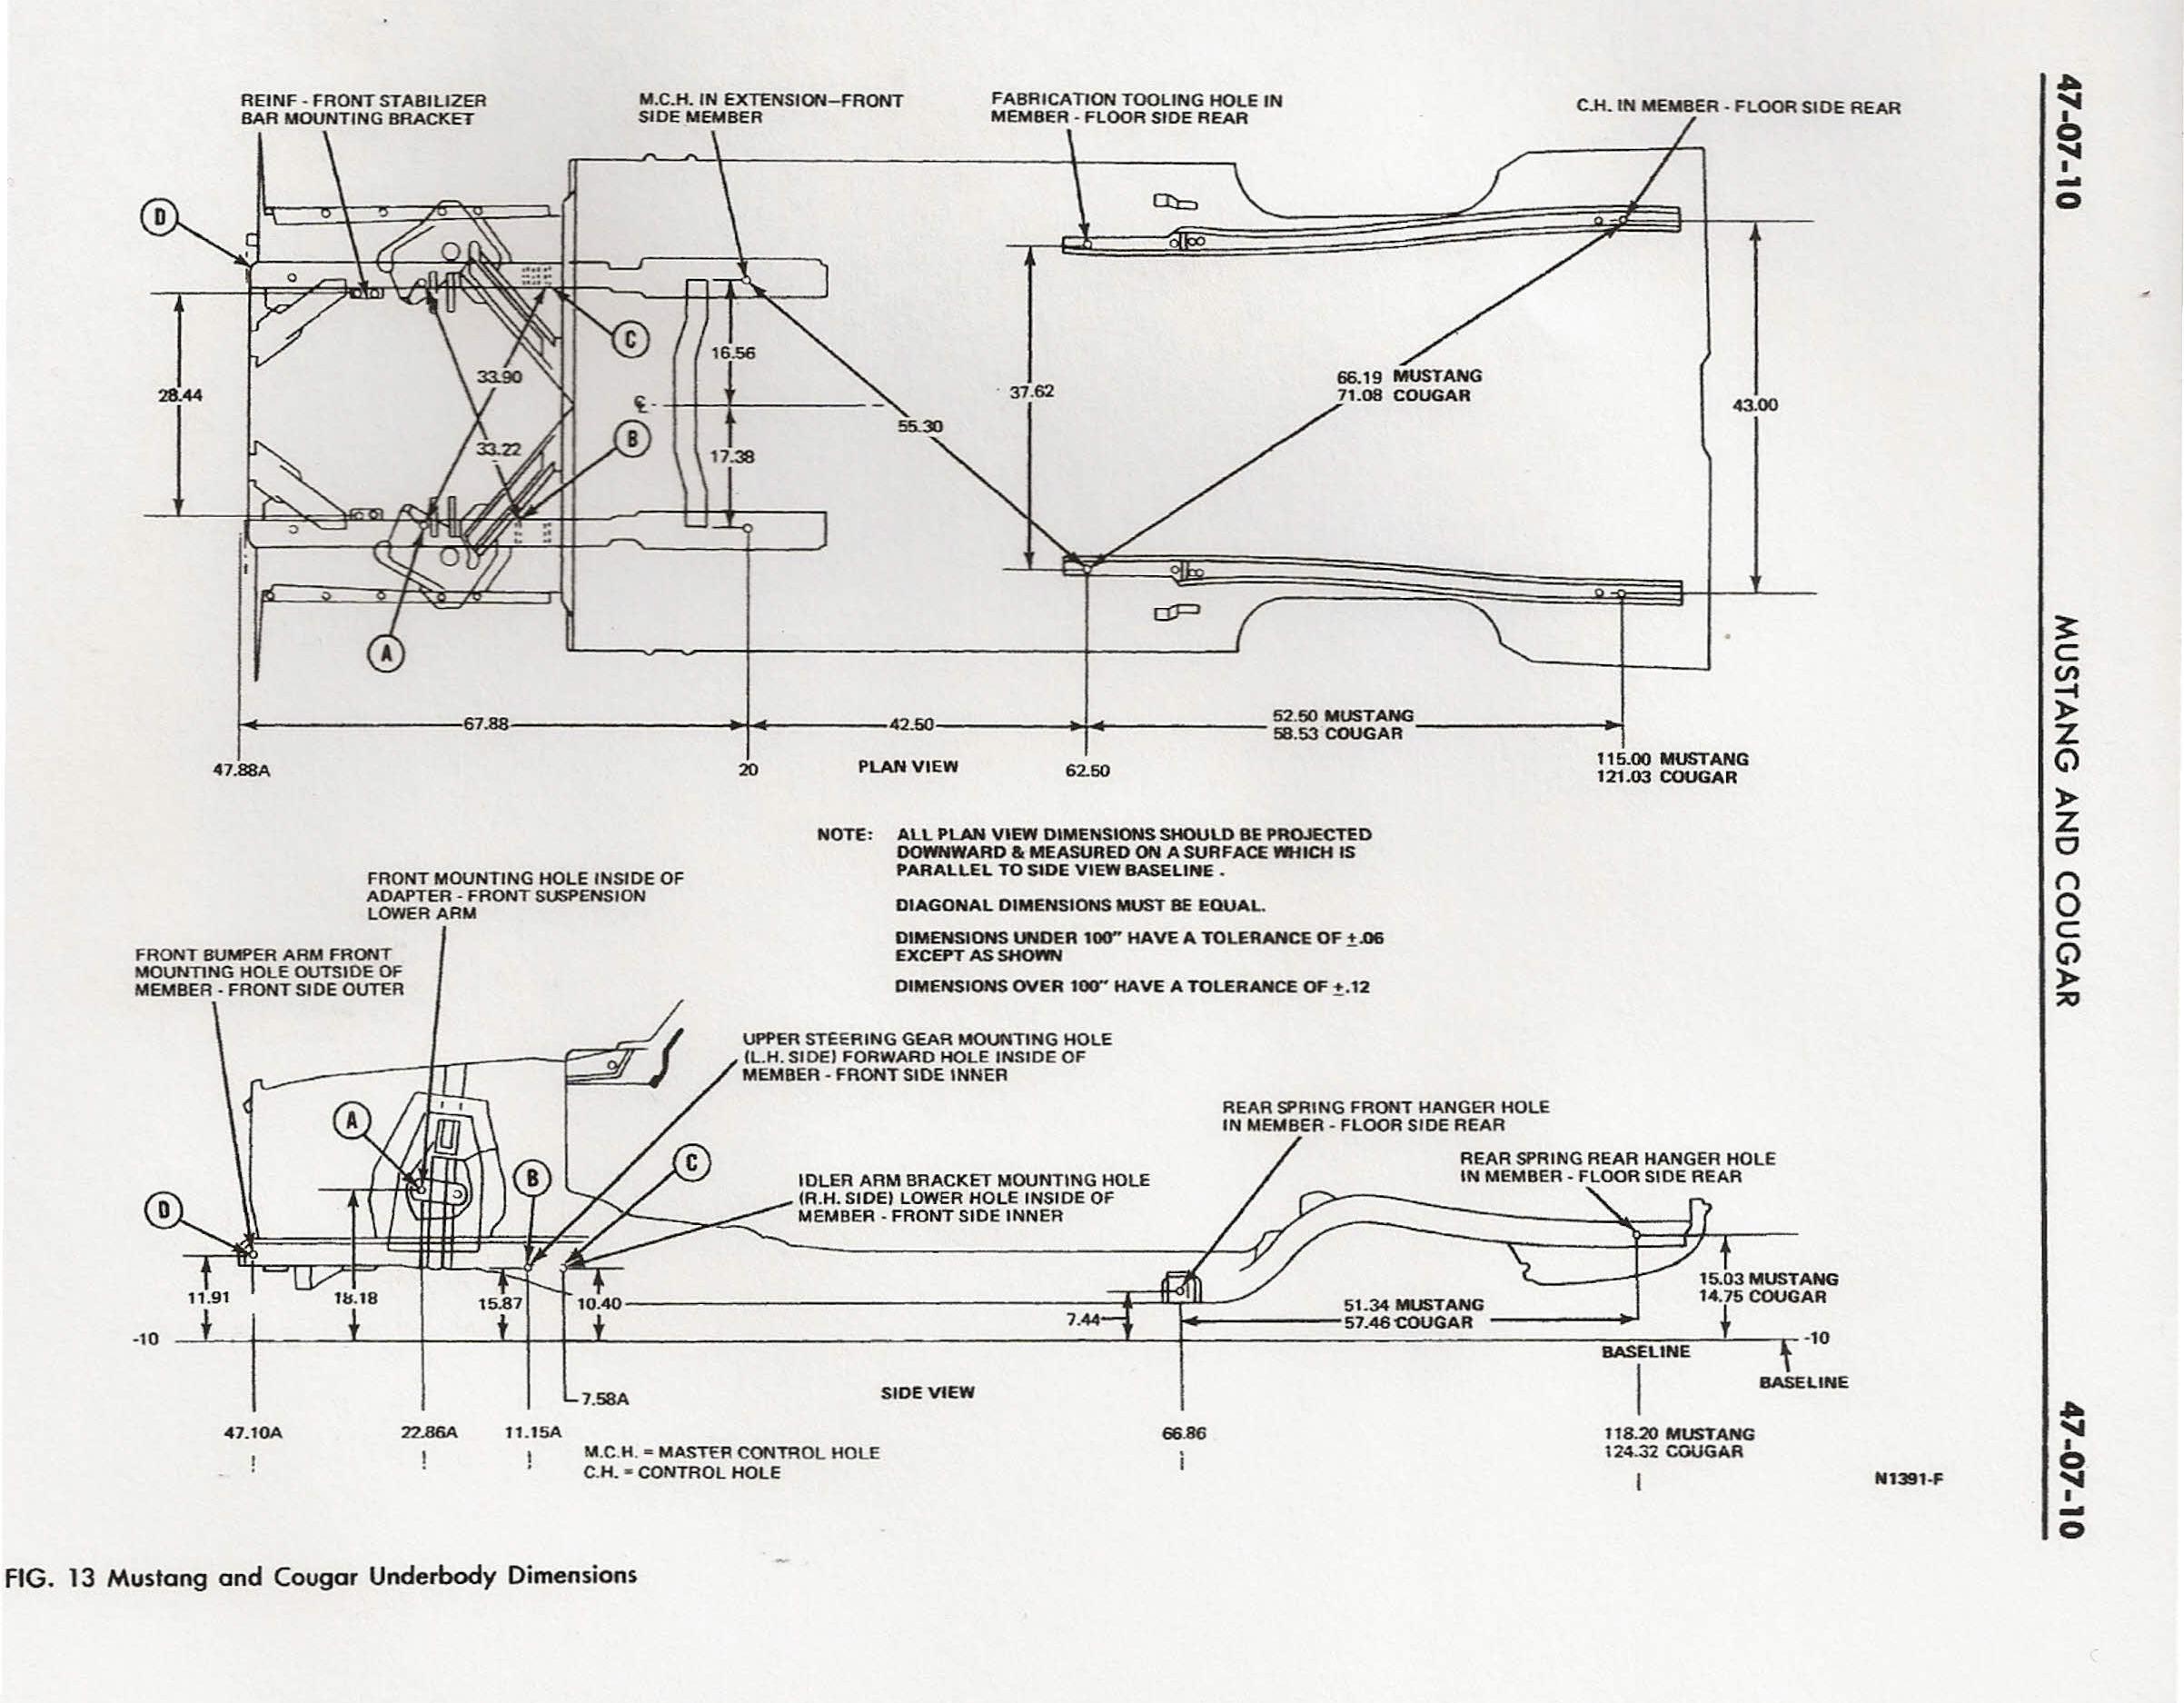
*Of the two unibody dimensional charts out there, one says 11.74" to the rear leaf mount centerline; the other says 15.03." The thread it comes from (https://7173mustangs.com/threads/underbody-dimensions.28786/) says the first is from the '71 manual, the other is '72-73. Clearly, one of these is wrong - which is it?

Underbody-dimensions-2-1.jpg


Underbody-dimensions-2-2.jpg


-Kurt
 
Last edited:
@Qcode351mach - any ideas on that framerail height issue in the drawings?

In other news, the 20mm T-track arrived, but the bolts aren't getting here until Monday. More waiting!

I also ordered some small screw-type stands to support the T-track on:

IMG_7819.jpeg

-Kurt
 
*Of the two unibody dimensional charts out there, one says 11.74" to the rear leaf mount centerline; the other says 15.03." The thread it comes from (https://7173mustangs.com/threads/underbody-dimensions.28786/) says the first is from the '71 manual, the other is '72-73. Clearly, one of these is wrong - which is it?

Hard to say with out actually setting up the measuring to one of those charts than checking on the one good side you have see what the numbers are. I didn't use ether of those charts. The chart I have came from a frame machine manufacturer. what they do is verify measure multiple cars, then produce these charts, My chart uses the lower surface of the frame rail. So again I'd setup on the one side that's good and see the numbers, Here's my chart
 

Attachments

  • 100_1310.JPG
    100_1310.JPG
    806.8 KB
*Of the two unibody dimensional charts out there, one says 11.74" to the rear leaf mount centerline; the other says 15.03." The thread it comes from (https://7173mustangs.com/threads/underbody-dimensions.28786/) says the first is from the '71 manual, the other is '72-73. Clearly, one of these is wrong - which is it?

Hard to say with out actually setting up the measuring to one of those charts than checking on the one good side you have see what the numbers are. I didn't use ether of those charts. The chart I have came from a frame machine manufacturer. what they do is verify measure multiple cars, then produce these charts, My chart uses the lower surface of the frame rail. So again I'd setup on the one side that's good and see the numbers, Here's my chart

Will keep that in mind. The connectors for the T-track arrived today, so I can finally get around to measuring next weekend (if it doesn't pour buckets again).

IMG_7827.jpeg

-Kurt
 

Attachments

  • IMG_7827.jpeg
    IMG_7827.jpeg
    3.5 MB
Last edited:
Halfway there. I assembled the T-slot today and played around with the positioning under the car.

Before setting up any T-slot, I first did a check to see just how level the car is. I used one 1500mm section across the width of the car with two 5.9" (150mm) T-slot sections as uprights. These were pushed square against the bottom of the rear framerails. A digital level in the center of this suggested the car is 0.2 degrees high on the right side. Not bad considering this was pulled off with fixed-height jackstands, a few wood shims, and a basic laser level.

IMG_7915.jpg

I then removed the 5.9" uprights, replaced them with 7.87" (200mm) T-slot - just a tad higher than the 7.44" center-to-"floor" factory measurement. These were positioned between the leaf spring mount eyelets. Then the entire square was built:

IMG_7919.jpg

It's low on the right side in the photo, but fairly well squared up with the control hole and trailer hitch mounting hole, based on the laser level. I still have to get it level front-to-back (and also take a few reference measurements to this effect off the car too before measuring the rear.

This is about all I can achieve at the moment, as I'm waiting on these to arrive:

61tGv4qz7FL._AC_SL1500_.jpg

These are speaker isolation spikes with 8mm threads. These are 16mm in total width (or so the seller claims), just big enough to center themselves in the leaf spring eyelets. I plan to put them on M8-to-M5 reducer adapters, which I could only find at McMaster Carr - with an unreasonably high shipping cost (and I made the boneheaded mistake of only ordering two initially, figuring on measuring the rear without any fixed points)

At any rate, the M8-to-M5 will let me slide them directly into the T-slot with a T-slot nut, so I can pre-level all the points at factory height, shove the front two into the spring eyelets.

From that point, I'll work backwards to level the square, then verify the left side rear leaf spring eyelet. With that, I should be able to lock the right side down perfectly.

I think.

I'm being careful not to get ahead of myself and let confidence bias run away with my logic.

-Kurt
 
Now that's a real NICE measuring setup !! I'm digging it hardcore !!

That’s a mighty fine compliment coming from the master himself - thank you!

It’s closing in on about $350 in materials, but I’ll always be able to re-use it in future. Also really not bad to store either.

The next piece of the puzzle has since arrived - the M5 to M8 step up adapters. The second set and the centering spikes should arrive tomorrow.

IMG_7978.jpeg

IMG_7979.jpeg

-Kurt
 
Last edited:
Two steps back today - the spikes are a bit small; they seat on the hex in the hole.

IMG_7984.jpeg

I stumbled across an alternative from the world of drifting - bumper quick-release fasteners. They should be big enough to work, but I bet they aren't M8.

I'm betting I'll need either a thread reducer or a completely different set of adapters to make these work. They supposedly will arrive tomorrow, but I don't trust Amazon's delivery claims at all these days.

6188Qb1Bf7L._AC_SL1200_.jpg

Quite impressive with all of your planning and prep to square it all up. Good Job! The house is only as good as the foundation it is built on.

I basically stopped the project years ago because I wasn't confident I could fix it correctly. Now that I have a good idea (somewhat) of what I'm doing, I'm taking every precaution to get it right.

I've also learned that when Q recommends something, you just do it. The alternative...is failure!

-Kurt
 
Last edited:
Progress! The M6 to M8 thread adapters arrived, allowing me to install the centering cones…on the other adapters.

IMG_8012.jpeg

Measured and set to 189mm - just a hair over the 188.9 that is 7.44”, but easier to measure accurately. I’m going to figure the difference in at the shackle mount.

IMG_8035.jpeg

Fits!

IMG_8040.jpeg

I’m going to have to wait a bit still to get this done, as there’s no way I can crawl in here with the t-slot as it’s configured right now. I’m going to drop it and brace it at the shackle measuring points:

IMG_8036.jpeg

IMG_8038.jpeg

-Kurt
 

Attachments

  • IMG_8012.jpeg
    IMG_8012.jpeg
    2.1 MB
  • IMG_8035.jpeg
    IMG_8035.jpeg
    2.1 MB
A lot of progress has been made over the last couple of days.

I ordered some more T-slot so I could drop the rear of the jig. Who would have thought that having an aluminum bar in the way of one's beer belly would have ever presented an issue? 😂

IMG_8057.png

This made it the jig slightly less stiff than before, so I doubled up at the back, just to be on the safe side. The supports at each corner ultimately hold this thing in place anyway.

IMG_8058.png

I had a hell of a time trying to get the uprights to fit yesterday. They'd slide in, but trying to blind-feel the screws into the T-slot nuts proved to be impossible. I cut the step-up adapters in length yesterday for a test fit. Today was the first try.

vlcsnap-2024-08-22-20h13m43s544.png

Spot on.

vlcsnap-2024-08-22-20h33m22s656.png

I also have a theory why the previous reading of the car's tilt was 0.2 degrees high on the right side:

IMG_8052.jpeg

I can't be 100% sure this level was the culprit, but I think that was the gauge I used on August 10th; it has a mark on it that I believe I remember from the initial measurement.

Either way, I can always re-check to the frame, but in a way, this is a check to the frame. I really have no doubts about the state of the frame at the front leaf mounts/behind the torque boxes and I know I have the centering spikes at the exact same height, left to right. When I leveled the car with the laser, I nailed the bottom edge of the framerails on the horizontal line. In other words, every check has been correlating with the other - a sign that I have everything in the right place rather than the wrong place.

At the back, things are a bit more of a headscratcher.

I rough-leveled the rear of the jig by measuring from floor to T-slot. I know that's not accurate at all with all the pits in the concrete, but I wanted to get in the ballpark first; plus, I'd like to get a feel for how resilient some of these measuring points are. I set up the angle finders and tried not to look at them while I leveled out to the floor measurements - just to get an idea of how close I'd get without being influenced by their readings.

I wound up with 0.1 degree down on the left and 0.3 degrees on the right.

vlcsnap-2024-08-22-20h49m27s845.png

Not bad, but this only sets a baseline for the t-slot framing level in space, it doesn't necessarily level it to the car. However, the car is on essentially identical jackstands front to back (with one out in front compensating for how nose-heavy it is, so it should - in theory - be close.

But the rear is not anywhere as satisfactory as the front, and I can't explain it - yet.

This evening, I freestanded the verticals for measuring the rear, as I couldn't install them - the exhaust is in the way. I ordered some more T-slot to mount these from the outside facing in instead.

IMG_8067.png

While I'm clearly in the ballpark, lengthwise (the t-slot crossmember is set to the 51.34" spring hole-to-spring hole measurement), it's not anywhere near where it should be in regards to height.

The centering spike is set here to the 15.03" measurement specified in the second factory diagram (or rather, 381.7mm; it's easier to measure this in metric when working on the car). Roughly eyeballing it after the fact, it looks somewhere around ~3/4" too high. The alternate 11.74" measurement (from the first of the two diagrams I posted above) is clearly a typo; it'd put the framerail down into the valance if that were a valid measurement, so we can dismiss that for now. Also, if it's ~3/4" off, that would put it's current position lower than the claimed 14.75" measurement for the Cougar.

Now, the T-slot could always be angled too high in the back (it's 0.1 degree off from level here; don't recall if up or down) which would certainly contribute to this discrepancy, but I question whether the car is that much higher in front to warrant an aggressive downwards angle of the T-slot to the back.

Once the additional T-slot arrives for the jig's "outriggers," I'm going to take some more accurate measurements of the rear shackle bushing. I'd particularly like to find out what the difference is between the 15.03" measurement and where the frame claims to be currently. I also want to find out if the car is angled up in front, though I doubt it (and I think the next nearest point is the idler arm bolt - not ideal).

There's one other thing: I've always had a suspicion that the rear crossmember edge is sitting higher than it should suggesting the framerail is sitting too high - not too low - from where it should be, contrary to what the measurements suggest. You might notice in some of the older photos of the car that the lower edge of the taillight panel (where the screws for the valance go) isn't backed by the crossmember where you'd expect it to be, but sits higher than that. It's high enough that the holes in the bottom of the taillight panel completely miss the crossmember, and the recess on each side of the taillight panel for the rear bumper dips a bit below the trunk floor as well.

I'm not 100% sure if this is the way it should be - it's been a while since I've had my paws around another '71-73 - but if I recall right, the valance screws are supposed to self-tap into the crossmember.

If anyone happens has a photo of their taillight panel and rear trunk crossmember with the valance removed, it'd help out a lot. Either that, or I might have to pay a visit to @BigBlue to check his coupe in person.

-Kurt
 
Last edited:
A lot of progress has been made over the last couple of days.

I ordered some more T-slot so I could drop the rear of the jig. Who would have thought that having an aluminum bar in the way of one's beer belly would have ever presented an issue? 😂

View attachment 92303

This made it the jig slightly less stiff than before, so I doubled up at the back, just to be on the safe side. The supports at each corner ultimately hold this thing in place anyway.

View attachment 92304

I had a hell of a time trying to get the uprights to fit yesterday. They'd slide in, but trying to blind-feel the screws into the T-slot nuts proved to be impossible. I cut the step-up adapters in length yesterday for a test fit. Today was the first try.

View attachment 92305

Spot on.

View attachment 92306

I also have a theory why the previous reading of the car's tilt was 0.2 degrees high on the right side:

View attachment 92307

I can't be 100% sure this level was the culprit, but I think that was the gauge I used on August 10th; it has a mark on it that I believe I remember from the initial measurement.

Either way, I can always re-check to the frame, but in a way, this is a check to the frame. I really have no doubts about the state of the frame at the front leaf mounts/behind the torque boxes and I know I have the centering spikes at the exact same height, left to right. When I leveled the car with the laser, I nailed the bottom edge of the framerails on the horizontal line. In other words, every check has been correlating with the other - a sign that I have everything in the right place rather than the wrong place.

At the back, things are a bit more of a headscratcher.

I rough-leveled the rear of the jig by measuring from floor to T-slot. I know that's not accurate at all with all the pits in the concrete, but I wanted to get in the ballpark first; plus, I'd like to get a feel for how resilient some of these measuring points are. I set up the angle finders and tried not to look at them while I leveled out to the floor measurements - just to get an idea of how close I'd get without being influenced by their readings.

I wound up with 0.1 degree down on the left and 0.3 degrees on the right.

View attachment 92308

Not bad, but this only sets a baseline for the t-slot framing level in space, it doesn't necessarily level it to the car. However, the car is on essentially identical jackstands front to back (with one out in front compensating for how nose-heavy it is, so it should - in theory - be close.

But the rear is not anywhere as satisfactory as the front, and I can't explain it - yet.

This evening, I freestanded the verticals for measuring the rear, as I couldn't install them - the exhaust is in the way. I ordered some more T-slot to mount these from the outside facing in instead.

View attachment 92309

While I'm clearly in the ballpark, lengthwise (the t-slot crossmember is set to the 51.34" spring hole-to-spring hole measurement), it's not anywhere near where it should be in regards to height.

The centering spike is set here to the 15.03" measurement specified in the second factory diagram (or rather, 381.7mm; it's easier to measure this in metric when working on the car). Roughly eyeballing it after the fact, it looks somewhere around ~3/4" too high. The alternate 11.74" measurement (from the first of the two diagrams I posted above) is clearly a typo; it'd put the framerail down into the valance if that were a valid measurement, so we can dismiss that for now. Also, if it's ~3/4" off, that would put it's current position lower than the claimed 14.75" measurement for the Cougar.

Now, the T-slot could always be angled too high in the back (it's 0.1 degree off from level here; don't recall if up or down) which would certainly contribute to this discrepancy, but I question whether the car is that much higher in front to warrant an aggressive downwards angle of the T-slot to the back.

Once the additional T-slot arrives for the jig's "outriggers," I'm going to take some more accurate measurements of the rear shackle bushing. I'd particularly like to find out what the difference is between the 15.03" measurement and where the frame claims to be currently. I also want to find out if the car is angled up in front, though I doubt it (and I think the next nearest point is the idler arm bolt - not ideal).

There's one other thing: I've always had a suspicion that the rear crossmember edge is sitting higher than it should suggesting the framerail is sitting too high - not too low - from where it should be, contrary to what the measurements suggest. You might notice in some of the older photos of the car that the lower edge of the taillight panel (where the screws for the valance go) isn't backed by the crossmember where you'd expect it to be, but sits higher than that. It's high enough that the holes in the bottom of the taillight panel completely miss the crossmember, and the recess on each side of the taillight panel for the rear bumper dips a bit below the trunk floor as well.

I'm not 100% sure if this is the way it should be - it's been a while since I've had my paws around another '71-73 - but if I recall right, the valance screws are supposed to self-tap into the crossmember.

If anyone happens has a photo of their taillight panel and rear trunk crossmember with the valance removed, it'd help out a lot. Either that, or I might have to pay a visit to @BigBlue to check his coupe in person.

-Kurt
You're more than welcome to come by anytime and take measurements, though mine may not be the straightest example, not by a long shot. I have the rear bumper off already, so whenever I have a few minutes this weekend I'll remove the rear valance and take pictures.
 
You're more than welcome to come by anytime and take measurements, though mine may not be the straightest example, not by a long shot. I have the rear bumper off already, so whenever I have a few minutes this weekend I'll remove the rear valance and take pictures.

Hey, working with not one, but two unreliable data points is a great way to ensure that anything I wind up picking up in the future should be a piece of cake by comparison 🤣.

It's a trial by fire. Just like how I learned all about carburetors, vacuum systems, and electronic ignition, all because of the hidden zinc pest / Zamac (zinc alloy) rot in a few Motorcraft 2150 carburetors. Quite the thing to cut one's teeth on, especially since it still seems to be fairly obscure information that there's a lot more zinc in these carburetor alloys than anyone would suggest. (I still didn't figure it out until 5 or 6 years later - when I found an unrelated spare 2150 developing massive cracks in it as if it were a zamac model).

Let's see if I can find some time to your neck of the woods. Haven't been even near the Hard Rock since Tom Jones was there last year.

FYI - for the rest of those tuned in, please feel free to share photos if you can. It'd help to have some more visual data points for reference.

-Kurt
 
Last edited:
Saturday brought perfectly-timed (not) showers in the morning, ensuring that this afternoon's work was humid, damp, disgusting, and miserable.

I should have been working on something British to commemorate the occasion.

Since my last post, I've formed a working theory (feel free to throw your alternate ideas forth though; I don't want to fall victim of confirmation bias) that the front of the car is higher than the rear, if only by a bit; hence the T-slot needing to be set with the same droop downwards to match the car.

I've ordered some more T-slot, as there's no way that I can establish this angle without linking to a known point at the front of the car. The closest point per the factory manual is the lower bolt hole for the idler arm up front. This bit, for those of you visually-inclined.

IMG_8086.jpeg

Of note, the '72 manual inexplicably insists on taking the measurement from the inside of the framerail, while the '71 simply states to use the lower hole when measuring from the right side. There's no reason for the latter requirement unless the holes are not square with each other - which is just not a possibility.

Obviously, I can't really do anything accurate until the T-slot and connectors arrived, but in the meantime, I decided to rough-test my theory. I know that what I'm doing is by no means even close to accurate, but just something to kill time and get an idea if I'm heading in the right direction.

IMG_8089.jpeg

I didn't take good pictures of this - other than to snap this photo of the chicken scrawling that I did - but I put the laser square against the lower idler arm and broadcast a horizontal line below it. I couldn't get the line reliably low enough to the T-slot, so I measured down to the laser line. Then I went to the forward half of the jig and measured from the laser line down to the T-slot edge - the known good datum line.

I combined this and got 11.161" as opposed to the 10.4" - a .761" difference. Indeed, it would seem by rough measurement that the car is higher in front.

I then used the distance between the idler arm bracket hole to the front leaf spring hanger hole. I assumed this is the 7.56A" + 66.86" (74.42") and then confirmed it by measuring it on the car. I came up with 74.62". Definitely in the ballpark.

This was followed by a bit of trig, using the .761" difference and 74.42" length to get a rough alpha value; in other words, the (approximate) angle the nose is pointed upwards, and the angle I have to tilt the t-slot downwards behind the leaf spring hanger holes. This came out to .58 degrees.

I went ahead and tilted the t-slot down 0.6 degress. While it's still not correct, I think I'm headed in the right direction. It'll take some more T-slot to know for sure, but things are starting to make sense again:

IMG_8093.jpeg

The left-side upright:

IMG_8094.jpeg

The current variance at the 15.03" height. This is the left side, mind; this should match when everything is measured out correctly, checked, and re-checked.

IMG_8096.jpeg

Fingers crossed for a dry weekend next week (and parts that arrive on time).

-Kurt
 
More progress. T-slot extended to the idler.

And yes, this area is disgusting thanks to the combination of ATF, leaves blown by gardeners, and off and on rain throughout this awful summer.

IMG_8139.jpeg

We are now at the lower idler arm bolt. The T-slot cannot support its weight this far out, so I have another pair of supports on the way.

IMG_8141.jpeg

I’m pretty sure the 0.5 degree angle of the T-slot is still conservative against what it should be, give that the centering spike is low when held level.

It's just dangling here; it's not that off.

IMG_8143.jpeg

Since the T-slot now extends right up to the bumper, I'll probably take a measurement off the front bumper mounting hole as well, per the factory underbody dimensions.

The extra bits arrive Monday. If I'm lucky, there'll be a break in the rain too.

-Kurt
 
Question for the frame cognoscenti:

Where on the slotted hole should I be taking the 11.91 inch “Front bumper arm front mounting hole outside of member” measurement from? Bottom? Centered? Top?

IMG_8219.jpeg

IMG_8220.jpeg

Logic suggests bottom, but I’m not exactly willing to gamble on it.

-Kurt
 
Here’s where I am today:

IMG_8250.jpeg

The idler measurement is coming up roughly a quarter inch too far forward, but centered by height. The length measurement from front to back is correct according to the factory specs (note that I am measuring the slotrail to the rear edge as my center-to-center measurement):

IMG_8252.jpeg

IMG_8253.jpeg

The point at the slotted hole in the front bumper is also an issue. Raising it anything higher than what you see below throws off the nice, centered measurement of the idler.

IMG_8251.jpeg

…and it also starts to bend the T-slot, throwing off the datum line:

IMG_8248.jpeg

Now, if I leave the idler point level in its slightly-too-far-forward state and avoid bending the T-slot from front to back, I get an inclination of 0.8 degrees.

IMG_8256.jpeg

At this inclination, the rear framerail measurement actually starts to make sense.

IMG_8258.jpeg

IMG_8259.jpeg

IMG_8262.jpeg

IMG_8263.jpeg

I like what I’m seeing, though part of me also wonders whether the LH framerail is slightly high given the taillight panel-to-trunk floor height discrepancy. Then again, this could *also* be because of the reproduction rear crossmember, which I know for a fact is too short. Whether it’s too *high* remains to be seen.

@Qcode351mach - if you have a second, could you weigh in with your thoughts and experience?

-Kurt
 
Last edited:
Back
Top