429 valves springs spacer

7173Mustangs.com

Help Support 7173Mustangs.com:

This site may earn a commission from merchant affiliate links, including eBay, Amazon, and others.
Joined
Mar 30, 2017
Messages
2,389
Reaction score
883
Location
The Netherlands
My Car
73 Grande 351C
71 Mach 1 429CJ
As I have no idea how the engine was when all together, and as I don't know much on 429 (tho learning daily). I can't find any doc on this, neither close ups picts of this setup.

So may be one of you can clarify this for me...

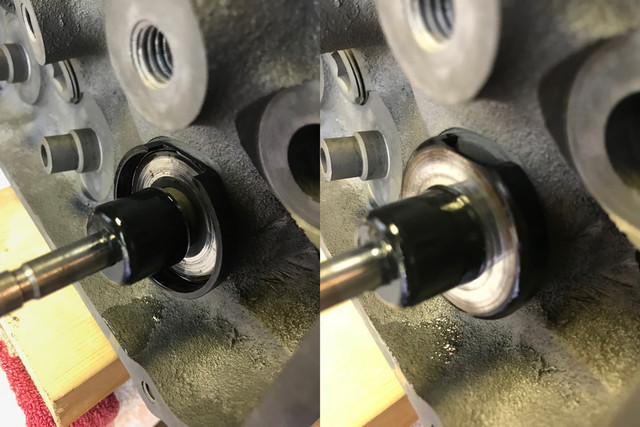
On my DOOE-R CJ heads, there is a spacer between springs and heads.

Reusing the originals, from the patina, I can see the larger part is in contact with the heads. (on the left on pict), I see the valves stems seals do not go down to the spacer thickness. If I would invert the spacer (on the right) then they would match the height of the spacer. seals would then seal. (They are not forced/tapped here on the pict, just pushed in for the picts)

I don't think right is correct orientation for the spacer, but it makes me wonder if the seals are the right ones,... I've ordered them for a 429, and the previous ones, (tho not originals) are of the exact same shape. They fit the valves stems nicely but are they long enough? I see the exact same ones at Summit for 429/460 applications. but the engine being CJ, I wonder if there would be a specific diff on those.

Also as I might be missing more parts than I thought, why is that spacer having this opening?

Is there something I need to have (that I miss, something that prevents it to rotate??) that would match this opening or is this shape there just ment for oil to enter the "cup" easilly and lubricate the spring at the base?

or am I all good on left side, and it's just how short the stems seals are and that opening on the spacer is a just an oil passage?

thx by advance.


Last edited by a moderator:
They are valve spring cups and keep the bottom of the valve spring positioned on the head. You can get them in different thicknesses to adjust valve spring pressure. The slot is an oil drain.

The picture on the left shows the correct position of it.

 
They are valve spring cups and keep the bottom of the valve spring positioned on the head. You can get them in different thicknesses to adjust valve spring pressure. The slot is an oil drain.

The picture on the left shows the correct position of it.
Ok, thx Don C, that one makes me happy as I do not miss parts for these.

About the umbrella stems seals length? I've meanwhile search more online and checked again on the heads, looks like they won't go deeper, I recall snap on or push in types but realized after I posted that it was not on a US engine. Looked in a 351 gasket kit, and they are similar. So I guess that must be it.

 
Yes, those are the umbrella valve stem seals. The Vitron type of seals are better, but may require machining the outside of the valve guides to be able to use them.

 
Fabrice,

The umbrella style seal like the one pictured in your entry is entirely adequate for most street driven applications, however, as stated by Don C, there is a more heat resistant "orange-ish" colored silicone umbrella seal that many builders will use today instead of the black stem seals. Don't worry about how far down over the guide you can slip the seal, as in operation, the seal will be pushed up the stem as the valve reaches maximum lift, and stay there during operation. On another note, from the photo, it appears that the tops of your valve guides have already been machined for "PC" style seals, no?

On a different note entirely, when adjusting valves, or checking valve train on these engines while running, if memory serves, two of the valve cover bolts are drilled through to the intake ports on big port 429s creating a vacuum leak, so put the two valve cover bolts back in those holes when adjusting the valves or you may experience a bad idle.

 
Last edited by a moderator:
Fabrice,

             The umbrella style seal like the one pictured in your entry is entirely adequate for most street driven applications, however, as stated by Don C, there is a more heat resistant "orange-ish" colored silicone umbrella seal that many builders will use today instead of the black stem seals. Don't worry about how far down over the guide you can slip the seal, as in operation, the seal will be pushed up the stem as the valve reaches maximum lift, and stay there during operation. On another note, from the photo, it appears that the tops of your valve guides have already been machined for "PC" style seals, no?

On a different note entirely, when adjusting valves, or checking valve train on these engines while running, if memory serves, two of the valve cover bolts are drilled through to the intake ports on big port 429s creating a vacuum leak, so put the two valve cover bolts back in those holes when adjusting the valves or you may experience a bad idle.
Well, frankly I don't know what has been done. If you have read on my project thread (will update it prolly tonite), I got the car and the engine parts in boxes and buckets. all mixed together. And while I try do more things at same time, it's hard to figure where all goes and if I actually have everything.

As I do not plan to race it, and will wear my lead shoes once in a while, I don't worry about the valves seals, but for the extra hardware that came with this valves train, I was having some thoughts about their length and the way they fit. I have no idea if these heads got any machining done in that regard. The very capable shop that did the work to reassemble the block with the parts I provided are good at what they do, but they do not have any insight in US engines that they see only in rare occasions. As they told me this week, the closest they see is old tractors or heavy machinery that they get sometimes. Such big blocks simply do not exist on this side of the pool. They measured all from books specs and own experience. No way for them or for me to know if the head were machined at some point. I'm a 429 noob :)

As about the valves adjustment and the good way to tune that engine, I'm collecting all info I can on this, as I plan do this later on. Forced by the lack of space to work in unconventional order to restore the car, I will for now, first put it back together, but not set load on the springs, and let the intake free. I will do this just before put it back into the car. I surely bookmark and note everything I can collect on the subject. Thanks for this extra detail that could make a diff when needed.

 
Last edited by a moderator:

Latest posts

Back
Top