Front seat cover install tip.

7173Mustangs.com

Help Support 7173Mustangs.com:

This site may earn a commission from merchant affiliate links, including eBay, Amazon, and others.
Joined
Apr 22, 2013
Messages
1,023
Reaction score
9
Location
san diego
My Car
1973 mustang convertible(some day)
So I paid an upholstery guy to do my front seat covers after I dismantled and painted the frames . The job came out loose and they blamed it on the poor fitment of the TMI foam and covers. Knowing I wouldn't be satisfied I dismantled then and found that the didn't attach the listing wire to the frame and didn't add any extra padding to tighten things up. I tried several times to get the hog rings to catch both the listing wire and the frame but couldn't get through all the materials. I remembered a thread on the site that recommended wire ties but still struggled those until I started using a surgical clamp to thread them. Once I tightened the wire ties it was very easy to get the hog rings to catch. The threading and wire ties made the install a snap. In hind side the front seat cover install was very easy once you figure out a few things:

1. Heat seat covers in the sun and covers become very pliable.

2. Wire tie listing wires first and fine tune adjustment. Where the listing wire goes in the seat consider slicing it where the wire tie/hog ring connects so it can slide up or down on the wire for adjusting the seat cover on the foam. Where my thumb is.

3. Add padding to fill loose areas

seat_inst1.jpg

seat_inst2.jpg

 
Last edited by a moderator:
Nice tips, Jim! ::thumb::

I don't know why an upholstery shop would have problems with the TMI Products seat covers. I did my own, and will assure everybody that using new foam with new seat covers will not produce a "loose requiring extra padding" condition. When the listing wires are properly engaged, there won't be any "loose" areas. Trust me. :cool:

Additional tips:

  1. Secure the foam to the seat frame and ensure the listing wires in the seat foam are exposed as required for ease of installation.
  2. Use plastic bags (like from the grocery store) between the cover and foam - they will allow the cover to slide over the foam as needed. They also do not make any noise or make the cushions feel weird or anything by leaving them in there.
  3. Make a small opening in the listing wire channels of the covers where the hog rings will be used to secure to the seat frame.
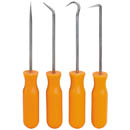
  4. Use a small hook to pull the listing wire into position to fully engage the hog rings before clamping them closed.
  5. Use the bent hog ring pliers - much easier to get into the tight places.
  6. Remove a little bit of foam around the areas where hog rings will engage listing wires (it won't affect the padding at all).


The hook I speak of was a small hand tool that came as part of a Mini Pick & Hook kit from Harbor Freight... except that you might want to get a better quality version from Sears, Lowe's, Home Depot, et al, so it doesn't come apart on you while trying to clamp the hog rings.

66836_zzz_130.jpg


Through the opening in both the foam and the listing wire channels, reach through with the hook, grab the listing wire, pull it into position, then hook the hog ring around it and the fastening point and clamp the hog ring closed.

It takes a little bit of coordination and strength to keep it all together while position and clamping the hog rings, which is why Jim's tip of using the zip-ties is such a huge help - I wish I had thought of that when I was doing mine. :bravo:

 
bad upholstery shop.

I never did seats before, and i rebuilt mine from the ground up and it came out near perfect.

in addition to mister 4x4:

the tool that is needed the most is a professional quality hog ring pliers.

 
Upholstery is one of the jobs about anyone on the forum should be able to do. If you have arthritis in your hands maybe no. Now if you get on a sewing machine and try that it is a different story. It takes lots of practice for sure. It also works better if you have someone to help with pulling and holding while doing upholstery.

Like it has been stated the thin plastic bags and heat gun, sun or hair dryer will do wonders with getting them on and in shape. A carpeted work bench is also a good aid.

David

 
I know I'm resurrecting a zombie here, but want to ask those who have done their own seats:  Was there burlap between the seat frame and foam and if yes, did you replace it?  Was there padding around the sides of the seat (I'm assuming base cushion) and did you replace that?  I'm seeing these items on the same page as the seat foam but haven't yet found out if folks are using them.

 
There was the burlap on my original seats, and I did replace it with new when I redid them.  As the foams starts breaking down over time, it'll help keep it from squishing through the bigger openings in the springs and frames.

 
Back
Top