My 72 Mach 1 ongoing Project Thread

7173Mustangs.com

Help Support 7173Mustangs.com:

This site may earn a commission from merchant affiliate links, including eBay, Amazon, and others.
Purists beware;

I retrofitted my inexpensive aftermarket tach inside my stock cluster. I just did not like the column mount for it especially having another tach right behind it. I already had almost everything apart so I thought I'd give it a go and it fit good enough that I can deal with it for a while like this. I do want to get the oem one rebuilt with modern guts so it can run off the square wave signal off my ignition but at this time there are more important things to put the money towards; plus the way I did this is easily reversed.


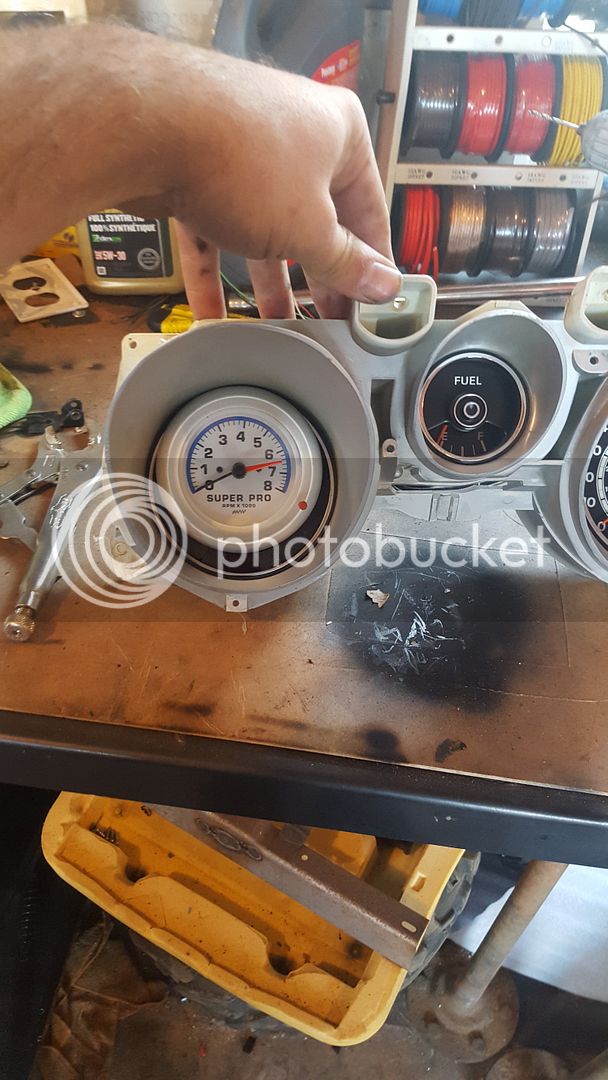
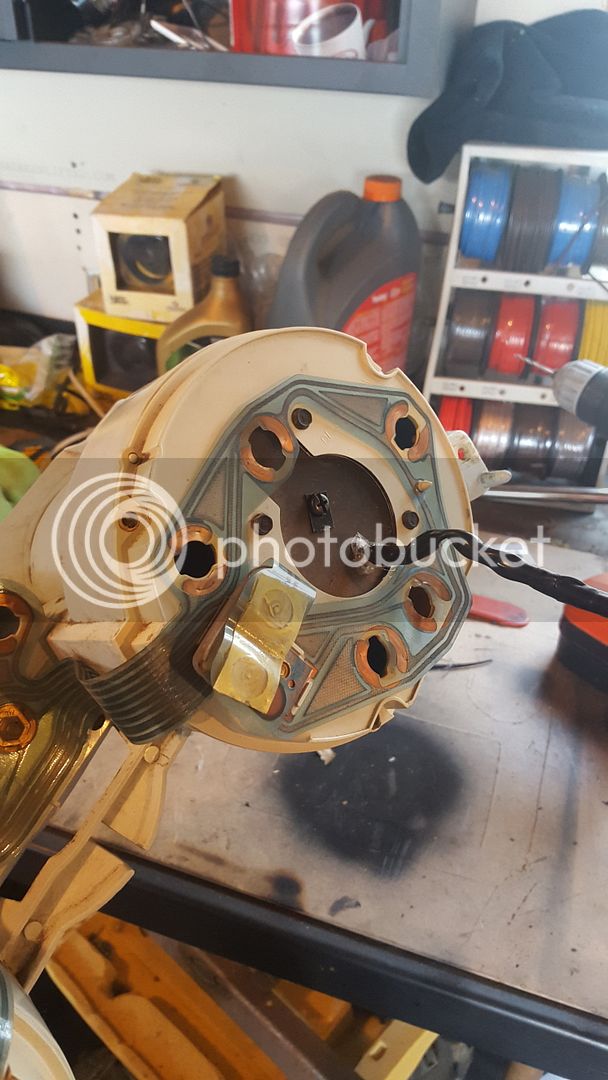
The fitment worked reasonably well; the tach is secured with a screw at the back that holds it against a piece of hardboard that I cut to fit snuggle inside the recesses where the stock tach sat. Its also held in by the factory screws. There is adhesive foam underneath it to give support; as well as at the bottom of the cluster to fill the gap it left. I hot glued the brake indicator lens to the front of the housing to maintain it's functionality with strips around it as well; I will however loose my brights indicator for the time being. With the way it's supported it sits quite solidly and doesn't move around at all being jostled about.

It's not great but it's functional and out of the way.

 
Been a while Time for an update!

I've been working on things here and there; the floor pans are done! I do still have some patch work to do where the rear seatbelt mounts. Made the plate up just gotta get it welded in. I took out the aftermarket sunroof to re seal it and decided to scrap the headliner I had at the same time (new red one on hand now)

I found that my car has had the roof re-skinned and whoever did it also removed two of the support braces while they were at it :eek: So I need to get something made up or fine a scrap car to poach the middle roof support off of. The front one wont go in with the aftermarket sunroof in there and I dont really want to take on getting rid of it right now.

Got a few things from the mustang shop in Calgary; new rear window seal; and trunk seal as well as the headliner, and new sail panels in red, and some weld in subframe connectors.

The rebuilt c6 is feeling awesome in place; and working great with the hurst ratchet shifter! Next up mechanically is the rear end swap from the open 8" to a limited slip 9".

 
We'll I've gotten underway on my rear end swap; pulled out the factory 8"


So Now I gotta get everything worked out for the 9" I have that I'd like to use. It's overall about an inch wider then the 8" I pulled, and the spring perches are already ground off. It's an old style Large bearing housing that had a 5X5.5 bolt pattern. The axles are 28 spline units at about 29 7/8" long (both) (centered pumpkin) The lengths off the 8" were ~31.5" and ~27.75 -centered pinion (rough measurements with tape measure.)

The mustang axles are the top 2 the 9" ones I have are the bottom 2


Because I want to run 31 spline axles and the 5X4.5 mustang bolt pattern I'm working on sourcing out new aftermarket axles; leaning towards a cut to length option. It seems like most assembled axles with bearings come with new style retainers so getting a bare axle and bearings/retainers separate is probably going to be the route I take. I also have to figure out what brakes to run, the drums off the mustang wont work with the new axle. I could attempt to source drums for the brakes that came off the 9" axle I have with narrower back spacing and a larger diameter drum(all the hardware is rough and needs to be replaced). I also came across a rear disc conversion kit that seems reasonably priced and is said to be compatible with multiple different brake spacing and both styles of large bearing end. http://www.jegs.com/i/Right-Stuff/965/ZDCRDM1/10002/-1

I've seem to come across a couple options for the small bearing bare axles that are a good chunk cheaper then what I've found for large bearing ones, And Yukon does make a conversion bearing with the 1.377" i.d for a small bearing axle and 3.15" o.d. for a large bearing housing; so that could be an option to keep the cost down. (budget is tight being in Canada the exchange rate right now is kinda killer)

I'm sure theirs a few guys here that have done more work with these rear ends then I have, input would be appreciated :)

 
Last edited by a moderator:
Well I ended up ordering Speedway cut to fit axles through ebay; they were the only option I could find that came to under $500 Canadian shipped with seals/bearings.

They use the PA20 bearing, a 2.5" brake offset, and have a 3.055" brake register; which will probably mean a bit of pretty easy machine work (luckily I know a few machinists that do cash work)

Looking at my brake options now; I got a friend that may have a new set of drums that I can buy off him cheap; he's gotta check the offset and bolt patterns in them next time hes in town.

Also gonna replace all the worn out rubber in the back end; it's really gotten affordable to replace it all with polyurethane. And look at getting a replacement sway bar....mine has been butt welded back together at some point and is really very ugly...

Who knows may even look into some powder coating.

 
More parts on the way

Poly leaf spring/ shackle bushings

new front brake calipers

all new brake hoses

KYB GR2 shocks all around

Diff rebuild kit

 
Sure am; I dont even have heat in my shop haha; but a set of insulated coveralls makes it all well; I dont get cold too easily. We get pretty good warm spirts around here when a chinook kits. supposed to be +9*c on sunday here!

 
Well it appears I have a bit of an oddball 9 inch housing. Generally you get a centered pinion and offset pumpkin (like the mustang) or a centered pumpkin and offset pinion. Well mine has an offset housing and pinion (equal length axles)... I haven't mocked it up yet but it's looking like may have to have it narrowed down on one side to keep things lined up properly; eyeballing it looks like a tad over 2" offset from where it was. Parts might get here this week but probably early next week to start mocking things up.

 
Last edited by a moderator:
Well it appears I have a bit of an oddball 9 inch housing. Generally you get a centered pinion and offset pumpkin (like the mustang) or a centered pumpkin and offset pinion. Well mine has an offset housing and pinion (equal length axles)... I haven't mocked it up yet but it's looking like may have to have it narrowed down on one side to keep things lined up properly; eyeballing it looks like a tad over 2" offset from where it was. Parts might get here this week but probably early next week to start mocking things up.
I put an 8.8 rear end out of an explorer in my 71. The pinion in those rear ends are offset quite a bit. If I remember correctly 2 1/2- 3". I have never had any problems with running an offset pinion. Still have the original u joints in it from when I had the driveshaft built, probably 8 years ago or more. If the overall width is ok I would run it.

 
Yea I would be fine running about a 2.5" offset, but this housing really is an oddball at about a 4.75" offset! thats just too much; I'm gonna have to find something else or have one side narrowed.

Then the long side axle flange to pinion center at about 31"


And the short side axle flange to pinion center at about 26 1/4"

31-26.25=4.75"


Now this axle was a bit wider then the factory 8" so I figure if I get the long side narrowed by about 3" I'd only be about 2" narrower then stock and have a minimal pinion offset at about 1.75"

 
New Axles showed up today; They look nice and stout; more stuff should be coming in over the next couple days.

On another note; I've got my gas tank out and am looking at some repair in my trunk area. The area around the gas filler is in the worst shape and mostly gone. The surrounding area is heavily pitted and has several pinholes. I'm playing with the idea of fabricating a large replacement panel for it. I am not really concerned with keeping it all original and in the future I do want to go to an in tank fuel pump possibly even a fuel cell. So making something now as a repair that incorporates an access point (or easy to add an access point) could work out; and have a lower cost of materials. It ends up being almost $300 for a trunk floor here.

Have any of you guys done a fabricated trunk floor. rather then original?

 
Whole wack of parts have now arrived; but not the differential bearing/seal kit. Almost got the leafs ready for the poly bushings; just gotta clean up the inside of the eyelet. Man it is not simple to get that sleeved bushing out without use of a press. Ended up having the most luck with the Rotary hammer.

 
Leaf springs are back in the car with the poly bushings(getting those sleeved rubber bushings out without a press was a job), and I mocked up the 9" housing I have to find that I wanted the drivers axle brought in about 2.75" to bring the pinion offset to approximately 1.5" Found a local guy that should have that done for my in the next day or two. (spent a long time starting at the engine bay of his twincharged fox.)

On another note; It looks like I'll be going fuel injected with a FAST system as well.

 
Cool!  Sounds like everything's moving right along.  Good for you! ::thumb::

 
Totally; I have to do this in stages; I wish I was the kind of person that stays motivated through years of building; I just have to drive it this summer! I am very happy to be getting my first car up and running well!

 
Well I've been thinking on how to do my fuel system. The EzEfi I bought included a few fuel system parts for me to build on. (walbro 255 inline fuel pump, and regulator with 6an fittings.)

I am thinking I'll use the existing fuel line as the return line utilising some AN to tube fittings and braided hose. For the extra bung on the tank I am leaning towards a weld in male bung as the tank is already out of the car and clean of fuel inside. I may still use the existing pickup and just add one bung. I haven't decided yet... neither the suction side of the fuel inlet or the return line should see significant pressure. If I weld the bung into the tank for the fuel inlet then it needs to be as low as possible, whereas if I use it as a return line it isn't really critical where it's located.

 
If your old vapor return line is still in good condition you could use the existing supply as the supply and use the vapor return line as your return line. It goes down the center of the trans tunnel and terminates into the top of the tank.

 
I would go with that route, since it will not involve any welding at all.  Just because the tank has been emptied, it can still go off when sparks or fire are introduced.  Fuel has a way of permeating even the metal, and I can attest that even 30-yr-old fuel leftover in the fuel line can still burn - no matter how much like shellac it might smell, it's still quite flammable.

 
I am somewhat hesitant to weld on the fuel tank for just that reason; it has been fairly thoroughly washed out though. My vapor line is intact; however I intend to take the car to the track periodically, and NHRA rules prohibit any fuel lines in the trans tunnel (must be outside frame rails).

Another option is a bulkhead AN fitting that just sandwiches in. I would just have to put it in a spot where I can hold the nut side (near the fuel neck or sender holes)

 
Well did some work putting the center section over the weekend, drive side is right centered, coast is slightly towards the toe of the gear, They are used gears.


backlash is at .009 and gear runout is .002

I've also come up with a plan for my fuel system upgrades. For the feed I am going to use a tube adapter to adapt the oem fuel feed to a male -6 fitting, then run new braided steel hose to the fuel pump then to the 10 micron filter canister and FAST throttle body, off that, more stainless braided line to the regulator then to another -6 tube adapter on the factory fuel line. then again from the other end of the factory hardline to a -6 bulkhead fitting that I will sandwich into the fuel tank, most likely just above the fuel sender/outlet hole. Not exactly a cheap way of doing it but it should make for a solid system thats reasonably easy to modify if need be.

 
Back
Top