- Joined
- Dec 28, 2014
- Messages
- 2,950
- Reaction score
- 632
- Location
- Washington Twp. Mi
- My Car
- 1972 Mach 1 Q Code
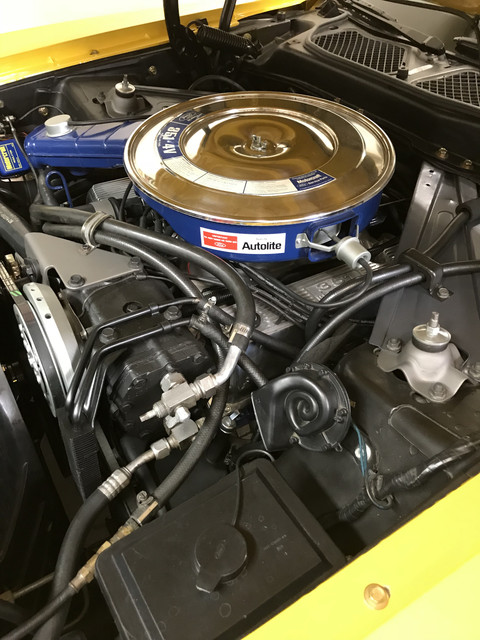
oh , sorry I have my original 50 year old q code air cleaner cover on.


I know it was last year when I enquired about the darker slop grey at NPD and was told it was out of stock and likely not being re-stocked, so it may no longer be available.... or not looking at the link.Now that I am done with the battery tray I need to ask which slop gray is the better option? I see two options one of a "medium" gray and a "darker" gray on NPD.
I was thinking the darker gray because I've mostly heard the gray is just slightly distinguished from the semi-gloss painting of the rest of the engine bay. Thanks in advance.
https://www.npdlink.com/product/paint-under-hood-dark-slop-gray-correct-dark/204598?backurl=search%2Fproducts%3Fsearch_terms%3Dslop%252Bgray%26top_parent%3D0%26year%3D
https://www.npdlink.com/product/paint-under-hood-medium-slop-gray-correct-medium/107680?backurl=search%2Fproducts%3Fsearch_terms%3Dslop%252Bgray%26top_parent%3D0%26year%3D
Your 50 year old air cleaner lid looks fine! ::thumb::oh , sorry I have my original 50 year old q code air cleaner cover on.
Looking good John.@jpaz Yeah its all different shades so I think I will go with the darker option just because its less dramatic looking
Her’s a couple pics of my underhood detail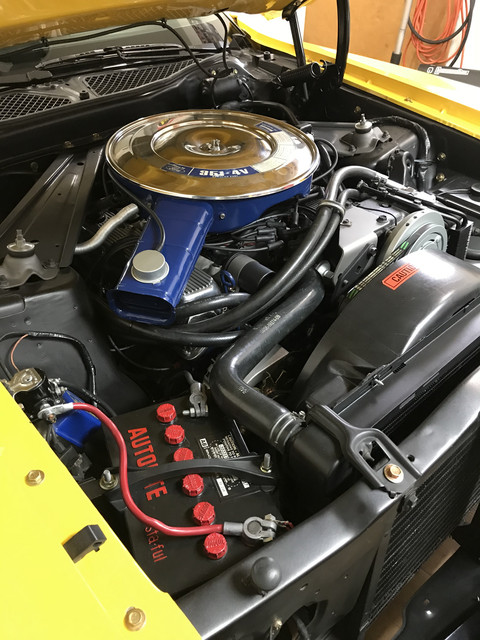


I read the thread you linked and it looks like the place to buy the solution (Palmetto) has no website or anything anymore. What else can I use as I am sure I can obtain the solution on ebay or amazon?
I guess you could ask Carolina Mountain Mustangs aka David. Pretty sure he has a thread on here somewhere about it. Another one to ask would be Fabrice, he’s gotta have info about it too. Or try looking in the search tab, that’s were I found the link I gave you.I read the thread you linked and it looks like the place to buy the solution (Palmetto) has no website or anything anymore. What else can I use as I am sure I can obtain the solution on ebay or amazon?
great tips thanksThe fan shroud did not have a finish applied it was as molded. I wash mine with lacquer thinner and blast with walnut shells. You can spray with satin clear to get an even finish. I do this for the under fender splash guards also. Only pic I have is out of focus. The splash guards I cleaned with lacquer thinner and did not blast as they were pretty good. Going to forum member in Europe soon.
I had not seen your post looking for the Iron Phosphate. Did you find some? You use distilled water to mix with it. A couple parts I did not mention that are also Iron Phosphate are the belt adjuster for the AC and also the bracket that holds the adjuster.
When you do the hood springs I take a piece of 1/2" conduit and stretch the spring slightly to get the coils separated so the solution gets between the coils. You will get a set of instructions with the phosphate. Heating the solution makes it work faster. I do outside use a thermometer like you check your deep fryer with. I got a couple different size stainless containers from Goodwill to do mine in. I mentioned previously that you raise the level in your container by putting in jars filled with water. You need the parts to be completely submerged so you do not get lines on the parts. Have lots of WD-40 to spray on the parts after they are washed. I have considered trying melting wax to coat them and see how that looks.
A radiator shop can solder it if you remove and take to them. Is the inside clean? Do you have deposits on the ends of the tubes when you look in?Now I have a leak in the radiator from a spot that looks like the fins were crushed during an engine swap. Is it possible to repair this? Maybe an expert is around the Cleveland area. I'll have to get a picture later since the whole thing is still installed.
It looks clean though I'm no expert, no white deposits or anything. The tubes had a light dusting of dirt which I wiped out. I had the whole thing out and flushed it a bunch.A radiator shop can solder it if you remove and take to them. Is the inside clean? Do you have deposits on the ends of the tubes when you look in?Now I have a leak in the radiator from a spot that looks like the fins were crushed during an engine swap. Is it possible to repair this? Maybe an expert is around the Cleveland area. I'll have to get a picture later since the whole thing is still installed.
If it's got a hole in it, why not bite the bullet and get it rebuilt to at least a 3 core. Your motor will thank you!!It looks clean though I'm no expert, no white deposits or anything. The tubes had a light dusting of dirt which I wiped out. I had the whole thing out and flushed it a bunch.A radiator shop can solder it if you remove and take to them. Is the inside clean? Do you have deposits on the ends of the tubes when you look in?Now I have a leak in the radiator from a spot that looks like the fins were crushed during an engine swap. Is it possible to repair this? Maybe an expert is around the Cleveland area. I'll have to get a picture later since the whole thing is still installed.
Exactly and the previous owner had a shop do it, they did a terrible job as well as a bad paint job on the engine that's in thereIf it's got a hole in it, why not bite the bullet and get it rebuilt to at least a 3 core. Your motor will thank you!!It looks clean though I'm no expert, no white deposits or anything. The tubes had a light dusting of dirt which I wiped out. I had the whole thing out and flushed it a bunch.A radiator shop can solder it if you remove and take to them. Is the inside clean? Do you have deposits on the ends of the tubes when you look in?
By the way, the rad should always be removed when removing/replacing a motor.
So now with the "new" engine (not in yet), you'll have the opportunity to do the engine bay and motor right and to your liking.Exactly and the previous owner had a shop do it, they did a terrible job as well as a bad paint job on the engine that's in thereIf it's got a hole in it, why not bite the bullet and get it rebuilt to at least a 3 core. Your motor will thank you!!It looks clean though I'm no expert, no white deposits or anything. The tubes had a light dusting of dirt which I wiped out. I had the whole thing out and flushed it a bunch.
By the way, the rad should always be removed when removing/replacing a motor.


