jowens1126
Jim
- Joined
- Jan 25, 2017
- Messages
- 733
- Reaction score
- 24
- Location
- Tavares, fl
- My Car
- 71 Mustang Mach 1
302-2v
C4
Today we dove into the 3 point seat belt install. There was a bit of a learning curve for us to get the rear interior out, but we finally figured it all out. I didnt get a chance to take too many pictures, but I will take the time when we do the passenger side to take more to add to this thread.
The kit I got is the 3 point kit for a 65-73 fastback from CJ Pony Parts.
http://www.cjponyparts.com/seat-belt-3-point-retractable-with-push-button-front-pair-coupe-1968-1973-fastback-1965-1973/p/SBR7-V/
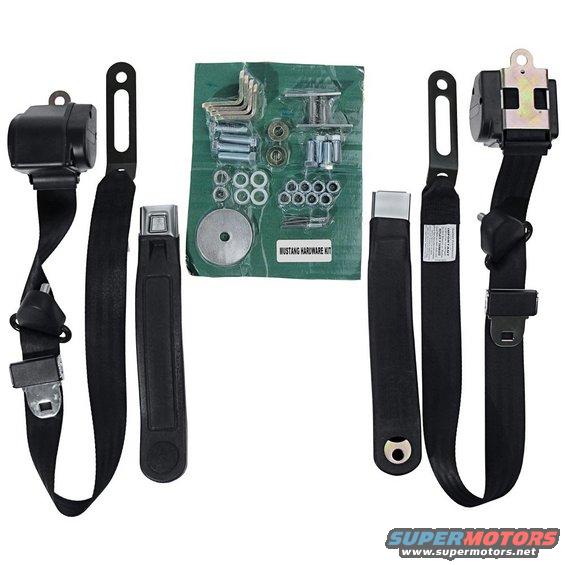
Here are my observations on installing the kit.
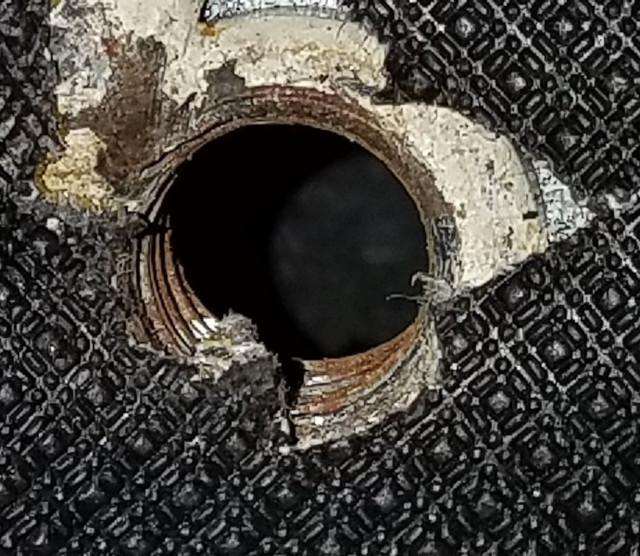
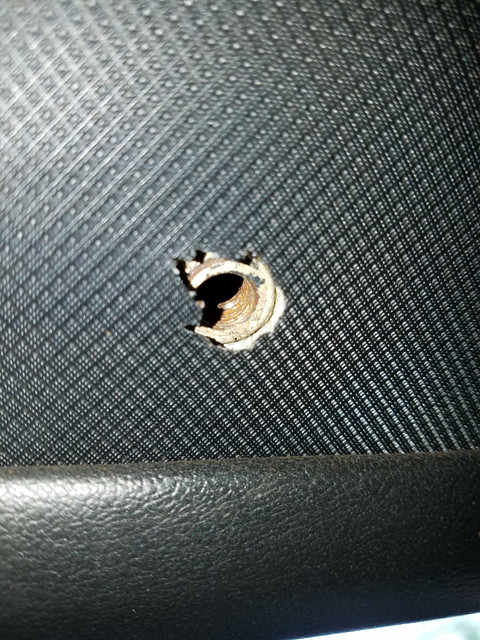
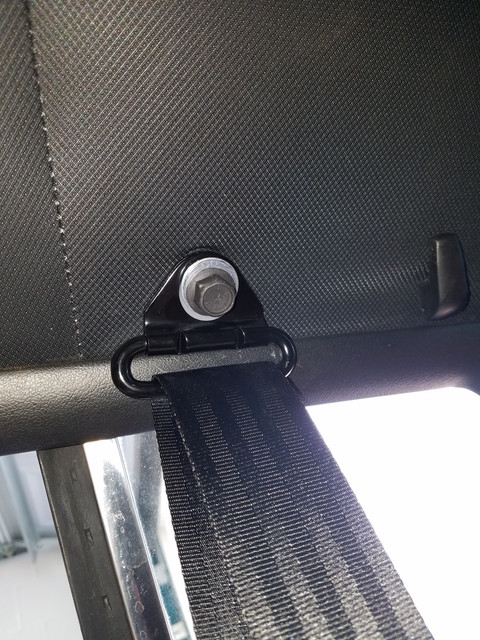
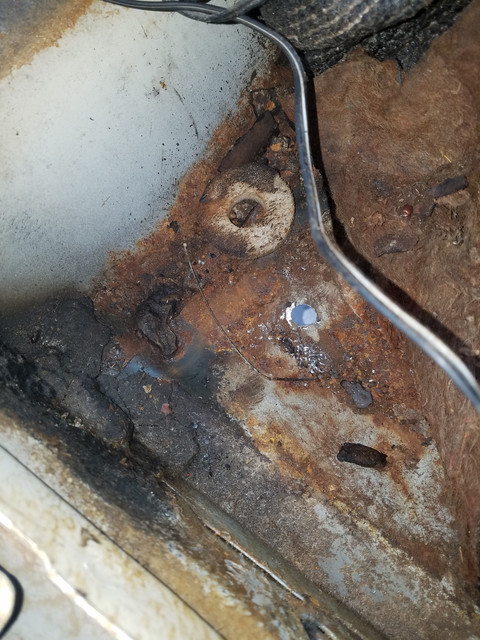
The first step is to locate the Original mounting point for the factory 3 point seat belt up on the roof line. You can locate it by pressing around on the headliner about 3 -4 inches in front of the factory coat hanger. Once you feel it, you can trim out a hole in the headliner to expose the socket.
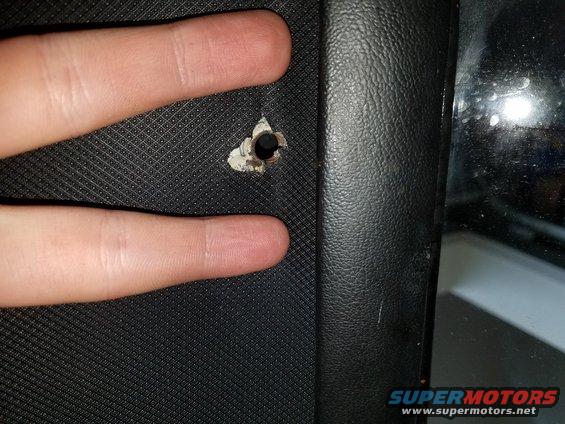
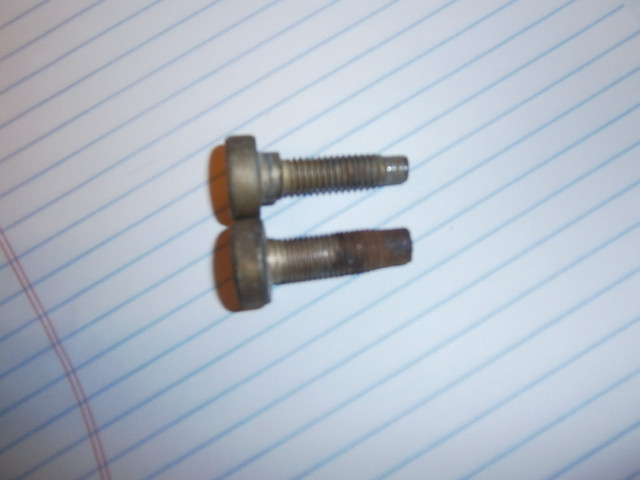
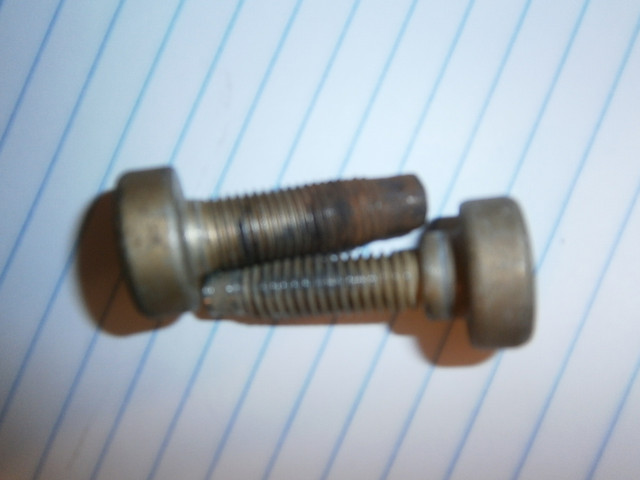
If yours is rusty as hell like mine, you will need to chase the threads with a tap. The threads are 3/8-16 coarse Thread. Use some oil on the tap so it cuts clean. Be extra careful starting it and watch your angle as the bolt is at a very odd angle in the roof. Once it is tapped you can look in the kit for the 3/8-24 bolt to hold it on there. Oh, but wait, THERE ISNT ONE. So now you will have to stop, go to the ACE Hardware store and get a 1" long 3/8-16 coarse thread bolt (For each side). Then you can come back home and continue working on it. Once your back at it, use one washer inside the belt hanger and then thread the bolt in. Start it by hand, and use hand tools to thread it in. It will only go in about 3/8 of an inch. It would also be wise to use some red Loctite on the threads of the bolt to keep it secure.
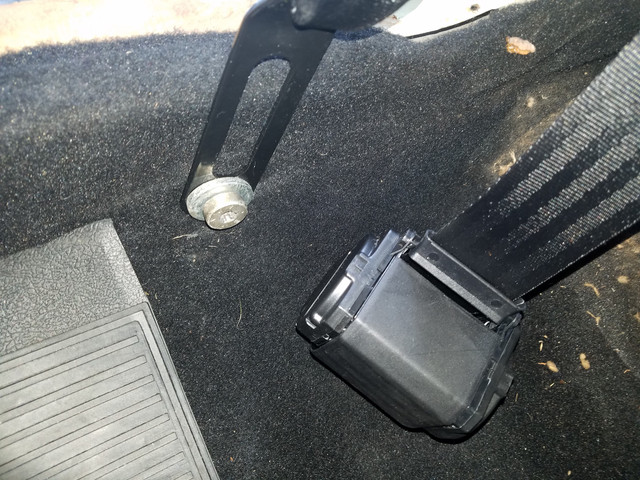
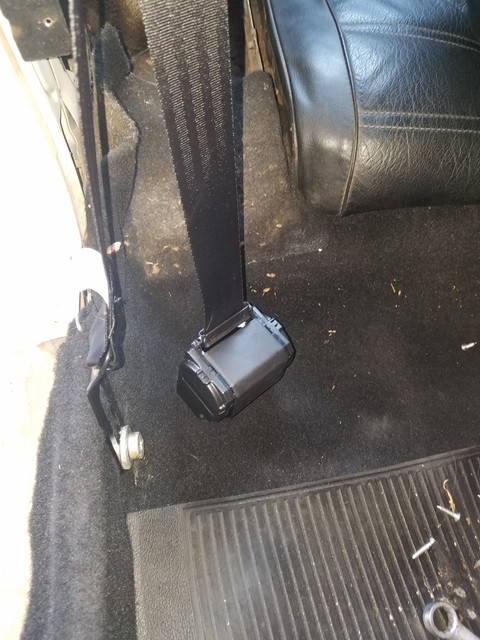
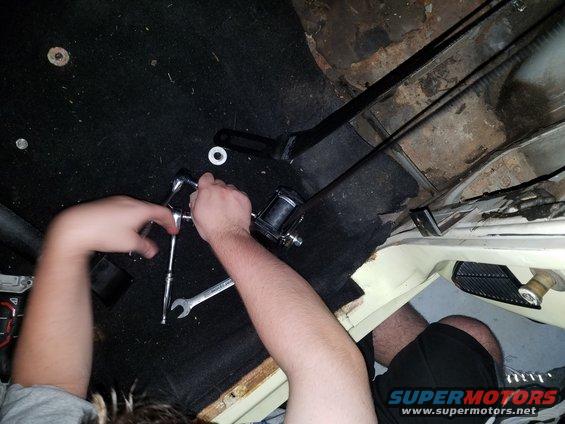
Once you have the top in place, then you can locate the best spot for the belt tensioner to sit. You want to mount it on the flat part of the floor. You dont want to get too close to the angled portion or you will be drilling too close to the fuel line that runs in the rocker on the drivers side. The door jamb plate and rear interior quarters need to come out to get to where you can pull up the carpet and mark the floor to drill the hole thru the floor pan to mount the seat belt tensioner. Once you have the location, you can mark the floor pan with a sharpie and drill the hole. You will need a 1/2" drill bit for the hole. It doesnt take much effort at all to drill thru that thin metal. Then you need to figure out where to cut the hole in the carpet and underlayment so you can bolt up the angle connector that the seat belt tensioner bolts to. Once the hole is drilled, drill thru the underlayment to make a hole for the bolt to go thru. As for the carpet, the way I did it was, to thread the bolt up thru the bottom of the floor and start the nut on the bolt, then lay the carpet back on top of it. Then feel around the carpet for it and trim the hole out with a very sharp exacto knife. Try to make it as small as you can so just the bolt comes thru. Once that is done you can lay down the angle iron piece and bolt that to the floor. Put the bolt thru it, push it thru the carpet and thru the floor pan. Have someone go under the car with 2 of the giant washers and one of the lock nuts and a socket wrench with a 9/16ths socket and a light. Then have them hold their socket on the nut while you wrench it in from the top. Once it is all the way down and TIGHT, you can attach the seat belt tensioner to the bracket with the shorter bolts. I used a washer on the back of the bracket, then the lock nut. If there is alot of bolt hanging under the car, you can trim off the excess with a grinder with a cutoff wheel.
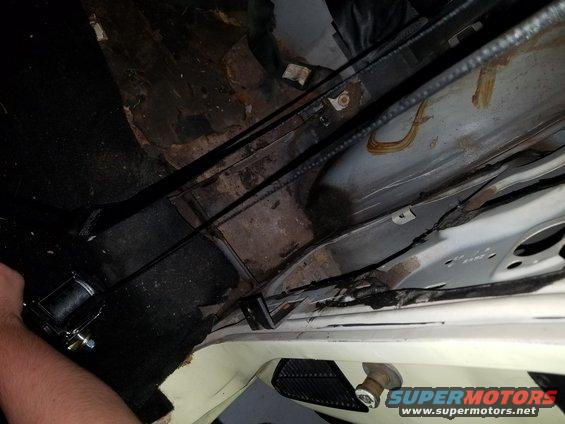
Now that part is done, the easy part is finishing the job.
The long bracket end of the belt system bolts to the stock location where the original tensioner mounted. Just use the same bolt and washers.
Next the seat belt receiver mounts up to the transmission tunnel using the original hardware.
Then you can put the seat back in place, and then the door jamb metal strip and then repeat on the other side.
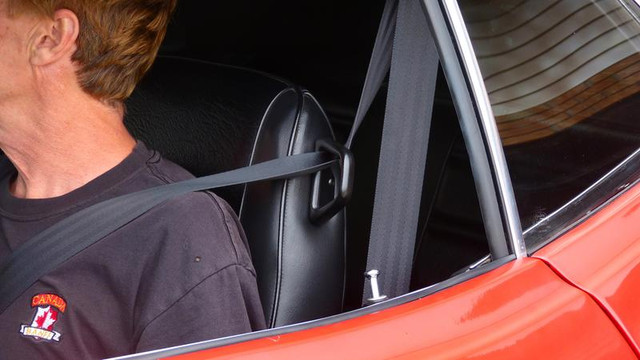
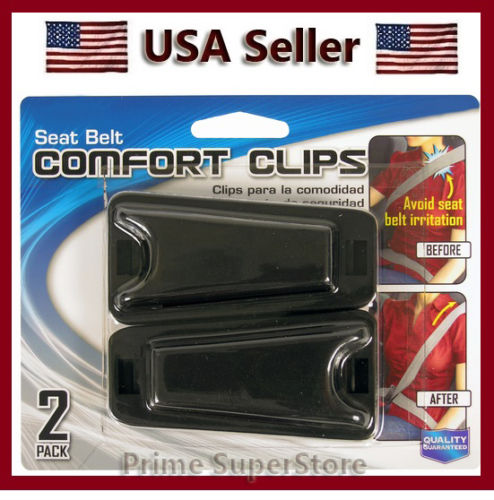
The finished seatbelt fit pretty nicely. It does run a bit high but its not as bad as I anticipated. To lower the point that the belt crosses your shoulder you can do one of 2 things. You can use a clip that clips the shoulder strap to the lap belt strap. Thats sort of a pain in the rear because you will have to position that clip seat time you use the belt.
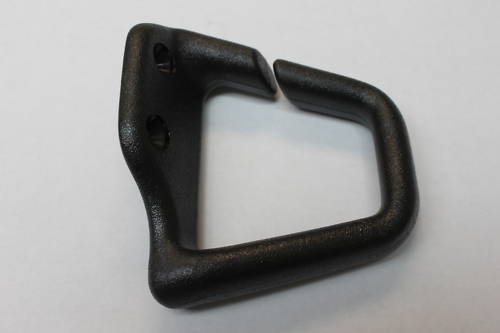
The other alternative is to mount some seat belt guides to the upper side of the seat. The guides from a 99-2003 Camaro/trans am/firebird should work perfectly.
I got this picture from the reviews on the Scott Drake Version of this kit (The difference is, its more expensive, which seems to be that way with all their products)
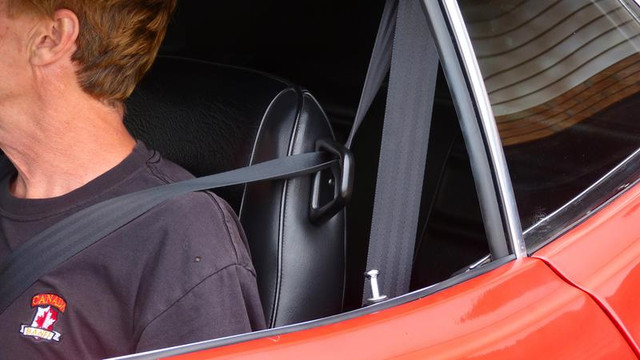
I think this is what I would like to try, but my son doesnt want to drill and mount anything to the seat, so we will try it like it is for a while, and if its a problem, we will discuss this again and make a decision.
Overall I am very satisfied with the install and performance of the kit. Its no where near as bad of an angle on the shoulder belt as I thought it would be. There are also easy fixes for the problem if it becomes annoying later on. The instructions from Seatbelt Solutions really arent as bad as I thought they were before doing the install. The most helpful instructions though to me was the video on the CJP website for this seat belt kit. They have a complete install video on it, though its in a older style car that they mount the upper shoulder mount to the inner rear quarter trim. The Roof line mounting point I had to figure out on my own, since there was little to no information online about its location. There was no information about the thread size of the bolt that mounts there either. I was thinking a bolt in the kit would be the right size but no. So I had to compare the kit bolt to the hole to get an idea on what size bolt it was, then look at the threads to see if they were fine thread or course thread, then just get a couple of bolts and see what worked.
After I bought this kit, I discovered from another member that there is a version of this same kit for a Van, that has the drop link for the roof attachment that should lower the shoulder strap to a much more comfortable position. I dont have any information on it other than that. Maybe someone else will add that to this thread for future reference.
Note: I originally tapped the top bolt with 3/8-24 fine thread, but Don from OMS set me straight on the thread size, it is 3/8 - 16 Coarse thread. So I ran the 3/8-16 tap back thru and used the correct bolt and its holding strong. I did the other side with the correct bolt to start with.
The kit I got is the 3 point kit for a 65-73 fastback from CJ Pony Parts.
http://www.cjponyparts.com/seat-belt-3-point-retractable-with-push-button-front-pair-coupe-1968-1973-fastback-1965-1973/p/SBR7-V/

Here are my observations on installing the kit.
The first step is to locate the Original mounting point for the factory 3 point seat belt up on the roof line. You can locate it by pressing around on the headliner about 3 -4 inches in front of the factory coat hanger. Once you feel it, you can trim out a hole in the headliner to expose the socket.

If yours is rusty as hell like mine, you will need to chase the threads with a tap. The threads are 3/8-16 coarse Thread. Use some oil on the tap so it cuts clean. Be extra careful starting it and watch your angle as the bolt is at a very odd angle in the roof. Once it is tapped you can look in the kit for the 3/8-24 bolt to hold it on there. Oh, but wait, THERE ISNT ONE. So now you will have to stop, go to the ACE Hardware store and get a 1" long 3/8-16 coarse thread bolt (For each side). Then you can come back home and continue working on it. Once your back at it, use one washer inside the belt hanger and then thread the bolt in. Start it by hand, and use hand tools to thread it in. It will only go in about 3/8 of an inch. It would also be wise to use some red Loctite on the threads of the bolt to keep it secure.
Once you have the top in place, then you can locate the best spot for the belt tensioner to sit. You want to mount it on the flat part of the floor. You dont want to get too close to the angled portion or you will be drilling too close to the fuel line that runs in the rocker on the drivers side. The door jamb plate and rear interior quarters need to come out to get to where you can pull up the carpet and mark the floor to drill the hole thru the floor pan to mount the seat belt tensioner. Once you have the location, you can mark the floor pan with a sharpie and drill the hole. You will need a 1/2" drill bit for the hole. It doesnt take much effort at all to drill thru that thin metal. Then you need to figure out where to cut the hole in the carpet and underlayment so you can bolt up the angle connector that the seat belt tensioner bolts to. Once the hole is drilled, drill thru the underlayment to make a hole for the bolt to go thru. As for the carpet, the way I did it was, to thread the bolt up thru the bottom of the floor and start the nut on the bolt, then lay the carpet back on top of it. Then feel around the carpet for it and trim the hole out with a very sharp exacto knife. Try to make it as small as you can so just the bolt comes thru. Once that is done you can lay down the angle iron piece and bolt that to the floor. Put the bolt thru it, push it thru the carpet and thru the floor pan. Have someone go under the car with 2 of the giant washers and one of the lock nuts and a socket wrench with a 9/16ths socket and a light. Then have them hold their socket on the nut while you wrench it in from the top. Once it is all the way down and TIGHT, you can attach the seat belt tensioner to the bracket with the shorter bolts. I used a washer on the back of the bracket, then the lock nut. If there is alot of bolt hanging under the car, you can trim off the excess with a grinder with a cutoff wheel.


Now that part is done, the easy part is finishing the job.
The long bracket end of the belt system bolts to the stock location where the original tensioner mounted. Just use the same bolt and washers.
Next the seat belt receiver mounts up to the transmission tunnel using the original hardware.
Then you can put the seat back in place, and then the door jamb metal strip and then repeat on the other side.
The finished seatbelt fit pretty nicely. It does run a bit high but its not as bad as I anticipated. To lower the point that the belt crosses your shoulder you can do one of 2 things. You can use a clip that clips the shoulder strap to the lap belt strap. Thats sort of a pain in the rear because you will have to position that clip seat time you use the belt.

The other alternative is to mount some seat belt guides to the upper side of the seat. The guides from a 99-2003 Camaro/trans am/firebird should work perfectly.

I got this picture from the reviews on the Scott Drake Version of this kit (The difference is, its more expensive, which seems to be that way with all their products)

I think this is what I would like to try, but my son doesnt want to drill and mount anything to the seat, so we will try it like it is for a while, and if its a problem, we will discuss this again and make a decision.
Overall I am very satisfied with the install and performance of the kit. Its no where near as bad of an angle on the shoulder belt as I thought it would be. There are also easy fixes for the problem if it becomes annoying later on. The instructions from Seatbelt Solutions really arent as bad as I thought they were before doing the install. The most helpful instructions though to me was the video on the CJP website for this seat belt kit. They have a complete install video on it, though its in a older style car that they mount the upper shoulder mount to the inner rear quarter trim. The Roof line mounting point I had to figure out on my own, since there was little to no information online about its location. There was no information about the thread size of the bolt that mounts there either. I was thinking a bolt in the kit would be the right size but no. So I had to compare the kit bolt to the hole to get an idea on what size bolt it was, then look at the threads to see if they were fine thread or course thread, then just get a couple of bolts and see what worked.
After I bought this kit, I discovered from another member that there is a version of this same kit for a Van, that has the drop link for the roof attachment that should lower the shoulder strap to a much more comfortable position. I dont have any information on it other than that. Maybe someone else will add that to this thread for future reference.
Note: I originally tapped the top bolt with 3/8-24 fine thread, but Don from OMS set me straight on the thread size, it is 3/8 - 16 Coarse thread. So I ran the 3/8-16 tap back thru and used the correct bolt and its holding strong. I did the other side with the correct bolt to start with.
Last edited by a moderator:


