I wouldn't be afraid of bead blasting the pan or just hot tanking it.You are going to wipe it down / wash degrease before you paint any way.Great looking bottom end ! Nice find ! Be sure and do a full oil prime before you fire it up ,get some fresh oil running through those bearings! I might even throw some Marvel Mistery oil or tranny fluid on the cylinder walls around the pistons and let the rings soak it in. Just my .02 !
You are using an out of date browser. It may not display this or other websites correctly.
You should upgrade or use an alternative browser.
You should upgrade or use an alternative browser.
351C Engine Strategy Consult
- Thread starter 72Q-code
- Start date


Help Support 7173Mustangs.com:
This site may earn a commission from merchant affiliate
links, including eBay, Amazon, and others.
- Joined
- Sep 30, 2010
- Messages
- 6,183
- Reaction score
- 1,148
- Location
- Mustang, OK.
- My Car
- 1972 Mach 1 Q code
2007 GT
1969 Cougar Eliminator B302
CSX 7000 Shelby Cobra FIA
2020 Edge ST
2002 F250 V10
+1 ChuckI wouldn't be afraid of bead blasting the pan or just hot tanking it.You are going to wipe it down / wash degrease before you paint any way.Great looking bottom end ! Nice find ! Be sure and do a full oil prime before you fire it up ,get some fresh oil running through those bearings! I might even throw some Marvel Mistery oil or tranny fluid on the cylinder walls around the pistons and let the rings soak it in. Just my .02 !
- Joined
- Aug 30, 2010
- Messages
- 324
- Reaction score
- 3
- Location
- Miami, FL
- My Car
- 1972 Mustang Convertible
Looks like she is ready to rumble, nice motor.
- Joined
- Oct 19, 2010
- Messages
- 1,000
- Reaction score
- 11
- Location
- North Carolina
- My Car
- 1972 Mustang Sportsroof
2010 Mustang GT
Start that baby up!!
72Q-code
Well-known member
- Joined
- Nov 22, 2010
- Messages
- 92
- Reaction score
- 0
- Location
- Columbus Ohio
- My Car
- 72 Q-code Mach 1, 351C 4 speed.
72 F Mach 1, 302 Automatic W/air.
Yep, that is kind of what I am thinking! I do need to clean it well and paint it though, man is it one ugly beast on the outside.
Also, it was smoking a bit when it was running, which I think was due to valve stem seals. So I do plan to do a leakdown test and probably pull the heads just to get a better look at everything and put new seals in it.
I am glad that disassembling the lower end and sending it to the machine shop (which almost always ends in expensive news) does not seem to be a needed step!
~Jim
72Q-code
Well-known member
- Joined
- Nov 22, 2010
- Messages
- 92
- Reaction score
- 0
- Location
- Columbus Ohio
- My Car
- 72 Q-code Mach 1, 351C 4 speed.
72 F Mach 1, 302 Automatic W/air.
OK, happy feelings gone.
I made up a leak-down tester based on some articles I found and my parts box, then went to work using it ,y newly built tool great excitement.
I ran the tests at low pressure to start and found #'s 2,3,4 and 8 to be in the 15% leakage range. Really good for a cold engine that has sat for years. #'s 1, 5, 6 and 7 were not so good. Some were getting well over 50% leakage. I upped the pressure and rocked them back and forth at TDC, readings did not go up much. The engine was producing ample power when it was shut down. Something had to be up.
I pulled the pan and valve covers back off. Tapping the valves on the bad holes with a mallet lightly did improve readings to 25-30% on those cylinders. So the valves must not be seating so well, perhaps some rust on the valves and seats that were open. Then I looked closer at the cylinder walls, and now that the pistons have traveled from their resting spots back and forth a few times, things look different...there are signs of rust. Slight, but rust. Damn.
I knew the heads were coming off, but I am guessing now at the very least I need to pull the pistons and dress the cylinders with a hone or some scotch-bright depending on condition? I would guess this rust is being generated from the rings, and causing them to not seal as well?
I knew it seemed to be going too well.
Another set on Flickr here:
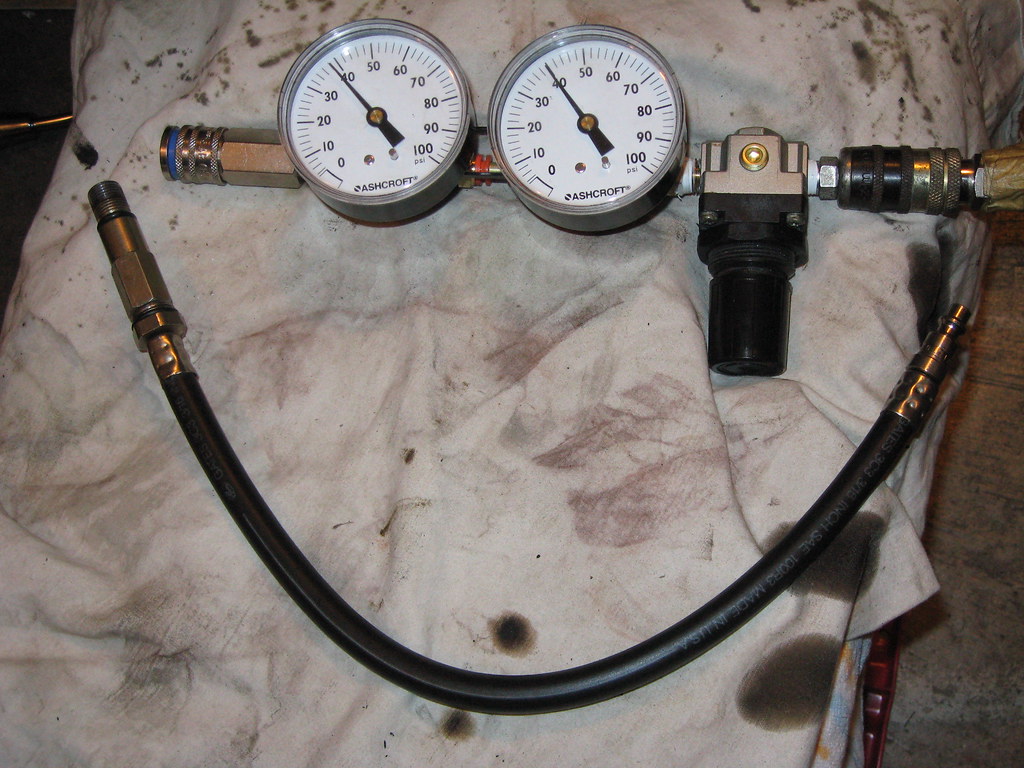
The new tool looks happy...

This not so much...

~Jim
I made up a leak-down tester based on some articles I found and my parts box, then went to work using it ,y newly built tool great excitement.
I ran the tests at low pressure to start and found #'s 2,3,4 and 8 to be in the 15% leakage range. Really good for a cold engine that has sat for years. #'s 1, 5, 6 and 7 were not so good. Some were getting well over 50% leakage. I upped the pressure and rocked them back and forth at TDC, readings did not go up much. The engine was producing ample power when it was shut down. Something had to be up.
I pulled the pan and valve covers back off. Tapping the valves on the bad holes with a mallet lightly did improve readings to 25-30% on those cylinders. So the valves must not be seating so well, perhaps some rust on the valves and seats that were open. Then I looked closer at the cylinder walls, and now that the pistons have traveled from their resting spots back and forth a few times, things look different...there are signs of rust. Slight, but rust. Damn.
I knew the heads were coming off, but I am guessing now at the very least I need to pull the pistons and dress the cylinders with a hone or some scotch-bright depending on condition? I would guess this rust is being generated from the rings, and causing them to not seal as well?
I knew it seemed to be going too well.
Another set on Flickr here:
The new tool looks happy...
This not so much...
~Jim
Last edited by a moderator:
- Joined
- Sep 30, 2010
- Messages
- 6,183
- Reaction score
- 1,148
- Location
- Mustang, OK.
- My Car
- 1972 Mach 1 Q code
2007 GT
1969 Cougar Eliminator B302
CSX 7000 Shelby Cobra FIA
2020 Edge ST
2002 F250 V10
Spray some penetrating through the spark plug holes and from the bottom. Let it it a bit then turn it over several revolutions. Test it again. Put your ear at the manifold plenum, exhaust ports, and bottom end to see how much is leaking past the valves vs. the rings. The rings may be sticking in the ring grooves causing the leakage, they may free up.
Chuck
Chuck
72Q-code
Well-known member
- Joined
- Nov 22, 2010
- Messages
- 92
- Reaction score
- 0
- Location
- Columbus Ohio
- My Car
- 72 Q-code Mach 1, 351C 4 speed.
72 F Mach 1, 302 Automatic W/air.
Chuck, you are correct. The ones that still have leakage issues are hissing form the piston skirts mainly now that I tapped the valves a bit. I will do as FastE said and gibe it a Marvel treatment and try again before I remove the heads.Spray some penetrating through the spark plug holes and from the bottom. Let it it a bit then turn it over several revolutions. Test it again. Put your ear at the manifold plenum, exhaust ports, and bottom end to see how much is leaking past the valves vs. the rings. The rings may be sticking in the ring grooves causing the leakage, they may free up.
Chuck
If I can get them to seat to under 20% cold maybe I will just pull the worst one and inpsect it to see how bad things look.
Thanks, I'll keep this going with my findings, all advice welcome.
~Jim
Last edited by a moderator:
I would do the Marvell oil top and bottom and let the rings soak in it for awhile.
72Q-code
Well-known member
- Joined
- Nov 22, 2010
- Messages
- 92
- Reaction score
- 0
- Location
- Columbus Ohio
- My Car
- 72 Q-code Mach 1, 351C 4 speed.
72 F Mach 1, 302 Automatic W/air.
I have to take back all the jokes I laughed at regarding Marvel Mystery Oil..."the mystery is why anyone uses it".I would do the Marvell oil top and bottom and let the rings soak in it for awhile.
I sprayed #1 and #5 (two of my wort ones) and let them sit for about 12 hours. I came back and hooked up the leak down tester and ran it again. On #1 I was still only reading about 50% leak down and when I got it right on TDC I wiggled it back and forth there and all of the sudden the gauge popped from 25 psi to 45 psi while being fed 50! That puts me at about 10% leakage as the rings broke free and seated from the oil. All of the leakage can be heard around the rings, especially now with the oil bubbling up around the oil control ring grooves.
Same thing happened with #5. I sprayed all the cylinders top and bottom and spun the crank (and the entire motor on the stand) over a few times to get a decent coating.
I have also been reading this book which has answered some questions:
http://www.mre-books.com/engine/hp36.html
Anyway I am going to be taking a week off of the motor thanks to other obligations, so the oil will have lots of time to do its thing. I have been thinking ahead a bit and wonder what the typical procedure is for painting. Paint the engine after assembly with valve cover, intake and oil pan gaskets in place, or paint the pieces before assembly?
Thanks again, the saga will continue.
~Jim
- Joined
- Sep 30, 2010
- Messages
- 6,183
- Reaction score
- 1,148
- Location
- Mustang, OK.
- My Car
- 1972 Mach 1 Q code
2007 GT
1969 Cougar Eliminator B302
CSX 7000 Shelby Cobra FIA
2020 Edge ST
2002 F250 V10
I'm glad the rings are loosening up for you. As far as paint goes, wash/wipe everything down with wax and grease remover, then wipe it down again with a clean rag. Scuff all surfaces with red scotch brite, wipe down again. Hi temp engine primer is available (Duplicolor, VHT) if you want to use it. The main thing is to get everything clean or else the paint won't adhere. I personally think Duplicolor Ford dark blue (DE 1606) is the closest match to the factory color. Others may prefer a different product. If you want the "as built" factory look the engine is painted assembled, less distributor, carb, coil, fuel pump, and accessories. Obviously you can paint all the pieces individually and then assemble them. Caution, all of the high temp paints I've used are very re-coat sensitive after 1 hour. If you spray on another coat after 1 hour the paint lifts and you get the ugliest wrinkle finish you've ever seen. I've seen it wrinkle after sitting for 3 weeks before another coat was applied. In other words, paint everything you want covered the first time. Keep us posted.
Chuck
Chuck
pitbullrescue
Active member
- Joined
- Feb 23, 2011
- Messages
- 32
- Reaction score
- 0
- Location
- waukegan illnois
- My Car
- 72 Q code sportsroof 89 5liter ,balanced,blueprinted.Global West suspension,Tremec 5speed
great advice from everyone,cant go wrong with what you guys have to say.while engine is out and taking heads off it is a great time to put a new cam in. modern cam profiles for cleavlands have come a long way,going with roller rockers is a good power builder also.im kind of at the same place,motor has been out to long as i got sidetracked from my resto.when you take a couple of maincaps off let us know what you find
- Joined
- Aug 12, 2010
- Messages
- 8,303
- Reaction score
- 681
- Location
- San Angelo, Texas
- My Car
- 1971 Mustang Mach 1
You don't still have the Edelbrock 2V Performer Dual Plane by any chance, do ya? If so, tell me what you want plus shipping to 76904.For now a set of open chamber 2V heads, and a new Edelbrock 2V performer aluminum dual plane intake is all that I really want to part with.The attic speed shop got my attention. What all do you have? There may be something I just gotta buy!
Chuck
As well - what ever happened? Did you get it running? What's the word, Man?
72Q-code
Well-known member
- Joined
- Nov 22, 2010
- Messages
- 92
- Reaction score
- 0
- Location
- Columbus Ohio
- My Car
- 72 Q-code Mach 1, 351C 4 speed.
72 F Mach 1, 302 Automatic W/air.
Ahh, I am FINALLY back. Long story short we decided we might want to move soon, and I had plenty of round the house projects to get done before we could put the house on the mnarket. I had to put the Mustang back on hold and gut a bathroom, remodel it, as well remodel a kitchen and living room. Today I am mapping out my plan for 2012, and priority #1 is getting the car back on the road! The house work is mostly done but with the market conditions, we are probably not moving anytime soon.You don't still have the Edelbrock 2V Performer Dual Plane by any chance, do ya? If so, tell me what you want plus shipping to 76904.For now a set of open chamber 2V heads, and a new Edelbrock 2V performer aluminum dual plane intake is all that I really want to part with.The attic speed shop got my attention. What all do you have? There may be something I just gotta buy!
Chuck
As well - what ever happened? Did you get it running? What's the word, Man?
I decided to stay away while I was doing the house work as it was just too hard to read the forum and focus on the house not the car. The good news is, starting now I am back. It's good to be back. Still have the intake, the motor has been sitting since June in a bag. That's about to change
")
Glad to be back, missed you guys!
Jim
- Joined
- Jul 5, 2010
- Messages
- 6,685
- Reaction score
- 386
- Location
- Grand Rapids, MI
- My Car
- 73 Convertible
It's good to hear from you Jim.
I understand the house projects. I'm doing a kitchen remodel instead of working on the car on my Christmas "vacation".
I understand the house projects. I'm doing a kitchen remodel instead of working on the car on my Christmas "vacation".
- Joined
- Sep 30, 2010
- Messages
- 6,183
- Reaction score
- 1,148
- Location
- Mustang, OK.
- My Car
- 1972 Mach 1 Q code
2007 GT
1969 Cougar Eliminator B302
CSX 7000 Shelby Cobra FIA
2020 Edge ST
2002 F250 V10
Glad you are back. This kitchen renovation syndrome must be very widespread. I'm in the middle of refinishing the cabinets and just installed a new dishwasher(PITA). Chuck
Similar threads
- Replies
- 4
- Views
- 334
- Replies
- 8
- Views
- 689
- Replies
- 3
- Views
- 312
- Replies
- 7
- Views
- 471