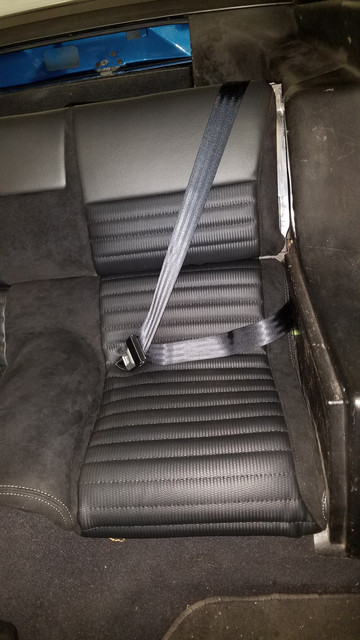
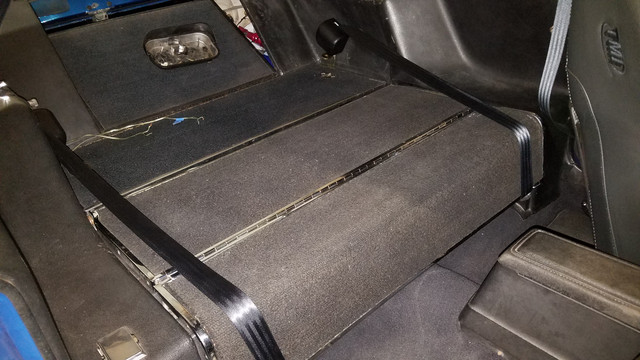
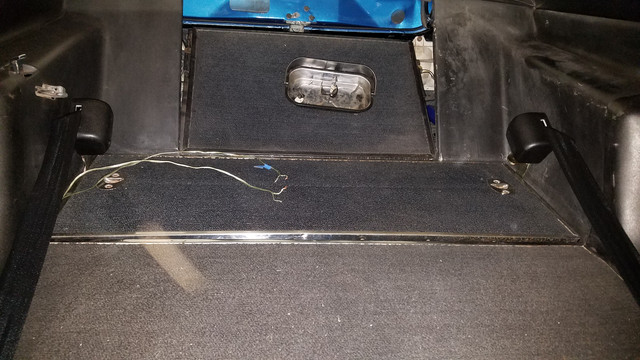
Added a 3-Point seat belt to my fold down rear seats

7173Mustangs.com

Help Support 7173Mustangs.com:

This site may earn a commission from merchant affiliate links, including eBay, Amazon, and others.
Joined
Aug 14, 2014
Messages
4,535
Reaction score
1,579
Location
Madison, WI
My Car
1971 Mach 1 w/408C stroker
So I have finally completed this project. I started with this idea a few years ago and did a lot of research. There was nothing off the shelf out there for fold down seat cars.

The starting point is a set of seatbelts from Wesco: https://www.wescoperformance.com/convertilble-seat-belt-metal.html. The key here is the length of the belt. This kit came with a 120" belt, but it happened to be too long. After I bought it I had to find a shop that can shorten it. I ended up having them removing 16". Therefore, the right length would be 104". Less will work but no more. If I were to do it again, I would buy the shorter belt and a slightly longer bucket seat end. The kit from Wesco comes with a 8" bucket seat end. I would get a custom one with 8.5" or 9". I got the main seat belt shortened by Seat Belt Planet (www.seatbeltplanet.com). They may be able to custom size it from the start. Once you are past sourcing the seat belt kit with the right length you will need 6" extension brackets for each side. I bought them from Wesco as well, but there are other sources (https://www.wescoperformance.com/6insebeexbr.html). I also got Wesco's hardware kit with bolts, washers and brackets.

Then comes the install. First is to install the anchor points behind the rear seats for the belt retractors. That's where those 6" extensions brackets come handy. The brackets have to fit between the interior and the floor panels. There is very little space there so this step takes a lot of double checking on measurements. I located the bracket as far back as I could, which is about one inch from the trunk panel. I installed the extension bracket with the ear towards the inner fender. The next step is to center punch the location of the hole. At this point double check again because on the underside you have to be between the rear frame and the inner fender. Careful on the driver's side because the gas line runs very close to there. I first drilled a small pilot hole to check the location. Then I drilled the hole slightly bigger than needed at 1/2". I ended up needing to Dremel the inside half of the hole to move the bracket inwards for a perfect location. On the underside there is only a small space between the frame and inner fender so I cut the supplied washer to fit in this channel. On the underside this area is very stiff due to it being next to the frame.

Locating the extension bracket with the ear towards the inner fender:
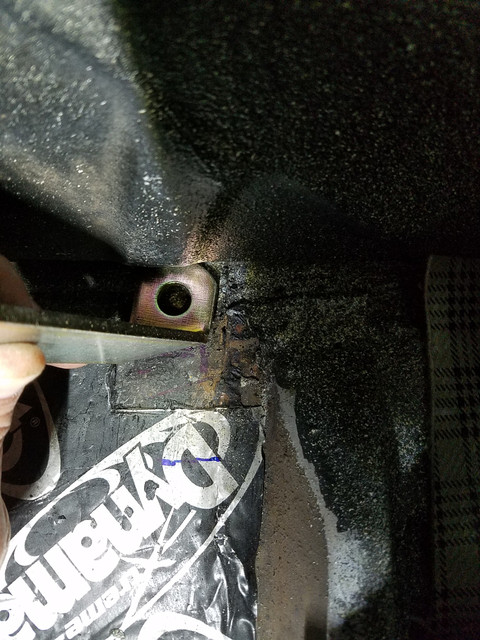


After pilot hole. Yeah... it is real close to where I want it. Unfortunately the location is right above the sway bar which makes it more challenging to get to the bolt.


Washer installed on the underside with shims on the fender side because the sheetmetal is thicker on the frame side.
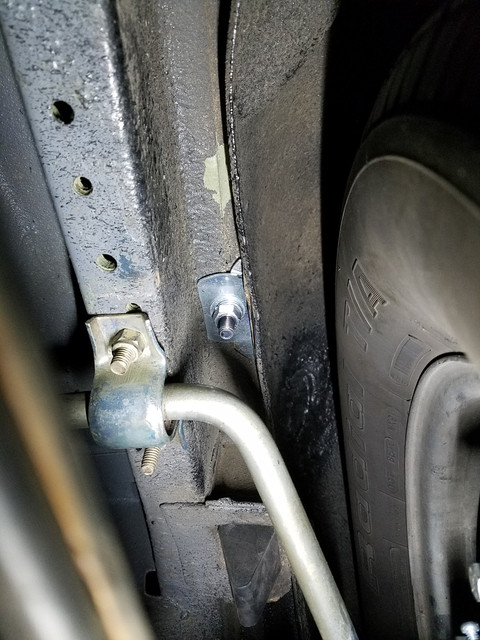


The bracket located right against the edge of floor panel:
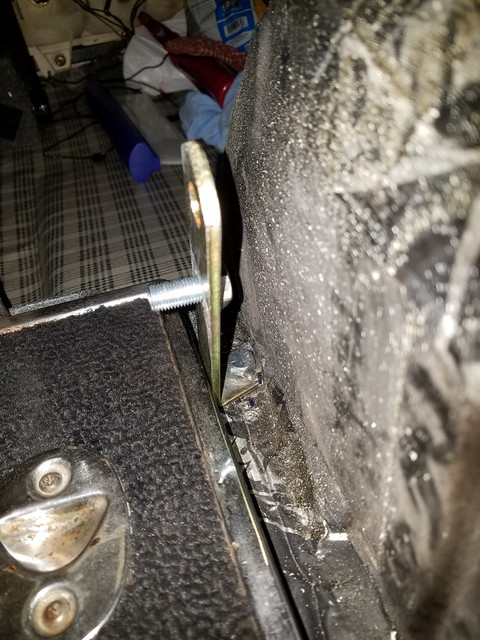


The above picture shows the bracket after the bolt was welded. I drilled a hole for the retractor about 2" lower so in reality it becomes a 4" extension. I did not cut the bracket since it will be all hidden behind the retractor. I welded the retractor bolt due to the tight space left between the bracket and the inner plastic panel to avoid having to fit a wrench in there. I also welded the through floor bolt to the ear because you have to tighten the underside bolt after the plastic panel is installed, which does not allow room to use a wrench.
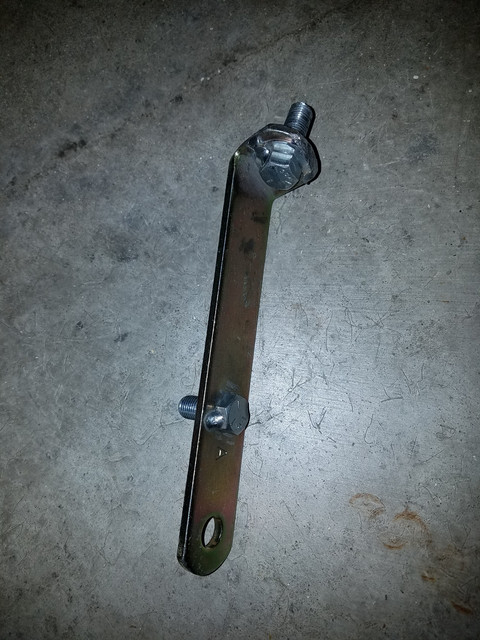


Here is the bracket fitted between the edge of the floor panel and the plastic side panel. I cut the flange of the plastic side panel in order to fit the bracket so close to it. The driver's side is a bit more challenging because the gas line runs through that area. I cut the through floor bolt a bit shorter so it doesn't come in contact with the line.
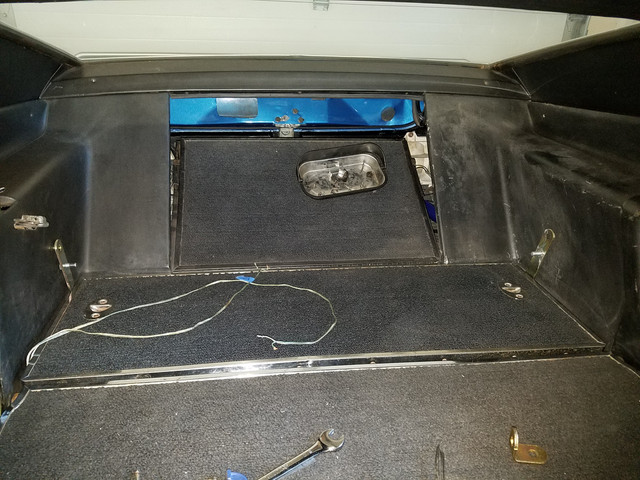

The next step is the belt guide. This guide has to attach to the rear of the seat back. I bought the kit from Wesco that includes the mounting plate for the guide (https://www.wescoperformance.com/3poremokit.html). For this step I removed the rear seat back and disassembled all the plated trim, removed the carpet and separated the two pieces that make the back (unfortunately I forgot to take pictures of this step). This step is straightforward, it just needs a lot of screws removed. I cut and modified the brackets to fit in a location about 2" from the edge of the seat back. As always double check all the dimensions before drilling and modifying. I drilled the hole for the guide bolt and tack welded the guides to the inside of the seat backs. I made a mistake here and I thought that this area was carpeted so I was not that careful with tacking so you can see a bit of a readout. This could easily avoided with a faster tack.

View of the guide's mounting plate inside the rear seat's back:
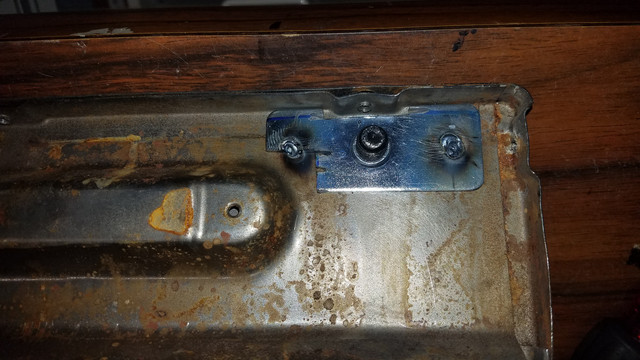


The passenger side is more tricky because the bracket that locks the seat back is also in that location.
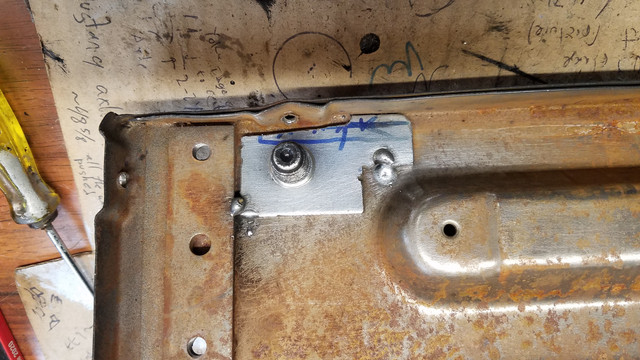


Back view of the belt guide after complete installation:
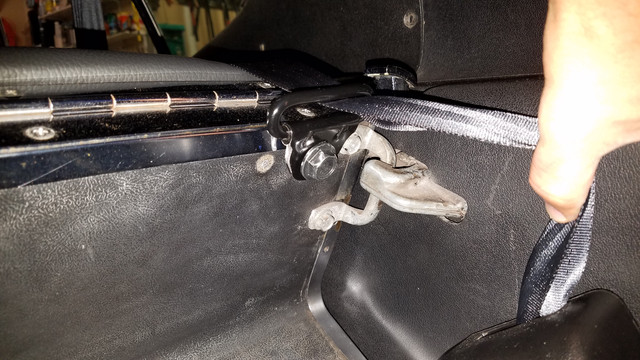


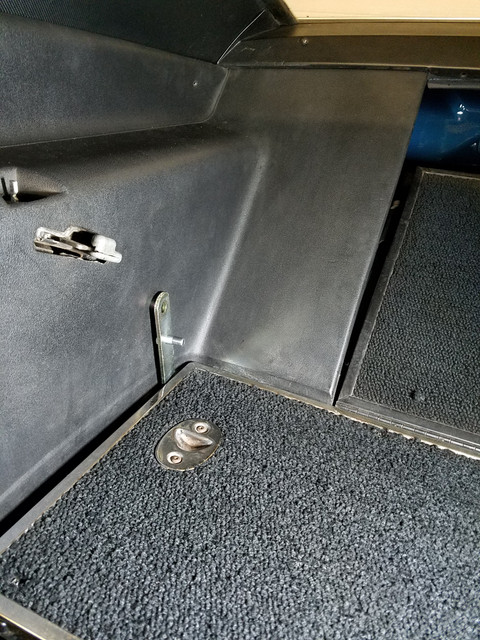
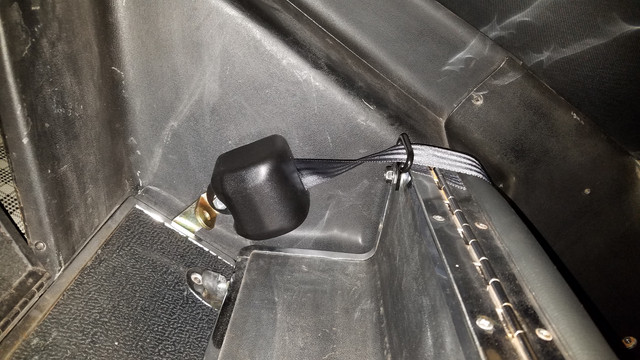
The last step is to attach the retractor to the extension bracket. I sandwiched one of the L brackets so they can be used as anchor points for hooks or a baby seat:


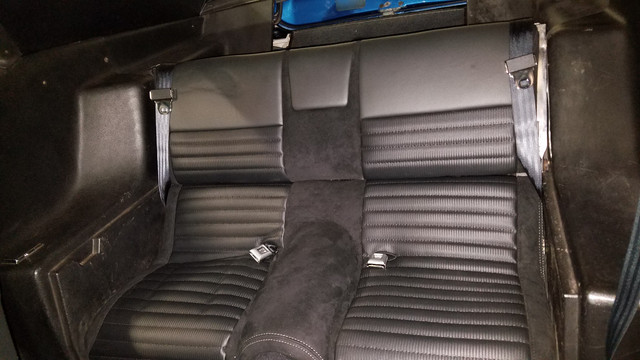
Here is the final product with the seats upright and folded down.


I am very satisfied with the culmination of an idea that started a few years ago. After some research, sourcing, spending extra money to shorten the belts, some patient, here it is.

 
Last edited by a moderator:
Looking great! I'd like to add 3 point belts both front and rear to the convertible. I think the plan would be simpler than with the fold down. Nice solid install and great advice. I'm gonna bookmark Wesco for sure!

 
Looking great! I'd like to add 3 point belts both front and rear to the convertible. I think the plan would be simpler than with the fold down. Nice solid install and great advice. I'm gonna bookmark Wesco for sure!
When sourcing the belt the most tricky part is to know the length. The specs only give the length of the belt, but it doesn't tell you anything about how much of the belt is out of the retractor when fully retracted (I call it the non-retracted length). This is the tricky part. In the case of the rear seat the non-retracted length has to be fairly short compared to what is out there. The reason why the non-retracted length is important is because you want tension on the belt when it is not in use so it looks better and sits snug against the seat or in the door post. My advice to anyone attempting this mod or any seat belt custom mod is to find a company that can work with you and customize the non-retracted length. I wish I would have known or thought of this because it would have saved me money and time.

 
Last edited by a moderator:
Nice install. Im currently looking at adding 3 point to my fold down rear seat sports roof. I also want to use the inertia reel, but plan on putting it in the same place as the original and bolting the top anchor point to the inside of the rear quarter. There is a panel and access in there to do it. See the picture (Not my car). Ideally I would like to just have an eyelet for the belt to clip into and have the rest of the belt retract into the real that is on the floor in the original location. I will keep you guys updated with the progress. Here is an install of a belt that is not inertia reel.

black rear seat belt.jpg

 
Nice install. Im currently looking at adding 3 point to my fold down rear seat sports roof. I also want to use the inertia reel, but plan on putting it in the same place as the original and bolting the top anchor point to the inside of the rear quarter. There is a panel and access in there to do it. See the picture (Not my car). Ideally I would like to just have an eyelet for the belt to clip into and have the rest of the belt retract into the real that is on the floor in the original location. I will keep you guys updated with the progress. Here is an install of a belt that is not inertia reel.

View attachment 52178
Interesting. I didnt know about that attaching point. Please take pictures. I wonder how strong is that area. Also, depending on the location, the reel may not fit between the attachment and the passenger's back.

 
Tony, That rear upper mounting point was added to meet Aust rules when the car was RHD converted. A plate with a seat belt nut was welded to the inner panel. There is plenty of room to do this with the sail panel removed. The set of seat belts is an Aus XB Falcon set, 2 X retractable front lap/sash (with a shorter tunnel stalk), 2 X rear lap sash, 1 X center rear lap belt. The set included the drop down shoulder bracket for the front seats and the drop down link for the rear floor mount to allow clear access to the rear seats. These are still made in Aus and meet current design rules.

 
David,
Thanks for the update.

Here are the pictures of the front seat belt install with the drop link as you described. Plus the stalks.

20210607_184820 (Large).jpg

20210607_184826 (Large).jpg

Here is the picture of the rear section. Note the red circle where the bolt can go. 

There is no room for an inertia real up in that space. I plan to have the real on the floor in the original space where it is now and it retracts into the floor. 

20210605_102959.jpg

The plate David mentions is like this one. It has a nut welded into it and then can also have additional screws or welded to hold it in place and spreads the load and can easily be installed in the top rear section of the body.

spreader plate.JPG

 
It seems that my plan to put an inertia reel belt in with the reel on the floor in the original location will be problematic as the belt manufacturers dont have a current approved design. In talking to the manufacturer, they do have an option for a fixed belt where the shoulder belt can be detached from the anchor point if needed. So am waiting for some drawings to be sent to see if this is an option. This way, the only evidence of a belt is an eyelet in the top rear quarter near the window when the belt is not needed or the rear seat is folded down. Will keep you posted.

 
Does any of this help ?  This plate was made to specs requested by my ADR compliance guy.

Material is 6 mm thick & plates are approx 100 mm x 75 mm.  The large bolt is the seat belt one while the smaller bolt & nut secure it in place - no welding required.  Position it where it needs to go then drill a single hole so the plate is tight in behind the panel. 

On the engineer's suggestion, this car DID NOT get rear seat belts - was configured as a two seater simply because of the hassle you are going through.  We took the easy option.  The recoilers are on the floor as you can see and the belts come up through a hole where the rear ashtray would be.  We did it as an " over the shoulder " style rather than have a hanger from the roof.   The ADR dimensions allowed this so the top anchor swivel is at the top of the B pillar and belts retract neatly when not in use.  It is done the same way - plate in behind the paneling with a bolt to keep it there.  I had to put spacers in behind the plastic panels to keep them flat when the belt attachment bolt was secured.

Might be worth a consideration for you ?

Backing plates - 2.JPG

Inertia reel anchor point..JPG

Inertia reel in place..JPG

 
Tony, I'm just going to mention that when I did my front seat belt conversion to 3 point, I ordered from Wesco, but when I had an issue with UPS shipping into Canada, I found out that Wesco was only a distributor for Seatbelt Solutions in Florida. You are actually buying Seatbelt Solutions product. That said, Wesco were extremely helpful getting me the correct parts needed. When I found I needed to change the cover sleeves on the tunnel belts, I found what I needed from Seatbelt Planet. I just wish these companies would offer a free running male buckle tang on the shoulder belt, the same as our daily drivers do. This was gone over in my post "re-visiting 3 point seat belt conversion".

Great job adding the 3 point belts to the rear. Would that also work for fixed back seats in the Mach 1?

 
Last edited by a moderator:
Tony, I'm just going to mention that when I did my front seat belt conversion to 3 point, I ordered from Wesco, but when I had an issue with UPS shipping into Canada, I found out that Wesco was only a distributor for Seatbelt Solutions in Florida. You are actually buying Seatbelt Solutions product. That said, Wesco were extremely helpful getting me the correct parts needed. When I found I needed to change the cover sleeves on the tunnel belts, I found what I needed from Seatbelt Planet. I just wish these companies would offer a free running male buckle tang on the shoulder belt, the same as our daily drivers do. This was gone over in my post "re-visiting 3 point seat belt conversion".

Great job adding the 3 point belts to the rear. Would that also work for fixed back seats in the Mach 1?
From now on, Seatbelt Planet is my vendor to go for custom seatbelts. I have no idea if it will fit fixed back seats since I am not seen the configuration. I assume it may be easier to do, but I could be wrong.

 
From now on, Seatbelt Planet is my vendor to go for custom seatbelts. I have no idea if it will fit fixed back seats since I am not seen the configuration. I assume it may be easier to do, but I could be wrong.
I hear you on Seatbelt Planet. Sometimes it pays to (maybe) spend a little more to get exactly what you want. As for the rear belts with standard seat, not something I'm too worried about as I hardly ever have anyone back there. I just wondered for others interest.

 
Does any of this help ?  This plate was made to specs requested by my ADR compliance guy.

Material is 6 mm thick & plates are approx 100 mm x 75 mm.  The large bolt is the seat belt one while the smaller bolt & nut secure it in place - no welding required.  Position it where it needs to go then drill a single hole so the plate is tight in behind the panel. 

On the engineer's suggestion, this car DID NOT get rear seat belts - was configured as a two seater simply because of the hassle you are going through.  We took the easy option.  The recoilers are on the floor as you can see and the belts come up through a hole where the rear ashtray would be.  We did it as an " over the shoulder " style rather than have a hanger from the roof.   The ADR dimensions allowed this so the top anchor swivel is at the top of the B pillar and belts retract neatly when not in use.  It is done the same way - plate in behind the paneling with a bolt to keep it there.  I had to put spacers in behind the plastic panels to keep them flat when the belt attachment bolt was secured.

Might be worth a consideration for you ?
Thanks for the info. I assume this is for the front seat and not the back? Do you have any completed job pictures?

For my fronts, I just used the original bolt holes and a XA/XB Falcon set up with a 250mm drop link.

 
Yes - fronts only.  No rear belts as too much hassle and nobody will be in there anyway.  I left the old ones there rather than dump them and a new owner may choose to re-visit this at some point.  Part of the L02 requirement calls for unrestricted exit for any rear passengers so I figured that the drop down from the roof would be considered a problem with this so the top of the B pillar, over shoulder option did the job.

These two pics are as good as I have for the final outcome.  Car has been sold so I can't get any better ones now.   The plates in behind the rear panels may also work for you if the engineers consider it strong enough.   There would be more going on in a crash if a rear seat passenger ripped these out ! !

Stick with it.

Fold-down sections fitted..JPG

Sash guide in place..JPG

 
Thanks for the info.. I checked with my engineer and he was happy to leave the front belts where they were and was not concerned about the access issue.

I have found a solution for the back where I can put an eyelet in the sail panel, and then just clip the rear belts into it when needed. When not in use they can roll up and stay beside the back seats. Will post pics when I get the belts and do the install.

 
So I have finally completed this project. I started with this idea a few years ago and did a lot of research. There was nothing off the shelf out there for fold down seat cars.

The starting point is a set of seatbelts from Wesco: https://www.wescoperformance.com/convertilble-seat-belt-metal.html. The key here is the length of the belt. This kit came with a 120" belt, but it happened to be too long. After I bought it I had to find a shop that can shorten it. I ended up having them removing 16". Therefore, the right length would be 104". Less will work but no more. If I were to do it again, I would buy the shorter belt and a slightly longer bucket seat end. The kit from Wesco comes with a 8" bucket seat end. I would get a custom one with 8.5" or 9". I got the main seat belt shortened by Seat Belt Planet (www.seatbeltplanet.com). They may be able to custom size it from the start. Once you are past sourcing the seat belt kit with the right length you will need 6" extension brackets for each side. I bought them from Wesco as well, but there are other sources (https://www.wescoperformance.com/6insebeexbr.html). I also got Wesco's hardware kit with bolts, washers and brackets.

Then comes the install. First is to install the anchor points behind the rear seats for the belt retractors. That's where those 6" extensions brackets come handy. The brackets have to fit between the interior and the floor panels. There is very little space there so this step takes a lot of double checking on measurements. I located the bracket as far back as I could, which is about one inch from the trunk panel. I installed the extension bracket with the ear towards the inner fender. The next step is to center punch the location of the hole. At this point double check again because on the underside you have to be between the rear frame and the inner fender. Careful on the driver's side because the gas line runs very close to there. I first drilled a small pilot hole to check the location. Then I drilled the hole slightly bigger than needed at 1/2". I ended up needing to Dremel the inside half of the hole to move the bracket inwards for a perfect location. On the underside there is only a small space between the frame and inner fender so I cut the supplied washer to fit in this channel. On the underside this area is very stiff due to it being next to the frame.

Locating the extension bracket with the ear towards the inner fender:


After pilot hole. Yeah... it is real close to where I want it. Unfortunately the location is right above the sway bar which makes it more challenging to get to the bolt.


Washer installed on the underside with shims on the fender side because the sheetmetal is thicker on the frame side.


The bracket located right against the edge of floor panel:


The above picture shows the bracket after the bolt was welded. I drilled a hole for the retractor about 2" lower so in reality it becomes a 4" extension. I did not cut the bracket since it will be all hidden behind the retractor. I welded the retractor bolt due to the tight space left between the bracket and the inner plastic panel to avoid having to fit a wrench in there. I also welded the through floor bolt to the ear because you have to tighten the underside bolt after the plastic panel is installed, which does not allow room to use a wrench.


Here is the bracket fitted between the edge of the floor panel and the plastic side panel. I cut the flange of the plastic side panel in order to fit the bracket so close to it. The driver's side is a bit more challenging because the gas line runs through that area. I cut the through floor bolt a bit shorter so it doesn't come in contact with the line.


The next step is the belt guide. This guide has to attach to the rear of the seat back. I bought the kit from Wesco that includes the mounting plate for the guide (https://www.wescoperformance.com/3poremokit.html). For this step I removed the rear seat back and disassembled all the plated trim, removed the carpet and separated the two pieces that make the back (unfortunately I forgot to take pictures of this step). This step is straightforward, it just needs a lot of screws removed. I cut and modified the brackets to fit in a location about 2" from the edge of the seat back. As always double check all the dimensions before drilling and modifying. I drilled the hole for the guide bolt and tack welded the guides to the inside of the seat backs. I made a mistake here and I thought that this area was carpeted so I was not that careful with tacking so you can see a bit of a readout. This could easily avoided with a faster tack.

View of the guide's mounting plate inside the rear seat's back:


The passenger side is more tricky because the bracket that locks the seat back is also in that location.


Back view of the belt guide after complete installation:


The last step is to attach the retractor to the extension bracket. I sandwiched one of the L brackets so they can be used as anchor points for hooks or a baby seat:


Here is the final product with the seats upright and folded down.


I am very satisfied with the culmination of an idea that started a few years ago. After some research, sourcing, spending extra money to shorten the belts, some patient, here it is.
My question is more inquisitive. What made some have a drop down rear seat and other not or was it just an option for all so they are random? If you know. Thanks.
 
My question is more inquisitive. What made some have a drop down rear seat and other not or was it just an option for all so they are random? If you know. Thanks.
Some here may have more detailed information, but I think it was an option. I can see it being useful when wanting to carry long items that didn't fit in the trunk. Something like skis or golf clubs.
 
Back
Top