Fabrice's 429CJ 71 project

7173Mustangs.com

Help Support 7173Mustangs.com:

This site may earn a commission from merchant affiliate links, including eBay, Amazon, and others.
@tony-muscle

I will propose this wonderful idea to my wife... I'm sure she'll love the idea!

-------------------------------------------------------------------------------------------------------------

Brrrrr. Wet & cold. Just like past 5 weekends, indoor Mustang stuff it is! :)

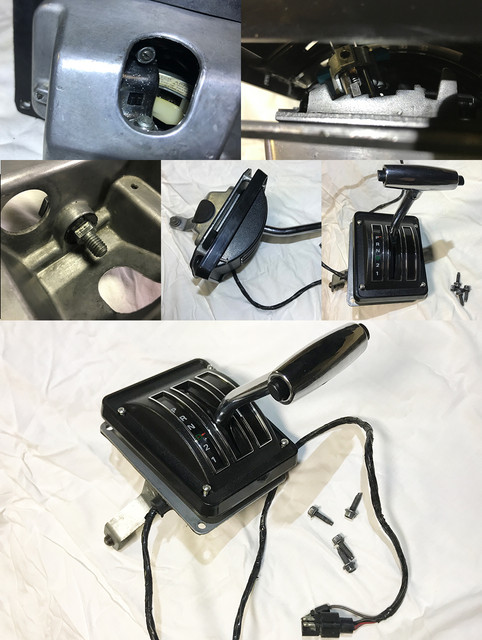
Still no sign of my parts from Australia supposed to be here last week, so I can't finish the shifter yet.

No prob, I got some fabs on to do: one of them is the throttle bracket.

As I have the Sniper EFI for the 429 already in house, I knew from the install I did on my 351 for the same device that the throttle bracket doesn't align with the unit linkage.

A quick install of the unit on the intake confirmed the issue, tho, way less than on the 351c.

Instead of 3.5cm offset found on the cleveland, projecting the line of the cable along the body to the bracket gave me only 1/2 cm...


As the diff wasn't that much, I thought about the easy way, that is modifying the original bracket restored a while back, but as I also will use a cable for the kickdown, i need a hole lower too and the part being curvy at that location, I decided to make one from scratch instead.

Plus I didn't like the idea to butcher that original part. Even if it likely with collect dust on the original intake for a very long time if it ever gets used again.

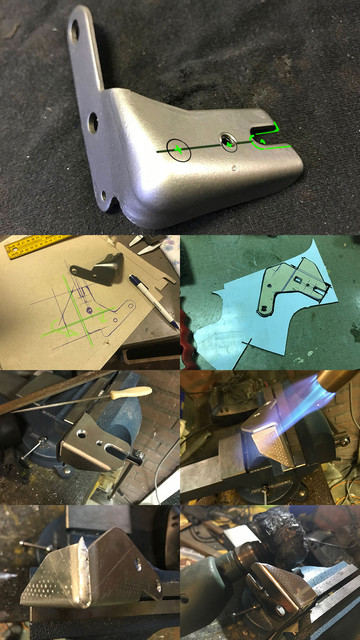
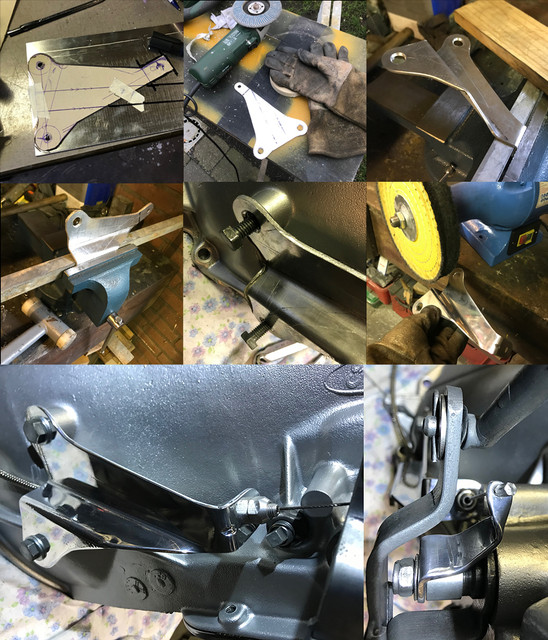
The original bracket has this shape not for nothing, clearly made to withstand the force that each time the cable is under tension would add some metal fatigue with a little bending at the base. So as a 50 tons press is not part of my tooling, went for an aluminium sheet of 3mm. Made a template of the original and cut a bit differently than the original to allow me to have 2 90 degs bends reproducing the same strength.

Out of aluminium, I got lucky and found few rests, only one allowed to fit the shape. No error allowed :D

Made my holes, using a electric saw with very raw teeth designed for aluminium, cut the shape and bent that baby together.

Finally, as the second fold has not much purpose to the base if its not welded back to it.

Used again these wonderful alumnium rods to do this after a good SS brushing. Unlike this summer where the repair of the thin headlight brackets screw holes was to the rod melting temperature in matter of seconds.

It took for this thickness much longer (stupid me forgot to isolate the bracket from the vice metal ). My torch was almost out of gas (lazy flame), so once dead, a new cardridge helped speeding up the process and finally got a nice solid solder bead.

Finished it by filing the edges and a quick polish.


At some point, I've declared the bracket good enough. Even fairly looking as the original, but having of course, the 1/2 cm offset and the extra hole for the kick down cable (that was supposed to be here 2 weeks ago... what's wrong with post services these days?? )

Bolted it on, checked the alignment, all fine. Using a fair amount of force, way more than the cable could possibly generate, did not get any movement in it. Bracket: done!

Sniper EFI installed in matter of hours they say :)

More fab tomorrow...

 
Last edited by a moderator:
Great job on fabricating a new bracket just annoying when you don't have the cable to try it out

I see your customs dept has had your package since last Thursday and maybe they are trying to find a way to tax you for it

Post always takes longer in the silly season but hopefully they will get it moving to you tomorrow

 
@OzCoupe72

Thx. Brackets are often seen as second rank citizens on a car. The time necessary to make one can be overlooked too. Plus this one is more important than one may think regarding safety.

Oh great, was still in Perth when I've check Friday. Sure it's busy season right now, but I see 1 on 2 package since October taking much more time than usual.

As long as all arrives and in one piece I don't mind waiting... Ok I lie, I do mind, I want see the parts! :D

---------------------------------------------------------------------------

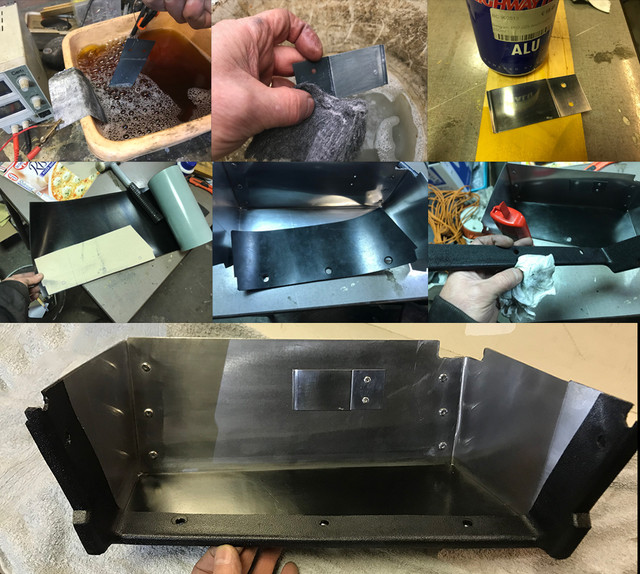
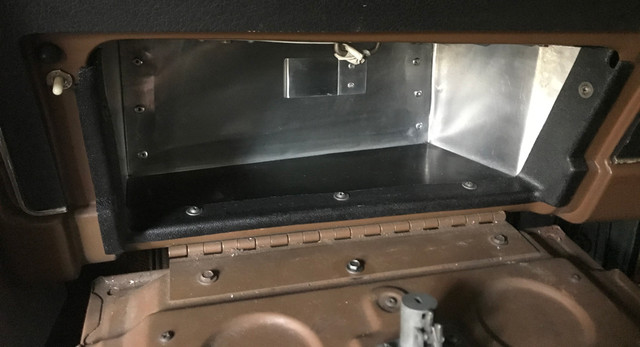
Today on the todo was to fab a new glove box from a sheet of 1mm aluminium...


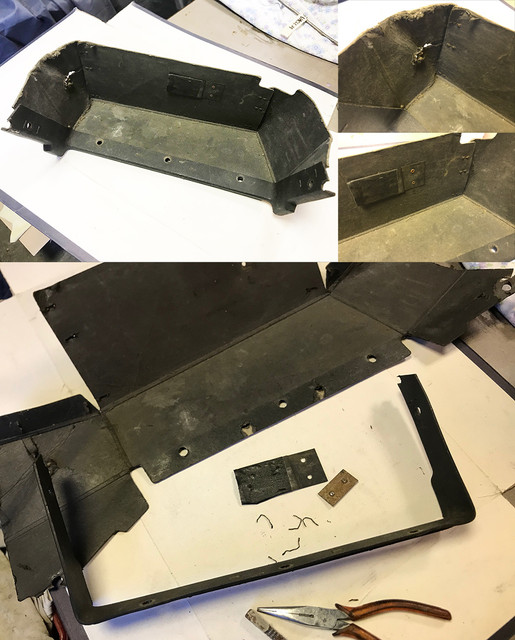
In a very poor state just as many glove boxes in 71-73, the goal today was to reproduce the paper/cardboard shape for this short glove box (I think I recall non AC ones are bit deeper).

I simply dislike the poor material choice Ford made for this, even a plastic glovebox would have been better. There might be re-pops available, I don't know.

A repop, probably even worse than the original would hang shapeless soon or later again anyway.

So time for some fab using bits more noble material than the original cheapo cardboard!


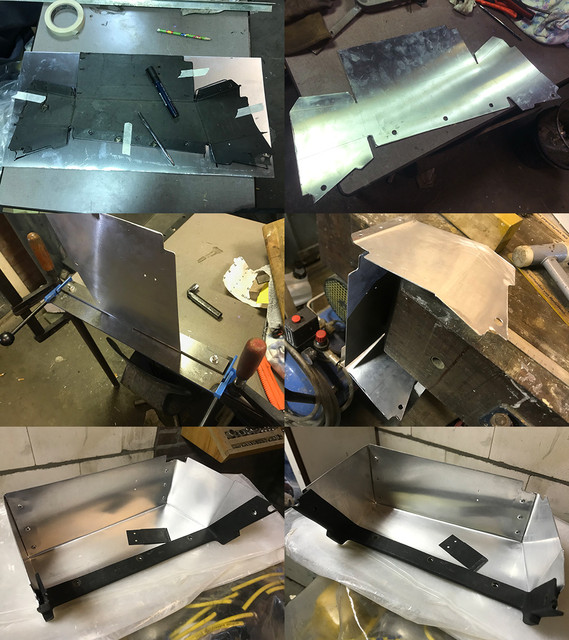
Once flat, traced with a sharpy and a marker the shape. As my original was very vague at the folds, the marker was for the contours, the sharpy to pick a more logical line based on how the sides must come together with a harder material.

Despite how simple cutting a sheet of 1mm may sounds, the practice showed pretty much the opposite. To keep the visible surface with no marks and create no crease during the cutting, it took way more time than expected, even using a very thin cutting disc. Once done, de burring the other side edges took a while as well.

Much more easy to work with 3mm like I've used yesterday!

The second problem I've encountered is that no matter which side you fold first, there is no real way to continue to use a metal breaker. Unless you'd have a long, with high jaws to allow sides to fold while only partially under pressure at the fold line. Happy me, my work bench is having a large wooden vice, so made most the folding by hand on it and ended up with all the holes matching the plastic ones.

Still need to finish it, rubber will be added on the bottom matching the plastic thickness on the front and set back the little thingy (supposed to hold papers I think, now enjoying a derust bath) and of course restore the plastic.

For now, temperature was really too cold for me to stay longer in the garage and called it a day.

To be continued...

 
Last edited by a moderator:
When I started reading about your replacing the glove box with different material, I immediately thought that you were going to use your pizza boxes as material. But noooo..., you had to use metal. Oh well...carry on with your good work.

 
Last edited by a moderator:
@midlife

Lol :D

-----------------------------------------------------------------------

2 of the packages in transit for weeks finally arrived. Made me forget the misery weather!


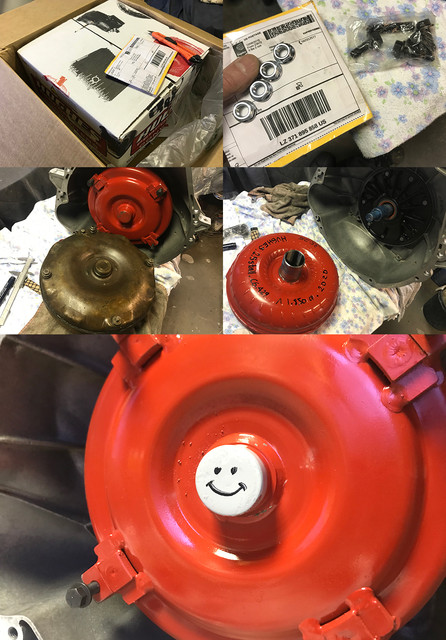
One of them was my converter. A Hughes 35-25, 12 inches, with a 2.2-2.5k that should behave nicely with my not too wild cam. I went for a Hughes mainly because for the specs I wanted it was together with another brand the only 2 offered for a human price.

The other similar in price/specs, wasn't on E-bay while this one was to be found with the global shipment option on via Jeggs. Meaning shipping of this heavy baby would not double the price: sold!

I'll spare you the story, just that Hugues contact/support emails on their site are totally useless. Via via got their tech dude claiming the converter is like the original (with studs) but that 4 nuts (not provided) are required. When you know 4 of these would arrive for above 80 buxx here via Summit or similar which is kind of.... nuts, I've looked hard online and got my 4 non metric bolts grade 8 this week for under 20. They arrived the same day as the converter.

Once the box open, said first some bad word loudly as it came without studs, grrrr but then was nicely surprised once I've lifted out, to see 4 bolts were provided!

Glad I did not order the nuts for the gold price... Why can't they just describe their product properly, answer the mails??

I need 4 nuts in engine bay and these may very well be of the right size, so a smile was back on my face!

Tho before having a happy dance, I first made sure the converter was meeting each and every specs. Lubbed both shafts, poured some oil into the converter and tested it..

Yes! Both shafts indexed in it nicely, all turning smoothly with zero play and the crank pilot was as it should be.

To celebrate, primed the pilot as the paint was damaged and wrote some tech stuffs on the other side for the future me that will prolly forget what kind of converter I've bought back in 2019 :)

Placed it back in the box: Converter: check!


Then came back to my unfinished glovebox. Plated the "paper holder" or whatever that is, just to say the original spirit is there and placed it back. Then cut the rubber to size, freed the screw holes, restored the plastic.

I'll test fit it back in the car later on, for now, I can mark the glovebox done too!


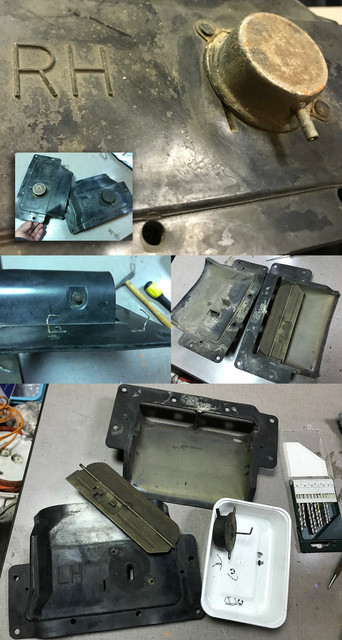
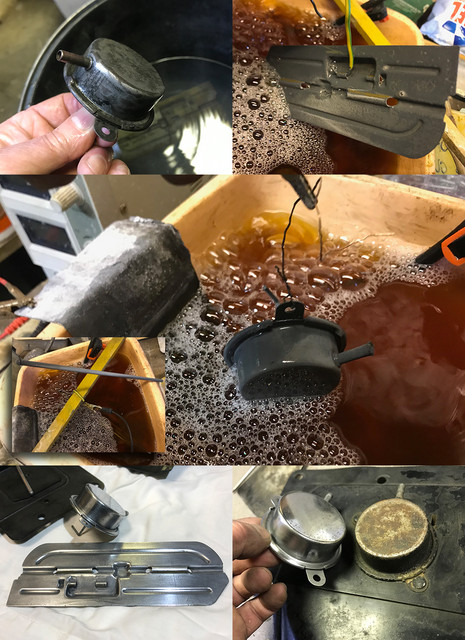
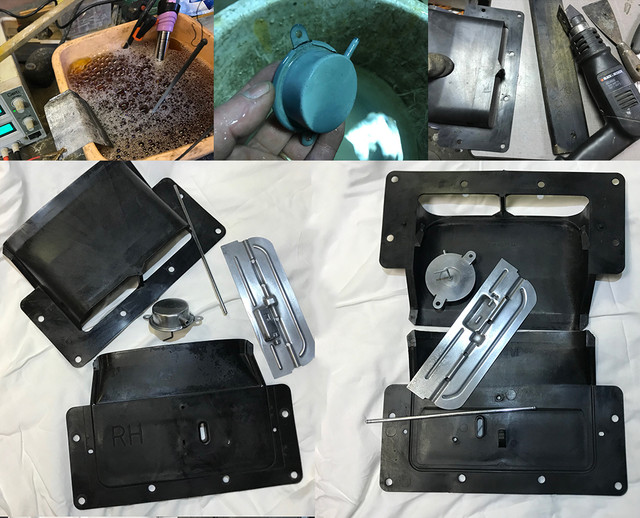
Went on to my next patients: the ram-air scoops. Dirty, rusty and full of overspray/ugly paint. Mainly Gold and black from the Hertz themed paint job.

First step was to put them appart. As I do not want to loose anything, I'll do one at a time. Good news is that both vacuum actuators work, so I will not have to open them to restore the diaphragm.

Once the 6 rusty staples were out, it opens with no problems as I was expecting some glue in between, but no. Removing the butterfly was more difficult as the axle is rusted and could not be pushed from the outside. Had to use some force, carefully, to expend the plastic a few mm and get the axle out. Re-installing it back should go much smoother.


Once out, a little persuasion with a small hammer got it loose. Both of them are should look much nicer tomorrow.

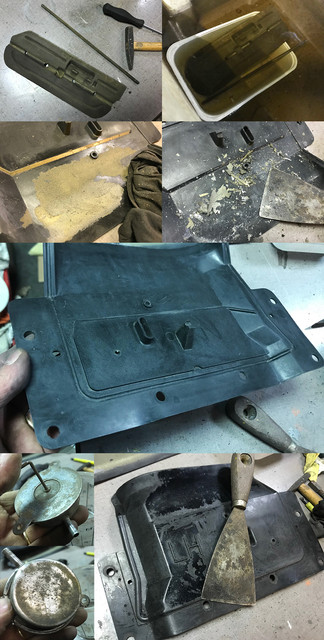
A good thinner wash showed me the paint was almost dry when it landed onto the plastic, so using a flat but not sharp knife (don't want to damage the plastic) I was able to lift it all from the inside.

The outside is another story, paint much thicker, tho managed to get rid of a big deal already.

As I don't trust paint remover on plastic, looks like I'll be enjoying this tedious work a little longer tomorrow..


Cooked during the nite and ready this afternoon, the axle, butterfly and actuator went thru my magic vinegar soup and after a quick soapy wool massage,

got them all to a state they haven't been seen into for decades. Comparing the to be done actuator makes it more obvious! :D

Tried the axle and as expected, it now slides into the butterfly smoothly, so reassembling the scoops together should go much easier.


With generations of oversprays and dirt also gone, the plastic looks much better.

I need to find staples and a plastic polish paste as the surface isn't nicely even. The inside will do fine as is.

If I can get the other side looking as good as this one I'll be a happy man!


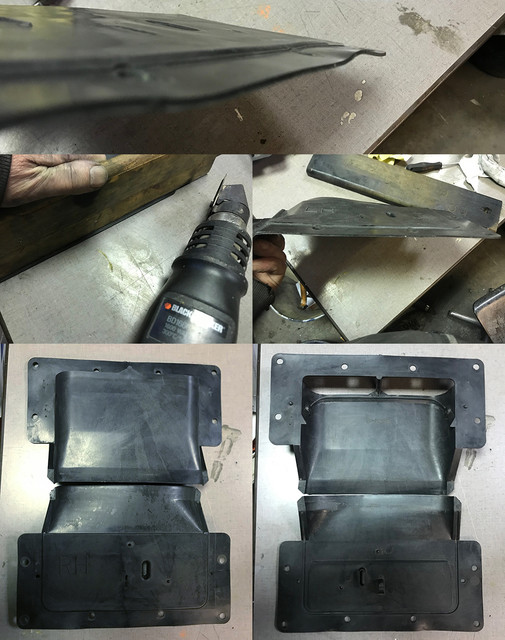
In between paint removal and plating, also corrected the edges with heat. Very carefully blowing hot air and pressing them flat. Some places were really wobbly. Even if it translates the quick way they were assembled originally at the plant, I couldn't let them like this!

The RH side was more tedious for the paint removal, but got eventually everything off of it. Reviving the plastic will be done later on, hopefully using some plastic polishing paste if I can find some by next weekend.

The metal parts not yet cooked (when it's cold the acid takes more time to be effective), I couldn't plate this side today, so rest of the afternoon went on cleaning the garage a bit, and prepping a new bracket for the KD cable on the trans, will post on that next time unless my shifter parts finally arrive next week.

All with all, another weekend with many time consuming details now done! Well almost :)

To be continued...

 
Last edited by a moderator:
Looking good, as always. Too bad the chromates are so hazardous, it would be nice to duplicate that yellowish coating without resorting to gold plating :)
Yes, yellow or white/blue passivation would be great,

But that's where I draw the line. I use only harmless chemicals as I hope to live long enough to actually enjoy the car finished ! :)

Most annoying is that using yellow or white/blue chromates, I'm just a dip away and wait till it's dry! Getting that iridescent purple/yellow finish.

Tho over here, I could only get the white/blue thru Germany, as its a level 3 hazard (yellow is 4 and restricted to pro use) and can be purchased in low quantity without licence.

Requires extra insurance costs for shipping too. 

Btw got a question you might know an answer to.

I'd like very much to set back plain nails as the original ones. Do you know how they are called and/or which tool I'd need to mount them?

EDIT: nvm, found tool+nails.

 
Last edited by a moderator:


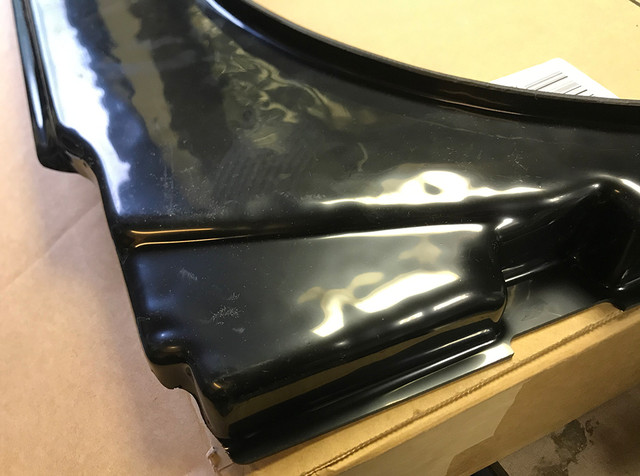
What the hell is that goo poo... thing? I hear you say!

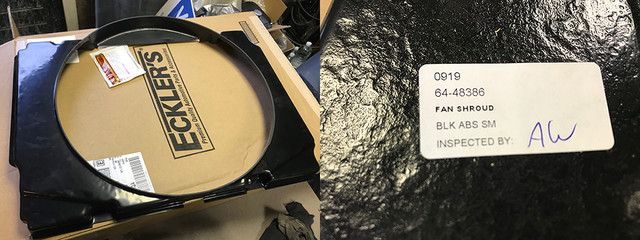
Well gentlemen, this magnificent piece of shite sold for just $105 (got it with $10 discount) with $125 shipping, $45 dollars import taxes is my long awaited quality repro 429CJ fan shroud (DOOZ-8146-D) that finally arrived today!

I've contacted 4 US companies to buy it, 2 replied. 1 of them wouldn't sell it to me claiming it wasn't for Mustangs at all! (thx to my friend @Secluff knowing serials better than them, I knew it was the right one!). So ended up ordering it by the one that seamed to know a bit about what they sell and actually wanted to do business: Eckler's. All 4 companies sell the same item that is from Mac antique cars.

On the site, the text and image described something I wanted.

https://www.ecklers.com/radiator-fan-shroud-abs-plastic-429-v8-90-48386-1.html


Made In The U.S.A. High quality reproduction....

Ridiculous considering, but had got a good laugth as on the other side (which reproduces the texture of the moon after a nuclear attack), some sticker shows that this thing was actually inspected!

The sticker even got a note written by hand! How authentic is that!? Now, it says "aw". As it can't be "Awesome" is it short for "awhhhh" or "awful"??

Let's just say USA made isn't what it used to be... what used to be a rare thing is now practically 1 on 2 items I receive the case: The quality I pay for isn't there.

So this expensive piece of shapeless ABS plastic will now cost me even more time and money to be corrected.

Of course as sending back isn't an option, I'm gonna send some spicy mail to Eckler/mac just so they know what I think about their controlled quality...

I now regret to not have sticked to my first plan that was to make one myself out of aluminium! @Motor City Mustang even took time to send me picts of his original and took measures I could have used for that.

I have tons of the todo, but I might very well do it at some point and throw this expensive abomination away if fixing it is too much work.


Oh well, it's Mustang time and temperature being bellow freeze, can't stay still staring at this thing any longer. Let's get back on the scoops where i've left them last week...

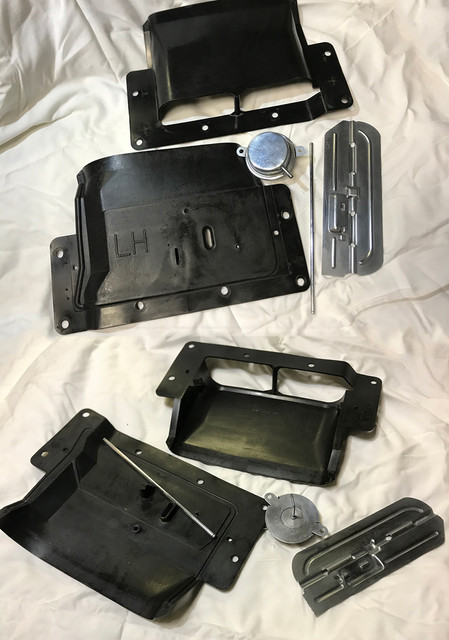
Finished the RH metal parts and heated straight back the covers as the other side and revived a bit their apperances. Its ABS plastic day today afterall :)


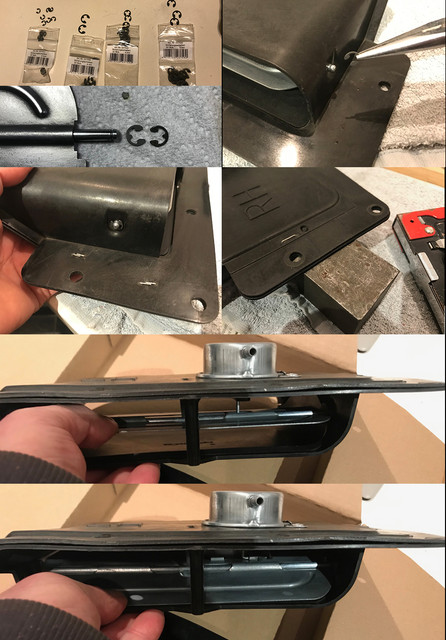
Time to reassemble: It took me a while to get the right term in Dutch to get them before the weekend, but found in an RC shop my "axle securing washers" (that's the dutch translation) and they arrived by post this afternoon. Perfect timing!

These are found in mutiple places on our cars and never had some in case one would fly away (and they often do that). As the scoops ones were corroded and hard to plate, decided it was the time to have some in different radius in house. The 4mm are the exact replicas of the original ones! (top left pict, new and old) As no tiny flat heads solid rivets with short tail were to be found, placed the nicest SS ones I had in house instead to hold the canisters. If I can find some one day, I'll replace them as I'd prefer flat ones as the originals.

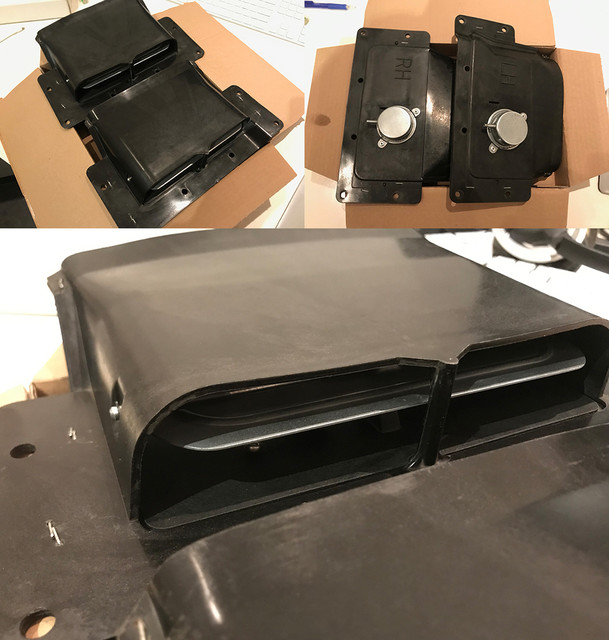
The plastic still looks a bit wavy, but is flat once screwed on flat surface and should look fine once back on the hood.

The staples were somewhat challenging and wasted at least 10 before have them all back in or very near original holes. Their legs are a bit longer, but as it's not visible, dit not cut them. When I'll polish the plastic, i'll prolly brush them black.

Once all was back in place, tested all and it seams like I have good looking & functional scoops again!! yeah! :)


I still need to find a way to polish that abs and get rid of its ancient scars, but if you compare the "before" picts of last week with these, you might undertsand why I'm a happy man!

Now time for a super long hot shower. brrrr!

 
Last edited by a moderator:
Xmas was 2 weeks ago, was for me today, as after weeks of delays all the goodies I was waiting for showed up this past week. First box was the most necessary: a new heater, mine died a few weeks back, and with the dog weather we have, it was nice to keep a dry pink nose vs a red one with a drup while busy :)


Another one was the long awaited package from @OZCoupe72 that stayed forever at the Dutch customs.

Thanks to Mick, I could finish my shifter with his handle and few other details.

As I've replated the spring and nuts of the tensionner, some efforts went into finding the right tension to change positions and lock nicely into the teeth of the guide. Moments later I could mark the shifter as done!


Rest of the day was about installing/putting together some of the tools that also arrived (at least one should be in action by tomorrow). And went back to what I've started last week: make new bracket for the kickdown cable that also arrived from China. Quality is same as the expensive Lokar that I have on the 73. Nice SS braided sleeve with SS cable, nice nuts etc..virtually identical except on the price.

As I want a shorter cable than on my FMX, which I know now is quicker said than done, the linkage being in the way and needs to be higher than the trans shifter axle to inverse the push to pull motion while keeping the traveling distance identical as the original lever. To get there, looks I'll need to spend much more time than I did on the FMX.

Did 3 prototypes already this afternoon and looks like I'm gonna need to make a 4th one before be able to have the one!

In another register, mailed this week to Eckler's about what I think of their beautifully crafted fan shroud and most importantly asked them what they think/will do about it. Not formulated using the most diplomatic verbosity ( I'm french after all), the automatic reply promessed 4 days ago a reply within 1 to 2 working days (they did reply within 2 days when I've requested shipping costs details). Till this day nothing. Either Eckler's is playing the chicken card or they already are busy fixing some urgent internal affairs (working day and night making a new one to honor their good name) or they are in shock, speechless after they saw the pictures of their high quality product and need few days to recover before come back to me or, and as of today that's the most probable: they don't care at all and hitted the delete button!

I'm gonna wait bit longer before they can enjoy the sound of my french accent, but I want and will get a reaction from them!

I've looked at that thing today (my eyes bled again) and I just can't let them go away with this that easy. It's criminal so bad.

I'll keep you informed on how that story develops if it develops at all... Meanwhile stay away from Mac's/Eckler's or make sure you see before buy.

 
Time for a little update!


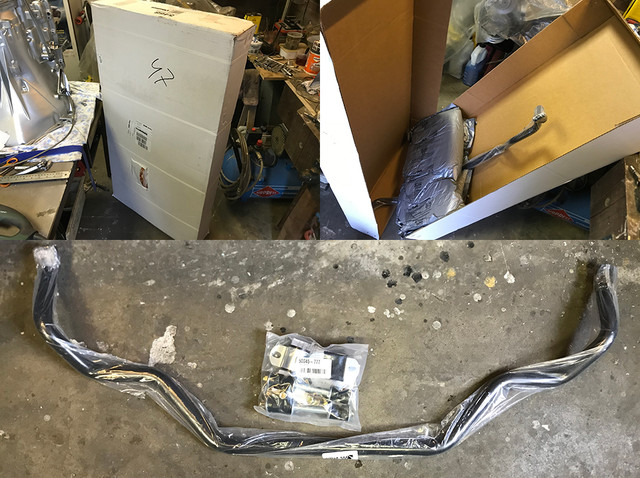
Day started with discovering my swaybar that came this week.

The box was huge, I was kinda worry it would become a problem as my space/storage is more than limited, but no, the box was full of nothing :)

After at least 30 years without, this car will finally have a swaybar back on!! The 429's supposed to have a bigger one than with other engines, of 1 inch but also made of unnobtainium, so found this nice #5468 swaybar from Belltech that is just a bit thicker (which cannot hurt) and it was on E-bay offered with a human price. Sold!

Frustrating a bit to not be able to try that baby yet, oh well, at some point in time, it's gonna be xmas everyday!! :)


Did not post past Sunday because I've spent whole Sunday making prototypes brackets for the kickdown that will be actuated by a cable.

Not that I like making prototypes, more because it turned out to be much more complicated than anticipated. Made 4 to pick the right angle, traveling distance and orientation and finally got the one in place. The hole that is actually not a round hole nor a rectangle to lock on the axle was also fun to make! :D

Why brackets btw??

Just like for the FMX kit used last year on the 351c, the cable kit for C6 is nowhere near what I want: short exposition of the cable, no hanging, have the cable in line with lever for a good pull.

I would gladly use the KD rod that I have, but Holley Sniper's are not aligned exactly the same way and do not support the Ford kickdowns anyway.


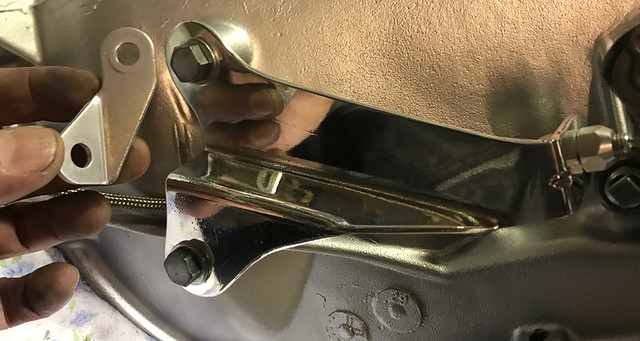
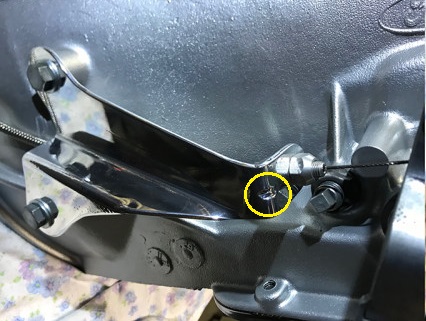
Next was the bracket to hold the sleeve, tension the cable. There too, easy pizzy I thought.... well not quite, tho less challenging than the tiny lever.

Made few carboard models and 2 aluminium prototypes before get one that had the strength to not bend when cable is tensioned, have the smallest distance from the lever while shifter linkage in all positions, be in line when pulling, not touching the round trans casing, allowing the belt nut to be accessed and last but not least, have a shape that follows the lines of the transmission to please my eyes! :)

The two challenging babies allowed me to test my new polishing wheel. Doing more and more plating lately, and with all the fabs that I plan to do, I thought it was time to invest in one.

No regret, it brought the two newly made parts to a chrome like finish without a drup of elbow oil! :)


Here just to compare what the kit provides for the same purpose... nah!!! :D


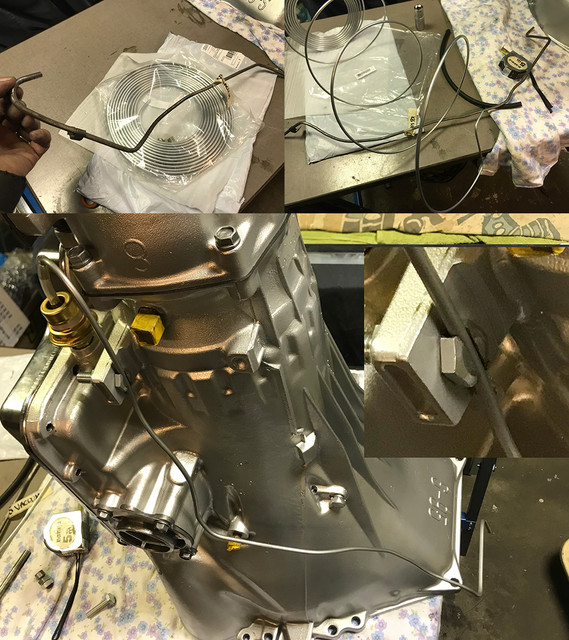
Next on the todo was to replace the old vacuum line, totally floating on the trans, out of shape and rusty. The idea was to create some kind of stud/bolt that would keep it in place.

All was fine till I realised I couldn't keep the radius that was just the tube diameter, as I just have inserted it before bent the tube. Making the hole bigger allowed it but too near of the side

I've ruined the bolt :( Oh well, no biggy as I think a plastic one will do a much better job... but no idea where to find that perl...

Also for once I have flaring tools in US size, I've ordered tubes in metrics! duh! So couldn't flare the ends nicely. So will have to buy a metric one as I plan to fab few brake and fuel lines later this year too.

Oh and back to that Ecklers's story with my melted horror fan shroud. It took a while and a few nicely formulated emails to get an answer, but finally got a reaction!

And not a bad one! They've actually controlled their stock and found out they have quite a few in similar condition.

They told me they have ordered a series of new ones and should be done by the end of this month. The manager promised me to personally check the part before ship it.

I'll have to wait and see the part here, but for now, looks like I might have what I've payed for mid February after all...

 
Last edited by a moderator:
Another horrible weather weekend passed...

Ideal weather for not very thrilling stuffs that need be done anyway. Been so busy lately, I could not bring the energy to post anything as I use to.

so trying to correct that today.

Not entirely sure what I'll do with my interior (the door panels especailly), make new ones or restore.

As the driver panel is already out, I decided to find out first before eventually re-fab everything what I can save...
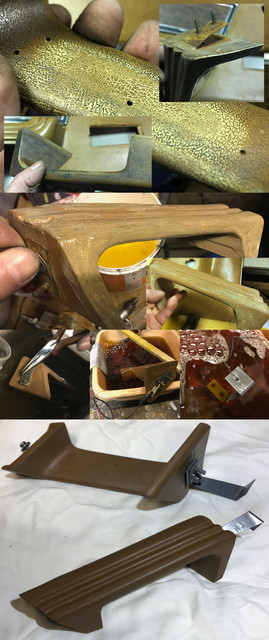


Everything in the interior looks bad, faded, dirty, damaged: all but the freshness I'm after.

I started by experimenting with all kind of things to see what's gives most success. From thinner to biting chemicals. The first victim was the door handle. Very ugly, corrroded...

Many drups of elbow oil later, after agressive treatment, derusting and plating, my driver handle ended up looking not so bad, in fact, it's looking pretty good now. Aside the absence of one nut, if I can save the other side same way, I think, i'll be able to reuse them.
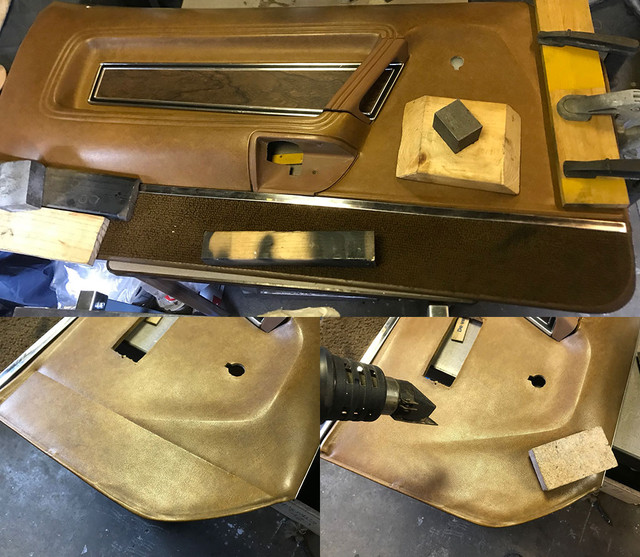


Started last week, as the panel was distorted big time at the top front and behind, I've let it under pressure for the whole week, with weights and wooden bits underneath to force the distorts back.

It's bad weather, so let's use that moisture in the air me dunk! After a week, the massive distort was gone and just a massage with heat and cork block did alright to refill the air bubbles in the foam underneath. If I need make a mould of it, I need it to be straight anyway...
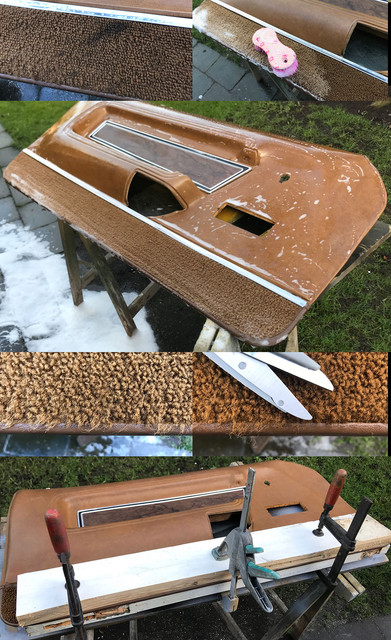


Almost black from dirt, the carpet abused with shoes for years at the front showed some wear, so after a very good cleanup, a hair cut: what do you know, the color regained freshness and the panel started looks way less bad than before. As the bottom is totally warped along the length and the board now soaked in water, I've removed the chrome trim, clearly bended, air blowed all the water I could from the carpet and placed all under pressure between 2 serious piece of wood.

See you in one or two weeks to see if that helps!
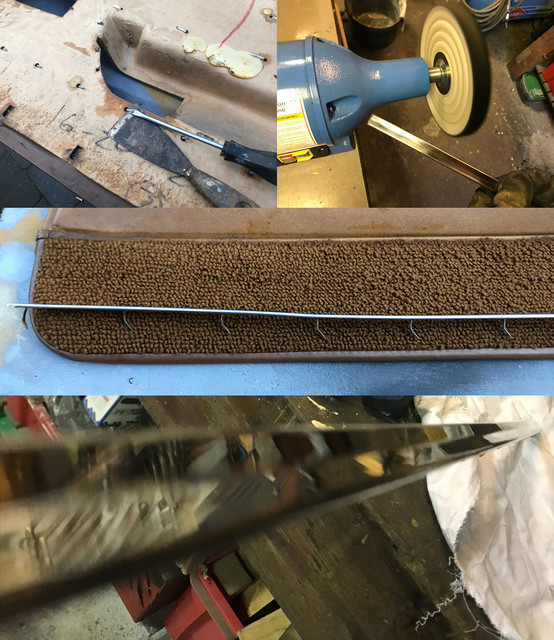


Just before the press, removed the trim, while full of dents and wrong curves, it was just like the panel, not straight at all.

So now that the panel is set to dry slowly in shape, I've carefully restored the straight line, and as the trim was having lots of scratches, gave it some love with my new toy and in no time, it was back to a mirror finish!
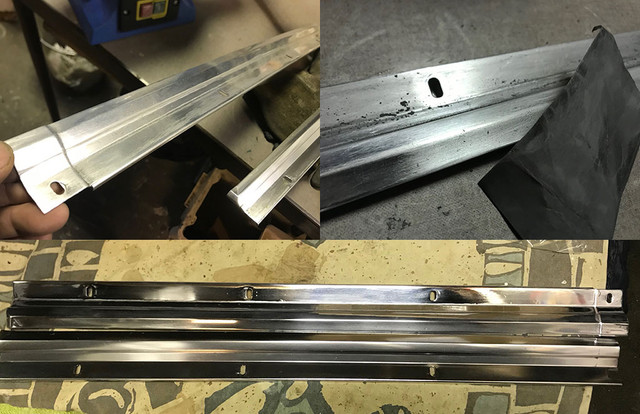


In between panel parts restoration, as the machine was now on table, also gave some love to the really corroded windows trims that I could not really get to a satisfactory level by hand. Bling bling now!! The more I use it, the more I think I'll love this machine! :)


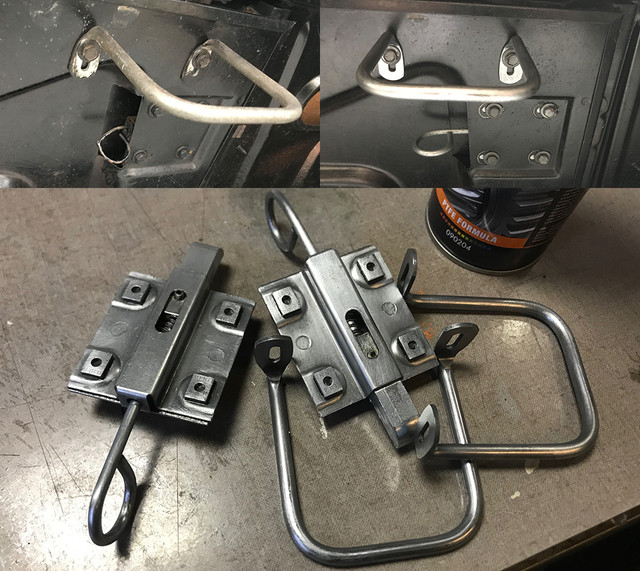
Still raining outside, went back to the car and picked my Sunday activity: the fold down door latch locks (or whatever these are called)

Totally in their juice, not really moving smoothly making difficult to lock the latch in place and the right side having a funky replacement for the original handle. I've started by cleaning them real good, and while some were in acid, others in plating bath.

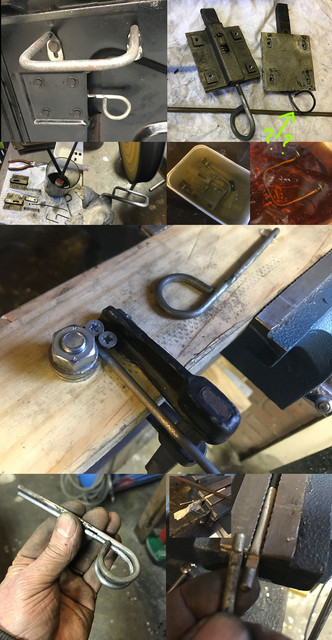
Went busy and tried to reproduce the missing pull handle. Luckyly, among my "you_never_know_it_can be handy" stash of old metal, I had an an iron rod, originally made to open windows curtons in house. Rusty yes, but the exact radius and strength I needed!

Using the right one as a patern to define the bending shape, made some primitive but strong setup with washers, screws to bend the quite strong rod to the hopefully same same as the original one.

Not really disappointed by the first attempt, with the help of extra hammering efforts, it gave me an almost identical part. Last detail was to file a recess for the lock allen screw and I was pretty much done!
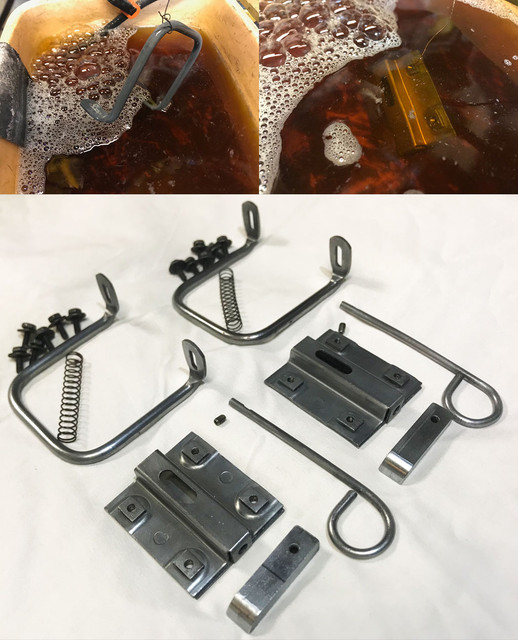


Fast forward after each and every bits of both sides went thru cleaning, polish, derust and plating. I ended up with 2 sets as new :) The funny part is that the original actually looks less nice that the new one!

Next weekend, i'll put these back together and go back to the panel. I'm investigating ways to inject foam, as there is a hole underneath a big crack I need to repair. All depends if the stuffs I've ordered will be there on time or not.

To be continued...

 
Last edited by a moderator:
Hopefully I didn't miss it in your description, but I am curious about the notch you made in the center of the bracket's end where is bent 90 degrees and has the cable attachment (bottom left picture). That's an interesting notch to make the angle bend stronger. How did you do that?

Edit: this is what I mean


Last edited by a moderator:
Hopefully I didn't miss it in your description, but I am curious about the notch you made in the center of the bracket's end where is bent 90 degrees and has the cable attachment (bottom left picture). That's an interesting notch to make the angle bend stronger. How did you do that?
I have strong teeth!! :)

tho in this case I might also have placed the part locked in vice with wood in between. as the angle is 90 deg, I used an old chisel with a not too sharp edge (pretty round actually) set at 45 deg and slammed it to desired depth. A square tube placed on one edge would so same but not very handy to slam on it. In this case, the bracket is made of 3mm aluminium folded slowly and as the cable once properly adjusted should never offer a great resistance, it's probably overkill but simply liked the extra!

 
The site was down this weekend and couldn't post an update. And then I forgot :)

As its still cold and still wet, I've continued spend my past weekend afternoons on small things...


First task was to put back the restored latches/locks on the rear door. I''ll remove them again when I'll handle the door/trunk but wanted make sure all was ok. Even with a non aligned setup, the door now opens and closes as it should and the handle looks a whole lot better than it was! :)


Also test fitted the glovebox made a couple of weekends ago and aside 1 screw that did all it could to resist to align and engage, all was fine. This one will also be removed when i'll restore the dashboard, but if some changes needed be done, i wanted do them now. No need as it fitted as a glove!


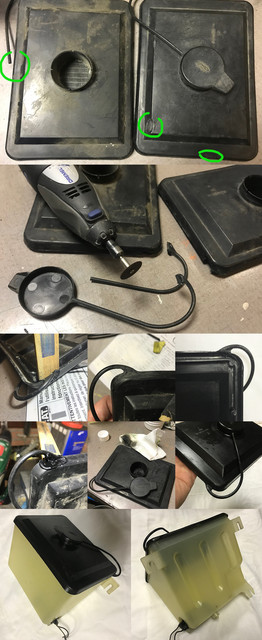
A while back, received a bunch of used parts from Indiana and Wisconsin. Among them a supposed to be fonctional windshield reservoir. Turns out it was not that great, not even functional, but as I kept the old one of my 73 (using a much smaller hidden one and have double oil filters where its supposed to hang on it)

I've compared them and saw the reservoir was nicer, the lid without any burned marks but the cap was gone. So performed a little transplant plastic surgery (pun intended). Few cuts, plastic melts, cleaning and sanding further ended up with a good as new reservoir. Tested the pump dry and looks like all should be fine. Not even sure Ill use it as it takes lots of space but at least I have it in good condition now.


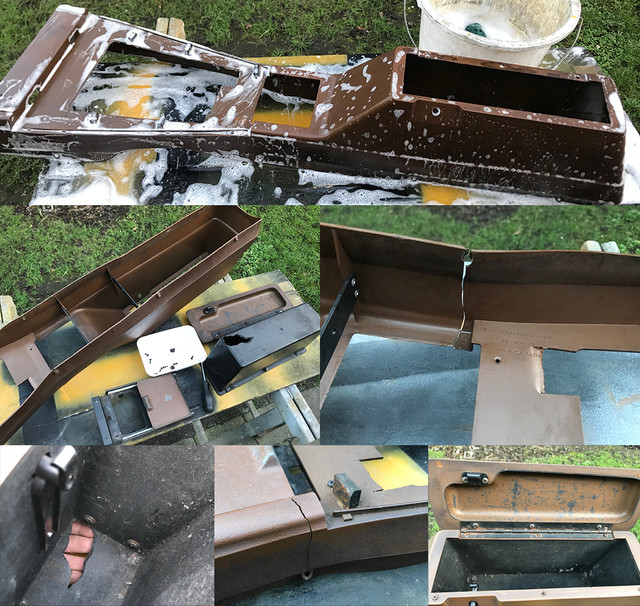
As I was into the car, removed the dirty and ugly long console to get a better looks at the misery.

In between clouds, put it appart and gave it a good cleaning wash. After a good inspection, looks like this one gonna need a massage to regain a bit of its lost youth... :)

Lots of breaks and dents, holes... reminds me my grille!


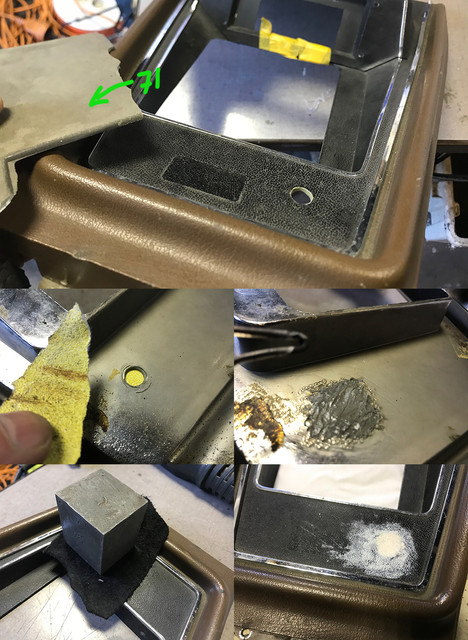
Anyway, so started with the top, which had some hole drilled for some reason, prolly a switch or light. Went pick another piece of the old donor 71 grille and used that to fill the hole. An era correct patch if you will :)

The challenge here being to keep some of the grain. Started by filling the melting plastic with a piece of sanding paper to keep it flush but not flat may i'd need to sculpt a tad later on. Once done, prepped a tiny bit of bondo, and right before it started to cure, placed a piece of real leather with similar grain onto it and left it that way. I have yet no clear idea how that will look, but it should look better than with a hole.


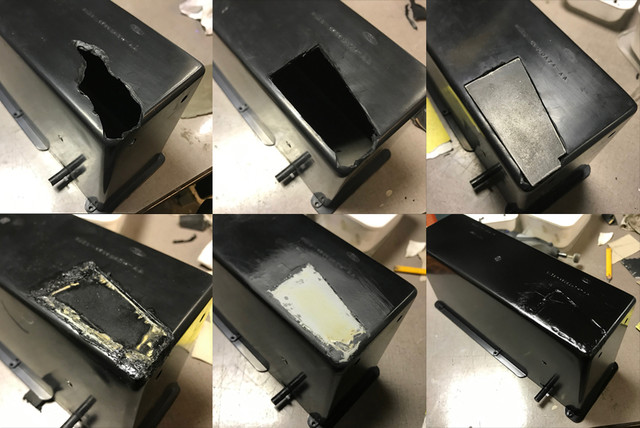
The next patient was the inner box. How one can and did make such hole in there is a mystery. For that one picked a straight part of the old grille,next to the corral for another era correct patch :) because the shape was too complex, I started by making it worse but with straight lines to ease the template making. Once the the template was fitting ok, did the hot surgery and after a quick sanding it ended up not that bad. Too cold to continue, I'll fine tune the little defects later on. For now even if repaired rougthly, I'm pleased the patch worked nicely and the box regained its strength...

I still have more smokey fixes to do on the console, but so far so good!

Meanwhile I've kept the door panel under pressure for another week as it wasn't yet completely dry.

to be continued...

 
Last edited by a moderator:
Nice work as always. Did you have a set of plans or dimensions/cuts/bends for the glove box insert that you would be willing to post?
I'd gladly share if I had one. But as you can see on previous page, I've used the old mouldy cardboard to cut the aluminium. The trick is to use the center of the folds, which are much wider on the cardboard than what you need (depends on thickness that you use and folding direction). Also you need to drill at connection points which isn't in the original, so the metal doesn't get ugly folds. For the rest, it's pretty straight forward. I did it using 1mm sheet, but regretted a bit not use 2mm, which would have allowed me to solder instead of using rivets.

It's not original, but I think its a pretty alternative to the cheapo cardboard.

 
First task was to put back the restored latches/locks on the rear door. I''ll remove them again when I'll handle the door/trunk but wanted make sure all was ok. Even with a non aligned setup, the door now opens and closes as it should and the handle looks a whole lot better than it was! :)
You may want to wait putting in those very standard door handles until you've seen mine (in about 4 years I think) coz they'll look awesome and you'll want them too.

Just saying ....
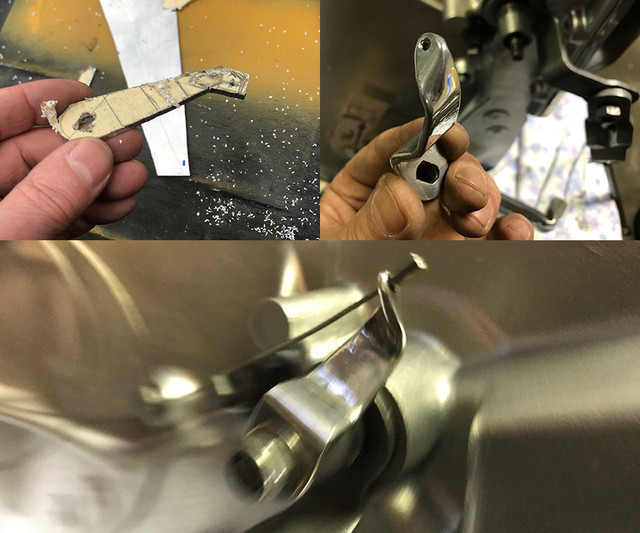
lollerz lollerz lollerz

 
Back
Top