Fuel Float Sender Adjustment

7173Mustangs.com

Help Support 7173Mustangs.com:

This site may earn a commission from merchant affiliate links, including eBay, Amazon, and others.
Joined
Jul 19, 2016
Messages
2,140
Reaction score
173
Location
Omaha, NE
My Car
1971 Mustang Convertible
Hi ALL, I don't know if I'm posting this in the right category. I've installed a new stainless steel sending fuel unit with a plastic float (no holes in it LOL). How and where exactly do you have to adjust the float arm for it to give an accurate reading? Do you just bend the arm close to the float or halfway on the arm? No matter how I bend it I can't get 70 ohms which it should show I believe.  I measured the resistance and I get 10/77 ohms empty/full or full/empty (don't remember). Thanks!

 
10-13 ohms indicate a full tank; 67-70 ohms represents an empty tank.

Here's how I calibrate fuel (and oil and water) gauges: make sure I have a 1/4 tank of gas. On the back of the dash cluster is the constant voltage regulator. Usually, there is a small post or screw (sometimes buried in epoxy) that can be turned to adjust the output voltage. Adjust the screw such that the fuel gauge reads 1/4 tank. Your other gauges will follow the changes, so the resulting oil and water temperature readings will be your new normal.

 
Lots has been discussed on fuel tank replacement and sender unit replacement.

When I did mine, new tank, SS lines and ethanol resistant rubber lines where needed, the method chosen was to add 5 US gallons, 19 liters, to the empty tank. With the car sitting level, it should have read 1/4, but didn't. It showed about 1/8th. Not being the electrical type, although I did measure the Ohms prior to installing, I did it the hard and possibly messy way. Using two floor jacks, one at each jacking point along the left side rocker, raise the car as high as possible so the gas won't leak out when the sender is removed. DO NOT forget the jack stands as well before going under the car!!

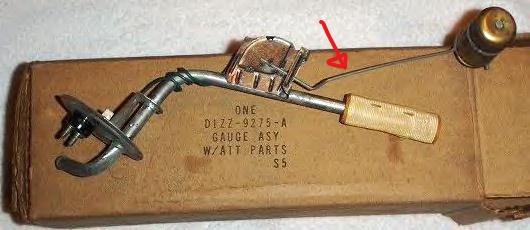
It was a bit of trial and error, but all I did was to bend the arm downward slightly where it is bent anyway. Reinstall and see what reading you have. In my case I hit it right on first time, got lucky I guess. I don't really care if the gauge read FULL, but I do care when it reads 1/4 or less.

Hope that helps,

Geoff.

 
Last edited by a moderator:
You know the full and empty Ohm readings, so you bent at the the pivot point, where the arm is welded/soldered to the sensor. Once you get it to the min/max Ohm range, then it's permanently set. If you need to tweak it later on, you bend it about an inch away from the pivot point outside the bracket that limits the movement.

 
You know the full and empty Ohm readings, so you bent at the the pivot point,  where the arm is welded/soldered to the sensor. Once you get it to the min/max Ohm range, then it's permanently set. If you need to tweak it later on, you bend it about an inch away from the pivot point outside the bracket that limits the movement.
Borrowed this pic and added an arrow approx. where mine was "adjusted".


On initial install, before adding fuel to the tank, make sure you are reading 70 ohms. This will confirm that the float is at, or above the bottom of the tank, so it will read empty on the gauge. You can then tape a piece of foam or wood to the bottom of the float and insert the unit into the tank and see if the ohm reading goes down. If not, you may want to bend the arm down a little, you don't want it to show empty too soon. If it reads less than 70 ohms, initially, you'll want to bend the arm up some, until you read 70 ohms with the tank empty.

 
Back
Top