


- Joined
- Jul 21, 2012
- Messages
- 3,292
- Reaction score
- 76
- Location
- South Florida
- My Car
- '71 Mustang Mach 1 M-code "Soylent Green"
'68 Plymouth Satellite
This is a partial repost from the progress thread from Soylent Green (my '71 M-code). Since it's buried in the 26-page progress thread, I figured I ought to split this off here for future/easy reference:
First off, to remind everyone as to what the trunk corners looked like on my car when I first got it:
This is what I'm starting with. Since there is a possibility that you may start out with corners that have been repaired in the past, let's go through the inspection process as well.
I've already ground off the paint a bit to find out where we have hidden filler. You can see some pink marks in the trunk stop divots (1972+ deleted the divots, possibly earlier), which is filler stuck in the divots that needs to be cleaned up:


The real problem can be seen from the reverse - these ends were previously patched ages ago by a bodyshop that brazed said patches directly over the rot. All of my cuts have to work past this rot, but - preferably - leave the divots intact.

I used the Milwaukee angle grinder with the rotary brush to clean the ends up, but I cleaned up the divots as shown:
(Hmm - shirt is inside-out. Does that mean I'm getting another Mustang?") )
)

The RH looks pretty much the same as before, but the left...oh, boy!


I shot them in primer to see the damage/repairs better:


Now for my not-so-secret, secret trick: Replacement corners...without having proper replacement corners. Coupe guys have it easy because they can chop up a taillight panel for the longer channels used on that bodystyle, and the rot usually accumulates there instead of on the curve as on Sportsroofs.
Using two ends cut from parts cars (BIG thanks to Eric for the LH section!), I chopped out the lower channels. Problem is, the channels are too short on both, and I don't want to chop up a taillight panel to lengthen them:


Enter alternate solution - cut the curved bit that faces upwards:

And about 1.5 hours later of banging, cutting, bending, and cussing:

The round end of a ball-peen hammer worked to form a rough divot, which I wound up flattening due to not needing it at all:

Repeat for RH side, using the LH panel from Eric's donor:

1.5 hours later:

Another hour later and the channel has been re-shaped (read = beaten and ground) into the proper straight line:

Two workable ends. Granted, RH side is a bit nicer, but I'll take whatever I can get:

RH corner cut and donor panel cut to fit:


LH was in such bad shape that I had no choice but to cut it short. Enough of the dimple survived to look passable:


These are the original ends, cut out of the car. Get a load of the cut-and-shut rot patchwork. Good old bodyshop work - always dependable, always disastrous.

Test fitting. A sheet steel section will be placed in the remaining gap on the LH side:


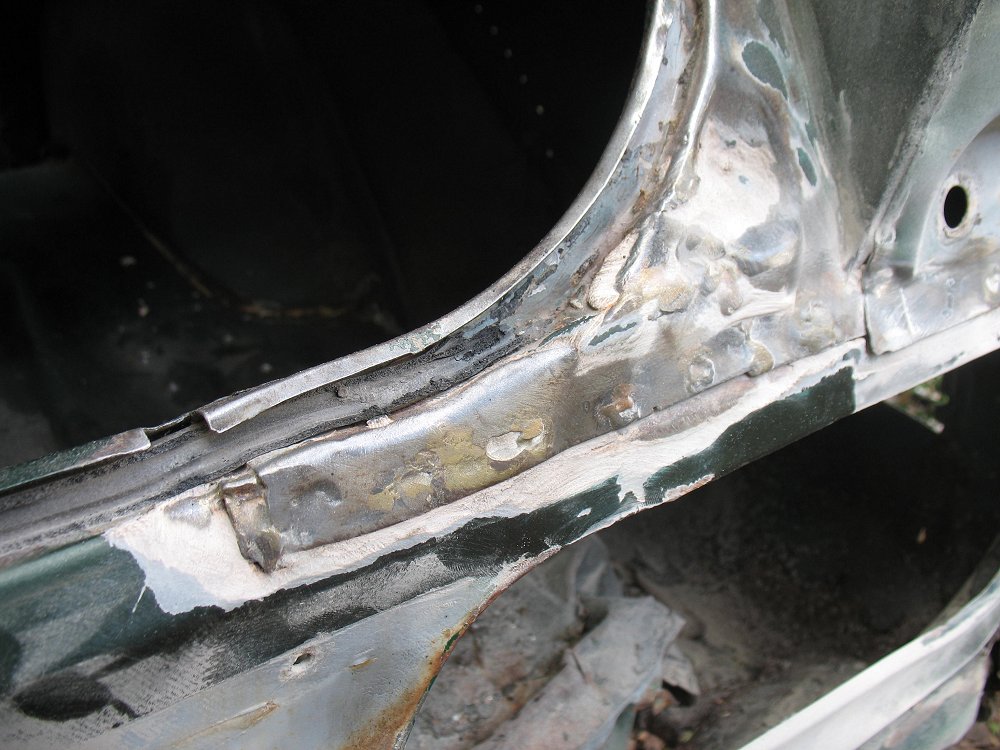
Welding time.

Welding these ends was a nightmare - wherever I thought I'd cleaned up the brass, I'd find just a bit more, and it'd blow through. Somehow, I got away with this on the RH side:

LH in progress. Note the copper sheet that I use to ground the MIG welder's electrode (wire) around the larger gaps.

Corners are freestanding now. They may appear to be at the wrong heights in this picture, which is not the case. They're a bit flexable, and the taillight panel merges with them perfectly and level when pinned in position:

RH:

LH:

7:30pm and closed up for the day:

Open to any questions!
-Kurt
First off, to remind everyone as to what the trunk corners looked like on my car when I first got it:
This is what I'm starting with. Since there is a possibility that you may start out with corners that have been repaired in the past, let's go through the inspection process as well.
I've already ground off the paint a bit to find out where we have hidden filler. You can see some pink marks in the trunk stop divots (1972+ deleted the divots, possibly earlier), which is filler stuck in the divots that needs to be cleaned up:
The real problem can be seen from the reverse - these ends were previously patched ages ago by a bodyshop that brazed said patches directly over the rot. All of my cuts have to work past this rot, but - preferably - leave the divots intact.
I used the Milwaukee angle grinder with the rotary brush to clean the ends up, but I cleaned up the divots as shown:
(Hmm - shirt is inside-out. Does that mean I'm getting another Mustang?
)
The RH looks pretty much the same as before, but the left...oh, boy!
I shot them in primer to see the damage/repairs better:
Now for my not-so-secret, secret trick: Replacement corners...without having proper replacement corners. Coupe guys have it easy because they can chop up a taillight panel for the longer channels used on that bodystyle, and the rot usually accumulates there instead of on the curve as on Sportsroofs.
Using two ends cut from parts cars (BIG thanks to Eric for the LH section!), I chopped out the lower channels. Problem is, the channels are too short on both, and I don't want to chop up a taillight panel to lengthen them:
Enter alternate solution - cut the curved bit that faces upwards:
And about 1.5 hours later of banging, cutting, bending, and cussing:
The round end of a ball-peen hammer worked to form a rough divot, which I wound up flattening due to not needing it at all:
Repeat for RH side, using the LH panel from Eric's donor:
1.5 hours later:
Another hour later and the channel has been re-shaped (read = beaten and ground) into the proper straight line:
Two workable ends. Granted, RH side is a bit nicer, but I'll take whatever I can get:
RH corner cut and donor panel cut to fit:
LH was in such bad shape that I had no choice but to cut it short. Enough of the dimple survived to look passable:
These are the original ends, cut out of the car. Get a load of the cut-and-shut rot patchwork. Good old bodyshop work - always dependable, always disastrous.
Test fitting. A sheet steel section will be placed in the remaining gap on the LH side:
Welding time.
Welding these ends was a nightmare - wherever I thought I'd cleaned up the brass, I'd find just a bit more, and it'd blow through. Somehow, I got away with this on the RH side:
LH in progress. Note the copper sheet that I use to ground the MIG welder's electrode (wire) around the larger gaps.
Corners are freestanding now. They may appear to be at the wrong heights in this picture, which is not the case. They're a bit flexable, and the taillight panel merges with them perfectly and level when pinned in position:
RH:
LH:
7:30pm and closed up for the day:
Open to any questions!
-Kurt