When a 1968 Plymouth Satellite 4-door enters your life...

7173Mustangs.com

Help Support 7173Mustangs.com:

This site may earn a commission from merchant affiliate links, including eBay, Amazon, and others.
First - while looking for those radiator studs, I wound up finding a workable kickdown stud - a new repop of a Max Wedge crossram bellcrank stud:

MWPP.jpg


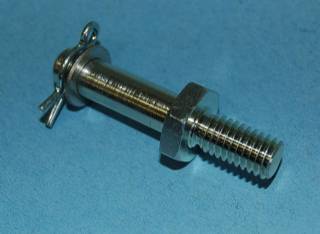
It's pretty much the same thing as the small block kickdown stud - with threads. Brewers Performance confirmed that the stud is 1-1/16" long (the same as the swedged SB piece) and should bolt right in the Mopar Performance Magnum bracket. If the threads are too small to fit snugly in the bracket, a captive bolt should center it.

As for actual work on the car:

1/2" spacer arrived today. The linkage clears the intake now, though the included carb studs were too short. Threw on these for the moment until I dig up a set in a suitable length:

2dm7fyo.jpg


And here's my little sacrilegious HEI unit beautifully hidden with a Designed2Drive heatsink adapter for Mopar distributors:

x639e.jpg


It looks great under the hood, in that it pretty much disappears!

6f369v.jpg


With a Ford E-core coil in place here (I hope to modify a Ford coil bracket to mount onto the original canister coil adapter), the HEI unit should be next to invisible:

35m19xy.jpg


2e0uzqa.jpg


-Kurt

 
A few proper daytime shots of the build:

2a7icsm.jpg


210fyvd.jpg


I took a hammer to the 318's original return spring bracket and reshaped it into something usable on the straight-up Magnum mounting boss:

b5mxhu.jpg


The MP conversion throttle bracket has been installed, seeing that the pivot pin should be a bolt-in:

208d66e.jpg


Mopar ECU wiring harness...

24q0qow.jpg


...meets HEI, the way I like it: Half-invisible.

2njc94j.jpg


The ballast resistor was cored out and a piece of wire soldered in its place:

s4cu1g.jpg


Reinstalled - and clocked properly, as the PO had pointed the leads straight down, interfering with the heater control valve. Not anymore.

14ikg7c.jpg


In preparation for the cooling system flush, I performed some athletic sanding of the mating surface on the problematic thermostat housing/water outlet. No longer a problem:

553x9c.jpg


-Kurt

 
Last edited by a moderator:
Made a quick stop to the junkyard (not the one I got the engine from) today to scout out a few things. I must have gone by 30 Magnum 5.2's and 5.9's this time. Yard was CRAWLING with them, though every single one looked quite rough.

20rvati.jpg


I was able to pick up two really nice Magnum air cleaners (and could probably have come home with 20 more), which I quickly found out are useless to me. They sit comically high on the 4-barrel Summit carb (and probably all others), plus, the bottom of the pan hits the float needle adjustment screw due to the clearance needed for the small-diameter filter element.

Looks like I'll have to dig up a proper air cleaner off a 1970's 4-barrel application. Good luck to me, for there wasn't a single carbureted Dodge in the junkyard that would have yielded one cheap ($100+ for an air cleaner on eBay is BS in my book). Not even any pre-'92 TBI engines. And I'm sure as hell not putting one of those plastic Dakota lawn sprinkler ducts on top of this build.

2jcygp3.jpg


On the right is a Ford E-core coil bracket, which I intend to modify to mount onto the factory, small-block Mopar canister coil bracket. On the right is a little gem that I found on a 1992 Ram (oldest Dodge on the lot there) - a dual-row power steering cooler.

The dual-row power steering cooler looks much like the old single-row units on big block Mopars. It's just the ticket as a slightly over-the-top-looking power steering cooler that still looks period.

Unfortunately, it was designed to mount right on the block in the same spot my power steering pump is located. A bit of home-brew engineering would be needed here.

I wanted to use something that would look similar to the stamped steel bracket used on big block Federal pumps equipped with coolers, so I took the magnetic timing pickup bracket from the van, pressed it flat, and welded it to two pieces of curved steel cut out of the original 318 flexplate.

9uxh1c.jpg


2n6f1mv.jpg


The not-so-complete, but satisfying result by the end of the evening:

2e0qo45.jpg


2q34vex.jpg


The only SAE pump reservoir bolts I had from the PS pump rebuilds were studs - so I have two studs protruding from the back of the pump to mount and center the bracket, hence the curved shape. All works out rather well, I'd say.

By the time the whole thing is done, it should look something like this:

2cxf7mu.jpg


-Kurt

 
Last edited by a moderator:
After one failure to solder the power steering cooler correctly yesterday (fins weren't clean enough to take the solder), I'm pleased to report 100% success:

xba8lt.jpg


71pkif.jpg


And it looks even better under the hood:

2ls7hqe.jpg


2lc367q.jpg


Not bad for a junkyard cooler mashed up with a magnetic timing pickup bracket and a few pieces of flexplate. And it even wears a stamped Mopar part number on it - bet that'll drive someone on Moparts nuts in about 50 years.

I'm not 100% willing to rely on the solder though. I'm going to fabricate a pair of brackets to fit onto the original mounting tabs and MIG them at each end. I'll feel more confident that this thing won't one day melt itself off into the P/S pump pulley.

-Kurt

 
One of the fellows on the Mopar forums asked why I had modified the ballast resistor rather than delete it entirely. My reply said quite a bit about the build, and I thought I'd share it here too:

I like the look of hiding all the little modifications or stealthy upgrading to newer parts that look like older parts. As a result, the whole enchilada looks entirely familiar - yet, it's completely different, requiring more than a few double-takes to figure out what kind of visual parts trickery is going on. It doesn't let in on how subtle it is until you give it a good look.

Take out the resistor, and that's just one less illusion, possibly betrayed further by the splice and solder required to join the factory terminals.

Packaging everything under the hood of a beater 4-door B-body is just icing on the cake. It may not be a real RK41 police Belvedere, but as a clone, I'm able to build it more as a Mopar fan's fantasy of what we really wish most police car packages to be - some kind of stealth, untouchable unicorn of a performance package, with a whole bunch of oddball goodies under the hood that look cool just by virtue of being out of the norm.

More often then not, most of these packages are not much different than their performance model equivalents, but the legend of factory go-fast bits in an unassuming plain white wrapper remains quite the emotional draw. That, and I'm sure that scoring performance bits cheap off a decommissioned car back in the day was the period equivalent of scoring some Trick Flow 440 heads for nothing on eBay today: It's the thrill of the bargain-basement hunt.

Needless to say, the real thing often falls short of our imaginations, but what fun is that? I let my imagination run wild here, and built something straight out of Jake and Elwood's Small Block Cop Car Performance Cookbook (on sale at all retailers, beginning the summer of '81).

At any rate, a beat-up '69 CHP Polara with a 440 gets my attention faster than a HEMI-powered '69 Charger Daytona, and I'm sure I'm not the only weirdo who thinks like this.

There's a good possibility the 318's original valve covers may even work their way back onto this thing too. The clips keep the wires looking very nice and orderly, and I'm not sure I care for that plastic click-in-place oil fill port on the Magnum covers. Plus, it's a dead giveaway that there are Magnum heads on this thing (though, strangely enough, I don't mind advertising the fact with the Maggie covers).

-Kurt

 
Are you gonna paint the PS cooler black? PS, good find. Haven't seen a double row before. I'll have to keep a look out for one.
Of course. I'm waiting to weld a reinforcement bracket on it first before I commit to fitting it under the hood permanently.

The double-row seems to be unique to 5.2/5.9 Magnum applications, part number 52038018. They're on eBay for a ridiculous price new:

http://www.ebay.com/sch/i.html?_from=R40&_trksid=p2050601.m570.l1313.TR0.TRC0.H0.X52038018.TRS0&_nkw=52038018&_sacat=0

The Max Wedge bellcrank pivot stud (for a cross ram intake) arrived today:

153leyp.jpg


...and it fits perfectly. Makes you wonder why MP didn't put it in the kit in the first place, as they include it with their Max Wedge bellcrank kit.

160ess4.jpg


However, the pivot itself is about 0.5mm larger in diameter than the original, and the bellcrank wouldn't fit. Not until I put the bellcrank in the drill press, anyway. Now it fits perfectly:

21eh50.jpg


And so, a happy, over-complex, $20-more-than-it-should-have-cost solution to what should have been a non-issue in the first place. :banghead:

-Kurt

 
Last edited by a moderator:
Mostly Odd Parts Assembled Randomly.... :p
Not too far from the truth this time around. Got my Ford coil pigtail today, and soldered the leads between it and the HEI unit and factory 12v power source, thus making the complete 360 between Mopar, Ford, and GM parts. Now I have to figure out where I can shove some AMC bits. The Magnum valve covers might actually qualify, seeing as the bolt pattern appears to take inspiration from AMC engineering.

I still have to kludge up some sort of exhaust behind the manifolds before I can fire it up and fill the cooling and power steering systems, but it's not that far off from being ready.

The black paint I used on the PS cooler came out awful. Might have to strip it and start over. It HAD to be on a part like this...

-Kurt

 
Last edited by a moderator:
Power steering pump cooler is finally painted installed and plumbed. What a mission - the first paint job was a disaster. This thing is NOT easy to strip of paint, as can be imagined:

s3dovb.jpg


10frkvq.jpg


Fabricated my Ford E-core coil bracket too, mounts directly to the factory intake bolts. Best part? I found a bunch of NOS Accel spark plug ends and a few two-piece, hammer-together clamping tools in my Dad's old diesel parts stash, which gave me the opportunity to cut up a special short wire for the coil (temporary, until I have new wires for the whole thing):

2ike14x.jpg


And - possibly the biggest thing that I've kept mum about - I've painted the original covers. I just can't go through all the effort of making this engine look period, and blatantly give it all away with those Magnum covers. Plus, I've missed not having the spark plug wire guides. Like the power steering pump, I screwed up the first paint job on these and had to strip them this evening. Pain enough to do it once in the day, twice just stunk!

jr8pap.jpg


292wneq.jpg


-Kurt

 
Last edited by a moderator:
Stealth Magnum!

xelv81.jpg


8xndcz.jpg


2j5c0tc.jpg


Whoever came up with those looms was a genius. Also modified each line to a better length and crimped 90 degree Accel connectors to them. Not really keen on how loose the fit is at the dizzy though.

-Kurt

 
Last edited by a moderator:
Honestly, sometimes these little problems can be downright sadistic.

3169q8l.jpg


Case in point, the throttle adapter bracket finally came in for this thing. I went through the effort of locating a proper factory throttle/kickdown stud to ensure the throttle cable would sit parallel with its mounting bracket, as the current Holley studs place the throttle cable outboard of the bracket next to the kickdown.

HAH!

dwp4k0.jpg


Go figure, turns out this thing is perfectly engineered for the Holley stud. :banghead:

Doesn't anyone bother to document this crap? I can't be the first to run into this, but it's not as if it's common internet knowledge, apparently.

Plus, the throttle return springs from the 2 barrel application are WAY too stiff. I'm going to try some generics, but I hope I can find a factory-looking two-spring setup that isn't this stiff.

-Kurt

 
Last edited by a moderator:
Move the return spring bracket back 1 intake bolt.
Now I feel like an idiot. I've had it bolted on top of the stock A/C compressor bracket boss all this time. Changing from the LA intake pattern to the Magnum pattern threw me off.

I love easy fixes!

-Kurt

 
Last edited by a moderator:
Not much tonight, other than I discovered that the van rim I pulled in the junkyard - which I mistakenly thought was a 16" after I pulled it - turned out to be a minty, 1980's Mopar 15x7" rim. Perfect rim for the spare, as I'll need 15" rims minimum to clear the Viper calipers up front.

Rim is at far right:

24ypg76.jpg


Thing is, I know, swear, and insist that this thing had a huge 16" tire on it when I got it - and somewhere here, I have video of me removing that thing in the yard. I also removed that tire with a manual tire remover, and I'll say one thing right now: It wasn't loose enough to be a 16" tire on a 15" rim. No way, Jose.

Yet, the rim is marked 15x7" Made In Canada, and the hoop is the exact same size as my Dippy police-spec rims, and it's an inch smaller than the 16" rims on the family's recycle bin on wheels (read = a Kia).

Someone must have magic-ed this thing into a 15" rim when I wasn't looking. I'm not complaining.

-Kurt

 
Last edited by a moderator:
Thanks, Paul!

In other news: The Holley 20-37 doesn't even come close. Shaft diameter is notably bigger than the throttle cable holes:

2pzwqpf.jpg


That, and it's a VERY loose fit - the threaded end has no business in a hole this size.

8wcv2a.jpg


I saw more than one source advertising this piece for "GM," and I'm about ready to believe this shaft has NOTHING to do with Mopar applications at all.

I put the previous Chrysler stud on it for the moment. It works as is, but I don't like it. We'll see.

-Kurt

 
Last edited by a moderator:
Back
Top