Paint guys, HELP!! SEM Hot Rod Black problems!

7173Mustangs.com

Help Support 7173Mustangs.com:

This site may earn a commission from merchant affiliate links, including eBay, Amazon, and others.
Joined
May 15, 2011
Messages
3,538
Reaction score
447
Location
PA
My Car
1971 Mach 1 Mustang
Hey guys I need some help. I'm working on this 71. I just shot the bottom of the rockers black the other day with SEM hot rod black. It turned out really nice!  Then today I come out and there are several spots where it's cracking and crinkling!! I shot the body with PPG deltron 2000 and then cleared over it with PPG clear. I let it sit for 2 days then taped it off, scuffed it and shot the bottom with the hot rod black. What do you guys think happened? Should I have have left the clear longer to set up before shooting over?? What's best way to try to fix this? Sand it down , shoot with primer sealer and try again? Here's some pics. I did same thing with doors and they turned out great?? Ideas??


This is from PPG's site. Might help get to the bottom of it....... Or maybe some of our experienced paint and body guys can give you some better ideas. Looks to me like the SEM didn't like the substrate.

Peeling

Appearance:Evident as peeling or easy removal of the finish.

Cause

Improper substrate cleaning or preparation.

Contamination (air lines or from the original finish etc.)

Wrong choice of undercoat for particular substrate e.g. aluminium, zinc coated metals or plastics.

Incompatible layers of paint.

Prevention and Cure

Clean all surfaces to be painted to remove wax, grease, polish and other foreign materials, before any sanding and again before any spraying. Sand thoroughly to provide sufficient 'key'. Use metal conditioners where specified.

Use only undercoats recommended for the particular substrate and top coat finish being used.

Use only recommended cleaners and primers for plastic substrates.

If peeling has taken place remove the finish for an area considerably larger than the affected area to a sound base and refinish.

Or

Blistering (from Contamination)

Appearance:Irregular pattern of blisters appearing in the dried paint finish.

Cause

Improper substrate cleaning or preparation.

Contamination (air lines, shop tools, old finish or previous repair).

Prevention and Cure

Clean all surfaces to be painted and remove grease, wax, polish etc.

Ensure compressors and air lines are drained regularly and kept clean at all times.

If blistering has occurred, sand affected area to a sound surface and refinish. In extreme cases, remove finish down to the metal and refinish.

 
I once painted an entire VW Bug and the paint cracked just like had to strip it with thinner and repaint.

Most common cause is putting lacquer on top of enamel paint or vice versa or improper prep before painting.

Tim

 
I had the same thing happen when I put a base coat down too wet, it didn't like the substrate primer. The web site calls for an EPOXY primer, OMG! https://www.semproducts.com/manage/html/public/content/techsheets/sem_tds_hot_rod_black_kit.pdf

You'll get it fixed. Chuck

 
Well I think I figured it out from doing some reading and talking to the paint shop. When I shot the yellow base and then the clear, as I got down to where the black was going to cover I sprayed less and less. Especially the clear. So most of my troubles are on the underside of the rockers and rear quarters. It seems that the base coat that didn't have much or any clear over it, reacted with the single stage black paint. So I am going to sand down the trouble areas, then shoot with sealer, then spray the black again. Thanks for the replies fellas. If anyone else has any suggestions, I'm all ears! This is why I weld, not paint!!

 
Well I think I figured it out from doing some reading and talking to the paint shop. When I shot the yellow base and then the clear, as I got down to where the black was going to cover I sprayed less and less. Especially the clear. So most of my troubles are on the underside of the rockers and rear quarters. It seems that the base coat that didn't have much or any clear over it, reacted with the single stage black paint. So I am going to sand down the trouble areas, then shoot with sealer, then spray the black again. Thanks for the replies fellas. If anyone else has any suggestions, I'm all ears!  This is why I weld, not paint!!
I do collision/paint work for a living and you are correct in the above reply as to what caused the paint to lift imho.   As soon as I saw the photos you posted I was pretty sure that the black lower color lifted on the areas where the basecoat ended and didn't have a good film build.   You probably had enough base  coverage on the bottoms of doors as to why they didn't lift.

Anyways I would re sand all the lifted areas/ featheredge and apply a good epoxy to create a good barrier to keep it from doing it again.  Make sure to spray epoxy on the whole area you plan on blacking out so you don't have the same problem.

PPG has a real nice epoxy in black that would give you a good ground base that way  you wouldn't have a lot of additional coats of color to apply for coverage.  This is the new dplv epoxy not the old dplf.   Its pretty good stuff.

Hope this helps and good luck, Brent

 
hey kevin, how cold has it been in your garage? I not real familier with ppg anymore. I do know some of their clears are pretty slow. any urethane will stop crosslinking (drying) at a certain temp. 59 degrees and up usually is safe. in other words. If you paint a car in the afternoon say at 70 and at night your garage cools off to 50 degrees. the clear can slow way down. some clears can be worse about this than others. so 2 days dry time may not really be 2 days. ask your supplier or look on line at the technical data sheet for air dry times on your clear. I think this may be the cause of your issue. also air temp vs metal temp can have an effect. I would seal the whole area as I have found the sem will look different over areas that have been spot primed. at 100.00 a kit. I wouldn't want you the find that out the hard way. it will blush on damp rainy days,so watch that. also epoxy sealer will work better to "lock down" any areas that have lifted. start with light coats on those areas, let the spots dry, sand if you need to , then go from there. hope this was some help

 
hi kevin me again. if you spot prime or spot seal and sand those areas still seal the whole area you are repainting. Revsitup made a good point about thin spots of clear possibly being the source of this problem. I've had that happen to me on parts that have been" cut in" the day before.

 
Hi Kevin,

OK, this one's a fairly common issue, and i run into this very problem from time to time myself.

I will start first by talking about curing and curing times. You said you used PPG clear. But which type? If you could tell me, i'll pull a tech sheet on it and confirm whether the clear you used is a bake only or a bake and air dry combo clear. In your case, you spray in your garage, and don't bake the paint after you apply it. You let it air dry. If it's a bake only clear, you have bought trouble on yourself, as it will take forever to cure and harden out properly. If it's a combo bake or air dry clear, you're good to go.

However, ambient 24 hr temps play a part in air dry cure out times as well. For example, if it's fairly cold, cure out will take longer to achieve compared to temps being hot. Heat is the accelerator in speeding up the curing and hardening process. In your case, if you have used an air dry clear, and let it dry for two days, with an average temp of around 73 Fahrenheit, that would be OK. However, any colder ambient temps would call for a longer cure out time, and also depending on how much paint you applied - eg, how many coats of clear you sprayed on.

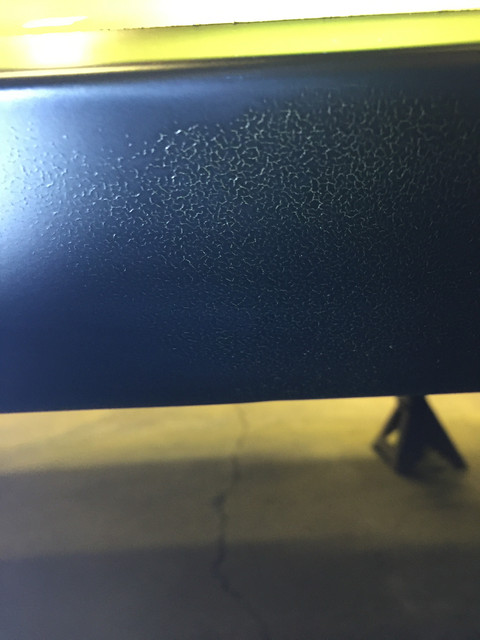
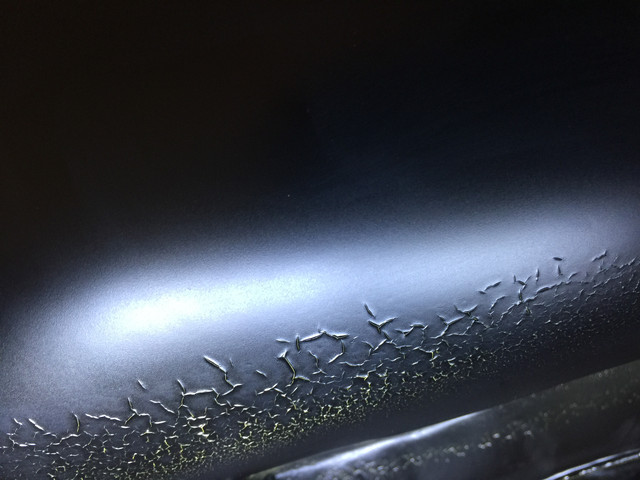
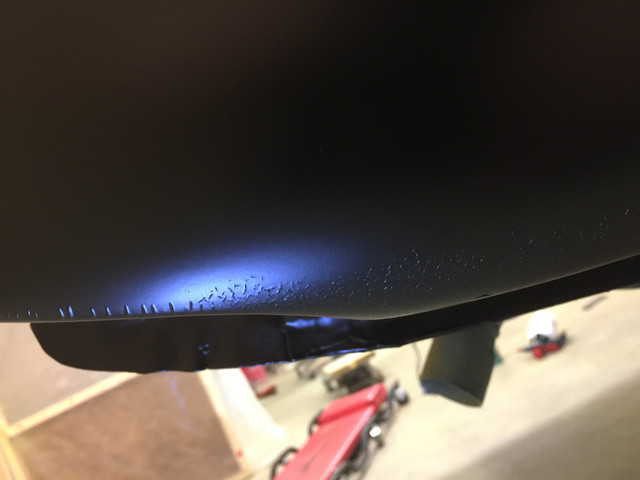
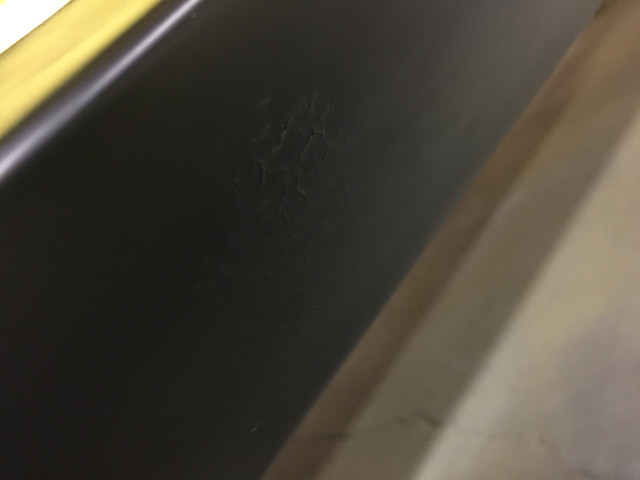
So getting back to your problem, the first thing to bear in mind, is how well your 2 pack clear was cured when you started to apply your Hot Rod Black. If the paint film has not cured enough, it will have issues with accepting fresh solvents, or in other words, it will be solvent sensitive. The Hot Rod Black is a 2 Pack mat black paint. 2pack paint's solvents are more passive than Lacquer paint's solvents, which is a bonus in terms of solvent reaction issues in general terms. However, in your case, that did not save you, as you got a major reaction issue. The problem technically in the game, is called   crazing, frying or crows feet.

So what has happened to you here is a combination of two things. Firstly, your clear was not cured enough, and was to a degree, solvent sensitive, and therefore  prone to solvent reaction with frying up in places it did. Secondly,and what you said above is very true - the main thing that has let you down or caused the frying up is the thin clear film build. This problem is a common occurrence with most 2 pack clears. If the clear has been applied in a very thin or sparing way, and the film build is very small, then no matter how well the clear is cured or how old or hard it is, it will still be open to getting solvent reaction issues when you apply fresh paint over it. The wetter you apply the fresh paint, the more chance you will run into solvent reaction problems like frying or crazing. Sorry, but that is just the chemical nature of 2 pack clears on the market today. For example, i respray many new car color coded external mirror housings. The car factories tend to skimp on applying much clear to the mirror bodies, and therefore, i sometimes get frying issues when i repaint over them - not good i'm afraid.

So what's the remedy? Make sure you're using an air dry clear / make sure you give the proper cure out time, depending on ambient temps and how much clear you applied / and do not attempt to apply any new paint over any area that has any thin or whispy paint films as a substrate. If you had applied a couple of light to medium wet coats of 2 pack primer/ putty on those thin whispy areas first, or better still, the whole area you were spraying with Hot Rod Black, that would have gotten you out of jail, as you would have isolated off the dodgy substrate, and therefore provided a sound substrate ready to accept any solvents from fresh coats of paint. In your case, your Hot Rod Black. What to do now?  Bad news i'm afraid. The fried up paint has to be completely removed, as you can't apply any paint over it now to try and remedy the frying up problem. It does not matter whether you partially sand out the frying, and try to apply primer or putty over it to remedy - it wont work.

Bad paint issues, and spraying over them to get you out of trouble does not work, as they end up showing or coming through again latter on in time. You MUST completely remove all the fried up paint and get back to a sound substrate again, before applying any more paint. Once you have done this, i would then carefully apply about two or three coats of primer/ putty over the entire area you want to finish in Black, sand down, and then move into applying your Hot Rod Black. Don't flog your primer/ putty on with wet coats. Apply each coat in a medium dry/ wet fashion, and give each coat a good flash off time before applying the next coat. This application technique minimizes the risk of any more solvent reaction happening. You could use an epoxy primer, which is a good isolator, but it's probably overkill there, as your 2 pack primer/ putty will do the job of isolating off the thin whispy painted areas successfully. Primer/ putties, putties, sealers, and isolators all have very low solvent content, and are very passive in that regard. They therefore greatly minimize the risk of any further solvent reactions occurring to any a solvent sensitive substrate. With most 2 Pack clear coats,the standard default is two medium or medium wet spray coats of clear, be it HS or MS clear, and proper cure out time for no frying issues occurring. One light coat or a whispy light coat of clear is asking for fry up issues to occur, no matter how well that thin paint film has cured out.

The frying problem is all about adverse solvent reaction to an existing paint film - the remedy is to try and minimize the chances of this happening as talked about above. Hope that was of help Kevin, and best of luck with your respray.

Cheers,

Greg. :)

 
Thanks for all the replies Gentlemen. I didn't even mess with it this weekend, was very frustrated. I did plastic off the whole car and used Upol multiliner on the floor boards and wheel wells, so the weekend wasn't a complete waste. Also got some work don't on my sons go kart. Now I can tape off the black area sand it all down and shoot some sealer over everything. Should I let the sealer set up a day or can I treat it as a normal wet on wet sealer and just let if flash off as normal then hit with the black??


upload image free google


upload photo


upload facebook picture

Got everything taped off today and sanded down. Took all the bad spots down with 320 wet. Then hit everything with 400 wet, then 600 wet. Wiped everything down and it looks pretty good. Not as bad as I thought. I will spray some sealer over everything tomorrow after work then hit it with the black. Hopefully all goes well. Thanks for all the replies fellas!

 
Last edited by a moderator:
Thanks for all the replies Gentlemen. I didn't even mess with it this weekend, was very frustrated. I did plastic off the whole car and used Upol multiliner on the floor boards and wheel wells, so the weekend wasn't a complete waste. Also got some work don't on my sons go kart. Now I can tape off the black area sand it all down and shoot some sealer over everything. Should I let the sealer set up a day or can I treat it as a normal wet on wet sealer and just let if flash off as normal then hit with the black??
Hey Kevin,

First up, did you manage to get any info as to whether your clear is a bake only clear, or is it a combo, bake and / or air dry clear?

To answer your last question, my advice would be to apply your sealer (one to two coats in a medium wet to dry fashion, and let each coat dull off / flash off, before applying the next one) , and let dry for a day. Then sand down for adhesion / nib purposes, and refinish with Hot Rod Black.

I say that because putting your sealer coats on, and then moving straight into your Hot Rod Black means you are dumping too much solvent onto that solvent sensitive substrate, in a short time, and then risking further reaction problems happening to you. You may not get reaction, but it's a risk i wouldn't be taking myself, given the nature of what has happened to you so far. That's your decision of course. Always remember -  the name of the game is to minimize the amount of solvent you bring to the sensitive substrate.

Best of luck,

Greg. :)

 
Thanks for all the replies Gentlemen. I didn't even mess with it this weekend, was very frustrated. I did plastic off the whole car and used Upol multiliner on the floor boards and wheel wells, so the weekend wasn't a complete waste. Also got some work don't on my sons go kart. Now I can tape off the black area sand it all down and shoot some sealer over everything. Should I let the sealer set up a day or can I treat it as a normal wet on wet sealer and just let if flash off as normal then hit with the black??
Hey Kevin,

First up, did you manage to get any info as to whether your clear is a bake only clear, or is it a combo, bake and / or air dry clear?

To answer your last question, my advice would be to apply your sealer (one to two coats in a medium wet to dry fashion, and let each coat dull off / flash off, before applying the next one) , and let dry for a day. Then sand down for adhesion / nib purposes, and refinish with Hot Rod Black.

I say that because putting your sealer coats on, and then moving straight into your Hot Rod Black means you are dumping too much solvent onto that solvent sensitive substrate, in a short time, and then risking further reaction problems happening to you. You may not get reaction, but it's a risk i wouldn't be taking myself, given the nature of what has happened to you so far. That's your decision of course. Always remember -  the name of the game is to minimize the amount of solvent you bring to the sensitive substrate.

Best of luck,

Greg. :)
Thanks Greg! I will shoot the sealer tonight and let her sit a day before shooting the black. What's one more day to minimize the chance of the same thing happening again!  Better safe than sorry. Can I just hit the sealer with a grey scotch brite before shooting the black or should I wet sand it with 600-800?

And to answer your questions on the clear, My clear is an air dry clear but can also be force air dried.

Thanks for the help AGAIN Greg!!  You always bail me out! ::thumb::

 
Last edited by a moderator:
Thanks Kevin,

You're very welcome. Good news on the clear thing being air dry as well.

Yes, you could use the grey Scotchbrite pad to sand down the sealer surface for adhesion purposes, but wet sanding with 600/800 wet and dry is a much better deal all 'round. Your call there again. I WOULD USE THE SAND PAPER MYSELF.

Greg. :)

 
Nice job! It's hard to beat yellow and black.
Thanks Greg and Mike!  I looked at it this morning before work and so far so good!!

Mike, the yellow and black isn't bad, but I prefer silver and black !!  :D


Last edited by a moderator:
Back
Top