Advice on brake conversion kits

7173Mustangs.com

Help Support 7173Mustangs.com:

This site may earn a commission from merchant affiliate links, including eBay, Amazon, and others.
There is that to it, no question. Drums are not that hard once you've done a couple.
Oh, no. I've done a couple hundred. I still hate them.

A dozen springs, cables, self adjusters, shoes, and pawls you have to get in the correct place and install in the correct order.
Compared to discs where its a couple pins and the pads are out. The hardest part about servicing disc brakes is jacking up the car. :D
Lol! in that case, I retract my comment!! I never said I loved em , but I do agree, discs are nothing (much) by comparison.
 
I'm going to replace the manual drum brakes and go with the power discs up front and keep the drums in the rear. I see a lot of conversion kits out there, some seem more complete than others. What I'm looking for is a complete kit that will include everything for the swap. Based on everyone experience that did this, can anyone offer any tips on what to look for, best company for completeness, ease of installation and quality. Thanks
Here's my two cents... My vert already has factory "Floating Caliper" Disc brakes, which are good, but not great. When restoring my 1970 all-drum Mustang, I decided to go 4 wheel disc. I have been driving the 1970 Mach for over a year now, and they look great front and rear and work great, but I don't see a significant bump up in braking performance in my 70 four-disc setup over my 73 factory disc/drum. So if I had to do it over again, I would have stayed with rear drums. When I decided to go all disc the number of modifications needed increased exponentially... I now needed to make mods to rear axle brake lines, most kits use a GM Distribution block so the lines to the distribution block and the Brake warning light wiring and plug all need modification. Let's not forget the modifications needed to the parking brake cable to the rear disc brakes. None of it was very difficult, but was it worth the trouble?

So if you are looking to keep the cost down and minimize the amount of change and effort, then go with either a stock rear drum and front disc, or a really nice after-market front disc setup, where you can still use the factory lines, distribution block, and brake warning light wiring. Another option is to install a complete Granada front spindle and disc which I chose for my 70-all-drum swap. There were a few reasons why I chose the Granda Setup, the spindle hub/bearings are much stronger than the 70-73 factory spindles, the calipers are stronger than the factory 70-73 floating calipers, and its still Ford factory parts which are less expensive and readily available, but again they require some minor modifications at the caliper end of the brake lines, must use Granada outer tie rod ends with your factory tie rods. Also, Granada spindles have larger bearings, as a result, the hubs have a larger diameter, so many if not all original factory wheels have a hub cavity diameter that is to small. I found most aftermarket wheels will work.
 

Attachments

  • 20220130_115139.jpg
    20220130_115139.jpg
    2.9 MB
  • 20200408_142452.jpg
    20200408_142452.jpg
    3.1 MB
  • 20201106_190901.jpg
    20201106_190901.jpg
    2.1 MB
  • 20201106_190917.jpg
    20201106_190917.jpg
    2.1 MB
I also have a manual Drum Car and am also working on the brakes right now.

I am in the process of changing out all the lines to SS Disc lines.

Some observations.....

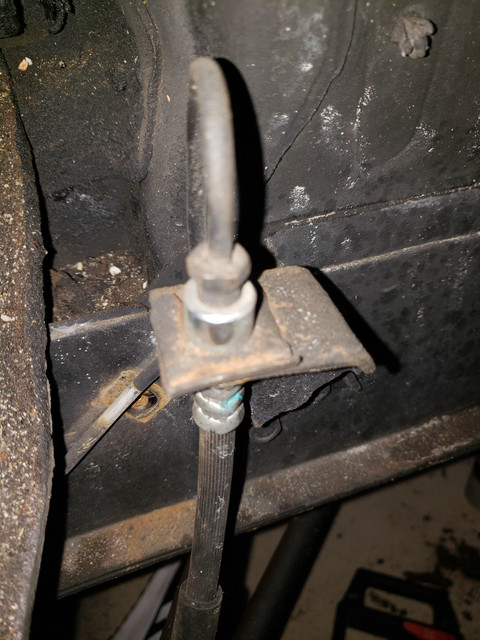
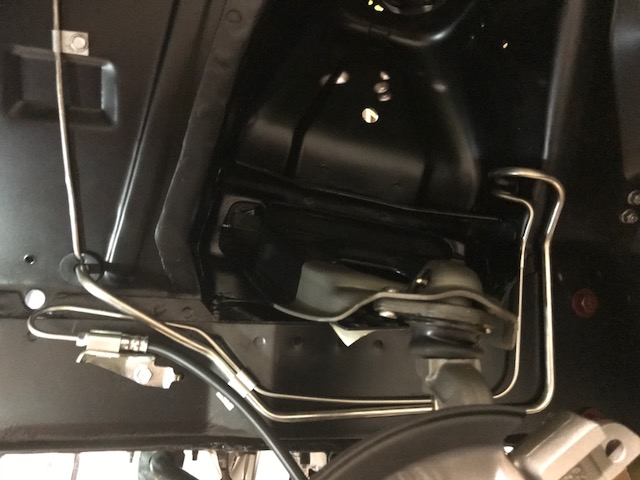
The Bracket that secures the front Brake Hose appears to be different on a Disc car than a drum car. When you get the Disc Lines, they will have bends in them that wont match up to your drum hose bracket, so you may have to bend them a bit. I did, and it wasnt hard.

Drum Car Bracket


Disc Car Bracket


The Ends of the Disc Brake Line Kit Will be different in some places than the Drum Line Kit. ie, the master cylinder lines will have different fittings. Depending on which proportional valve you use, you may need different fittings on the new lines. If you stick with Mustang specific parts, everything should work fine. If you go with an after market Proportional valve like I did, The ends will be different. If you go stainless, you do not want to be changing ends. So make sure you order the lines with the correct ends.
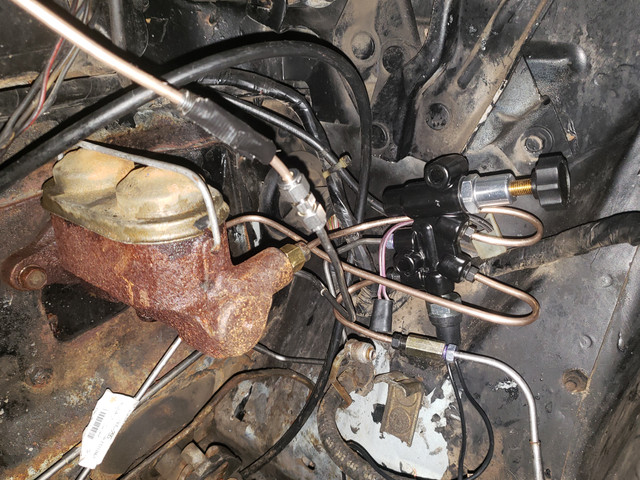


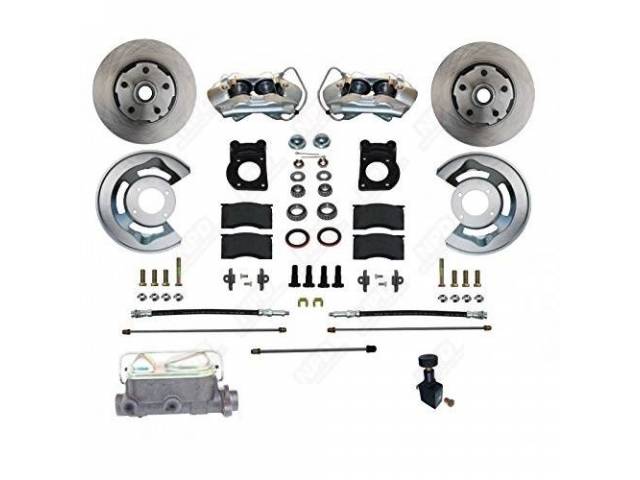
Conversion Kit.

I also like the SSBC Kit. It is inexpensive and will fit. I havnt got it yet, but its on my list.

https://www.npdlink.com/product/disc-brake-conversion-kit-street-bandit-front-drum/207115/200824


Master/Booster Upgrade.

If your kit doesnt come with the master and brake booster, you will need to get them.

I prefer the LEED Brakes 9" Booster. If you ask nicely when you order they will also send you the new Bolt on Pivot Point for the pedal.

https://leedbrakes.com/i-21155650-9-inch-power-brake-booster-black.html
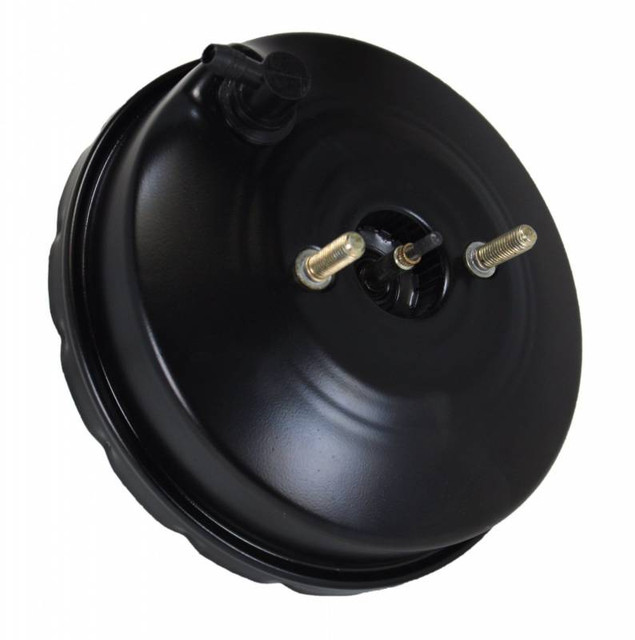


You could also go with the master/booster combo.

https://leedbrakes.com/i-21155649-hydraulic-kit-power-brake-booster-kit-71-73-ford-mustang.html
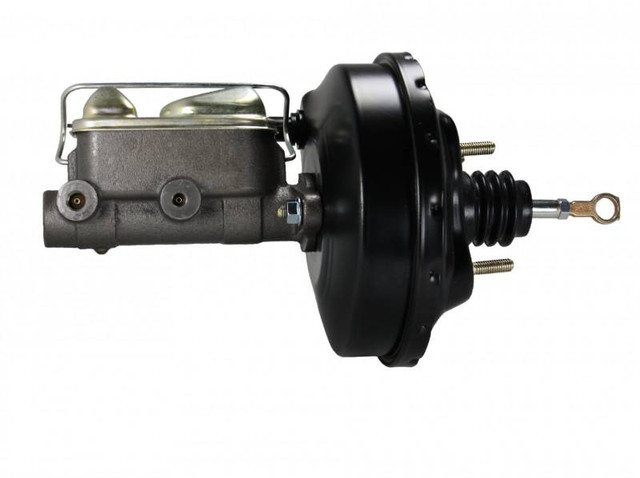


You will need to remove the Drivers side Shock Tower Brace for access. Then Remove the Drum Master Cylinder and disconnect from pedal, and brake switch. (Giant pain in the ass, remove the seat first.)

This will leave you with 2 Studs holding the Pedal Assembly in place. Remove the 2 Studs by threading on a nut, then a 2nd nut and lock them into each other, then turn the inside nut to rotate the stud bolt out.

Once the pedal assembly is out You can remove the pedal from the bracket. If you can, this would be a good time to blast and paint/powder coat all that stuff.

Then using a drill press, drill the hole for the new bolt in pivot point. Since the rod on the booster is lower than the drum master, it must be relocated.

You can bolt it on, or bolt it and weld it in place.

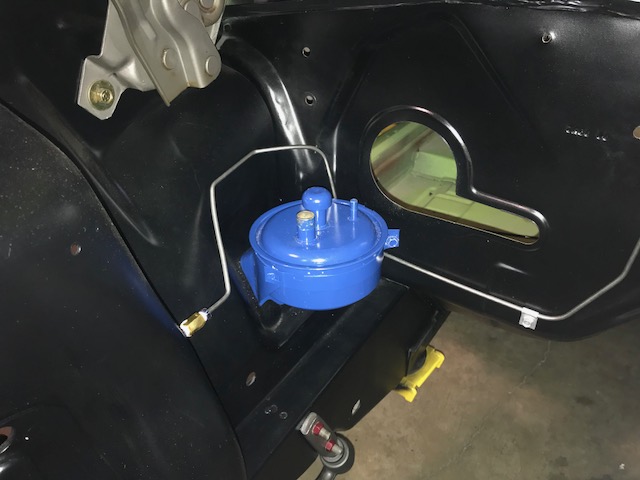
While everything is out, replace all your lines. This will be immeasurable fun! You will need to unbolt the Emissions canister and preferably the vacuum canister to get access to the passenger side lines and union.

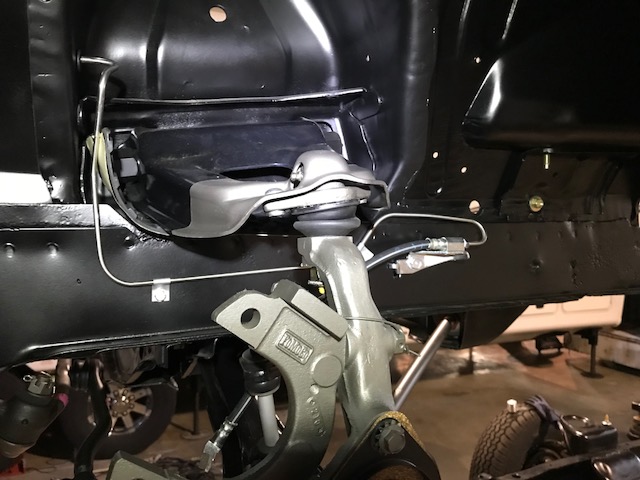
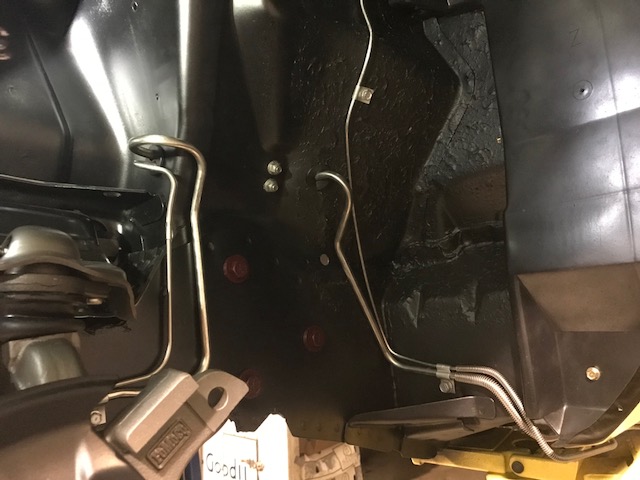
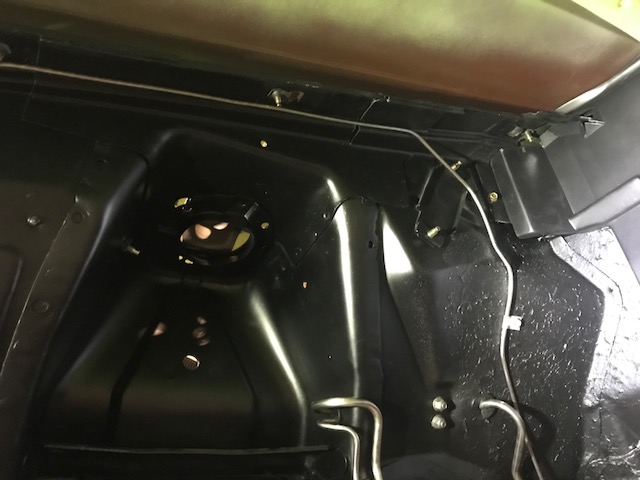
Use these Reference pictures as a guide.
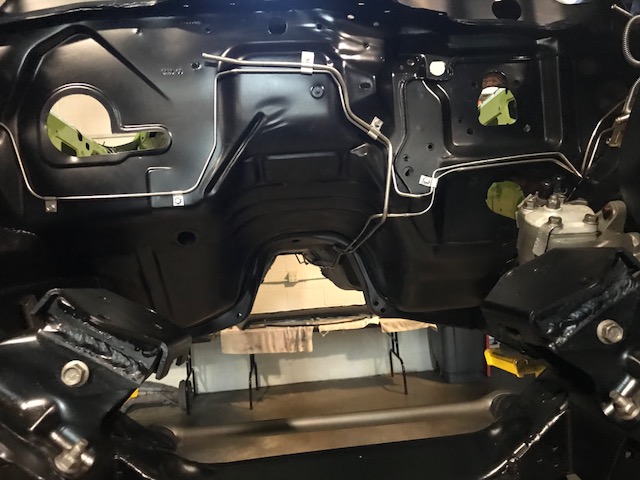


Then Put back together and mount the booster and pedal assembly.

Mount the Master Cylinder AFTER Bench Bleeding. Install the lines pointing up so they wont leak fluid and loose prime on the master.

Connect it all up and bleed it. it will be lots easier to bleed the disc brakes than the drums were.
Great pictures!
 
I also have a manual Drum Car and am also working on the brakes right now.

I am in the process of changing out all the lines to SS Disc lines.

Some observations.....

The Bracket that secures the front Brake Hose appears to be different on a Disc car than a drum car. When you get the Disc Lines, they will have bends in them that wont match up to your drum hose bracket, so you may have to bend them a bit. I did, and it wasnt hard.

Drum Car Bracket


Disc Car Bracket


The Ends of the Disc Brake Line Kit Will be different in some places than the Drum Line Kit. ie, the master cylinder lines will have different fittings. Depending on which proportional valve you use, you may need different fittings on the new lines. If you stick with Mustang specific parts, everything should work fine. If you go with an after market Proportional valve like I did, The ends will be different. If you go stainless, you do not want to be changing ends. So make sure you order the lines with the correct ends.


Conversion Kit.

I also like the SSBC Kit. It is inexpensive and will fit. I havnt got it yet, but its on my list.

https://www.npdlink.com/product/disc-brake-conversion-kit-street-bandit-front-drum/207115/200824


Master/Booster Upgrade.

If your kit doesnt come with the master and brake booster, you will need to get them.

I prefer the LEED Brakes 9" Booster. If you ask nicely when you order they will also send you the new Bolt on Pivot Point for the pedal.

https://leedbrakes.com/i-21155650-9-inch-power-brake-booster-black.html


You could also go with the master/booster combo.

https://leedbrakes.com/i-21155649-hydraulic-kit-power-brake-booster-kit-71-73-ford-mustang.html


You will need to remove the Drivers side Shock Tower Brace for access. Then Remove the Drum Master Cylinder and disconnect from pedal, and brake switch. (Giant pain in the ass, remove the seat first.)

This will leave you with 2 Studs holding the Pedal Assembly in place. Remove the 2 Studs by threading on a nut, then a 2nd nut and lock them into each other, then turn the inside nut to rotate the stud bolt out.

Once the pedal assembly is out You can remove the pedal from the bracket. If you can, this would be a good time to blast and paint/powder coat all that stuff.

Then using a drill press, drill the hole for the new bolt in pivot point. Since the rod on the booster is lower than the drum master, it must be relocated.

You can bolt it on, or bolt it and weld it in place.

While everything is out, replace all your lines. This will be immeasurable fun! You will need to unbolt the Emissions canister and preferably the vacuum canister to get access to the passenger side lines and union.

Use these Reference pictures as a guide.
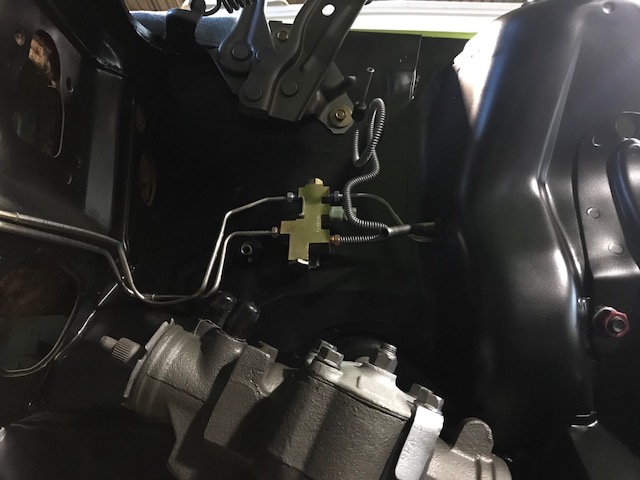


Then Put back together and mount the booster and pedal assembly.

Mount the Master Cylinder AFTER Bench Bleeding. Install the lines pointing up so they wont leak fluid and loose prime on the master.

Connect it all up and bleed it. it will be lots easier to bleed the disc brakes than the drums were.
Hi there. I am dead smack in the middle of performing this upgrade. I have disc brake spindles, factory proportioning valve, disc brake pedal, etc. My question is on one of these photos. you can clearly see the intermediate (front to rear ) brake line routed down the transmission tunnel. This is how my application is as well. Then in another photo showing the drivers side front brake lines, you can clearly see a brake line coming out in front of the control arm, routed straight up, across the bottom of the fender aprons, then down and following the fuel line to the rear of the car. I am confused. Why are there two brake lines going to the rear of the vehicle? I hope I explained this properly.
 
Hi there. I am dead smack in the middle of performing this upgrade. I have disc brake spindles, factory proportioning valve, disc brake pedal, etc. My question is on one of these photos. you can clearly see the intermediate (front to rear ) brake line routed down the transmission tunnel. This is how my application is as well. Then in another photo showing the drivers side front brake lines, you can clearly see a brake line coming out in front of the control arm, routed straight up, across the bottom of the fender aprons, then down and following the fuel line to the rear of the car. I am confused. Why are there two brake lines going to the rear of the vehicle? I hope I explained this properly.
That’s probably a 429 CJ car with a 5/16 return fuel line.
 
Back
Top