'71 Mach 1 rear axle removed today for service

7173Mustangs.com

Help Support 7173Mustangs.com:

This site may earn a commission from merchant affiliate links, including eBay, Amazon, and others.
Today's update.

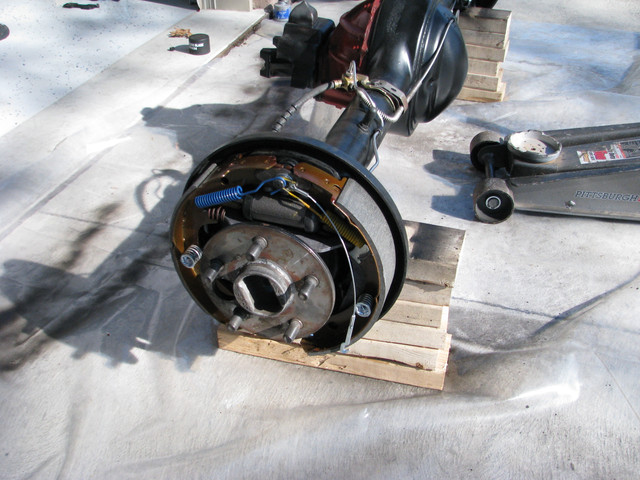
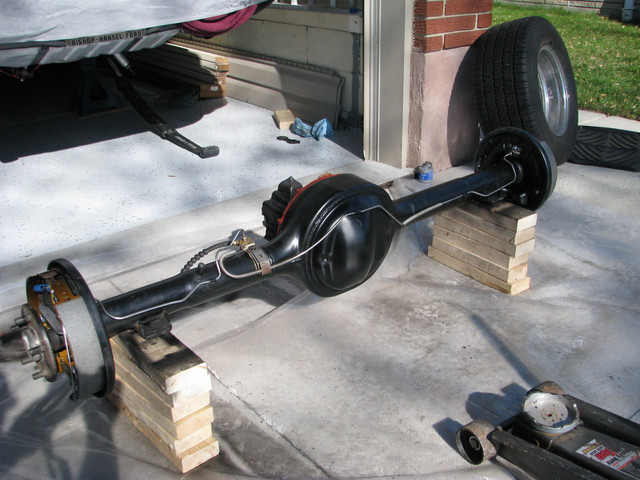
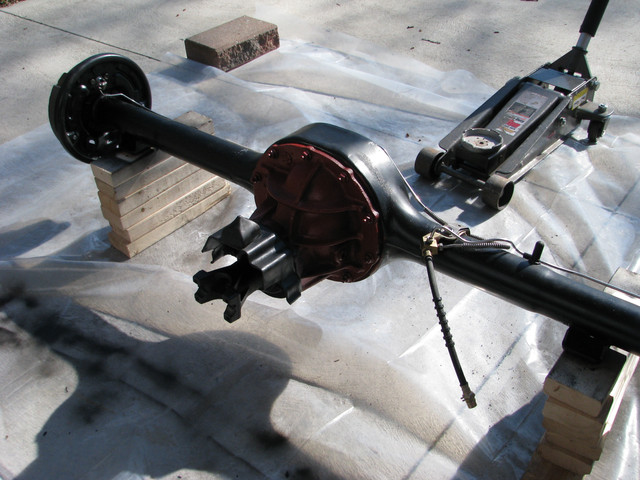
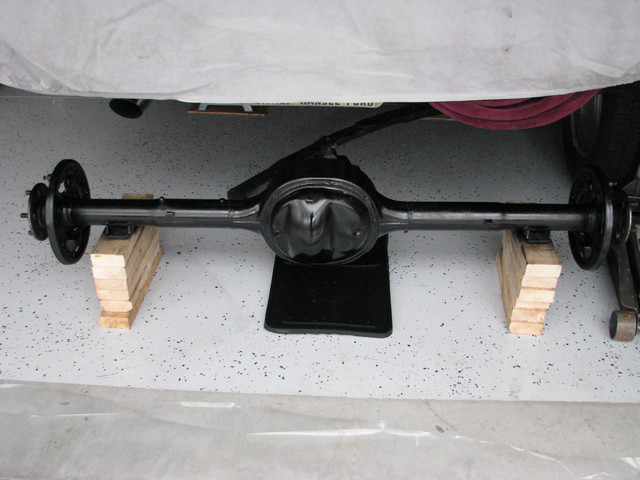
Well, it was finally warm enough outside to start cleaning and prepping the axle for paint. As with the rest of this car, no rust to speak of, just some light surface stuff that easily came off with a wire brush in a drill. Took all of an hour to do the whole thing. Once clean, I use a product we have in Canada called Dominion Sure Seal Rust Converter, which is a converter and primer. I used this more for the primer quality the to stop rust. Once that had dried, I was able to get a first coat of Eastwood Chassis Black over it all except the center section that of course will be red oxide primer. There is still some work to do another day to finish it off. Once done, I'll install the new brakes and get it back in the car, hoping the rear springs I got de-arched, will be okay. (if you read my other post on the GTA springs, you'll know why I say "hoping").

Anyway, I did find some paint markings on the bottom of the case as well as some on the center section. Unfortunately, they are not very clear or readable, so here's a couple of pictures hoping someone might be able to have a better guess as to what they are. The case ones appear to be 62 and possible 91, but the 9 and the 1 are sort of joined together at the bottom of the 9 and 1, so just a guess. The one on the center section appear to be 11 and 5 or maybe 6. The tag was unfortunately missing from this axle as it was evident it had be apart at some point for major service work.


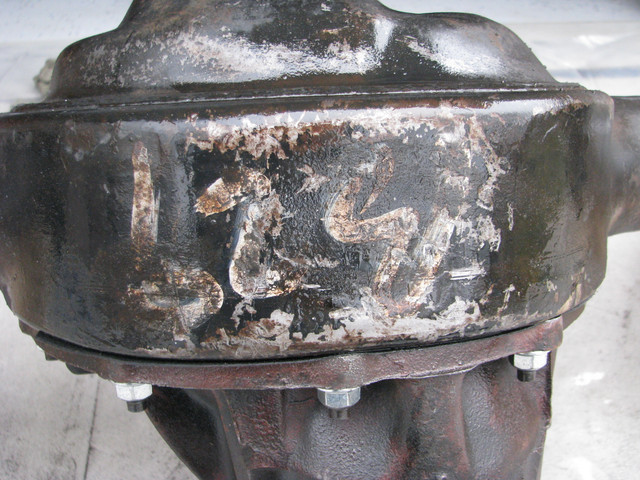
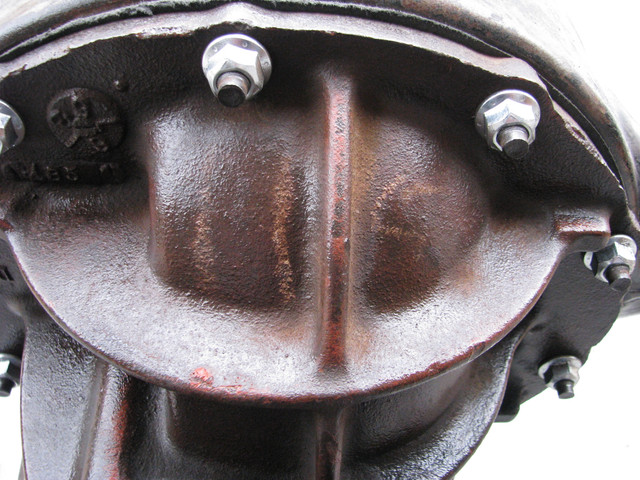
Maybe a date 11/5 (70) Car is a Feb 71.


Any thought, please post them.

 
Well, so far no-one has offered any ideas about what numbers theses are on the pumpkin. It's not the tag code, as my build sheet shows that as 955A. So it's a mystery I guess. I'm not going to replace them without knowing what exactly are. Besides they're underneath so no-one will ever see them. As for getting a replacement tag, at 55 bucks US, probably not this side of a better exchange rate.

Geoff.

 
So, today I made some progress on getting the axle back in. Hopefully that will happen tomorrow, but as I have to work on my back, on my own, it's not going to be that easy, but doable.

Now I know why so many swap from drum brakes to discs. It's been many years since I last did a drum brake rebuild and now I know why. What a friggin pain. I was hoping to assemble the brakes before refitting the axle, but realized I have to connect the parking brake cables before I can hook up the self adjusters...... and no, I don't have the proper tool and can't get one because the auto supply stores are all closed. Anyway not a big deal, but as I'm in a tight 1 car garage, I wanted to be able to put the right rear wheel on and be done.  

Anyway here are a couple of pics of the progress.


host image

 
Looking really nice. A lot of work but worth the effort . Did mine a while back the same way, on my back by myself. Watch hooking your brake line back up. Don't know if they are all the same but with the jack stands under the frame and the rear end just hanging on the springs put a strain on mine. Pulled it really tight. Make sure to loosen your parking brake cable before you try to hook them back up. It will make life easier.

 
Looking good!

Regarding the marks on the axle, I think I remember from some Mustang Monthly article that there wasn't consensus on them as they would have been applied at the axle plant, so not used for ID when the assembled axle arrived at the assembly plant. I think that these axles had a paper tape style tag around the driver's side tube under the bolt holding vent tube and brake line junction block, this tag was what the assembly plant line worker would have matched up to the car's build sheet.

So, I would agree with you that the marking you found were probably dates and/ or job #'s internal to the axle plant...

-Matt

 
Last edited by a moderator:
Looking really nice.  A lot of work but worth the effort . Did mine a while back the same way, on my back by myself.  Watch hooking your brake line back up.  Don't know if they are all the same but with the jack stands under the frame and the rear end just hanging on the springs put a strain on mine.  Pulled it really tight.  Make sure to loosen your parking brake cable before you try to hook them back up. It will make life easier.
 Thanks for the heads up on loosening the cables. I'll do that for sure. What I plan on doing is to get the axle in and bolted up, but I will also put jack stands under the axle as extra support. 

Once the axle is in, I can put the wheels on with just a couple of lug nuts so I can push the car out into the driveway. Then I can finish the brakes and check everything before bolting the wheels up tight. Oh how I wish I had a 2 car garage!!!

 
Looking good!

Regarding the marks on the axle, I think I remember from some Mustang Monthly article that there wasn't consensus on them as they would have been applied at the axle plant, so not used for ID when the assembled axle arrived at the assembly plant. I think that these axles had a paper tape style tag around the driver's side tube under the bolt holding vent tube and brake line junction block, this tag was what the assembly plant line worker would have matched up to the car's build sheet.

So, I would agree with you that the marking you found were probably dates and/ or job #'s internal to the axle plant...

-Matt
 Thanks Matt, 

I agree that the paint markings would not be for assembly ID from the fact that the build sheet refers to 955A for the axle. The marks on the center section are not dates either as I found the casting date code and is 1B5 71-Feb-05, 17 days before the car was built. Kind of prove it is the original axle without the tag that was obviously tossed at some point. I think these marking were as you say, axle plant only markings. so not worrying about putting them back on. I can't really make out what exactly they are anyway.

 
So, today I made some progress on getting the axle back in. Hopefully that will happen tomorrow, but as I have to work on my back, on my own, it's not going to be that easy, but doable.

Now I know why so many swap from drum brakes to discs. It's been many years since I last did a drum brake rebuild and now I know why. What a friggin pain. I was hoping to assemble the brakes before refitting the axle, but realized I have to connect the parking brake cables before I can hook up the self adjusters...... and no, I don't have the proper tool and can't get one because the auto supply stores are all closed. Anyway not a big deal, but as I'm in a tight 1 car garage, I wanted to be able to put the right rear wheel on and be done.  

Anyway here are a couple of pics of the progress.


host image
" I was hoping to assemble the brakes before refitting the axle, but realized I have to connect the parking brake cables before I can hook up the self adjusters...... and no, I don't have the proper tool and can't get one because the auto supply stores are all closed."  Try using a very small gates clamp to compress the "fingers" enough start them in the hole in the backing plate. I have no idea what is up with the font change???? Chuck
 Thanks Chuck for that tip. Going back in shouldn't be too much a problem, getting the finger compressed to get them out is the challenge. As for the fonts, I needed the magnifying glass. Also I/we used to be able to delete pics and text before re-posting, can't seem to do that either.

 
Last edited by a moderator:
So, today I made some progress on getting the axle back in. Hopefully that will happen tomorrow, but as I have to work on my back, on my own, it's not going to be that easy, but doable.

Now I know why so many swap from drum brakes to discs. It's been many years since I last did a drum brake rebuild and now I know why. What a friggin pain. I was hoping to assemble the brakes before refitting the axle, but realized I have to connect the parking brake cables before I can hook up the self adjusters...... and no, I don't have the proper tool and can't get one because the auto supply stores are all closed. Anyway not a big deal, but as I'm in a tight 1 car garage, I wanted to be able to put the right rear wheel on and be done.  

Anyway here are a couple of pics of the progress.


host image
" I was hoping to assemble the brakes before refitting the axle, but realized I have to connect the parking brake cables before I can hook up the self adjusters...... and no, I don't have the proper tool and can't get one because the auto supply stores are all closed."  Try using a very small gates clamp to compress the "fingers" enough start them in the hole in the backing plate. I have no idea what is up with the font change???? Chuck
 Thanks Chuck for that tip. Going back in shouldn't be too much a problem, getting the finger compressed to get them out is the challenge. As for the fonts, I needed the magnifying glass. Also I/we used to be able to delete pics and text before re-posting, can't seem to do that either.
 Just put the clamp on the other side of the backing plate to remove. It is a bit tedious but it works. Chuck
 No worries Chuck, all done except finishing up the brakes. I now have the axle back in, all bolts / nuts tightened to spec, but for this old man crawling around on the garage floor for 2 or 3 hours was quite enough for one day. Tomorrow, I'll finish the brakes, bleed the lines and get it back on its wheels. If i'm lucky, I might even test drive it. There is a possibility we could be under "lock down" in Ontario any time soon, so I may not be able to joy ride for a while. We'll see I guess.

Anyway, thanks for the tips, I'll post a couple more pics when done.

 
Okay guys, done and tested.

today, I connected the parking brake cables, easy when you loosen off the cable adjuster, connected the brake adjuster thing, bled the brakes, checked everything over and put the wheels on. Took it off the jack stands and fire it up. Damn it sounded good after nearly 5 months hibernation! Once running, i check I had brakes before taking it out for a blast around the block. Happy to say no nasty noises from the new Traction-Loc dif. I just had to lay a bit of rubber with the back end snaking about a little, loved it!

With the springs de-arched about 1/2" more than I asked for, the ride height is not too bad with about a 1/2" higher than the front. With BFG 14"s, 235 front ,245 rear, ground to top of wheel arch measures 25 1/4" and 25 3/4' respectively. so dose anyone else have these size tires and can tell me what their car 's ground to wheel arch heights measure?

So now that project is done, not sure what else I need to do with this car. Drive it maybe, if the "law" will allow me under the circumstances.

Thanks to all for you interest and comment,

Geoff.

 
That great to hear the test drive went well. It’s always a great feeling taking the first ride of the year too! Your going to have a lot of fun with the Trac lock.

I say drive it, while you can, to go get some milk, bread and beer. Lol No one said that you can’t drive a cool car to get essentials.

 
That great to hear the test drive went well. It’s always a great feeling taking the first ride of the year too! Your going to have a lot of fun with the Trac lock.

I say drive it, while you can, to go get some milk, bread and beer. Lol No one said that you can’t drive a cool car to get essentials.
 Thanks John, Fortunately my insurance doesn't say I can't go get groceries!! 

 I took a look at the sway bar links and they are not straight up and down in either direction now the car is on it's wheels. I would say that the side to side is off about 1/2" overall from the original which is odd as both looked to be the same width. Front to back is also not optimal either. I'll take some pics and post back on your thread.

 
Back
Top