advancements in LED lighting 2014

7173Mustangs.com

Help Support 7173Mustangs.com:

This site may earn a commission from merchant affiliate links, including eBay, Amazon, and others.
To anyone who is attempting to use the blue diffuser cups in your dash...you will never be happy with the outcome.

The ONLY way that the white LEDs shining through the blue diffuser cups will give you a passable OEM-style soft green glow is if your blue cups are in pristine, like new-condition.

If your car has more than 30,000 miles on it, then it is a safe bet your blue cups are faded...otherwise your dash lights would still look good with the OEM set-up!

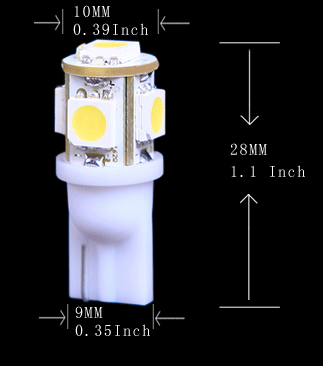
Ditch the blue cups and install green 5-SMD LEDs and you will be happy.

Hi Greg. I got Autometer's for my car as well. I tried the same SMD led in them that I did my dash with, and the light output matches. I haven't installed them yet, but did a mockup.

Spot on Totalled. That will be the way i will be going as well for sure now myself. Thanks for your feedback and the pics.

Hi Kit,

I agree with you 100% on what you say above. I should of had the common sense to realise that the old diffuser cups would never have delivered a decent illumination color and brightness in the first place, and on that basis, i think it's wrong and misleading for Hi Po to promote and sell their products, claiming to give you fantastic results,and knowing that you can't yet buy new replacement diffuser cups for our '71-'73s yet, and the old cups won't deliver a good result.:mad: A waste of good money and time. In fact, i may send them an Email pointing this out to them and complaining as well. I guess it's all about living and learning eh! It's also annoying that we can't buy new pods at this stage too.

Thanks for your feedback,

Greg.:)

 
Last edited by a moderator:
I installed the new LEDS in the main gauges tonight.

the usual pain in the butt of pulling the panel and the gauge cluster.

i replaced the HIPO older gen blue leds with the new green ones i got off ebay.(T10 SMD)

the usual issues with bad contact and messing around getting all the leds working right.

one issue. on the Right gauge(speedo) i was getting a weird triangle reflection from the led, it turned out it was the left lower led on the gauge causing the problem, i had to paint the top Green LED array with black paint to get rid of the problem, but it worked perfect the side leds on that bulb were fine. so it took some extra work but i got the leds and the cluster looking right.

got everything back together and took the car out to test all the leds make sure the turn signals, high beam and brake warning light worked. the sun was just starting to set, but i could see the Green glow around the odometer even then.

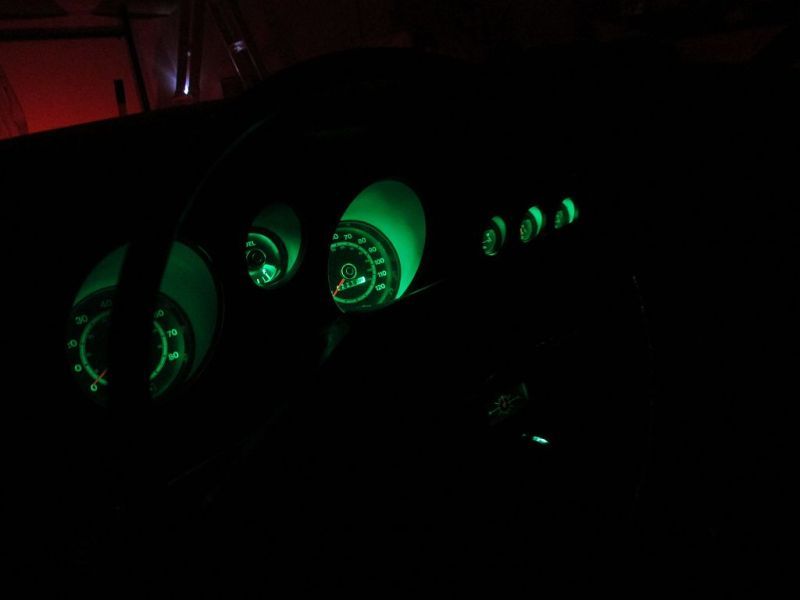
sun went down and wow excellent the green glow looked awesome and i could read the gauges.

so on a scale of 0-10

the stock bulbs with the blue filters and the problems about 1,2ish.

the original HIPO kit, with blue filters removed, about 3,4ish blue glow and an improvement but still awful.

The ebay multi array LEDs green, no filters, 6,7ish green is great the illumination is a massive massive improvement.

you can read the gauges and the color is great.

comments, i wish it still was a little brighter, but the light is dim-able no problem

i will be doing the center gauges next, i made a video of the install but it came out terrible so i won't post it.

 
Many thanks for your feedback Dan. That's very good info to know. Other than the hassles you encounted, i'm very happy the upgrade turned out to most of your satisfaction. I will be going that way myself, and hopefully that will be my last upgrade.

Cheers,

Greg.:)

 
One thing to add here is the condition of the printed circuit for you gauges can be an issue also. I know when I installed my LED's the flexible circuit harness was not so flexible anymore and very brittle. Just worn out after 40 years. So I just held off installed a new one at the same time as I installed my LED's.

 
Last edited by a moderator:
One thing to add here is the condition of the printed circuit for your gauges can be an issue also.

Hi there,

In what regard would it be an issue? For example, would it stop the bulbs from lighting at all, or would it cause the bulbs to be dimmer. What exactly happened to you in your situation?

Thanks,

Greg.:)

 
Last edited by a moderator:
i'll note i replaced my circuit board 2 times.

the original circuit board : you can clean the copper i used kaboom and it shined the copper up like new, Problem the 40 year old mylar was brittle and the contact areas where the bulb sockets touched were worn out.

when i changed out the old voltage regulator on the board i broke the mylar and snapped off one of the regulator connectors, also the copper around the main connector started to de-laminate from moving it around.

enter repro board #1

I swapped the board and i had it in the car about 3 years. I was using the normal 194 bulbs and i decided to go with the HIPO kit.

when i pulled it i found the copper was again de-laminating. i was having problems with one bulb and i kept pulling the cluster and eventually one of the copper contacts actaully broke off.

enter repro board #2

i kind of learned my lesson and i took clear tape and carefully around the edges of the copper where the connector goes i wrapped the tape around the ends to keep the copper from popping off the mylar.

i also put a couple of pieces around 2 bulb sockets that i had an issue with in the past on my car, this board has been in the car for over 5 years and i just did the swap to the next gen LEDS on it.

the black bulb sockets themselves are the cause of problems. the Plastic itself suffers from 40 years of degrading from the heat of the 194 bulbs, many times the sockets will break apart in your hand from just touching them. 10 years ago i had to find replacement sockets from a junk car to replace many of mine that had fallen apart.

the metal contacts are 2 piece and they slip into the plastic, these get corroded. i soaked mine in rust / oxidation remover a couple of years ago and i also coated everything with dielectric grease to try and protect the metal from corroding again.

this worked pretty well i had 2 sockets that required me to bend the outer arms a little to get the bulb working.

sometimes somebody bent the socket arms too far because they got angry with a light not working when you do that you can tear the copper pcb wires on the mylar then you get to replace the circuit board again.

i know one friend that soldered jumper wires from the sockets to the circuit board. its possible with a low heat iron and thin solder.

corrosion on the circuit board just causes bad contact so you hit a bump and a light turns on and off, the copper is wide on the mylar so that is not the issue. the only time i would replace a board is when the mylar cracks, the copper peels off the mylar, or the copper is torn, everything else is the tension you set with the bulb sockets.

a word of caution on the next gen LED bulbs. there are many manufacturers. i ordered a specific bulb that has a filament of wire for the bulb contact on both sides, many just put the filament on one side of the bulb i figured 4 connections is better then 2

example.

the filament is bent around the base of the green plastic giving you contact for both wires on both sides of the case.

$_12.JPG


this version only has the filiment on one side and is cut shorter so you only get contact on one side.

3001_zpsde096ba4.gif


the double filament makes the bulb base thicker and it holds in the sockets with more tension.

its a small difference but it can make or break you.

i can give the ebay link to the bulbs i bought but the seller is pretty terrible,,, example i bought 20 led bulbs, 18 came and he sent me some kind of adjustable IR circuit for a remote and a made in china Iphone charger that will most likely burst into flames if used. the seller grabbed a bunch of boxes off the shelf and shipped me the stuff so i know it was a mistake but his rating isn't very high... i figured for less then 10$ with free shipping it was worth the risk,,, the bulbs cost me about 7$,,,, verse 75$ dollars if you buy from a more reputable vendor.

 
Two more notes:

1) the replacement bulb holder/ sockets are NOT correct...no matter what any "expert" tells you. The mounting clips/tabs are not "clocked" in the same place, so when you screw the holders all the way in the back of the cluster, some of them will not make contact correctly.

2) LEDs will not light up dim if you have a poor connection. They will either light up at 100% intensity, or will not light at all. Just a function of LEDs

 
1) yup stay away from the reproduction light sockets.

2) is not true unless they are non-dimable leds.

these are dimable so you have to be careful low voltage/ bad contact will cause them to illuminate dim.

on a non-dimable LED they reach a threshold and are either fully on or off.

the deal with LEDs is they are low amp draw a bad joint on a pcb may cause proper voltage transfer but no amperage, so you measure a gap and get a 12 volt reading but put a bulb across the contacts and it will not light up. (happens on cold solder joints where there is an airgap caused by a bad joint or damage to the pcb. so an led being a low amp draw can still fully light up on a bad contact or bad joint.

now SMD made non-dimable T10 style LEDS just 2-3 years ago they came in 2 forms one was a PCB mounted system that plugged into the standard 194 socket and these newer ones that simulate the base of a bulb and then have colored plastic showing the color of the light. these newest ones support proper dimming.

the older SMD bulbs would either be fully on or off when you tried to use the dimmer on the head lights switch.

OH i forgot to mention you will want to mark the power polarity on your circuit board, leds will not work when installed backwards.

I can post a scan of a + or - layout for the circuit board.

Messing around with the gauge lighting is frustrating so i recommend 2 tests one on the bench with a 9 volt battery touching the terminals and a second one hooked up in the car to the harness but leave the speedo cable and the tach wire disconnected so you can move the housing around.

flip the headlights switch and look at how the gauges are lit, this was when i found the problem with mine having this weird triangle glare and i traced it back to one LED, i then masked off the array and found it was just the top led causing the issues, so i painted just that led black and then reinstalled and re-tested.

better find out then then after you put everything back together.

 
Thanks again Dan,

Top technical advice from yourself. It's always amazing what can go wrong with the old systems isn't it.:(

Thank you for going to the trouble and effort in providing such a detailed rundown on matters relating to the dash cluster lighting. It's much appreciated indeed.

Greg.:)


Two more notes:

1) the replacement bulb holder/ sockets are NOT correct...no matter what any "expert" tells you. The mounting clips/tabs are not "clocked" in the same place, so when you screw the holders all the way in the back of the cluster, some of them will not make contact correctly.

2) LEDs will not light up dim if you have a poor connection. They will either light up at 100% intensity, or will not light at all. Just a function of LEDs
Thanks for that info Kit.

Greg.:)

 
Last edited by a moderator:
its never easy is it :)

glad i could give my detailed experience so others don't step on a land mine.

i hated to drive at night because i could barely see the gauges and this was after i converted to the older style LEDs

now i'm more then happy to go for a spin in the moonlight.

 
72HCODE hit it right on the head. 43 years is a long time. 38 of those years were spent in upstate(think Canada) New York for my Mustang. While it is a phenomenal survivor for its age you can tell the winters took its toll in unseen areas. The copper contacts had corroded and the previously flexible harness was coming apart as I removed the bulbs. No clue when if ever the some of the bulbs had been replaced.

I figured I had the dash already apart and it was a pain to get everything out. Why not do it right the first time.

God knows Kit I am glad I had a bench power supply to test the bulbs in the cluster. Even with the instructions I think I had half the bulbs in backwards or not quite clocked right so they didn't work. It would have really sucked to have installed and removed it multiple times to get the bulbs right.
Any tips for how to bench test?


I used some small gator clips that I have in my garage for projects like that. In my case I have a DC power supply specifically for my RC Cars and Slot Cars but adjusted it to 12V DC and connected positive and negative to the cluster. I am sure a battery would work fine also. I don't have the cluster diagram here though that showed which contacts to use.

 
Last edited by a moderator:
I touched the circuit terminals with a 9 volt battery.

When I first did it I bought a kit and it came with a diagram showing + and - so I marked the circuit board at that time.

This time I used a 9 volt but I did final testing and adjustment in the car.

I did have one terminal marked reversed so I played with it inside the car off the bench.
Dan,

Could you post the + and - diagram?

Thanks

 
Then I got wide angle green SMD LEDs from superbrightleds.com and that is more like it.

IMG_0104.jpg
I've sat in Pat's car at night and fell in love with the green lit gauges. It looks exactly as shown in his pic...beautiful.

 
Has anyone tried a color change? I know a few posts said you will be unhappy with the stock defuses in the panel so remove then. I would love to have the same greenish blue color it has now only brighter but if I cant do that may as well go crazy right?

 
a total color change is more work assuming you have a stock instrument panel there is additional blue filters in the radio, climate control and the bulbs are different as well. it is possible to color change to what ever you want. making a rotating color like in the new mustangs is a lot more work i think you have to run a 3rd control line back from all the color change leds to make it work and have a electronic controller to set the color.

 
i'll note i replaced my circuit board 2 times.

the original circuit board : you can clean the copper i used kaboom and it shined the copper up like new, Problem the 40 year old mylar was brittle and the contact areas where the bulb sockets touched were worn out.

when i changed out the old voltage regulator on the board i broke the mylar and snapped off one of the regulator connectors, also the copper around the main connector started to de-laminate from moving it around.

enter repro board #1

I swapped the board and i had it in the car about 3 years. I was using the normal 194 bulbs and i decided to go with the HIPO kit.

when i pulled it i found the copper was again de-laminating. i was having problems with one bulb and i kept pulling the cluster and eventually one of the copper contacts actaully broke off.

enter repro board #2

i kind of learned my lesson and i took clear tape and carefully around the edges of the copper where the connector goes i wrapped the tape around the ends to keep the copper from popping off the mylar.

i also put a couple of pieces around 2 bulb sockets that i had an issue with in the past on my car, this board has been in the car for over 5 years and i just did the swap to the next gen LEDS on it.

the black bulb sockets themselves are the cause of problems. the Plastic itself suffers from 40 years of degrading from the heat of the 194 bulbs, many times the sockets will break apart in your hand from just touching them. 10 years ago i had to find replacement sockets from a junk car to replace many of mine that had fallen apart.

the metal contacts are 2 piece and they slip into the plastic, these get corroded. i soaked mine in rust / oxidation remover a couple of years ago and i also coated everything with dielectric grease to try and protect the metal from corroding again.

this worked pretty well i had 2 sockets that required me to bend the outer arms a little to get the bulb working.

sometimes somebody bent the socket arms too far because they got angry with a light not working when you do that you can tear the copper pcb wires on the mylar then you get to replace the circuit board again.

i know one friend that soldered jumper wires from the sockets to the circuit board. its possible with a low heat iron and thin solder.

corrosion on the circuit board just causes bad contact so you hit a bump and a light turns on and off, the copper is wide on the mylar so that is not the issue. the only time i would replace a board is when the mylar cracks, the copper peels off the mylar, or the copper is torn, everything else is the tension you set with the bulb sockets.

a word of caution on the next gen LED bulbs. there are many manufacturers. i ordered a specific bulb that has a filament of wire for the bulb contact on both sides, many just put the filament on one side of the bulb i figured 4 connections is better then 2

example.

the filament is bent around the base of the green plastic giving you contact for both wires on both sides of the case.

$_12.JPG


this version only has the filiment on one side and is cut shorter so you only get contact on one side.

3001_zpsde096ba4.gif


the double filament makes the bulb base thicker and it holds in the sockets with more tension.

its a small difference but it can make or break you.

i can give the ebay link to the bulbs i bought but the seller is pretty terrible,,, example i bought 20 led bulbs, 18 came and he sent me some kind of adjustable IR circuit for a remote and a made in china Iphone charger that will most likely burst into flames if used. the seller grabbed a bunch of boxes off the shelf and shipped me the stuff so i know it was a mistake but his rating isn't very high... i figured for less then 10$ with free shipping it was worth the risk,,, the bulbs cost me about 7$,,,, verse 75$ dollars if you buy from a more reputable vendor.
please, can you provide me the ebay link for the green leds...now that it's been 6 months or so, still happy with them? thanks

 
Back
Top