Fabrice's 429CJ 71 project

7173Mustangs.com

Help Support 7173Mustangs.com:

This site may earn a commission from merchant affiliate links, including eBay, Amazon, and others.
Let me ask you something Fabrice, how do recycle all these chemical baths after they're spent? I don't know what the laws are in Holland but I would think here in the U.S. there are some strict laws on disposal/recycle. Just wondering, you've done a great job so far.

 
Let me ask you something Fabrice, how do recycle all these chemical baths after they're spent? I don't know what the laws are in Holland but I would think here in the U.S. there are some strict laws on disposal/recycle. Just wondering, you've done a great job so far.
He sends them to Spain!   lollerz

 
Let me ask you something Fabrice, how do recycle all these chemical baths after they're spent? I don't know what the laws are in Holland but I would think here in the U.S. there are some strict laws on disposal/recycle. Just wondering, you've done a great job so far.
First the quick answer: I don't recycle! Not that I'm an irresponsible pig, its simply that I reuse these over and over.

I do use harmless chemicals only: acetic acid (aka plain old distilled white vinegar), epsom salt for the electrolytes. That's it. No cyanides, no chromates, no suggary brighteners, no strong acid. And I stick to 3 metals only: copper, nickel and zinc. With this combo, there is no dangerous fumes during the process just oxygen bubbles on the anode and hydrogen on the cathode. Hydrogen is explosive for sure, but the quantity coming free is so tiny, you'd need to do this in a sealed container for 1/2 hour to get an explosion risk.

The electrolytes: The zinc solution is harmless. The nickel and the copper acetates are light toxic and should never go down the drain even for this small amount, just like you would not ditch engine oil in your garden or give oven cleaner to drink to your cat. Similar to the green oxidation on your copper water pipes that you should not touch with bare hands.

The solutions are for 80-85% water, there is some evaporation each time you use them. I refill with the distilled water used for rinse. I do only bigger parts using zinc because I don't want to have too much nickel. I have +-3 liters, that's fine for small parts, biggest parts done were the radiator brackets.

For de-rusting, I use similar stuffs: vinegar and phosphoric acid (5%). Both relatively harmless. This acid is classified dangerous only when at high level of concentration because it's corrosive. You can't buy it when concentrated anyway. It's sold at 3-15%. Often used for the garden as a fertilizer. You even drink it in your cocacola or Dr Pepper in small amount. I use the very same bath for about 2 years now.

May you'd want try plating once for fun and recycle right away. You could boil your solution and deliver the few grams of powder to your recycle street or bring your solution bottled, just like you'd do for your engine oil.

I don't want to use the kits you can buy online as they do use much more dangerous stuffs and are also introducing problems/costs for the recycling and even for shipment. Like the chromate I was talking about for zinc passivation in my last post for instance. https://www.tifoo.de/en-uk/blue-chromate-conversion-coating

That's also why I do not try other metals or do chrome.

All with all, done this way it's safe but it's not a game either.

@midlife,

hehehe, glad you have your connection back, missed your jokes :)

 
Fabrice was the weekend devoted to research? I miss your updates. The depth of information is second to none
ahahah sorry Steve, sorry for being lazy :)


I did details like painting the back side of the mirror support, waaaaay too cold (4c) and had to heat gun it. 

Zinc plated the trans inspection plate and few other details too.

So I did something on the project but nothing worth a post update I'm afraid. (posting these for you!! )


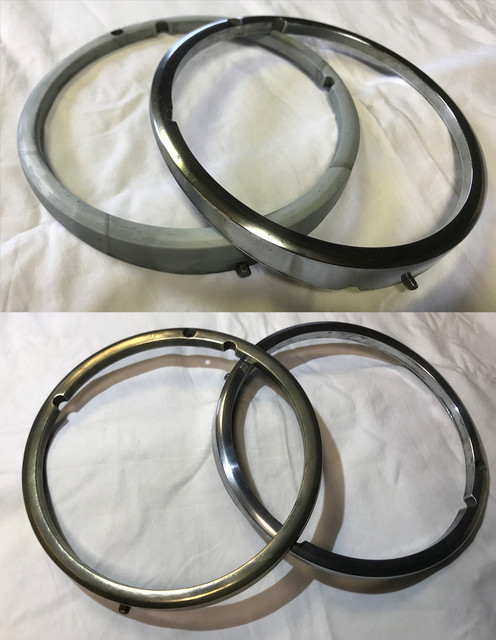
Spend some time on the "reconstructive" plating of the pot metal/zamac headlights bezels.

I can get the surface back to a point where it would be as new after a polish.

but I'd like to thick copper plate them first, buff and then nickel plate them.


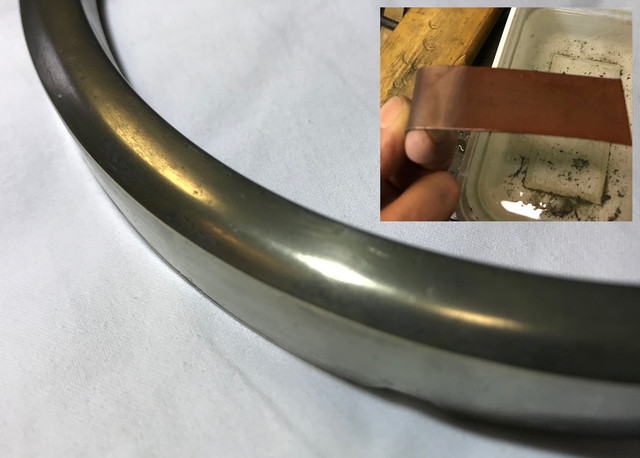
I've tried and found a way to get a nice durable thick coat good enough to be buffed for a good nickel base vs the failures I got in the past on steel. Very handy to restore pitted surfaces, so got some results I will be able to use but failed so far to get the same on pot metal/zamac. Best I get so far is some brass alloy layer result and while that look will come handy for some parts, it's not even near of where I want it to be...

 
Last edited by a moderator:
Terrible weather. Cold, strong winds, heavy rain...

So back to MUSTANG SCIENCE!

Started with retrying to get copper on zamak...
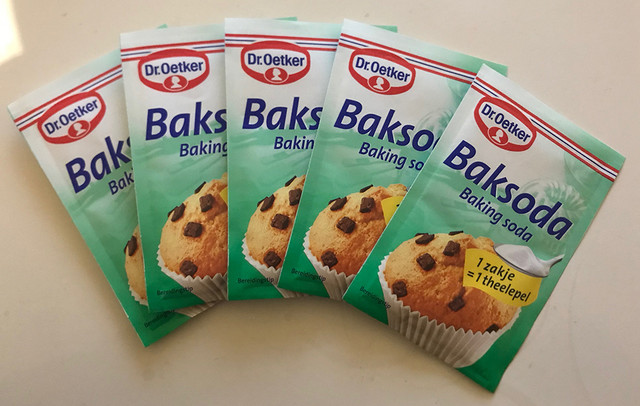


When nothing works: just like for welding, Dr Oetker is your best friend...
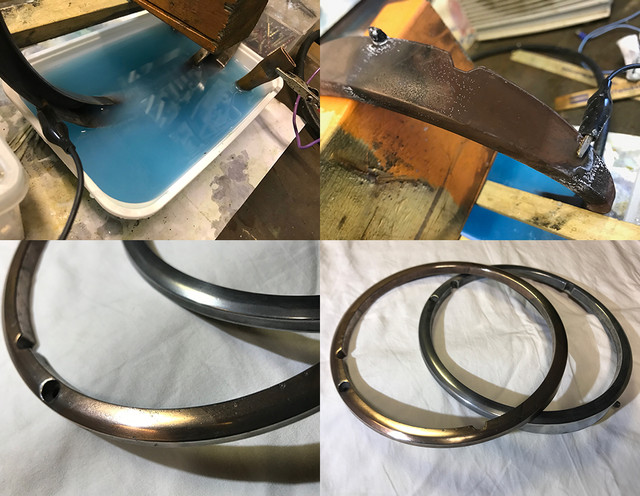


Because zamak (pot metal) is an alloy mostly composed of zinc. Its reacts the moment you submerge it with acid. Once you add power, even low, you plate and remove at the same time. Explains the brass layer result of last week.

I've red on the subject and pro's are using cyanid baths for this. Short story, no way I'm gonna go that way. Instead wanted to see what I could do with mild alkalin bath using the above baking soda.

And what do you know: it works!

However, because I wanted to try and see first, I didn't have a big enough bath. less than 1/2 liter or something. To get a useful layer on this part in one pass, I'd need make more and let it over night at very low voltage, may be 1 volt to get a much thicker layer that I can use to buff the old pitting. That would also prevent burns and give an even deposit as seen on the pict caused at where the part was submerge and then exposed to the air. If weather is bad again next week, I might try that. No rush on this. But if you compare with past post pictures, it's now really copper vs brass. If the surface would be perfect, its kinda beautiful too. Amazing what 5 tea spoons of baking soda can do :)


Its been a while since I've showed you horror pictures, so as weather might be "paint ok" in a not too far future, I've collected new parts, enough material for dirty work! :)

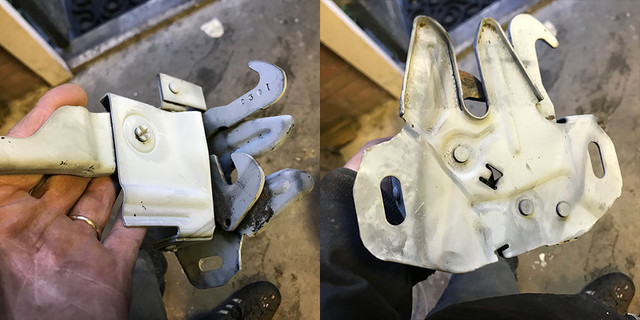
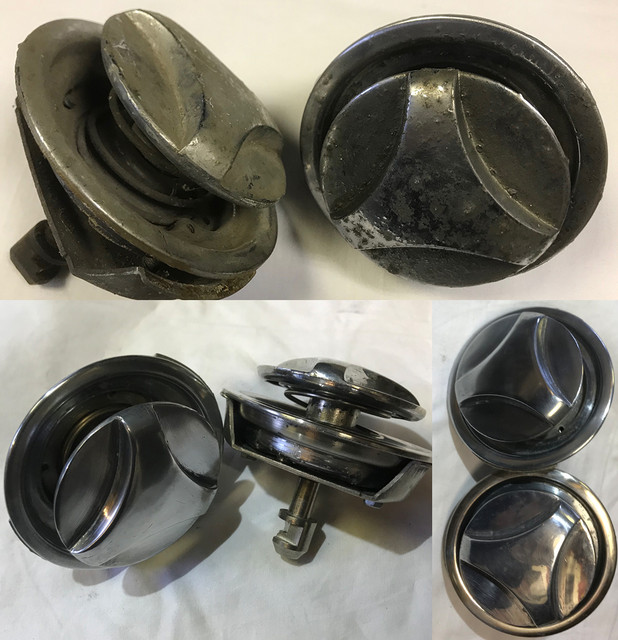
Some will be zinc plated, some painted and some both. So removed a few more parts on the car. Notice the rusty hardware, and started by spreading some paint remover on the latch mechanism..


Here some horror picts after 16 hours. But after a good cleaning massage, things started look at some mustang part.


Did the other part (under a new layer of remover right now) and because the lady rust is at work on this latch too, its now in my derust bath, and will stay prolly 48 hours in it.


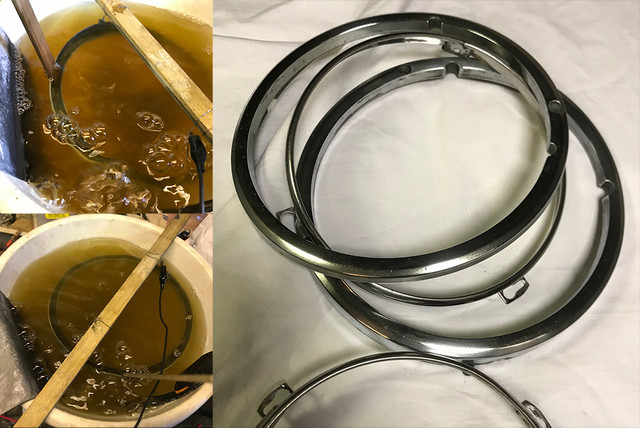
The light bezels were also derusted. A bit strange part, looks like stainless, but there is some rust.

I'll return on these, as one has some damage and need make a buck to hammer it back to a round shape.

I'll need to weld or solder one of the lip too, it broke once I've turned the screw on the car. Anyone repaired one of these?


In between, been busy cooking the hardware on saturday and electro cleaned them today for a couple of hours.


For these, I've used the receipt found last week that deposits a strong and thick copper layer.

Left, raw from electro cleaning, in the middle after being plated, on the right, just brushing them with wool makes the copper shine like a new penny.

If you wonder why copper plate them and not directly apply nickel... Unlike zinc that will corrode to death to protect the underlaying substrate by its negative charge. Nickel is the opposite. The substrate will corrode to protect the nickel. Having the copper in between reduces this behaviour a lot.


I did not polish any of the hardware, just brushed them and plated them in copper and then they received a layer of nickel. I'll polish some if that will be required later on but for now the 50 years old latch hardware is good to go for another 1/2 century.

I've started other stuffs, and should have more horror picts to show soon :)

To be continued...

 
Last edited by a moderator:
Terrible weather. Cold, strong winds, heavy rain...

So back to MUSTANG SCIENCE!

Started with retrying to get copper on zamak...


When nothing works: just like for welding, Dr Oetker is your best friend...


Because zamak (pot metal) is an alloy mostly composed of zinc. Its reacts the moment you submerge it with acid. Once you add power, even low, you plate and remove at the same time. Explains the brass layer result of last week.

I've red on the subject and pro's are using cyanid baths for this. Short story, no way I'm gonna go that way. Instead wanted to see what I could do with mild alkalin bath using the above baking soda.

And what do you know: it works!

However, because I wanted to try and see first, I didn't have a big enough bath. less than 1/2 liter or something. To get a useful layer on this part in one pass, I'd need make more and let it over night at very low voltage, may be 1 volt to get a much thicker layer that I can use to buff the old pitting. That would also prevent burns and give an even deposit as seen on the pict caused at where the part was submerge and then exposed to the air. If weather is bad again next week, I might try that. No rush on this. But if you compare with past post pictures, it's now really copper vs brass. If the surface would be perfect, its kinda beautiful too. Amazing what 5 tea spoons of baking soda can do :)
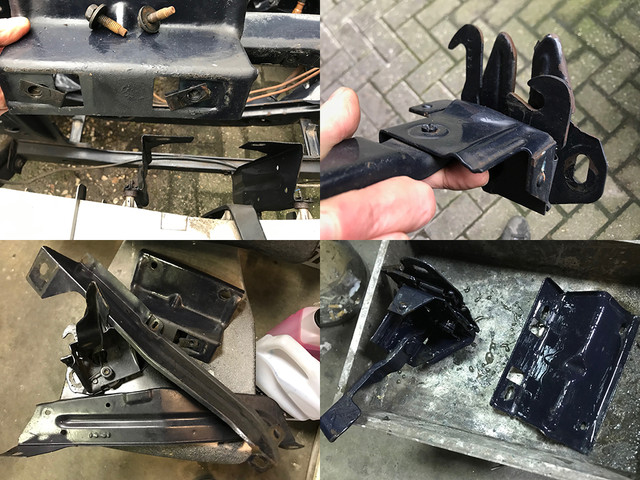


Its been a while since I've showed you horror pictures, so as weather might be "paint ok" in a not too far future, I've collected new parts, enough material for dirty work! :)

Some will be zinc plated, some painted and some both. So removed a few more parts on the car. Notice the rusty hardware, and started by spreading some paint remover on the latch mechanism..
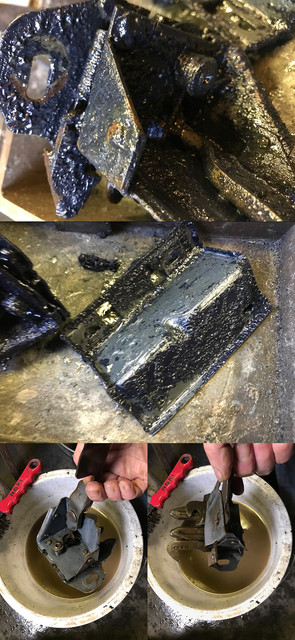


Here some horror picts after 16 hours. But after a good cleaning massage, things started look at some mustang part.
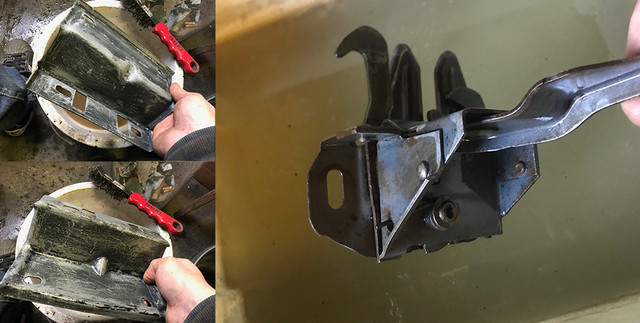


Did the other part (under a new layer of remover right now) and because the lady rust is at work on this latch too, its now in my derust bath, and will stay prolly 48 hours in it.
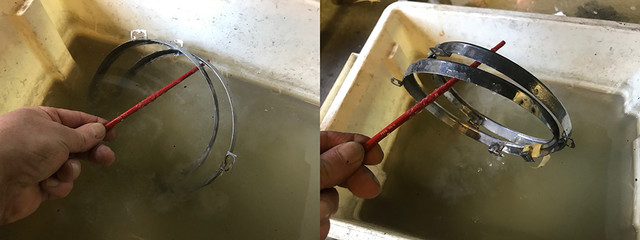


The light bezels were also derusted. A bit strange part, looks like stainless, but there is some rust.

I'll return on these, as one has some damage and need make a buck to hammer it back to a round shape.

I'll need to weld or solder one of the lip too, it broke once I've turned the screw on the car. Anyone repaired one of these?
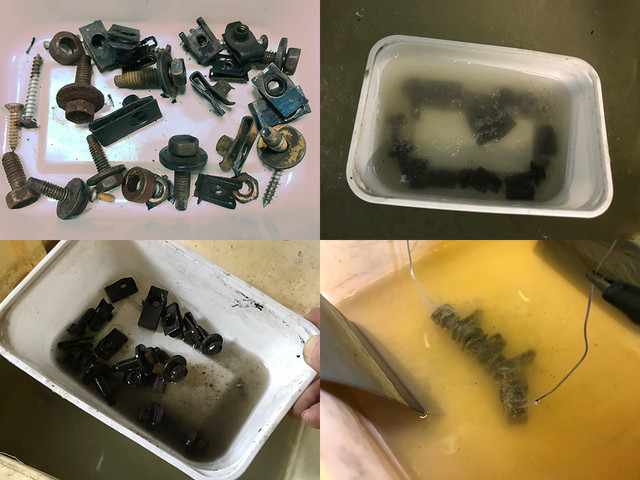


In between, been busy cooking the hardware on saturday and electro cleaned them today for a couple of hours.
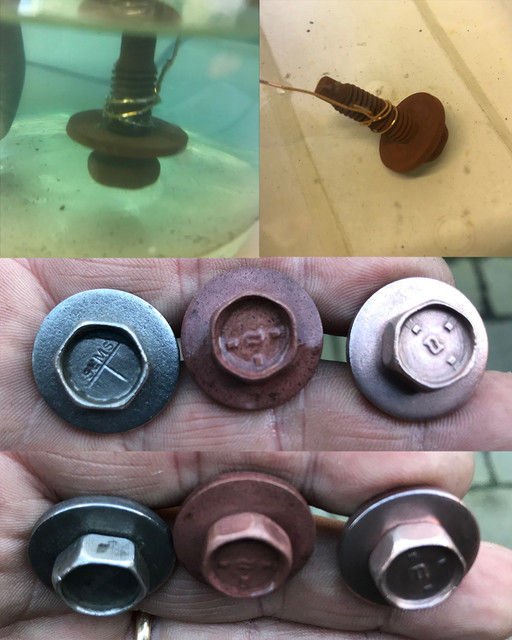


For these, I've used the receipt found last week that deposits a strong and thick copper layer.

Left, raw from electro cleaning, in the middle after being plated, on the right, just brushing them with wool makes the copper shine like a new penny.

If you wonder why copper plate them and not directly apply nickel... Unlike zinc that will corrode to death to protect the underlaying substrate by its negative charge. Nickel is the opposite. The substrate will corrode to protect the nickel. Having the copper in between reduces this behaviour a lot.
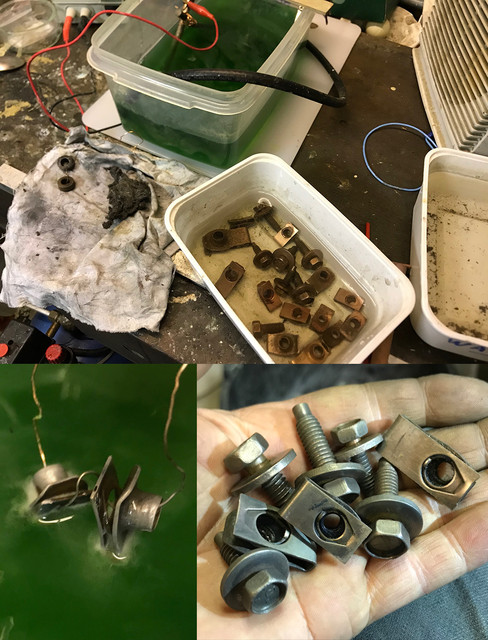


I did not polish any of the hardware, just brushed them and plated them in copper and then they received a layer of nickel. I'll polish some if that will be required later on but for now the 50 years old latch hardware is good to go for another 1/2 century.

I've started other stuffs, and should have more horror picts to show soon :)

To be continued...
1 ZAKJE = 1 THEELEPEL isn't Dutch a Funny Language !? 1 BAG = 1 TEASPOON 

Dr OETKER to the rescue LOL! I remember Dr. OETKER from my childhood, GOOD STUFF!

Looking really awesome there Chef Fabrice de la Bocuse!  :p

 
Chef Fabrice,

 Great work not only with your new recipes when you cook, but also with your lab work cleaning and plating metals. I still feel like I need to send you a new Lab coat and goggles.

Still working on some of your numbers. Be sure to let me know when you get your sample bolts in and what quality level they are!

Master Chef and Chief Engineer Fabrice
ahaha, Yeah I could use a coat/googles. :)

I've looked again at the shop I've mailed you about (and others here)

So far, the english sized grade 5 quality they offer is not only expensive, 3 to 4 euros a piece but only zinc finished. meh...

Also flat headed unlike the original ones that I'd like to have. I keep looking (and meanwhile restoring the ones I have worth saving)

 
Half the temp announced last week for the weekend, still too cold to spray anything,

but spring is really coming now. Was really nice day and dry for once.

Went back to the hood latch. I've let it in derust bath for almost whole week. Totally forgot it :)

So today, it was cooked :)


After a good soapie cleaning, it got a 2 hours electro cleaning.


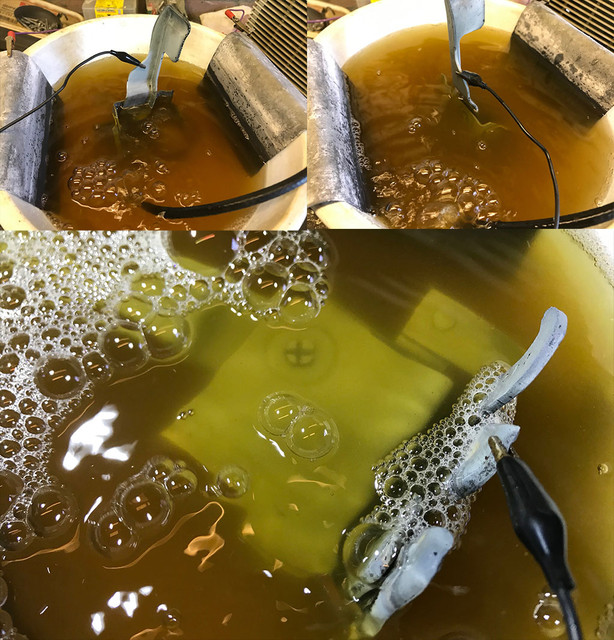
Then went bathing for several hours in my zinc juice. Alternating garden activities and turning the part to get it nicely covered.


Few hours later, rinced and air dried, a good layer of zinc was on the latch.


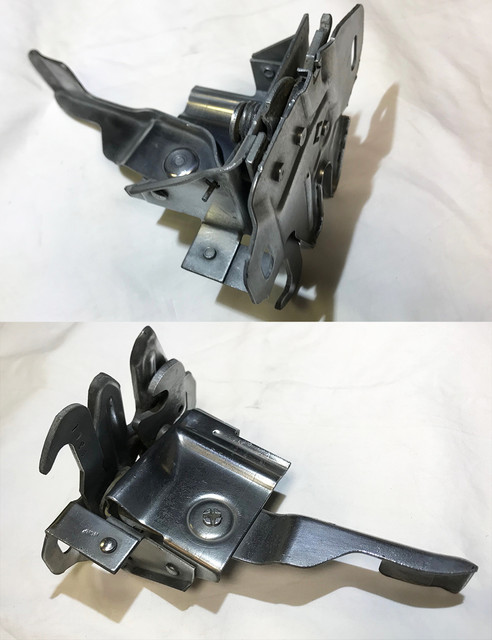
A tad of elbow oil with wool later and tadaaaaa: the latch was as good a new! :)

Tho not finished yet, it will receive bits of paint asap, mainly on the non rivetted regions.

But for now, I'm pleased with the way it looks.


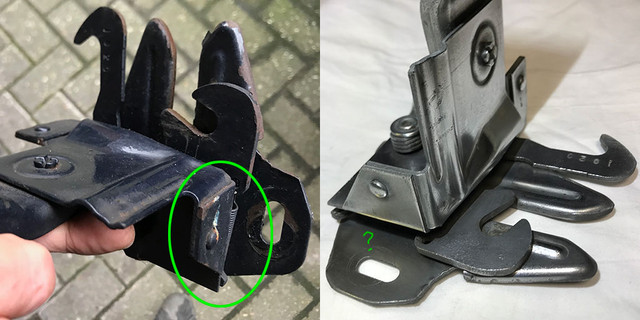
Blinded by the bling bling, it took a while before I noticed a spring was gone. On the left, this picture was taken 2 weeks ago. The spring is clearly there. Where did it go???

I have no idea! Over cooked it may be?? :)

Mmm, where could I buy this kind of detail over here. That too, no idea :)

to be continued...

 
Last edited by a moderator:
Some springs don't like the acid bath/cleaning solution; others tend to disappear in the plating process. I believe this is common on door latch mechanisms as well.

Since spring is right around the corner, why not look there for a replacement?

 
@midlife :)

As the bubbles season comes to an end, today I've finished a few things..


Half done last week, I've reapplied some paint remover and brushed the bracket to bare metal.

Cleaned it and zinc plated it. With the paint that I'll spray on it in coming weeks, corrosion should not come back anytime soon on this one.

There was a few weeks back a discussion about this part and the latch and the way it was done. From what I saw on mine that was painted over the original finish, Ford applied zinc (it was almost gone), then a light grey primer and a darker grey paint (still visible top left).

I won't do the same for the finishing color, but the principle will be the exact same: zinc, prime, paint.


Then reassembled the hood twist locks. they are not perfect but considering the way they were and that I've used them to learn the basics of plating, they'll proudly do their extra safety job again.


And after so much efforts to finally get copper on zamak, I've replated both lights rings in a thick layer of zinc :)

I just couldn't get a thick soft copper layer that I could use to buff on this metal as I now can get on iron/steel.

I was planning to retry another idea but paint/body season being at the corner, that will wait. They look good enough anyway.

I'll be mainly busy on my 73 in coming weeks, but I should be able to paint a couple of parts for the 71 in between.

To be continued...

 
Last edited by a moderator:
Spring is here!

Wanted to paint today but had to check my wife's car, mow the lawn...

No prob, I'll paint more parts in one go!

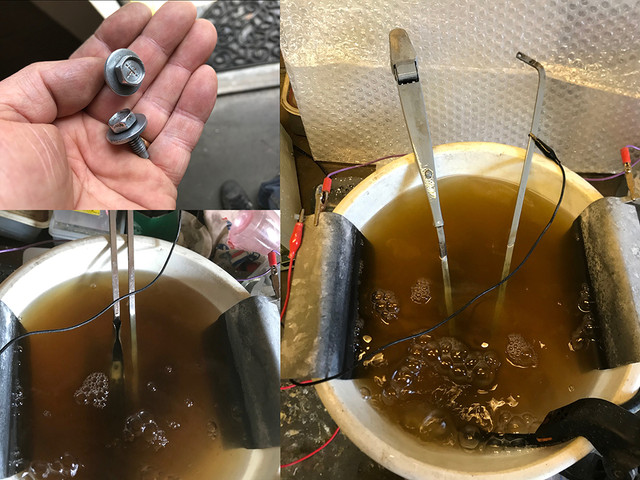
In between garden/car activities, I started by giving a cleanup to the garage (was really needed) and while packing parts done during the winter, I saw I've missed 2 bolts for the trunk latch. So plated these first and they joined the latch bracket in a box.


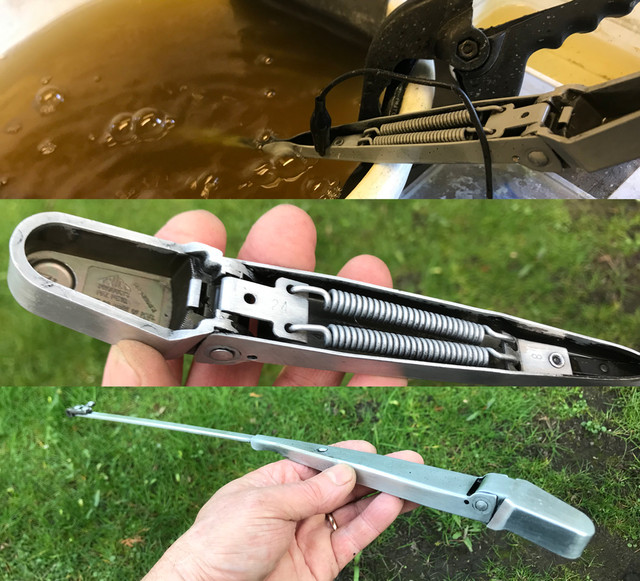
Then took the wipers arms that were waiting from last week. Gave them a cleaning session and they went in bath.


Two hours later both were done. Now being protected, they'll be painted black later on. Glad to see there were no missing springs this time :)


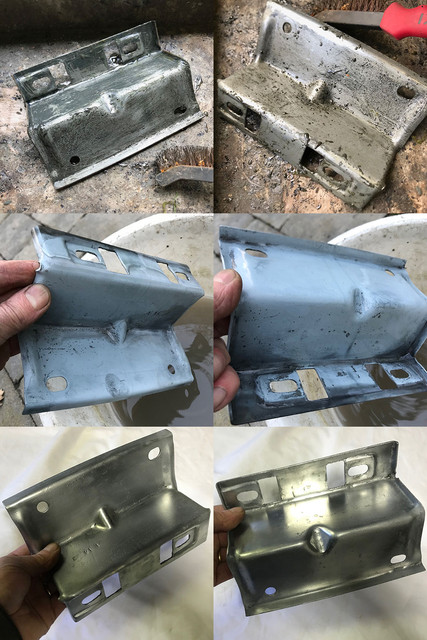
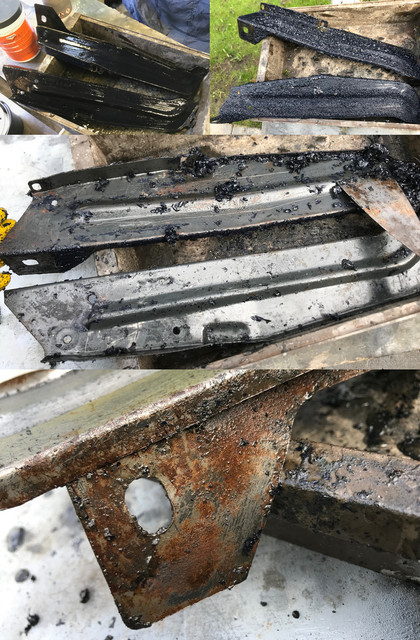
Then the next patients were the 2 central brackets holding the 71 grille.

Just like the rest, they were painted blue, and were at first sight looking good. I know more than one who would have thought, bit sanding, primer and done.. But after a paint removal session, it/s clear there was rust underneath.... Turn it the way you want, it's a 50 year old car and everything needs be done.


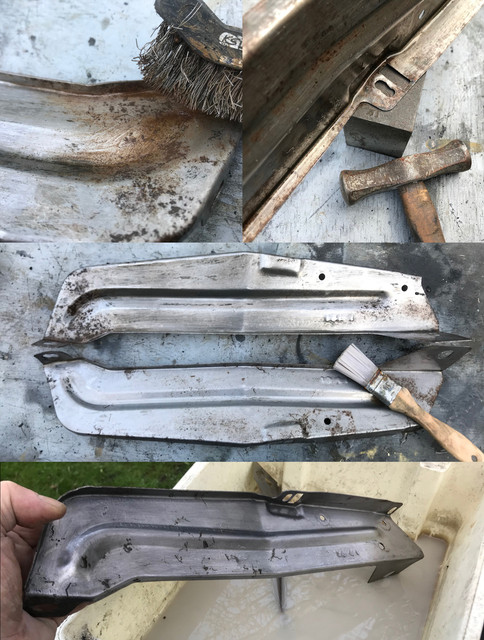
So after some raw brushings, phosphoric acid and the metal hammered in many places to restore their shapes, they went in the de-rust bath. One is still cooking, and handled the one as I wanted plate at least one today...


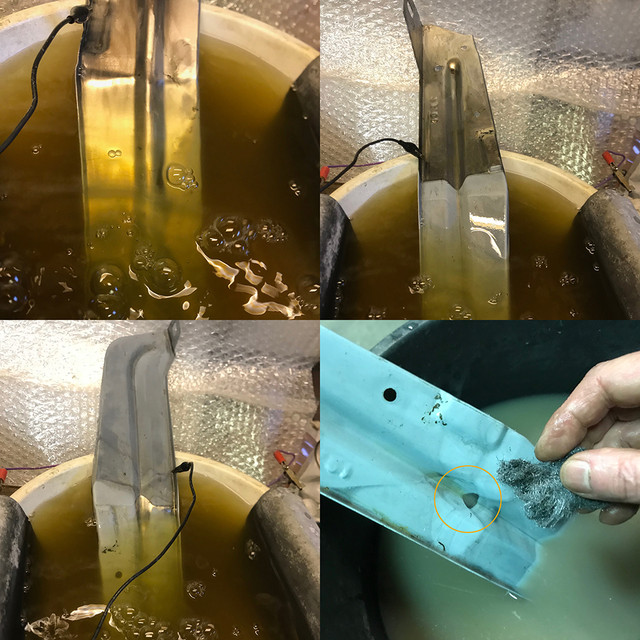
After a good de-rust bath + brush + wash, the clean bracket went in my way too small bath for these. Tomorow, I'll use a larger container... Because of this restriction, no matter how I moved, I couldn't get one spot done. The price to pay for being too lazy! :)


Moments later, after a soapy clean and a wool massage, got my bracket bling bling & protected, ready to receive some primer and paint very soon...

Tomorrow, I'll do the other one, and more if the weather is as nice as today...

 
Last edited by a moderator:
Hey now Fabrice send them center brackets on over...meaning my way.  lollerz Yours are in better shape than mine (totally dented) which are at the chrome shop right now LOL. They promised me they'll turn out real nice, one can only hope! Nice work you do!!!

 
@Not A T5

Mine were not looking that bad but I had to hammer them back in shape in many places. Especially the holes ears, where metal was displaced because of excessive torque used on the bolts/retainers.

Glad I did not start spray anything, temp dropped a lot today.

So went back to restoring old metal...


So started with the bracket that stayed the night in my derust bath..

What a... !?

Rust is mostly gone, but part is plated in copper!!!

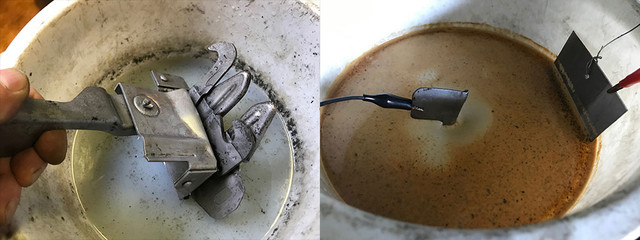
After trying many ways to plate durable copper, for one acid method I've tried to over saturate the vinegar. Plating result was really brownish and not durable and added this +- 25cc test to the bath weeks ago. So there is no waste and the copper would not hurt anything... I've used this bath since then on many parts and bolts, but somehow only this particular bracket metal reacted to it, and so I got my part de-rusted and plated while doing nothing! Go figure! :)


Anyway, because +-12 hours were not enough, there were still pits of rust and was planning do that baby today, so went mechanical, followed by acid. Just like the first one, two hours later, ended up after a wool massage with a bling bling bracket and of course a missed spot like yesterday, only this time, there is copper there! :)


No more rust! I know I will epoxy prime and paint these, still, I hate these missed spots!


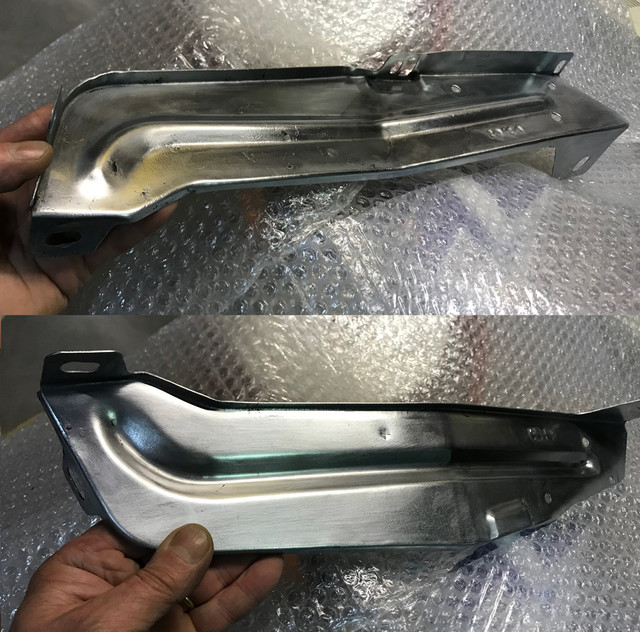
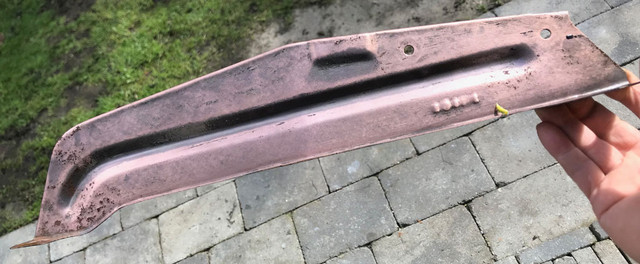
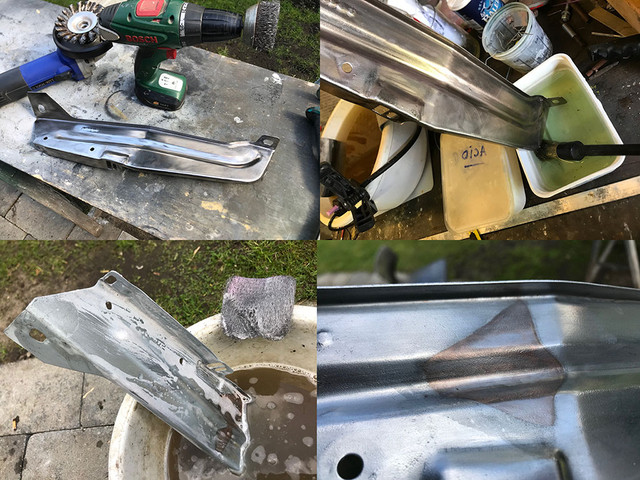
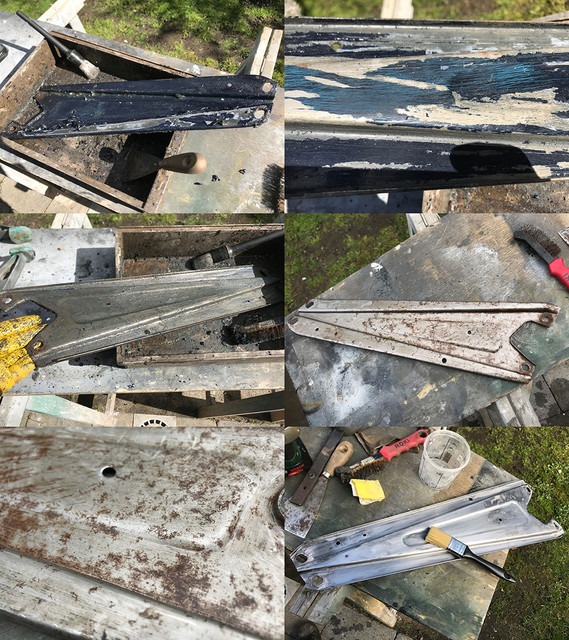
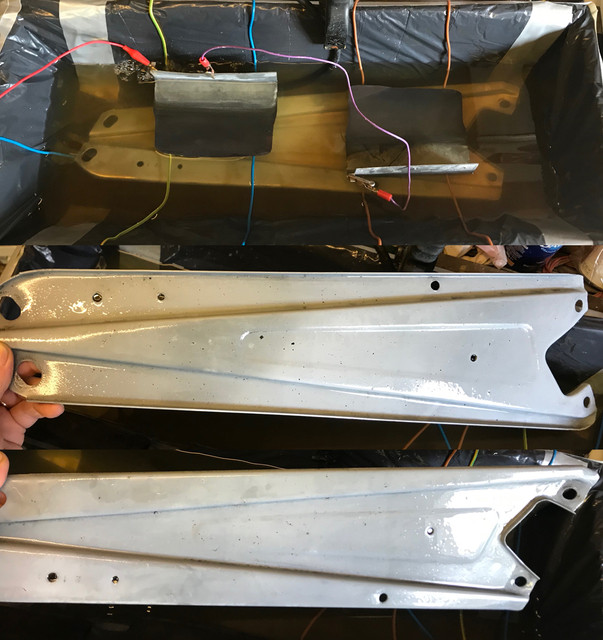
While the bracket was plating, I was busy with the next patients: the tower braces (or what ever these are called). Took the first one, looking decent in the blue paint, its when paint was removed that it was obvious. rust was there. Not that much but of the kind that would lift a paint. After some chemical and mechanical massage, finally got rid of the rust and could see the healthy bare metal on entire part.


Yesterday, I was planning to use a bigger container, problem is that these are much larger than any of the containers I have in house. No matter what, these are waaaaay too big :(

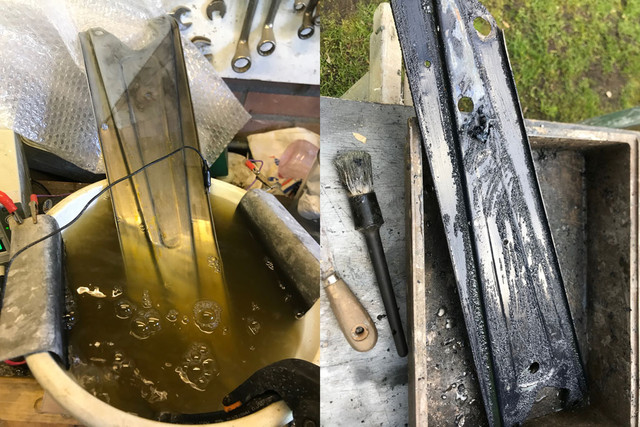
So I though, I protect at least both extermities, while I was starting on the other one.


I need a bigger container! Now! But these are 60 cms, even the smaller brackets do not fit in diagonal of the standard sized 45cm containers. But much bigger means much more juice, which isn't really what I'm after. I need something long, not deep. I may make one myself this week..


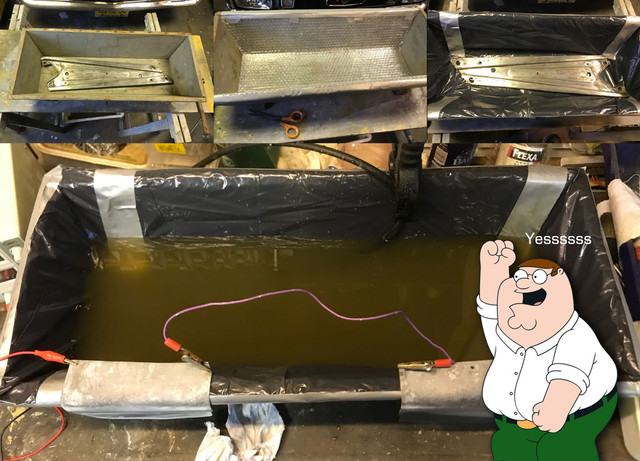
And then I recalled some wooden chest with rusty old tools that I was supposed to bring to the recycling station months ago. Hammering & tape noise in garage: YES!

So I'll be plating these very soon and in one pass. No more missed spots :)

Because of its strange angles, I don't even need much extra juice, 1 or 2 liters will do just fine. I will suspend the anodes on top vs on the side...

Moral of the story: not listening to the wife right away is a good idea! (sometimes) ;)

To be continued...

 
Last edited by a moderator:
Ah! I've looked online by plastic companies, most I found was about food storage and transport in all shapes bellow the standard 45cm.

For greater, dimension expends a lot on the 3 axes. Was about to go look for a bath tub to wash babies.. 

I'm set for these 3 or 4 parts for now, didn't think about trays for plants... thx for the idea, good one!

Will go take a look next time I drive nearby one of these garden centers.

 
Just a little update.

Not usually doing anything during the week, but as the brace was 1/4 done and the bath ready.

I didn't want to see the metal rusting again where it was unprotected!


Did not need any extra fluid, made a quick and dirty hanging system for the anodes usually hung on the side. Doesn't need be nice or be hight tech, its a one time thingy that needs to work.

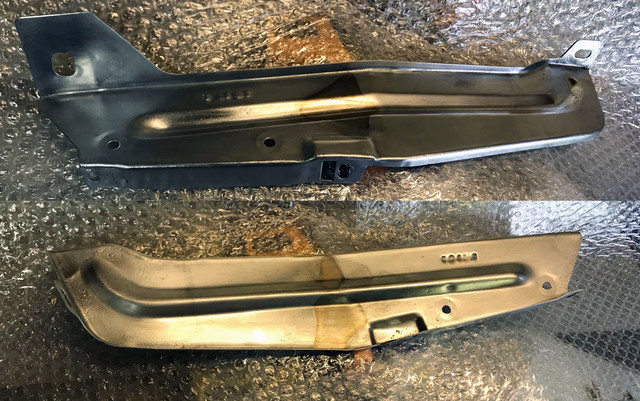
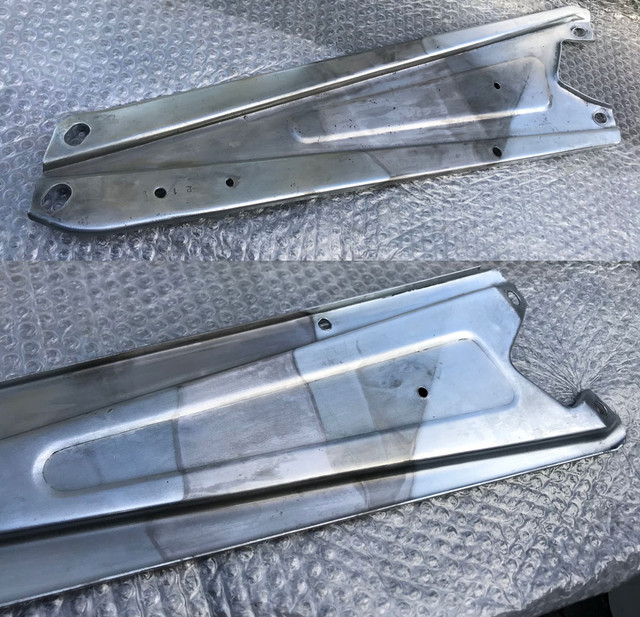
In between work (the real one), went to move the anodes every 15-20 minutes. And got the part fully coated with a nice even and thick layer.


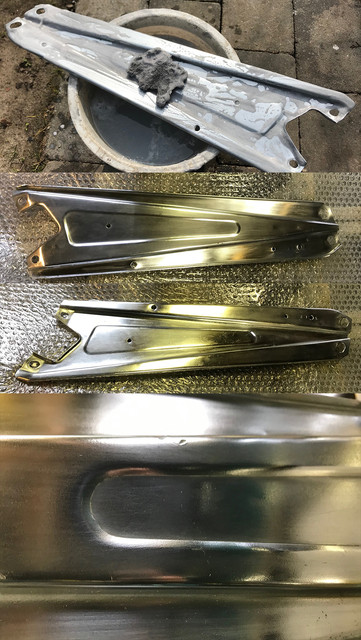
A little soapy bath to remove the acidity and a wool massage later: bling bling! :)

It's about rust removal and corrosion prevention. If these were not ment to be sprayed soon, I'd give them a nice polish. You almost want to keep them this way :)

Vinegar is a truly magical liquid, amazes me every time!

 
Last edited by a moderator:
Back
Top