Your going to need sunglasses to protect your eyes if you get them parts any more shiney
Fabrice's 429CJ 71 project
- Thread starter Fabrice
- Start date

Help Support 7173Mustangs.com:
This site may earn a commission from merchant affiliate
links, including eBay, Amazon, and others.
- Joined
- Mar 30, 2017
- Messages
- 2,418
- Reaction score
- 930
- Location
- The Netherlands
- My Car
- 73 Grande 351C
71 Mach 1 429CJ
@Pegleg
Ahaha yeah man,
Actually you might be extra right, as they say tomorrow might become the first really nice day of the year.
Today was nice but still bits cold. A good reason to be active
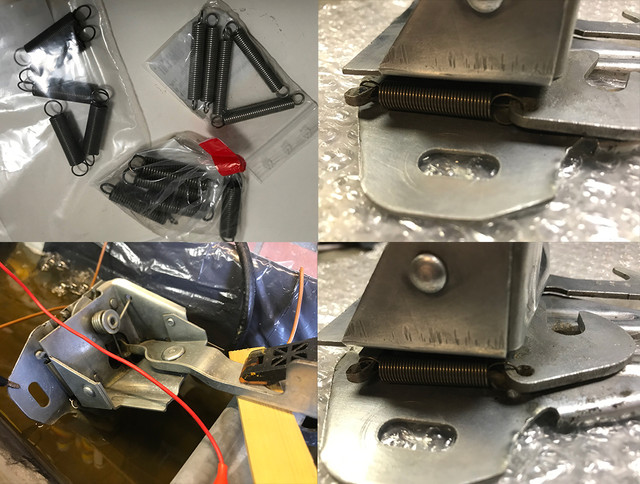
Got this week some replacement candidates for my missing latch spring. Still haven't seen it anywhere... Thanks to Steve (@Pegleg) for measuring on his car and me on my own latch (the holes), ordered variations of the guessed size (length, rest length, max length, diameter) in stainless steel. Got 2 matches, one bit too strong, as Steve told me it was soft to the touch (not much tension), so went for the gentle one. Played a bit with it, looks like the extra lock arm activated and released by this spring works as expected. May i need more muscle, i have the other one, but not really expecting I'll need it.
Also plated extra the handle, as I'm not yet sure if I will keep it this way of painted.
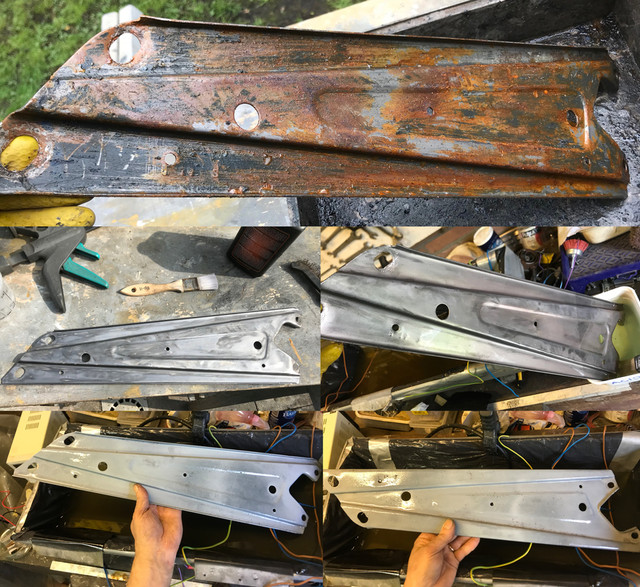
Then took the second brace. Finished to remove the old paint, de-rust, metal brushing, acids...
2 hours of plating bath later, they were under a nice thick layer of zinc.
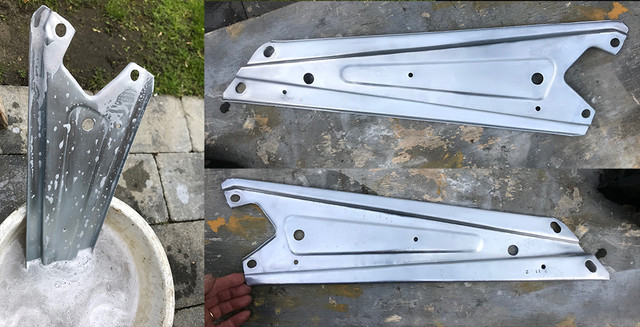
Wool massage in soapy juice: bling bling just like the other one. Both ready for the next step!
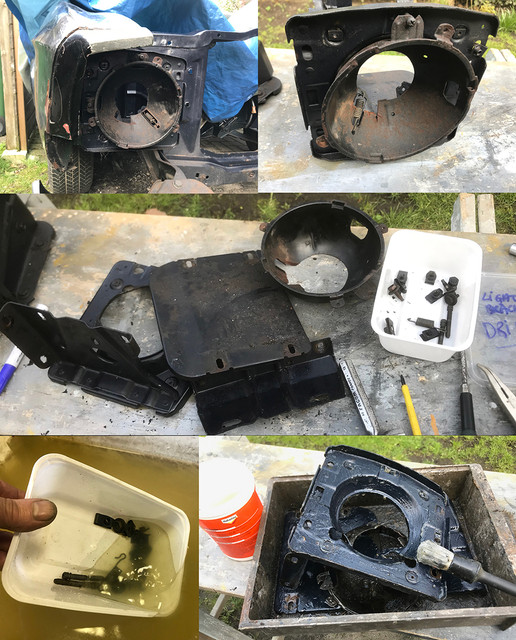
In between cooking sessions, I was busy on the car collecting a new load of parts that need and will be massaged. Next victim: the headlights brackets. After many picts taken during removal, I've dismanteld one, degreased it, its hardware sorted is now in bath and should be done by tomorrow.
The 4 pieces are now enjoying a paint remover. I should have again some pretty nasty picts to show by tomorrow
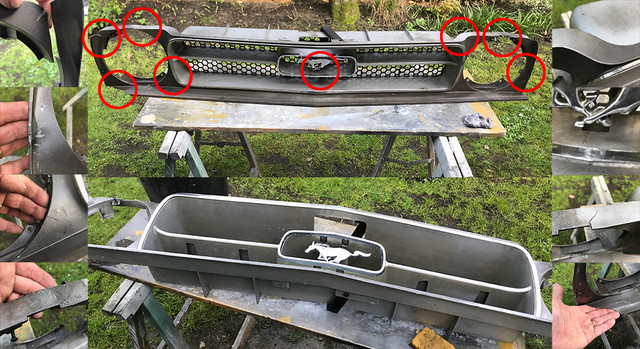
Another victim that will require surgery is the grille. Not less than 8 broken bits, 2 kinda severe, 1 so severe there isn't even the missing piece. Looks like I gonna need some new toys to fix these but I'm strangely more confident about fixing these than just removing the moldings.
The pony is obvious, 2 nuts behind, but the thin moldings and the one in center?
How do you remove these? On a 73, there are plastic clips, but on this 71, I see rust bleeds on the plastic behind the stainless parts. What's the best way to proceed?
Also if someone have picts of the expected hardware/clips... that would be very welcome. thx by advance.
Ahaha yeah man,
Actually you might be extra right, as they say tomorrow might become the first really nice day of the year.
Today was nice but still bits cold. A good reason to be active

Got this week some replacement candidates for my missing latch spring. Still haven't seen it anywhere... Thanks to Steve (@Pegleg) for measuring on his car and me on my own latch (the holes), ordered variations of the guessed size (length, rest length, max length, diameter) in stainless steel. Got 2 matches, one bit too strong, as Steve told me it was soft to the touch (not much tension), so went for the gentle one. Played a bit with it, looks like the extra lock arm activated and released by this spring works as expected. May i need more muscle, i have the other one, but not really expecting I'll need it.
Also plated extra the handle, as I'm not yet sure if I will keep it this way of painted.

Then took the second brace. Finished to remove the old paint, de-rust, metal brushing, acids...
2 hours of plating bath later, they were under a nice thick layer of zinc.

Wool massage in soapy juice: bling bling just like the other one. Both ready for the next step!

In between cooking sessions, I was busy on the car collecting a new load of parts that need and will be massaged. Next victim: the headlights brackets. After many picts taken during removal, I've dismanteld one, degreased it, its hardware sorted is now in bath and should be done by tomorrow.
The 4 pieces are now enjoying a paint remover. I should have again some pretty nasty picts to show by tomorrow

Another victim that will require surgery is the grille. Not less than 8 broken bits, 2 kinda severe, 1 so severe there isn't even the missing piece. Looks like I gonna need some new toys to fix these but I'm strangely more confident about fixing these than just removing the moldings.
The pony is obvious, 2 nuts behind, but the thin moldings and the one in center?
How do you remove these? On a 73, there are plastic clips, but on this 71, I see rust bleeds on the plastic behind the stainless parts. What's the best way to proceed?
Also if someone have picts of the expected hardware/clips... that would be very welcome. thx by advance.
- Joined
- Nov 15, 2016
- Messages
- 652
- Reaction score
- 15
- Location
- Australia
- My Car
- 1972 Mustang Coupe 302 Auto RHD
G'day Fabrice
Good to see your restaurant is still running flat out
The 71 & 72 grille moldings are clipped directly on to the grille plastic, no removable clips
If you are very careful, unlike myself, pry them off and you might not break any of the raised sections on the grille
I broke several and glued most back on with PVC glue which kind of worked although some broke again
From what Don says at OMS the 73 clips are too wide
Picture below shows on the left what you are left with when they break and on the right a good one

Fabrice mine was pretty beat up too. I went a differant route to you. I just bought a new one but i chopped the old one up and sold it on Ebay as a man cave shelf
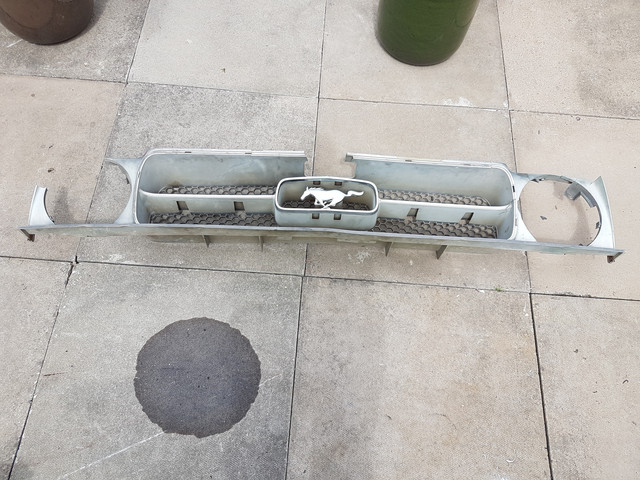
Can you see the oblong holes where the trim fits
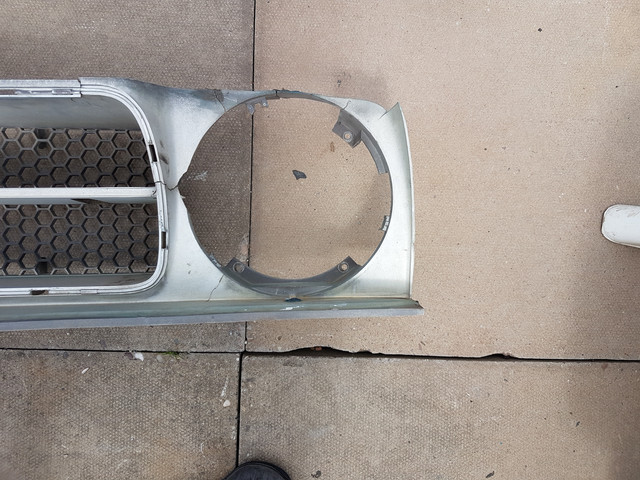
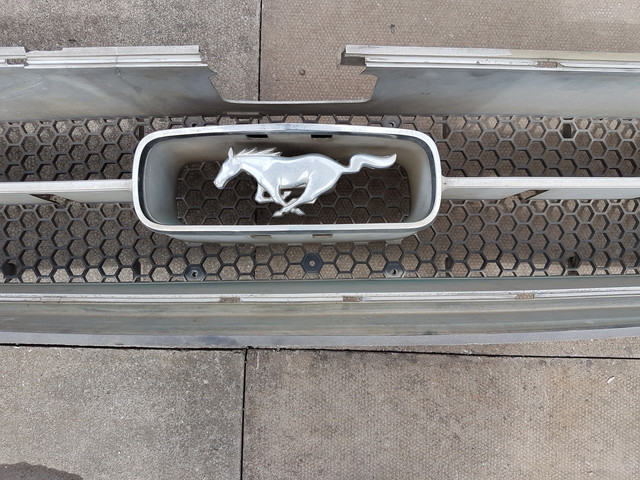
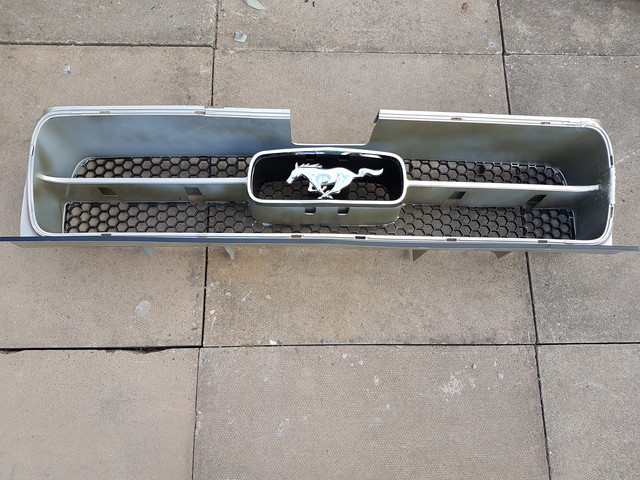
This was how the old one ended up. Chopped what was left of the headlight surround off, strengthened the bad cracks with fibreglass, and sprayed silver/gold. Sold on Ebay to a buyer in France for £100 which went toward new one.
I took the old trim off the one i sold and its for sale on ebay. You can see the back of the trim in this listing https://www.ebay.co.uk/itm/333125908629?ssPageName=STRK:MESELX:IT&_trksid=p3984.m1555.l2649
Hope this gives a better idea of how trim fix on

Can you see the oblong holes where the trim fits


This was how the old one ended up. Chopped what was left of the headlight surround off, strengthened the bad cracks with fibreglass, and sprayed silver/gold. Sold on Ebay to a buyer in France for £100 which went toward new one.
I took the old trim off the one i sold and its for sale on ebay. You can see the back of the trim in this listing https://www.ebay.co.uk/itm/333125908629?ssPageName=STRK:MESELX:IT&_trksid=p3984.m1555.l2649
Hope this gives a better idea of how trim fix on
Those oblong holes should have a piece of plastic in them that the trim attaches to but its just a oblong hole. The bits missing from the oblong holes are very very fragile and very difficult to remove trim without breaking brittle plastic
- Joined
- Mar 30, 2017
- Messages
- 2,418
- Reaction score
- 930
- Location
- The Netherlands
- My Car
- 73 Grande 351C
71 Mach 1 429CJ
@Steve, @OzCoupe72
Thx guys. Yeah, I know I can get a new one. I can even find these here for a human price. I'll try and see. May I succeed, I might even let the trims on as there is no really big plus to remove them anyway... Gonna try on the most damaged bits and if I don't get a nice bond, I'll have a cave deco
Got yesterday the feeling I'd be looking at nasty things today.. I was right
BUT I did it in the sun! What a wonderfull day it was...
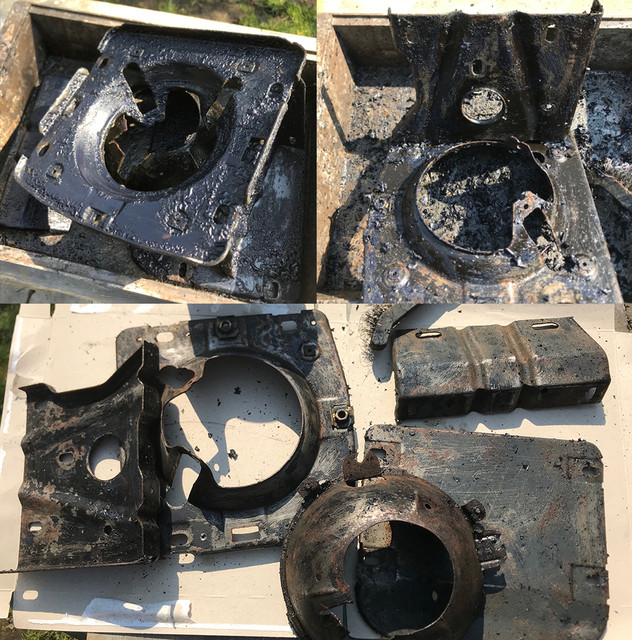
Nothing better than old rusty headlights bracket to celebrate the nice weather!
Here after a nite, paint was fairly easy to remove. Then re-applied and my paint remover that works only when it's not too cold confirmed it was a nice day to do this.
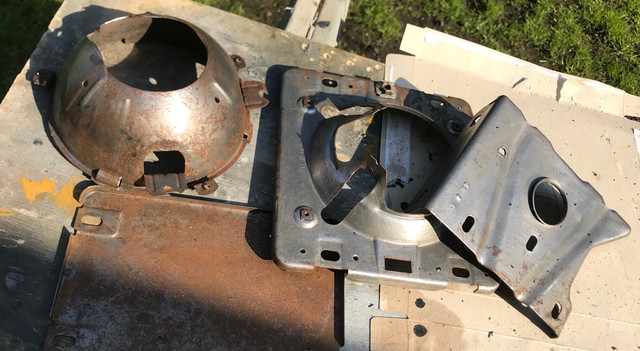
While one part was already under electrolysis, drilled the 4 rivets as to work better and not long after I finally got my parts paint free. Not rust free!
Once again, do not ever trust the way paint looks. It's a 50yo car! There is rust there!
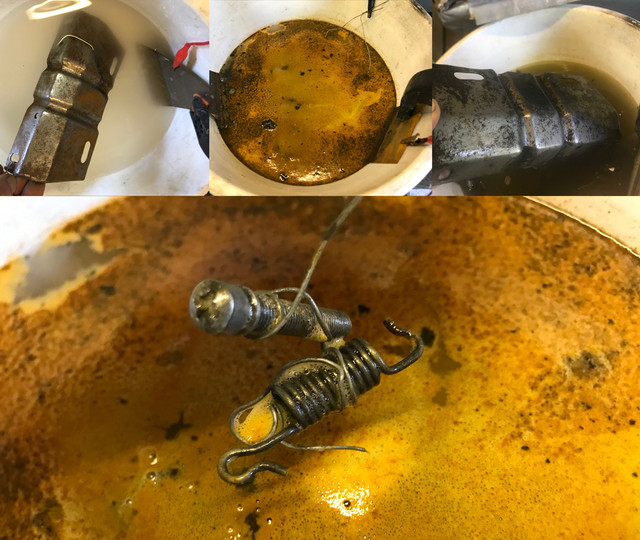
I will not display all the ugly nasty soups I've played with today, but I'd thought you'd like an impression

Multitasking between baths, brush, clean sessions, got my first result done. After few hours of misery, these made my happy
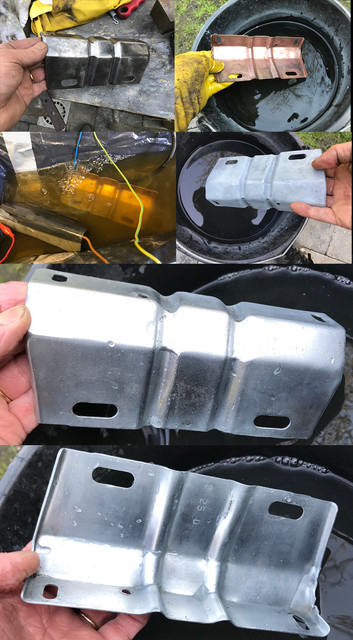
Then the next one followed... Notice the top right pict: its copper!! I found why and how I got the good copper layer last week, and now that I can reproduce, I let the elements do the work!
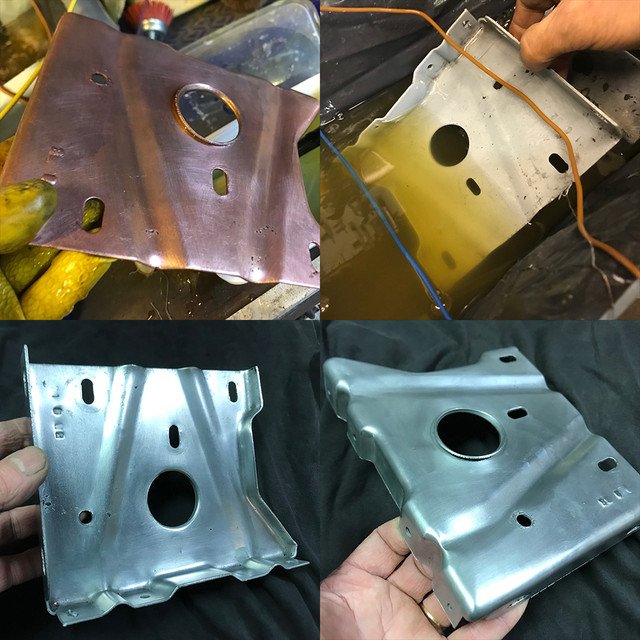
Copper, zinc : Boom! Another bling bling part done!
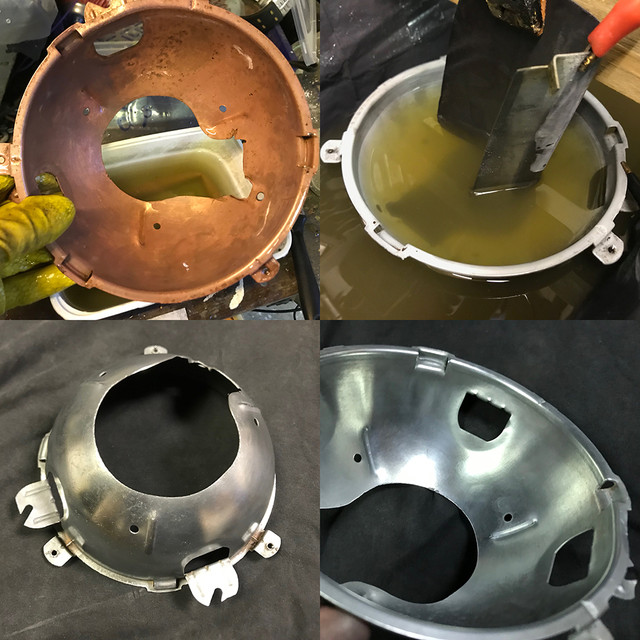
Look at this baby... I thought I might need find a replacement! It's already better than new now and its only 1/2 way done!
Because the 2 others are having lots of corrosion, they are still in bath and will be electro cleaned in the eves this week..
All with all, a very productive day today. I even restarted the 73. The Sniper did its magic. almost 6 months still, turn key, no pomping no nothing. Started like a modern car and went idling a flawless 900rpm after first starter turn. No more carb ever for me for sure!
To be continued...
Thx guys. Yeah, I know I can get a new one. I can even find these here for a human price. I'll try and see. May I succeed, I might even let the trims on as there is no really big plus to remove them anyway... Gonna try on the most damaged bits and if I don't get a nice bond, I'll have a cave deco
Got yesterday the feeling I'd be looking at nasty things today.. I was right
BUT I did it in the sun! What a wonderfull day it was...

Nothing better than old rusty headlights bracket to celebrate the nice weather!
Here after a nite, paint was fairly easy to remove. Then re-applied and my paint remover that works only when it's not too cold confirmed it was a nice day to do this.

While one part was already under electrolysis, drilled the 4 rivets as to work better and not long after I finally got my parts paint free. Not rust free!
Once again, do not ever trust the way paint looks. It's a 50yo car! There is rust there!

I will not display all the ugly nasty soups I've played with today, but I'd thought you'd like an impression

Multitasking between baths, brush, clean sessions, got my first result done. After few hours of misery, these made my happy

Then the next one followed... Notice the top right pict: its copper!! I found why and how I got the good copper layer last week, and now that I can reproduce, I let the elements do the work!

Copper, zinc : Boom! Another bling bling part done!

Look at this baby... I thought I might need find a replacement! It's already better than new now and its only 1/2 way done!
Because the 2 others are having lots of corrosion, they are still in bath and will be electro cleaned in the eves this week..
All with all, a very productive day today. I even restarted the 73. The Sniper did its magic. almost 6 months still, turn key, no pomping no nothing. Started like a modern car and went idling a flawless 900rpm after first starter turn. No more carb ever for me for sure!
To be continued...

$69.98
JH DESIGN GROUP Men's Ford Mustang Collage Black Zip Up Hoodie Sweatshirt (Large, CLG2-black)
Affordable Family Clothing

$18.99
Checkered Flag Men's Ford Mustang Cap Tri-Bar Pony Logo Adjustable Black Hat
The First Class Realtor

$34.95
$55.00
The Complete Book of Ford Mustang: Every Model Since 1964-1/2 (Complete Book Series)
Amazon.com

$9.00
2016 Hot Wheels Vintage American Muscle 1970 FORD MUSTANG MACH 1 die-cast 4/10
Cards and Bobbles

$13.75
$16.39
Ford Mustang: Trivia & Fun Facts Every Fan Should Know About The Great American Icon!
Amazon.com

$29.70
$35.95
Ford Mustang, Mach 1, GT, Shelby, & Boss V-8 (64-73) Haynes Repair Manual
Haynes Repair Manuals

$18.77
$24.95
Ford Mustang Pony Racing Stripe 5.0 Muscle Shelby Long Sleeve T-Shirt Front Back Print-Black-Large
Giftware Shop Usa

$22.98
JH Design Women's Ford Mustang T-Shirt's in 2 Styles Short Sleeve Crew Neck Shirts (as1, Alpha, l, Regular, Regular, CLG4-black/pink)
Affordable Family Clothing

$19.99
Checkered Flag Sports Ford Mustang Baseball Cap for Men - Logo Car Racing Hat Heather Gray, One Size
West Coast Corvette / Camaro

$119.99
Polished Rocker Panel Sill Plate Molding Kit with Clips Compatible with 1964-1966 Ford Mustang - Authentic Restoration for Classic Car Enthusiasts
Classic 2 Current Fabrication

$34.49
$42.95
Mustang by Design: Gale Halderman and the Creation of Ford's Iconic Pony Car
USA Speed
- Joined
- Jul 19, 2016
- Messages
- 2,144
- Reaction score
- 175
- Location
- Omaha, NE
- My Car
- 1971 Mustang Convertible
100 british pounds for a busted up grille...What a Bargain!Fabrice mine was pretty beat up too. I went a differant route to you. I just bought a new one but i chopped the old one up and sold it on Ebay as a man cave shelf

Can you see the oblong holes where the trim fits


This was how the old one ended up. Chopped what was left of the headlight surround off, strengthened the bad cracks with fibreglass, and sprayed silver/gold. Sold on Ebay to a buyer in France for £100 which went toward new one.
I took the old trim off the one i sold and its for sale on ebay. You can see the back of the trim in this listing https://www.ebay.co.uk/itm/333125908629?ssPageName=STRK:MESELX:IT&_trksid=p3984.m1555.l2649
Hope this gives a better idea of how trim fix on
- Joined
- Mar 30, 2017
- Messages
- 2,418
- Reaction score
- 930
- Location
- The Netherlands
- My Car
- 73 Grande 351C
71 Mach 1 429CJ
Usually not busy in the evenings (may be I should)
I've finished to zinc plate one side of this "nobody cares about" assembly.
Not riveted yet, will do after the paint job, but here's what I got after a few drups of elbow oil and looking at bubbles for a few hours
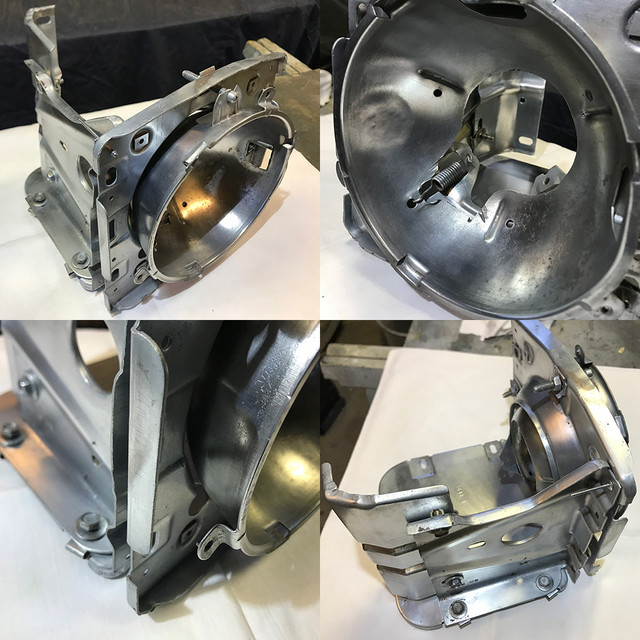
Metal is having scars from the now ancient pits from corrosion here and there. These will be corrected after the primer is applied.
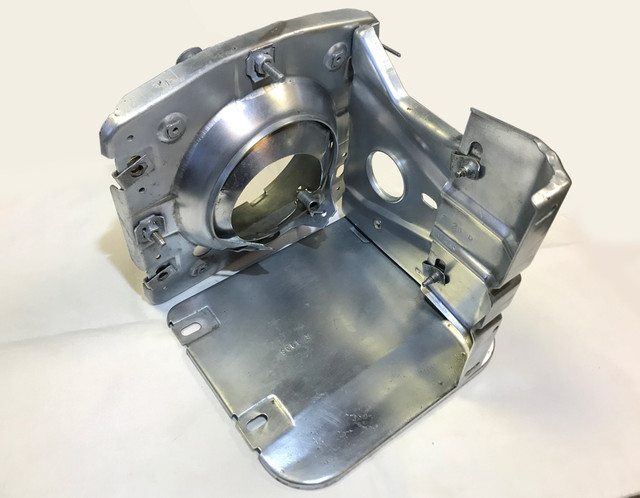
I don't want to think about the fact that it's just 1/4 of the work done,
for now, my vinegar and me are very proud we got this rusty piece of equipment back to this state!
I've finished to zinc plate one side of this "nobody cares about" assembly.
Not riveted yet, will do after the paint job, but here's what I got after a few drups of elbow oil and looking at bubbles for a few hours

Metal is having scars from the now ancient pits from corrosion here and there. These will be corrected after the primer is applied.

I don't want to think about the fact that it's just 1/4 of the work done,
for now, my vinegar and me are very proud we got this rusty piece of equipment back to this state!
Fantastic job Fabrice. Great work ethic and a eye for detail. That will look stunning when painted
Last edited by a moderator:

Another victim that will require surgery is the grille. Not less than 8 broken bits, 2 kinda severe, 1 so severe there isn't even the missing piece. Looks like I gonna need some new toys to fix these but I'm strangely more confident about fixing these than just removing the moldings.
The pony is obvious, 2 nuts behind, but the thin moldings and the one in center?
How do you remove these? On a 73, there are plastic clips, but on this 71, I see rust bleeds on the plastic behind the stainless parts. What's the best way to proceed?
Also if someone have picts of the expected hardware/clips... that would be very welcome. thx by advance.
I wish I would have seen this post early Saturday, I just replaced the clips on my grill molding this weekend. I got the clips from NPD and they fit very well, it is still a pain to install them on the molding and then on the grill itself. Here is a link to the ones I bought.
https://www.npdlink.com/product/mounting-kit-grille-molding-concours-improved-design-using/106357?backurl=search%2Fproducts%3Fpage%3D2%26search_terms%3Dgrill%252Bmolding%252Bclips%26top_parent%3D200001%26year%3D1973&year=1973
Also, I may have a spare grill that I have no problem giving to you, not sure how much shipping would be but we can check on that. I will look this week and take some pics. When I looked at it last month, it had no damage so let me know if you want it, it still has the coral and mustang on it as well.
And by the way, great work, your project is looking great.
Tom
- Joined
- Mar 30, 2017
- Messages
- 2,418
- Reaction score
- 930
- Location
- The Netherlands
- My Car
- 73 Grande 351C
71 Mach 1 429CJ
As I did not reply on the above post here, just for the record, I've been in contact with @vintageman for his generous offer. Turns out his spare grille is not a 71 but a 73.
So I'll be trying soon to see if I can repair it and give up early for a new one may that fail.
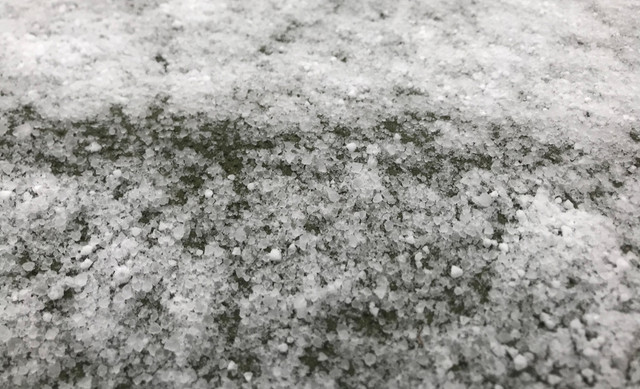
It was supposed to be very nice and warm this weekend.
Instead ice, snow and its freeze point as I type
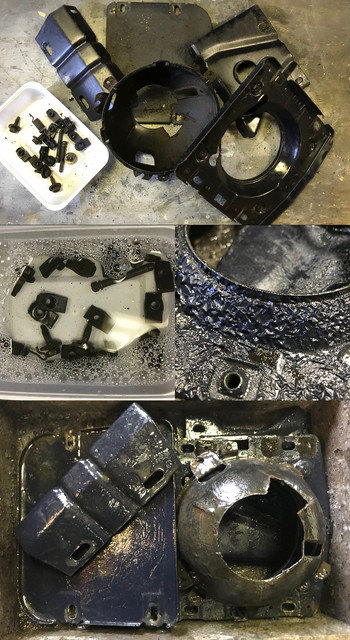
So went back to misery headlights assembly #2 in my cold garage.
Sort, clean, degrease, paint remover, bath here bath there. My now routined rituals.
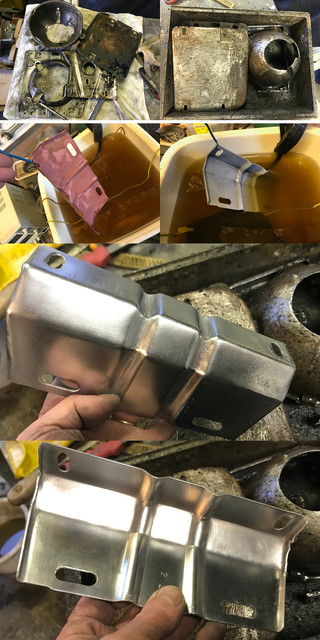
After fixing the headlight cup that was butchered like the other one. Its a common thing on french cars that were driven in the 80-90's, as french lights back then were having an extra light on the side that the US cup did not allow to fit. No problem, as its not visible once installed, excepted it was done the "pig" way and very sharp to the touch.
Because the temp was low, of course my paint remover works half or less. So after a cleaning a session, re-applied some in the hope it will do at least some bits during the nite despite the cold.
In between, one part had most my attention and got my first victim in a nice bling bling zinc jacket when the sun went down.
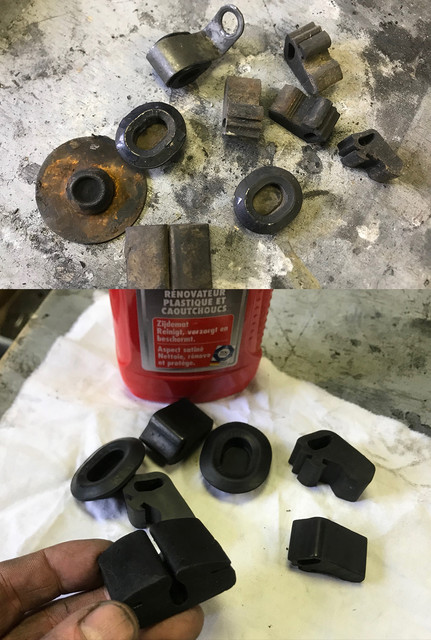
Among other small works, sorted some rubbers/grommets previously removed to see which ones I actually need to order. Thinner does wonders to restore raw rubber and a small massage in plastic/rubber cream got me 80% of the rubbers as new.
The big ones removed in trunk are not to be saved, I know where to find them and will order new ones.
However if someone could tell me how the one in my hand on the pict is called and where to find it, that'd be handy. This is one of the two rubbers that slides into the butterflies welded on the trunk floor when you have the fold down option.
Tomorrow, less ugly picts & more bling blings I hope!
So I'll be trying soon to see if I can repair it and give up early for a new one may that fail.

It was supposed to be very nice and warm this weekend.
Instead ice, snow and its freeze point as I type

So went back to misery headlights assembly #2 in my cold garage.
Sort, clean, degrease, paint remover, bath here bath there. My now routined rituals.

After fixing the headlight cup that was butchered like the other one. Its a common thing on french cars that were driven in the 80-90's, as french lights back then were having an extra light on the side that the US cup did not allow to fit. No problem, as its not visible once installed, excepted it was done the "pig" way and very sharp to the touch.
Because the temp was low, of course my paint remover works half or less. So after a cleaning a session, re-applied some in the hope it will do at least some bits during the nite despite the cold.
In between, one part had most my attention and got my first victim in a nice bling bling zinc jacket when the sun went down.

Among other small works, sorted some rubbers/grommets previously removed to see which ones I actually need to order. Thinner does wonders to restore raw rubber and a small massage in plastic/rubber cream got me 80% of the rubbers as new.
The big ones removed in trunk are not to be saved, I know where to find them and will order new ones.
However if someone could tell me how the one in my hand on the pict is called and where to find it, that'd be handy. This is one of the two rubbers that slides into the butterflies welded on the trunk floor when you have the fold down option.
Tomorrow, less ugly picts & more bling blings I hope!
Last edited by a moderator:
The cold holding everyone up. Some more than others. It sucks and its frustrating. Those rubbers look like brand new Fabrice. Great job as always from you. Tomorrow is a new day new challenge
- Joined
- Jan 1, 2012
- Messages
- 8,577
- Reaction score
- 1,458
- Location
- Eugene, OR
- My Car
- 1971 Mustang Sportroof M code
Trap door bumpersFabrice
However if someone could tell me how the one in my hand on the pict is called and where to find it, that'd be handy. This is one of the two rubbers that slides into the butterflies welded on the trunk floor when you have the fold down option.
https://www.cjponyparts.com/rear-trap-door-bumper-2-fb-1971-1973/p/HW608/
They are on Ebay too for $5.01 BUT with a $50.46 shipping charge. Are they 6ft square and weigh 100lb. Unfortunately this is the norm with a lot of sellers for those of us living outside the USATrap door bumpersFabrice
However if someone could tell me how the one in my hand on the pict is called and where to find it, that'd be handy. This is one of the two rubbers that slides into the butterflies welded on the trunk floor when you have the fold down option.
https://www.cjponyparts.com/rear-trap-door-bumper-2-fb-1971-1973/p/HW608/
You may want to ask Don if he has any. GSP makes shipping a realistic price
https://www.ebay.com/itm/Mustang-Folddown-Trap-Door-Bumper-1971-1972-1973-Pony-Enterprises/171528218196?hash=item27efe0e654:g:OcEAAOSwBP9UV9yg
- Joined
- Jul 19, 2016
- Messages
- 2,144
- Reaction score
- 175
- Location
- Omaha, NE
- My Car
- 1971 Mustang Convertible
Great work as always! On your cold garage, can't you just run some kind of heater(s)? Myself, I wouldn't put up with the cold 
I checked out the waste oil burners on Ebay and couldnt believe how expensive they are for what they are. Waste oil is very cheap but heater isntGreat work as always! On your cold garage, can't you just run some kind of heater(s)? Myself, I wouldn't put up with the cold
- Joined
- Mar 30, 2017
- Messages
- 2,418
- Reaction score
- 930
- Location
- The Netherlands
- My Car
- 73 Grande 351C
71 Mach 1 429CJ
@Not A T5
Elbow oil generates enough heat. Got red nose whole day, but was ok.
@Pegleg
[They are on Ebay too for $5.01 BUT with a $50.46 shipping charge. Are they 6ft square and weigh 100lb. Unfortunately this is the norm with a lot of sellers for those of us living outside the USA ]
Yeah man... Vendors of the internet, see what you force me to do!? All your fault if i restore vs buy!
@Don C
thx, with the right name, results pop up on screen...
As expected, way too cold nite and the paint remover did near nothing,
all took more time than expected and even the best part that I wanted start with first was far from being ready...
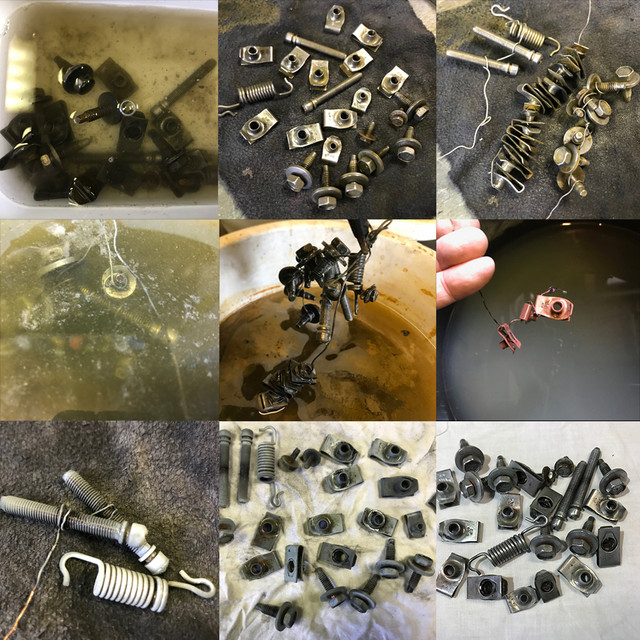
Done in between other parts, gave some love to the grille and assembly hardware.
Vinegar for the nite, brush, then electro clean, then plate and a quick wool massage.
The more I restore these, the more I want a tiny soda sandblasting corner. Unfortunatly, i'm out of corners
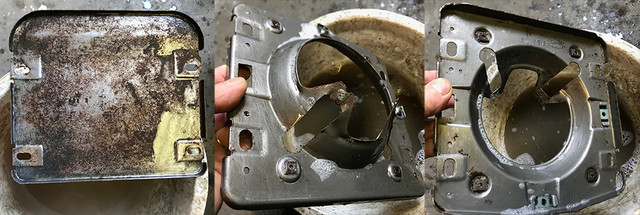
Even after a nite of de-rust and brushing this side is way more corroded than the other. So these will stay a couple of days and i'll finish them next week. All remaining parts are now paint free tho.
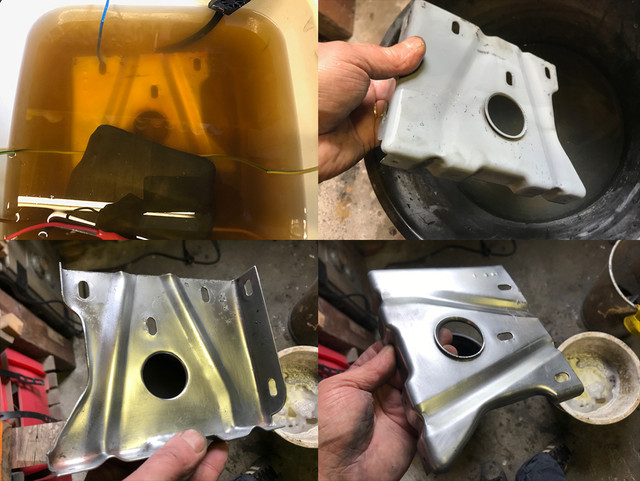
Finally got my first success story later in the afternoon!
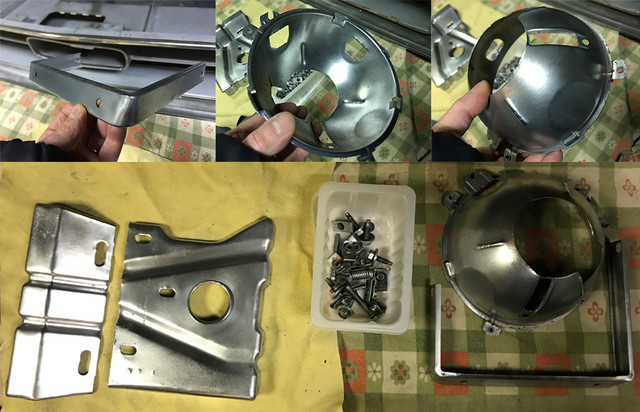
End of the day, the highly corroded cup was done too and even got the grille bracket back to better than new.
I was hoping to be done or at least almost done, but temp was really not helping. So I will need finish this side next weekend and may be try do some stuffs in the evenings as I'd love to start spray something next weekend...
To be continued...
Elbow oil generates enough heat. Got red nose whole day, but was ok.
@Pegleg
[They are on Ebay too for $5.01 BUT with a $50.46 shipping charge. Are they 6ft square and weigh 100lb. Unfortunately this is the norm with a lot of sellers for those of us living outside the USA ]
Yeah man... Vendors of the internet, see what you force me to do!? All your fault if i restore vs buy!
@Don C
thx, with the right name, results pop up on screen...
As expected, way too cold nite and the paint remover did near nothing,
all took more time than expected and even the best part that I wanted start with first was far from being ready...

Done in between other parts, gave some love to the grille and assembly hardware.
Vinegar for the nite, brush, then electro clean, then plate and a quick wool massage.
The more I restore these, the more I want a tiny soda sandblasting corner. Unfortunatly, i'm out of corners

Even after a nite of de-rust and brushing this side is way more corroded than the other. So these will stay a couple of days and i'll finish them next week. All remaining parts are now paint free tho.

Finally got my first success story later in the afternoon!

End of the day, the highly corroded cup was done too and even got the grille bracket back to better than new.
I was hoping to be done or at least almost done, but temp was really not helping. So I will need finish this side next weekend and may be try do some stuffs in the evenings as I'd love to start spray something next weekend...
To be continued...
Theres a lot done there Fabrice. Not just done but well done to the highest standard. Time invested into a hobby never has a value as its not a job or a chore. Only a pleasure. I hope its warm enough next weekend for you to begin painting. Its going to be warm enough here (So the experts tell me) but will see when it happens. Might even get the tomato plants in the greenhouse next weekend
- Joined
- Jan 7, 2015
- Messages
- 8,032
- Reaction score
- 536
- Location
- Western North Carolina
- My Car
- Multiple Mustangs!
You are doing fantastic work you can come work on my cars anytime you want.
The square plates on bottom of headlight bucket and the angle brackets that bolt to radiator support get the Slop Gray paint. You can probably buy something close local. The headlight bracket and bucket get Satin black.
Cheers,
D
The square plates on bottom of headlight bucket and the angle brackets that bolt to radiator support get the Slop Gray paint. You can probably buy something close local. The headlight bracket and bucket get Satin black.
Cheers,
D
- Joined
- Mar 30, 2017
- Messages
- 2,418
- Reaction score
- 930
- Location
- The Netherlands
- My Car
- 73 Grande 351C
71 Mach 1 429CJ
Thx David, Ok let me finish my 2 mustangs and I book a plane... Might take a while thoYou are doing fantastic work you can come work on my cars anytime you want.
The square plates on bottom of headlight bucket and the angle brackets that bolt to radiator support get the Slop Gray paint. You can probably buy something close local. The headlight bracket and bucket get Satin black.
Cheers,
D
For the grey, I will not use the original greys, I have selected greys for accessories/parts and stick to them for entire car. They will be lighter than the Slop gray and a tad warmer to marry better with my non original green (darker and metallic). All is and will be done with respect of the original but to some degree as I want the car to have my own twist on it above originality.
For the black, I have a quart waiting, but I need go this week to buy some semi gloss clear coats. There are few options, no sure yet which one I will pick.
I should try one very soon if temp permits it.
Similar threads
- Replies
- 14
- Views
- 617
- Replies
- 16
- Views
- 978
- Replies
- 17
- Views
- 1K


