Fabrice's 429CJ 71 project

7173Mustangs.com

Help Support 7173Mustangs.com:

This site may earn a commission from merchant affiliate links, including eBay, Amazon, and others.
Temp above 20c, sunny, Spring is here!!


The first brushes of the year are finally out!

Good kuz, I was using the autumn left overs :)


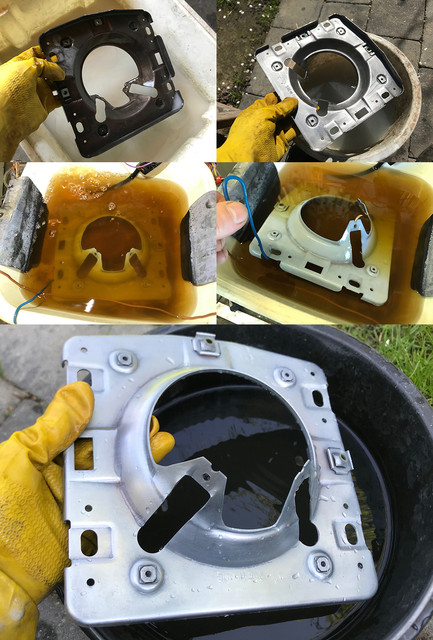
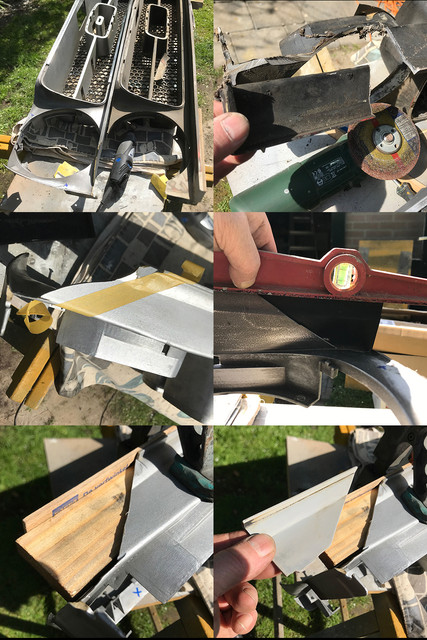
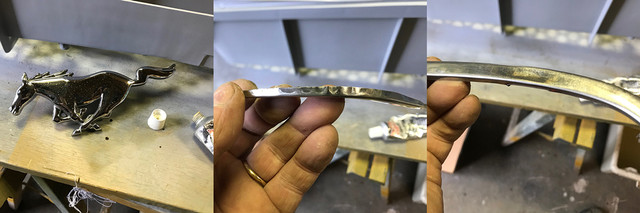
Before go search for hidden eggs, started by finishing the 2 headlight assembly parts.

Both were having lots of corrosion and passed the week in vinegar.

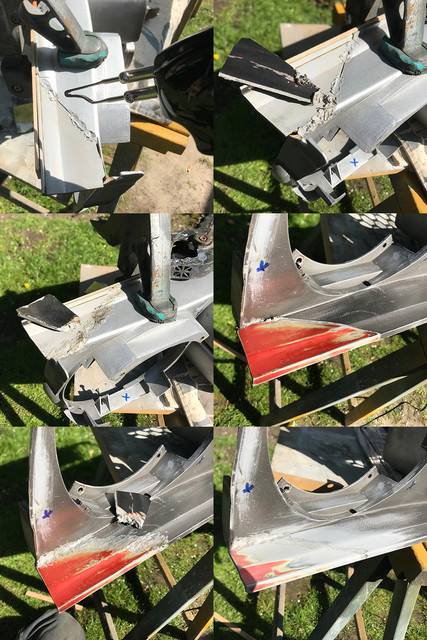
A wool massage in the sun, some cleanup and a few volts later, the first one was ready.


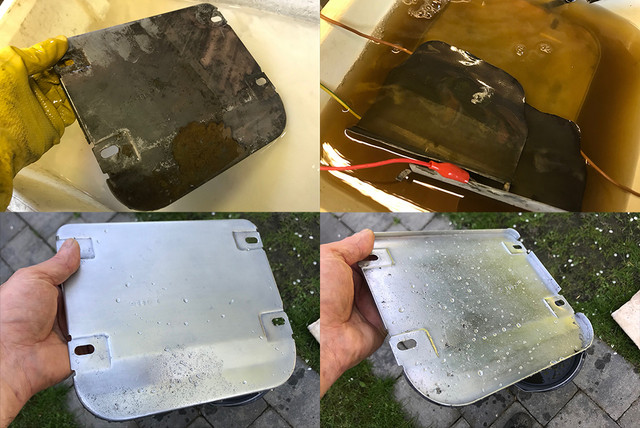
The last one, still having bits of rust in its deep pits, received few drups of elbow oil, and was done not long after that.


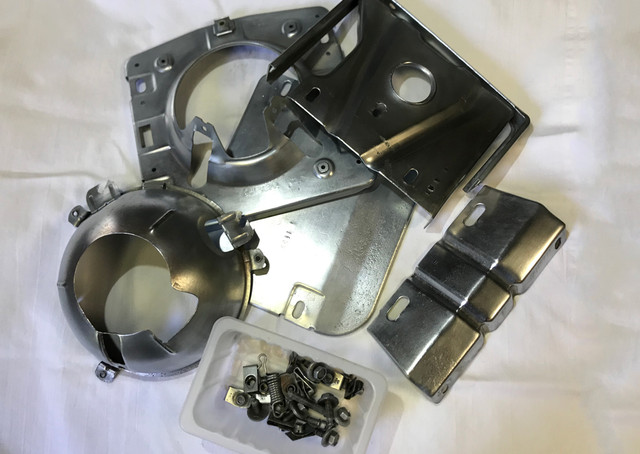
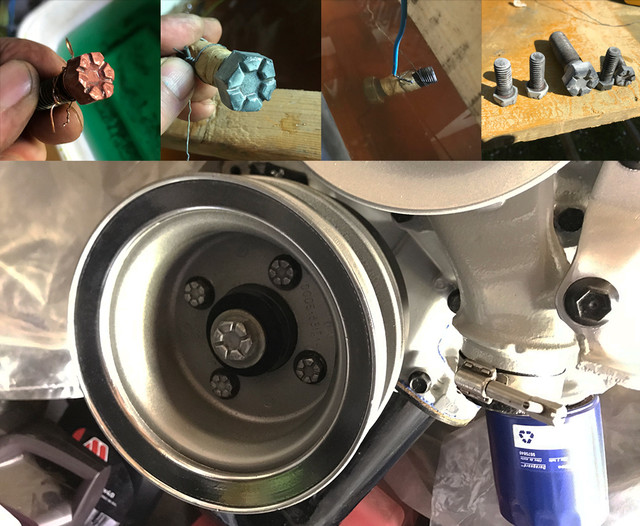
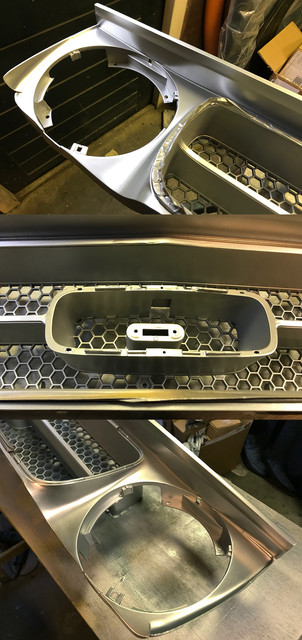
The second headlight assembly now plated, it was time for a group picture before next step.


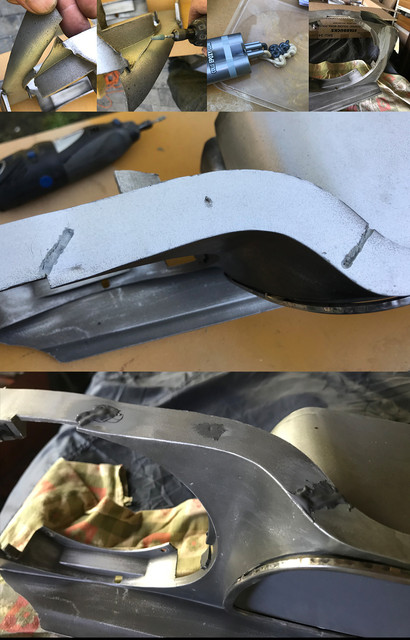
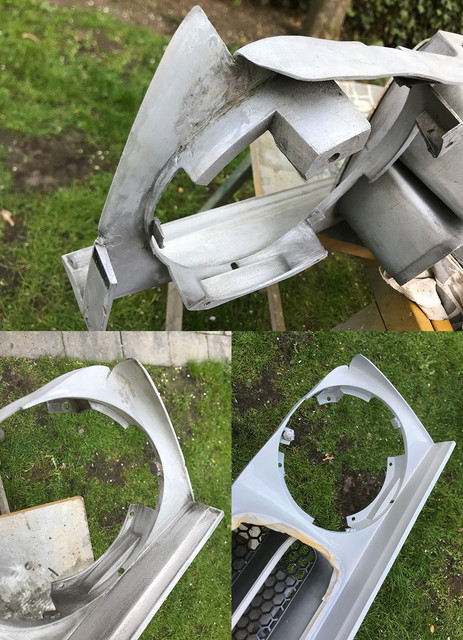
After all this work to restore these parts to a rust free and protected condition.

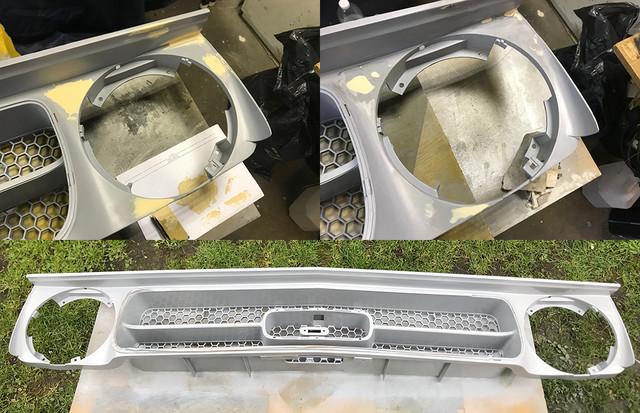
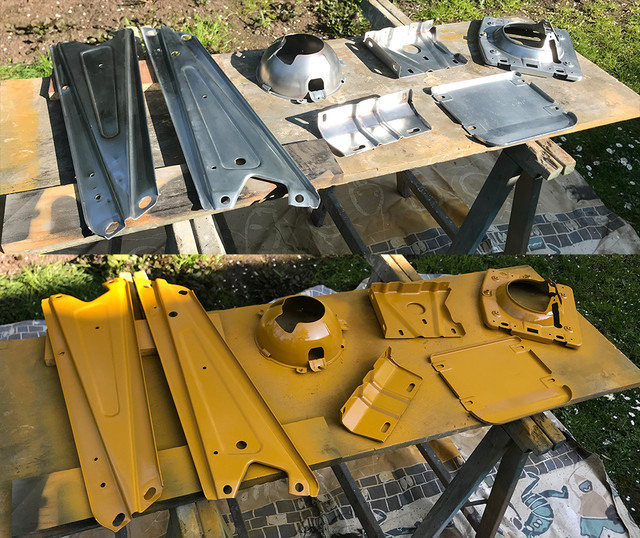
It took less than a minute to ruin their shine with the first layer of epoxy!

Bye bye bling bling! :(


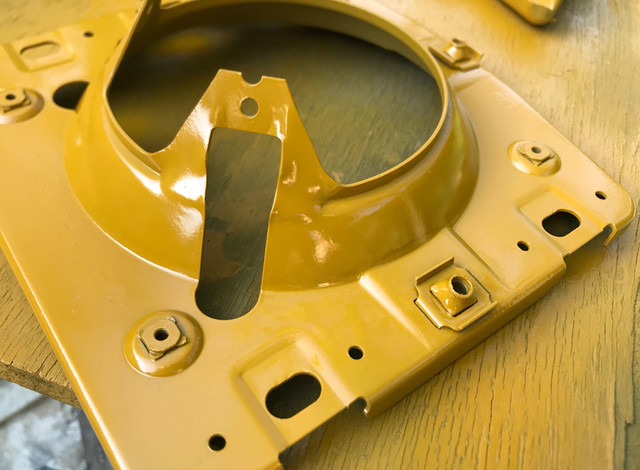
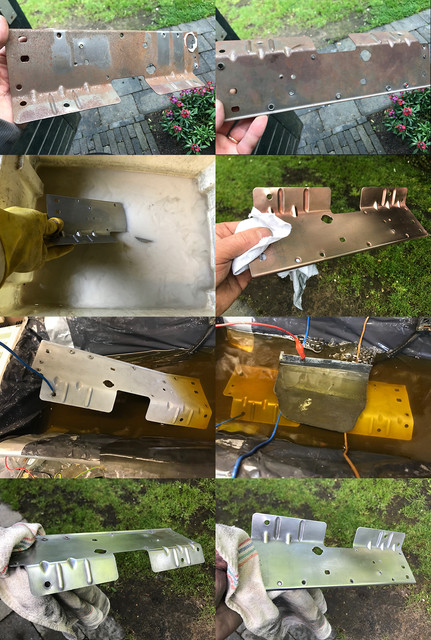
I wanted to have a thick layer applied today on the ones with the most scars, so I can sand them a bit tomorrow,

before they all receive a final coat.

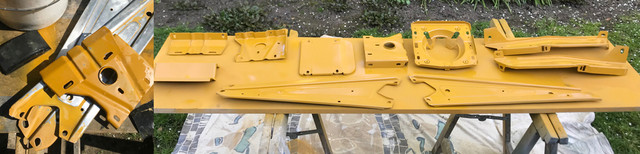
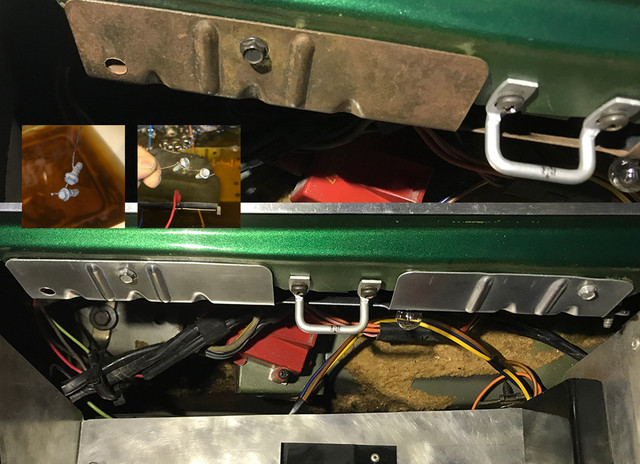
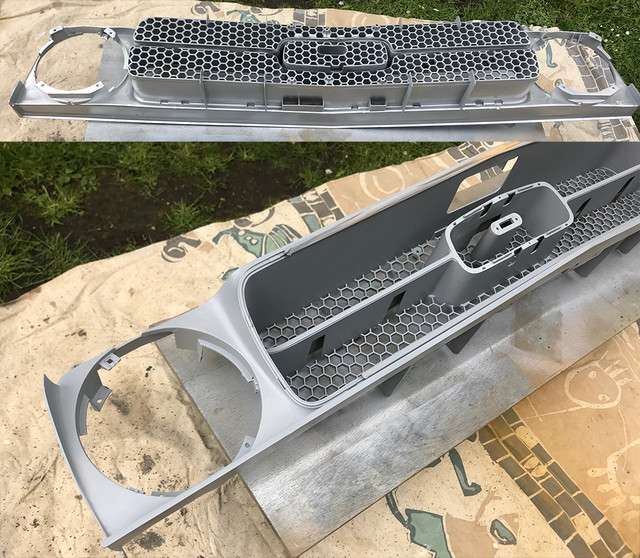
After months waiting, its the day I finally get to finish these brackets that I could spray!

Perfect timing!

 
Last edited by a moderator:
Fantastic day again today.


After a quick water sanding of the parts sprayed yesterday where most ancient rust pits were,

Sprayed another epoxy layer on them and and few other parts.

As epoxy needs hours to cure and be hard, I'll continue tomorrow.


While I was cleaning the garage a bit, I took a peak at the engine, and for some reasons, I did not like the look of the bolts I painted in black on the damper last summer. So removed them, prepped them and 1 hour later got them back on the damper in their new protective layer.

Much better!

mmm I think I might have some kind of plating addiction now :)


Since its was sunny and warm in the sun, I took the Dremel out, and practiced some plastic surgery on the damaged grille.

Using a 2 components epoxy glue that is supposed to be for metal that I've used multiple times on hard plastics with great results (strangely never on metal).

Temp was ideal for this kind of products.

I'll know by tomorrow if the repair will be strong enough to hold the biggest damage where the grille is in two parts. Also fixed more than planned as I did more glue that required. Enlarged and created V shapes to be able to have a good amount of epoxy.

If the repair works, I'm prolly gonna shape some aluminium and reinforce the original structure with it near the lights holes, as the original plastic casting is fragile by design there. Bit strange considering the heavy overkill guys behind to hold it and the headlights.

To be continued...

 
Last edited by a moderator:
Yep Yep your addicted to the smell of white vinegar bubbling away. :D 

Great work as always Fabrice.

You may want to consider some aluminium under the top middle section too. The stretch where the latch is. I am constantly leaning on that very fragile piece of plastic

 
A week ago, there was ice and snow in garden...

Today near 25c, warm and sunny.

But lots of wind... so no paint day.

I decided go back to the grille and see how the glue did...

It did semi ok. looked ok but did not feel strong. It would break within no time again.


This ain't gonna work: time for PLAN B! :)

I remembered I had somewhere an old destroyed 71 grille that I was planning to use for deco one day..

What would I loose to try to do some kind of transplant for the big piece mine misses?


Once the old plastic donor was found, I was desapointed to see that it had the exact same side broken...

mmm, ok. So quickly made a template, cut the receiver a bit more to have a clean and straight cut, Took a wider piece of the other one on other side, (That was painted in red at some point) and quickly assembled a wooden support to replicate the missing shape and have the new piece with its shape mirrored aligned properly...


Then because I knew the glue would not do, I thought, I can only loose 400 buxx for a new one at my door if this fails.

If it's plastic, it can melt, but I don't want to burn it either, so I thought: my soldering gun is not too hot, let's find out! :)

After few tests on the old grille, I was pleased and surprised to see that it was going like if that gun was designed for melting plastic! :)

Using a piece of the old grille as donor with the right shape, I had my Frankenstein creation ready and most of all: strong as if fresh out the mould!

(notice how the sacrificial piece used for soldering becomes smaller)


As everything was going beyond expectations, I repaired at least 20 other places, reinforced some places...

and because at some point I didn't know where to look, I've sprayed a thin layer of primer to inspect.

Thx to the even surface, I saw I've missed one small crack, so will repair that one next time when primer will be dry.


Because I didn't trust the glue on this side either, tho ideal to hold everything in place,

I've removed it and soldered all again with the donor plastic. Few cracks fixed later, I've also applied a primer layer

to that side to see all in details clearly. No crack missed there.

Without anything added, just soldering plastic and sanding, I'm pretty happy to see that PLAN B worked beyond all expectations!

The grille feels strong as one piece and doesn't make any "busy adding a new crack" sound anymore.

The trick to get a solid bond is to first go deep and melt the crack and fill with donor plastic while hot and ensure all becomes one.

After a small addition of bondo to smooth out some hard to reach places for sanding, like the 4 cracks repaired near the pony corral

I think I might have a brand new 50 year old grille in a near future :)

One shadow to the good news is that the center molding, strangely made of chromed plastic, unlike the zamak piece I was expected like on my 73, it was glued and broken in many places. Had contact with Don @OMS for a new one, but he was out of stock for that one. So I guess, the hunt is on, tho If I can't find one, I don't think it would take me long to repop one myself out of real metal. We'll see.

The moral of today's story: do not throw your old grille because it has cracks or even misses big pieces, it's surprisingly easy and cheap to repair them!

 
Last edited by a moderator:
Wow Fabrice, fantastic work !
Thx, Plan B is the way to go!

I did the same thing to fix some cracks in my original grill as well. Nice work
Thought after seeing that the glue failing to have a solid bond because not of the same plastic composition, to let some pieces melt in aceton for a couple of days, and use that as paste but as all was on the operation table outside, I thought I'd give that a try first. It works not only great, its super easy! Tho, may I need repair more one day, I'm gonna go get a oil painter knife and weld it on the gun, to have a flat "spoon", which would on other kinds of plastics like panels inside the car where i have huge speakers holes to close, it should remove lots of needed sanding.

For a grille that was broken in so many places and missing a big chunk, it really worked beyond expectations. Really happy! :)

 
::thumb::  Fabrice Your ingenuity never ceases to amaze and inspire. Anyone doing a restoration only need follow your build thread to get the answers they are looking for. :goodpost:

 
Great work Fabrice, I will also be attempting grille repairs so really good to see how you have approached it and with great success. You cannot be defeated !

 
You do great work and many of your solutions are very innovative as well as effective. Keep up the great work. I look forward to seeing the finished project.

Chuck

 
Great work and looks like you've added a new addiction to your list

The soldering iron is a great tool for plastic welding and if you have a soldering iron with multiple tips even better

I find the flat blade tip works best as you can smooth the repair afterwards with the flat side

Keep up the good work but beware of the fumes from the plastic!

 
Great job fixing the grill. You could also add some steel pieces as a reinforcement mixed with the molten plastic like a small nail without the head bridging the two pieces, but it may not look pretty. Or if you wanted more reinforcement you could lay out some bare glass fiber over the crack and mix it with the molten plastic.

 
Thx for the kind words guys. Makes me melt... as plastic :)

@OzCoupe72

Replied that a few msgs back, while busy I saw it indeed would be better to have something flat, on the grille it wasn't a must, the tip on my gun has round corners and that did ok, but for one of the future job on interior panels, I think having some where you can heat a little and smooth out on a fairly large surface will be a must.

I saw you can also heat and have a tiny influence on the surface, might be something worth an experiment to try see if on the interior panel there would be no way to mimic the texture. Thinking of some laser graved surface that could be gently pushed on the repaired bits, not too warm. Tho, i'll see when so far, as the plastics inside are bit different. Plus I have this wild idea for a while to make my own leather interior, so I would not even need to worry about the texture of receiving parts...

Regarding smoke, I was outside and it did not smoke that much, very little at times mostly not, prolly because I've left the longest tip on that I like for its progressive heating, that i find especially handy when you solder wires instead of ending with a hard not to be bended connection. Inside it might have been another story tho. Good you mention it.

@tony-muscle

Yes, @pegleg mentioned that too. Totally agree, I have already reinforced some places with plastic but something better needs be done as it will break at some point again otherwise. The top thin part especially, where you very likely lean on while busy on the engine. I need got get some aluminium for that...

 
" The top thin part especially, where you very likely lean on while busy on the engine. I need got get some aluminium for that".

Aluminium was my thinking too. I would go for polished aluminium as it would make the grill and corral surrounds ping more in the sun. Its a shame your not in the UK. I got a square metre sitting in the shed. Unless anyone is travelling from UK to Holland this year

 
Weather was terrible today. rain, rain...

No way for me to spray anything, so went back to the grille, fixed the cracks I've missed last week, sanded and its now waiting for primer.

As my mini work space is now full of parts everywhere waiting for paint,

I thought, I'd work on little details on the 73. Plated a few bolts, finished to install properly the new power windows relay...

and then did some "Midlife porn"! :)


This plate/support/bracket, whatever its called, is another "nobody cares" case (except Randy aka @Midlife of course), but as my 73 is fairly clean inside, I was always annoyed

to know there was rust there. Especially because lots of components are having their grounds on it, I thought today was a good day to finally get to it.

Not rusted to death, a few minutes in de-rust + wool, removed all the corrosion. Then because it was left untreated by Ford to ensure conductivity, I've first layed some copper. Then it took a dive in my zinc bath for a few...


In between did all the small bolts and 2 hours later the plate/support and its hardware was as new again.


Here's the before and after. Some may find it overkill, but I'm addicted now, I needed my plating shot! :)

I'll do the 71 as well soon.

Hope I can paint tomorrow, at least a few parts so I could make space and start on my next victim...

 
OMG! I mean that literally: you are my God, Fabrice. Thanks for the porn. Now then, are you going to do your fuse box clips like I suggested? I know it's going to gnaw at you until you do...

 
@Midlife

[i know it's going to gnaw at you until you do...]

Yes it will and even thought about doing it today, but you just retired, you wouldn't handle so much porn in such short amount of time. :)

Anyway today was the weather worse than yesterday.


Yesterday I had applied some bondo to smooth out some scratches that were hard to sand out on this kind of plastic, all reduced to a minimum ready for paint..

At some point, rain stopped and the sky wasn't promissing bad news for a few, so left the details I was plating cooking and went quickly spray another layer of primer.


While the primer was drying cleaned up the pony and moldings. Its obvious I'm gonna need the passenger side 1/4 molding, the one I have has been repaired once in a very strange manner and has a dent too. I saw these are avail, so will look for one.


The skies still relatively free of rain clouds, applied a first layer of the grey on the back and the hard to reach places underneath. Lighter than the more darker original that I've seen on many repops but more suitable for my taste in combo with the green that will suround it. Once done, helped dry with heat gun on the 4 pieces that would allow to turn it.

And started apply on the front...


I was not a minute busy, rain started again! The grille was back inside in an instant but damage was done, the surface was ruined with many tiny drups :(


Totally aware it was my fault to try. I've again went plan B. heat dried that paint, fine sanded it and got rid of all the drups and presented the grille at the door so I could spray while it rained.

Finally managed to have the layer on! Still wet on the picts, the paint shines more than it does but one thing is sure, it does look a whole lot better than 2 weeks ago.

No more cracks, scratches to be seen and in one solid piece! :)

Next week, I'll paint the honeycomb black and the entire grille will receive a semi gloss protective coat.

If the weather permits it that is.

To be continued...

 
Back
Top