Fabrice's 429CJ 71 project

7173Mustangs.com

Help Support 7173Mustangs.com:

This site may earn a commission from merchant affiliate links, including eBay, Amazon, and others.
If you can come up with a way to plate plastic that will be awesome.
I work with plastics, and we see a lot of plastic light reflectors that have a shiny "plated" coat, or metallized. Actually, most reflectors now-a-days are plastics with a reflecting coat. I don't know all the details on how is this coat laid out, but it involves a kind of vapor deposition method, which may not be an easy DIY project.

I did a quick search and here are a few links to read:

http://www.vacuumplaters.com/metallizing-process.php

http://tennvac.com/wp-content/uploads/2015/05/Metallization-white-paper-%E2%80%93-Physical-Vapor-Deposition-Technology.pdf
There are many ways, one I want to try is conductive graphite paint (under 10 bucks), used in electronics, once applied you can then electro plate first copper then nickel. The process of plating remains the same, the only question open for now for this paint, is how good the paint sticks on "our" plastic and potentially how to mix it to keep the conductivity but having a durable adhesion. I hope test this in a not too far future...

 
Fabrice very impressive what you have and learned and acheived since i left for Tenerife 11 weeks ago. I have to sort my hood hinges at some point in the future so will be interesting to see your results.

There are plating module kits out there. Frosts in the UK sell a kit (out of stock right now) https://www.frost.co.uk/common-plating-module.html

 
thx @Pegleg, you might get 1/2 an answer below..

Still cold and wet: back to MUSTANG SCIENCE! :)

Did some experiments this week, to test alkaline solutions in scale of few cc's , aside copper working but plating way too fast and not giving me the durable result I'm after. (Tho much better than past tests with copper). Done some experiments on mixing metals, and learned the hard way how to ruin a bath that I needed this weekend :(

Once you have Fe or Cu or Zn in your bath, these elements plate before the Ni, and then you only get some "tiger, zebra", "pitted" results or an ugly irregular dark grey surface. (I have some of these failures outside to see if they even protect raw metal). Some say you can dummy plate at very low current to remove these, but it didn't work fast enough for my taste...

Short story: Glasses, gloves on, back to drawingboard!

Unlike with expensive solutions, I needed 2 liters of vinegar to start over. The only problem being the time necessary to obtain a saturated enough electrolysis. at least 24 hours. Got just enough ready on time for my next victims!
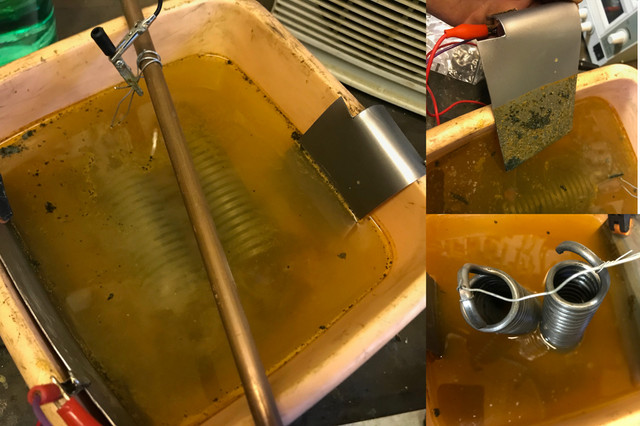


Meanwhile, during past week, I've seen that what looks clean to the eye, isn't perse true from a plating perspective, and that's exactly how I've ruined my bath last week, by dropping all kind of test bolts not really clean and having all kinds of metals on them that acted as contaminants.

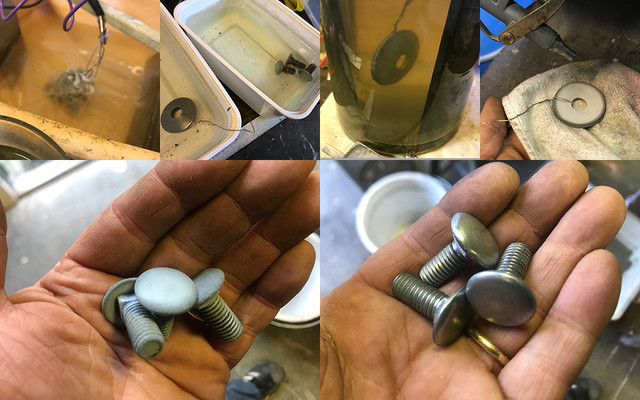
So as the hood hinges springs were next on the todo, they were previously de-rusted, but spent another 24 hours under current to remove any impurities before be placed into the bath. The solution for this is washing soda in warm water (that went cold over time as the bath heater hasn't arrived yet ). The springs came out really pristine after this electro cleaning, especially where you can't really go with your hands or tools.
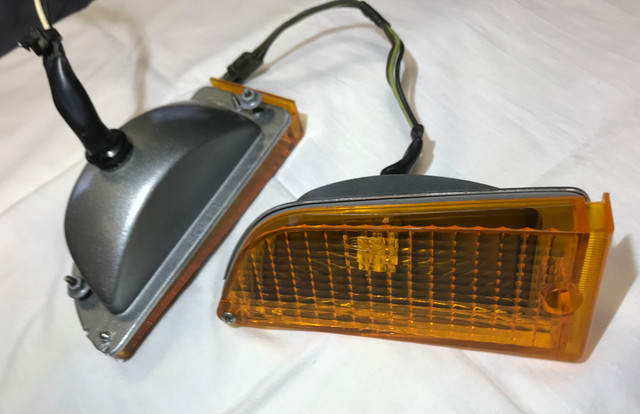


While the springs were in bath, I've finished the lights, because the gasket and the plastic lens aren't really following the shape of the casing, I've taped, primed and painted the region that was exposed. Few moment later, helped with heat gun in between they were both finally done. Prolly a tad overkill.

But I was finally able to mark the valance lights as done! Yeah!
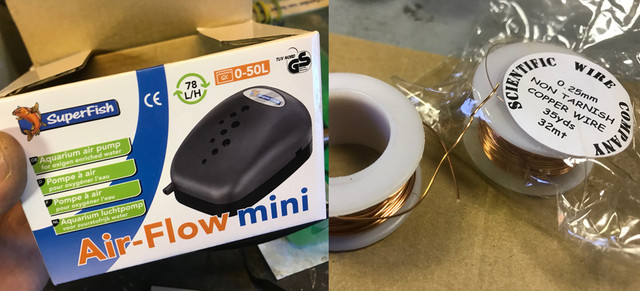


This week some of the heavy guns that I've ordered arrived! :)

I got myself a super ultra whatever air pump for aquarium, (5 buxx) and finally got my hand on non coated pure copper wires. One would think you find this wire everywhere... nope. In all kinds of flavours, all plated/protected but not the raw copper I was after. Anyway no more hand stir, no more house wire stripping! :)


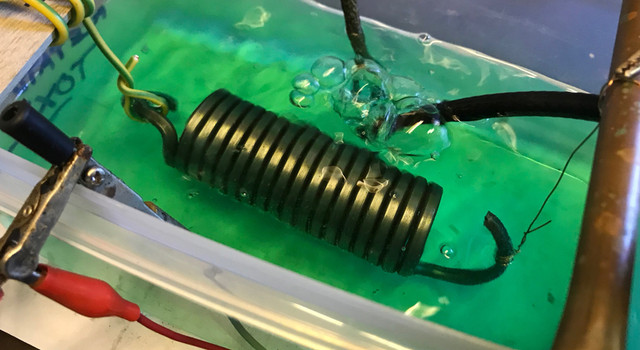
Bubbles machine in place, the first spring was set in bath after distilled water rinse, a 10 minutes hydrochloric acid session, followed by another water rinse. Not perse visible on the pict, the bath gets a nice displacement/circulation, but not enough to blow the parts away.

Funny here is that some people actually buy this cheap pump for their aquarium at home. This thing makes more noise than an old fridge!
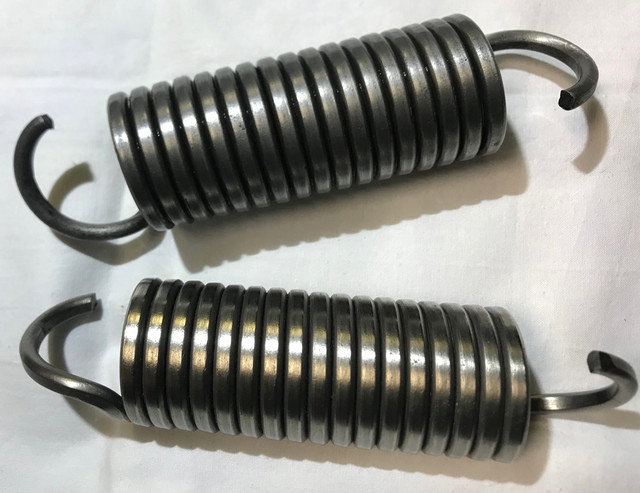


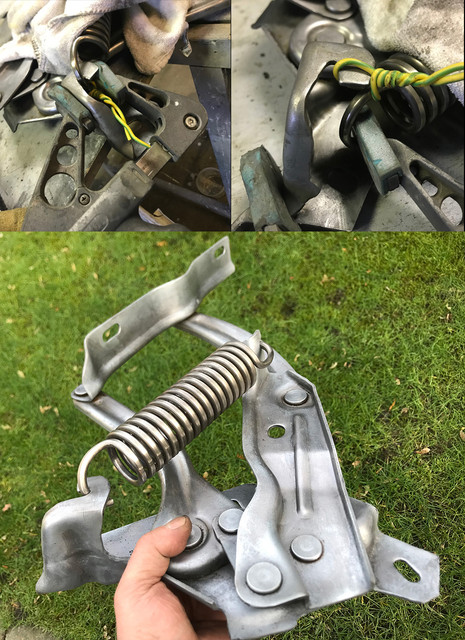
3 hours later the first one was done. very hard to photograph the diff into the bad light of my garage, and the next spring was just rinsed, but you can see the difference.

I must say it was the most difficult part to plate of my entire carriere as a plater!!! ( 3 weekends in a row) :)

Probably because of the shape, acting as a coil, it demanded lots of attention and did not behave as any of the parts tried before. I needed to move, rotate the part, change position of the anodes constantly to get a nice even layer of nickel.
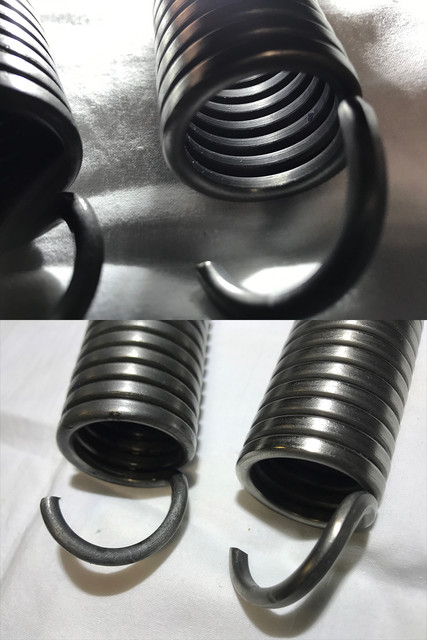


Here's a close up of both the super clean not plated and the plated one.

@Don C, very hard to plate inside indeed, if you try the electroless kit, I'd be very curious to see how that turns out when you do yours.
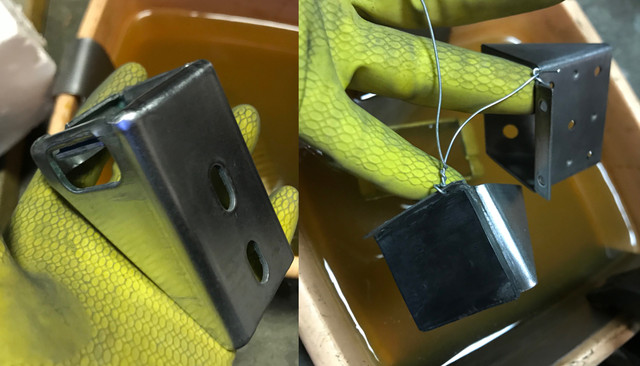


In between sessions, been busy prepping other parts, some of the 73, and also some details that will not be kept bling bling, but for some like the windshield stops that are prone to rust, I thought a protective plating before a good paint can't hurt...
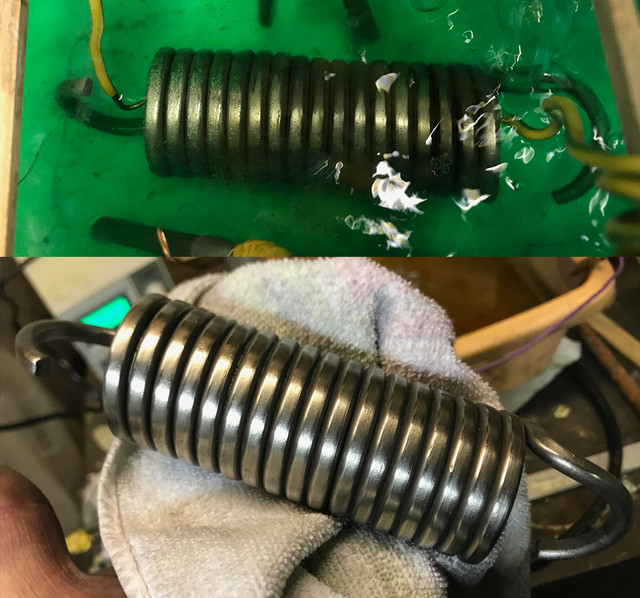


Another 3.5 hours later, the second spring came out. Notice on the above pict the diffs in regions of the plating while busy. Found out that a given moment, probably once the entire surface was covered that the amps were fluctuating and going down, at this point the metal being platted becomes almost like chrome and gets deposited on the surface much much faster.

So just like the first one, during last few moments, I was rotating the part every minute and it payed off nicely. This is how it came right out the rinse bath. Once air dried and gently polished with kitchen paper, it's the most beautiful spring ever seen in my street ever!

Really pleased with the results as I did not expect to get them as nice as they turned out.

For the rest of the hinges, I'm still experimenting juices as I'd love something darker and less reflective. I hope to find out something nice for next weekend..
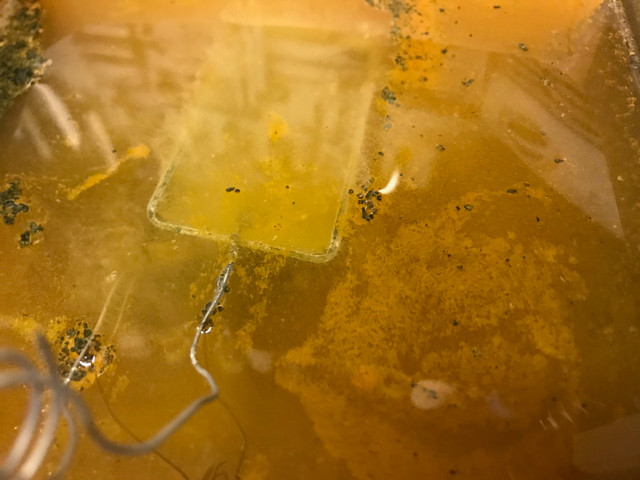


Too cold for me to stay longer, I've set the next soup on and should be done by tomorow.

To be continued...

 
Last edited by a moderator:
Because using the electroplating method doesn't seem to get into cracks and crevises I'm guessing the plating didn't bond the spring coils together. That is my main concern with using the electroless method, which is supposed to get into irregular surfaces.

 
Because using the electroplating method doesn't seem to get into cracks and crevises I'm guessing the plating didn't bond the spring coils together. That is my main concern with using the electroless method, which is supposed to get into irregular surfaces.
Well, first, my plan was to make an external tensioner, just to have more space between coils. tried via the inside, but because the end of the spring is rotated 90 with an offset, you can't insert any rod thru the spring with the necessary offset to do this. The good news is that the coils are really round, so they touch each other with a very small surface, also being at rest, once you lift on one side, the coil becomes tensioned a bit by its own (heavy) weight, it's no longer in a straight line (And you as you need to rotate a lot while busy). It's very small, but there is a space. The electrolyse just need to be in contact with the surface to do its work. Even if that is a micron, thats enough. The problem is not if there is a deposit in between, the problem is its thickness and looks. Just like any parts done so far, if there is no polishing of the surface, it's not shiny, and if concave or encapsulated, you get less on the surface.

That's partly why i've let them more than 3 hours each so that the entire surface got covered. Even if that would be only a few microns. I can see in the inside clearly the nickel yellowish deposit everywhere, really different than the grey it was having right after the electro cleaning.

Also i've found out that using this mild acid method, that building up the current gives the best results. Like less than a volt for the first 10 minutes, then gradually up to 2.5 volts. Last minutes around 3, 3.5 with 1 amp. This creates also a much more visible difference from the inside/concave vs outer surfaces where you get a near chrome surface look (if surface wasn't sandblasted).

If the electroless method is not too thick and can be done very slowly, from what I see you should be able to plate without bonding. In worse scenario, you would need to make the tensioner that i've skipped. When they are at rest, you really do not need that much to be able to have enough space in between, say a paper sheet thickness.

 
Last edited by a moderator:
thx @Pegleg, not sure if there would be much demands.

After the cold, hard winds and rain and rain and rain

Another no paint weekend.


No prob, I'm loaded for the weekend. Got the hinges to plate with zinc, later on the rear brakes...

The mini anode you find online will no do, so went plan B, and got myself 1 meter long 99.99% pure for 5 euros more. I can plate zinc for eternity :)

I'm sure the girl at the supermarket must have wondered what on earth one could possibly do with so much vinegar! :)


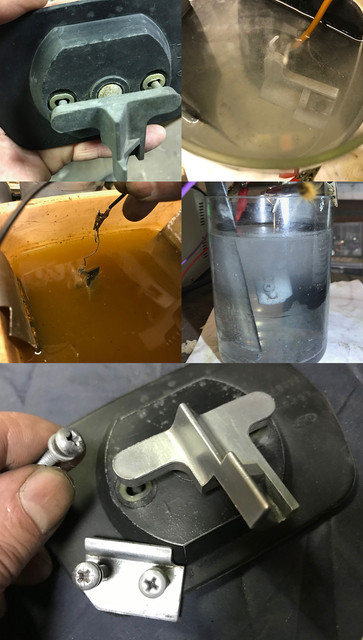
While the juice for zinc was cooking, went back to the deck lid lock of the 73. Turned out just like the 71: bling bling!


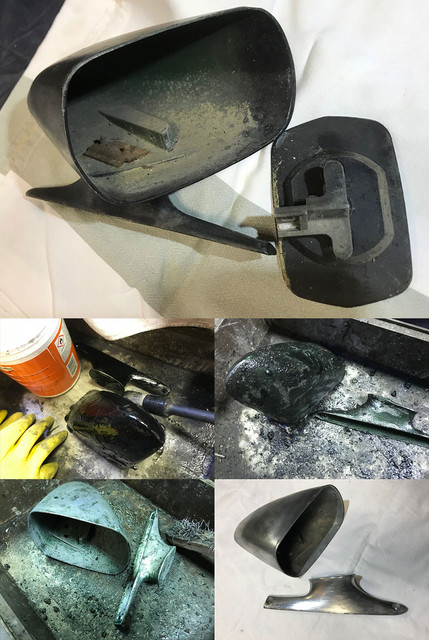
Meanwhile, couldn't resist and had to test the zinc and the plate+screws inside the driver's mirror were good victims to try that out. Unlike Nickel, unless you used complex and very nasty additives that affect the way crystals are forming, you end up with a mat deposit. Zinc being a cathodic soft metal, it takes 1/2 a drup of elbow oil to make it shine. The price to pay for using environement friendly soup.


Same punition for the windshield stops. They will be painted later on, but as I know from the 73 that they do oxide, these will not for a long while. One of the rubber is missing, I have already the necessary in house, but was short on hands and time to get to it. Will do this this week.


While the air pump in bath was buzzing, been busy prep the passenger side mirror. Like a deja vu, been thru the joys of paint stripping and got the casing in zamac ready to wait for a paint job.


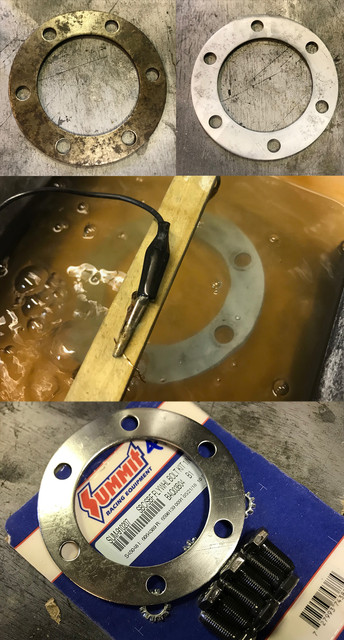
As the zinc juice is now ready, the rusty plate, the screws and even the support went in bath. (notice the diff of the small plate with pict above: rust vs bling bling! )

protected for another 1/2 century, I'm gonna paint the back side soon, and will try to see if i can locate some mirror glass while at it.


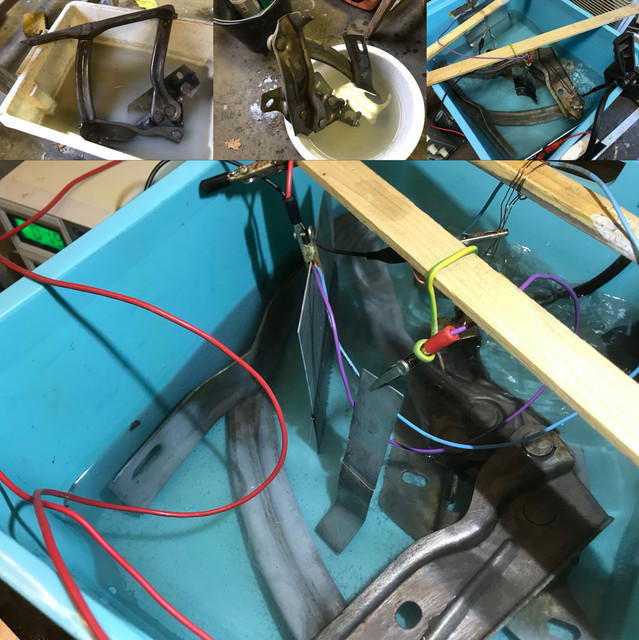
And then it was time to work on the first hinge. Both got paint removed and were derusted a few weeks back, so a degrease and rinse session were done and the first one went into the solution.

What a surface to cover! With this new solution not saturated enough it took ages to even start do something, the surface did not got grey as fast as small parts and because of the complex shape and the lack of options to move them into this container, I had to move the anodes many times. I thought I would never manage to cover them and end up with zebra hinges...


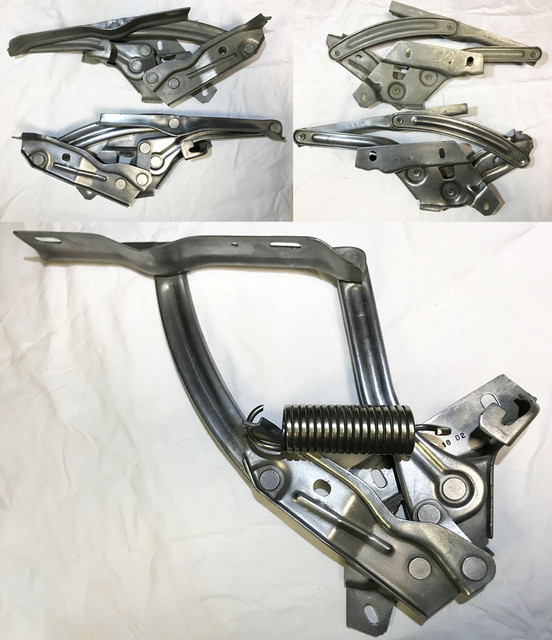
Once rinsed, dried and the dull removed. It's when I compared with the other one that the difference was really visible. Much whiter. As seen with nickel, its sometimes hard to notice the color change of the substrate while busy but it was covered everywhere.

In contact with moisture, the dull would return. As I do refuse to use the lethal chromates to passivate, grand pa's wax and oil will take care of that. The metal underneath is now protected and rust should not return for a long while, which is the primary goal.

Took much more time than expected, the other one should go faster now that the solution is bits saturated. I'll see how that goes next weekend.

They should look pretty with their nickel springs once on the dark green hood.

To be continued...

 
Last edited by a moderator:
The springs are back! Both my springs and the spring!

The sun was back for the first time since new year and working outside was really plaisant for a change.


Finished zinc plating the other hinge and enjoyed the royal pita that is to place the springs back in place while the hinges are not held by something. Not wanting to damage the nickel, had to build up tension with some wire, weird constructs to hold... royal pita and was not done in 5 minutes.

Glad both are finally done.

I know now, next time I do hood hinges again (prolly never), I will look for rivets (tried but couldn't find these)

and replace them. Not because there are damaged, but it would have been so much more easy and would have got a better result with smaller parts vs a huge assembly that was pain to move around, sucking power etc... Looking back at how they were in the first place, no regrets at all, but would have been better.


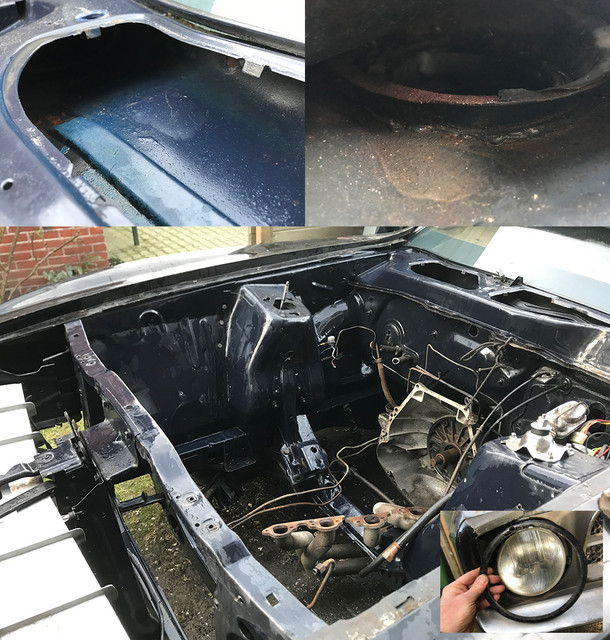
Because it was such nice weather, I went back on the car to collect "todo" parts and while at it, cleaned the engine bay to inspect it more closely. I'm was fairly surprised to see that what I took on many places for light rust, was not even rust but dirt. Even the cowl vent is painted inside, and has just a start of rust that needs be handled. Not claiming the car will be on the road by next week, but the extend of the todo is less than expected.


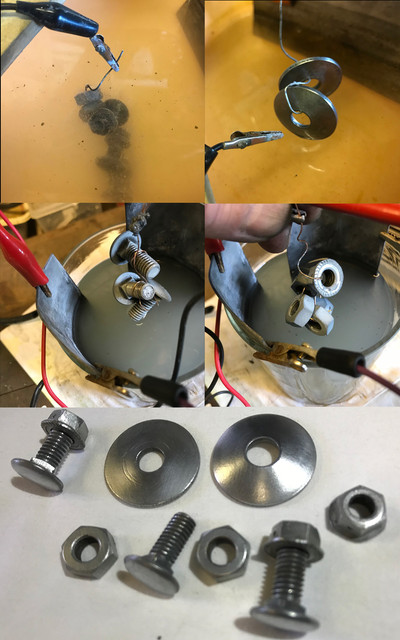
In between things, I've let some hardware cook over night, brushed and electro soda to clean up last details before apply a layer of sinc. As I can't buy this kind of hardware in any local store, I'm really amazed once more at what 2 or 3 volts and a tad of vinegar can do. Zinc is also much more easy than nickel, it needs much more power to get started on this kind of aloy, but once a few microns are succesfull, it build up super fast.


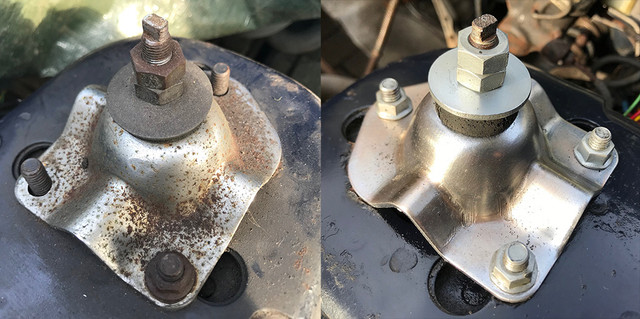
I'm busy making "rubber replacements" and the top tower will be handled next week (paint or plating, or may be both kuz I can now :) ), just couldn't resist to try and compare. The other side is still cooking...


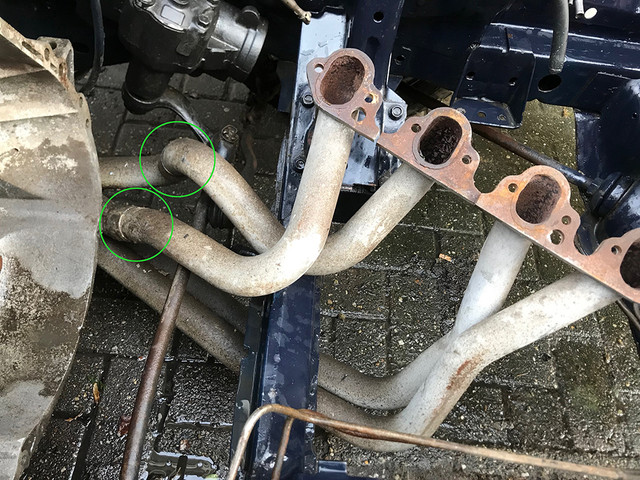
One of the todo very soon is to get that C6 out to rebuild it. But that header in the way must go out first. It's really stuck and considering to cut it for a new pair that would not arrive here under 1200, I would very much like to succeed to separate the 2 tubes. I'll let them coated once done.

I'm gonna get a torch this week and they've received plenty penetrating oil. There is some hope, but if any one has a good trick to get this done, please shoot!


Done details too. I've inserted a piece of thermo rubber on the winshield blocks that were plated last week, so I will be able to paint them very soon.

and before I knew it weekend was over :(

To be continued...

 
Last edited by a moderator:
Very nice, Fabrice. You've certainly accomplished a lot in the last few weekends, especially considering the weather.
Thx Don, not even near of what I was planning to do, but as long as I do at least a thing per weekend, the project goes on!

These things take awful lot of time for sure. When i've picked this new year eve resolution. (always try something new)

Never thought I would like it as I do now. Despite the very limited space that I have, I know I'm gonna have now a permanent "plating" corner.

That spring looks great!
thx Vinnie. We'll do yours together!

Wow, man, that is a lot of great work. Keep it going! You have to be very proud of yourself being able to accomplish all that on your own.
I did almost nothing! Just looked at bubbles, mother nature did the rest! :)

Its magic, really love it!

 
Fabrice the only advice for seperating the pipes would be grind the visible weld off at the joint and then heat the pipe that attaches to the header. That should expand the metal and allow it to loosen enough to remove.

 
Fabrice the only advice for seperating the pipes would be grind the visible weld off at the joint and then heat the pipe that attaches to the header. That should expand the metal and allow it to loosen enough to remove.
There is no weld, it's a very tight tube in a tube connection with a 30 years film of corrosion in between. On a workbench a bit heat, small beatings and a little force would get them loose for sure, but as they are now, with the lack of practical space to get to them/work around the connection is another story.

Oh well, I'll try the torch/heat massage first and move to plan B if that would fail...

 
thx @JRANGER

Tho, I did not do much this weekend, but as long as some stuff gets done its allright I guess.


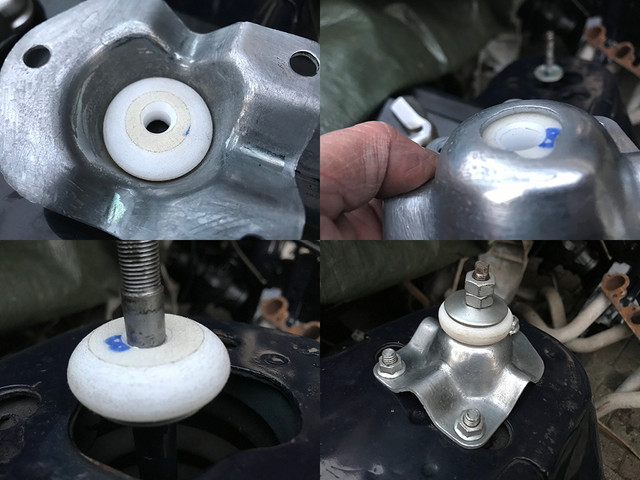
Did few bolts and nuts, like the second tower cap hardware among others.


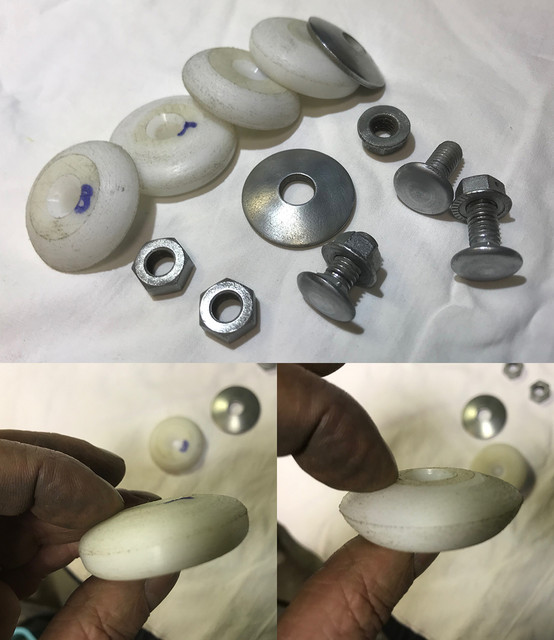
Here the set with the raw bushings, turned to fit on both the koni's axle/cups and the end cap.

As the choice is either a too small for my taste and generic polyurethane bushings from Summit or original rubber that will not last long. Just like for the 73, made my own so they fit both the cup bellow on the shaft, the cap inside and the top+cup.


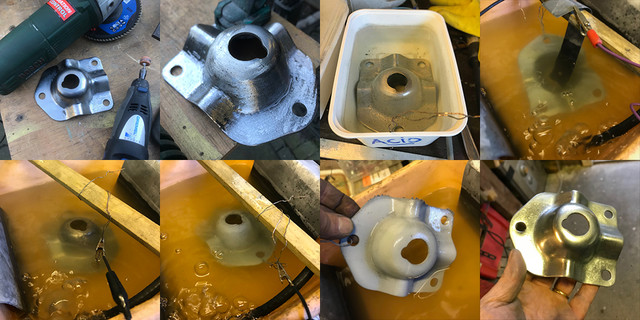
The cap is damaged at the top, been used too long with crushed rubber bushings before new were placed and shocks replaced.

Forward in time, I just discovered these are avail as repops and affordable. Looked for these last week online and couldn't find any. I've wrongly supposed they were not avail anymore... pfff, considering they are just $20, I could have used my time on something else.

Anyway, this side was really rusty, and spent a week in bath. Then what was left of the old chrome stripped mechanically, and got electro cleaned, and finally zinc plated. They will receive a good layer of paint + sanding work as soon as the temp permits it. For now, rust is gone.


That I'll replace them later on or not. I've fined tuned the bushings for a good fit and the axle will never ever touch a side again. Polished a bit the top ones, and will finish them to shiny when i'll install them for good.


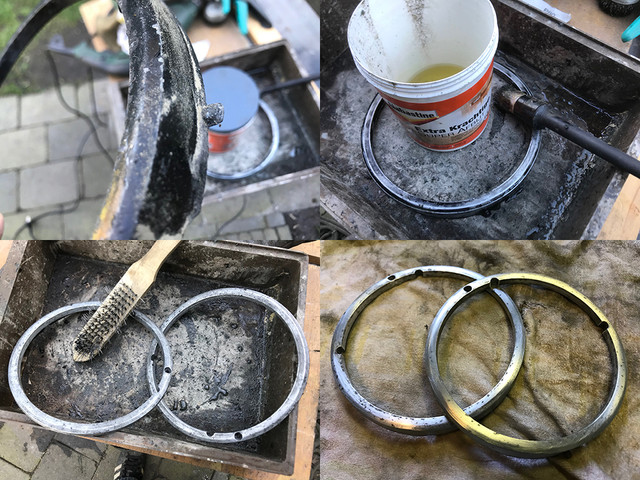
Gave some love to the lights bezel, made of Zamak/pot metal, they were extremely pitted, and it took a while to get their surface up to a "good enough for paint" quality. This are quite bizare parts, only hold by a single screw, considering their weight, I bet some must have quite a play over time. I'll see once I'll do the grille if there's something I can do to improve this.


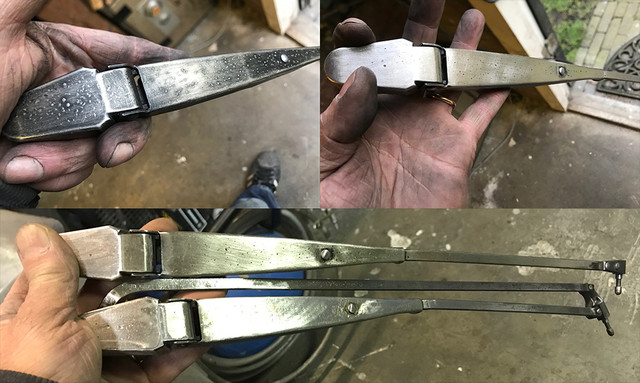
Similar work for the wiper arms. They spend days in the de-rust sauce. Very corroded. As I can't accept to spray onto pitted surfaces and hope the primer will hide the misery. I had to massage both quite a bit to get them to a good enough surface. A primer + sanding should bring them to good as new.

All these joined the "to be painted" queue...

To be continued.

 
Last edited by a moderator:
Sometimes its the small stuff that counts. I spent all Saturday working on my kitchen remodel so i know i feel the same way. Small victories, i might of spent an hour Sunday to get the 73 mustang before i returned to the house work

 
Another cold weekend,

Got a short visit from @Vinnie on his way back from picking his dipped hood this morning.

Result is pretty nice. I'm sure he'll post something soon about it.

Then it was back to the usual rituals for these cold and wet days: derust, clean, plate, polish, repeat.

Aside another series of old bolts and nuts brought back to life did a few other items.

The choice of parts mostly guided by the metal I'm currently using: zinc.


Like this plate for the flywheel. The classic rusty part usually derusted and oiled before being reused. No polishing here, just a nice protective layer. Believe it or not I've bought new bolts for this one! :) Should be all looking clean once assembled.


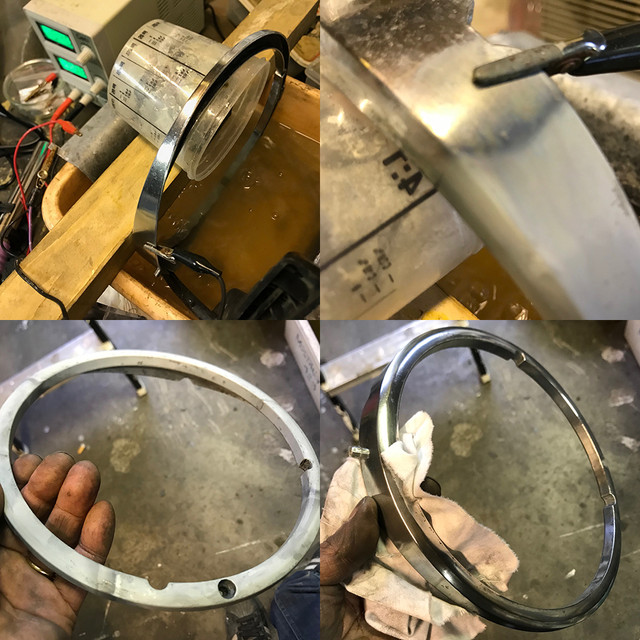
Also started an experiment of "reconstructive chirurgy". I'm curious to see how good a really pitted piece of zamac could be restored when not broken by adding thickness. On the pict, the lightbezel cleaned up last weekend was a good candidate for this: really pitted but not dented. It went twice a full 360 session, polished in between. On second pass, aside the deepest pits of corrosion, the resulting surface is almost back to its 1971 glory. I'm gonna redo this till its looking good just to see what's needed to "refill". I''ll prolly try to add after that a layer of copper followed by nickel to see what kind of result I could get.

Plan is still to paint these, but who know's..


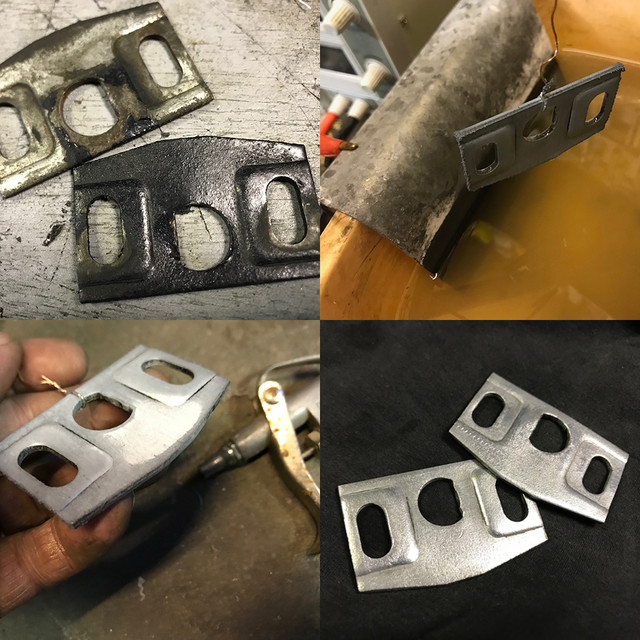
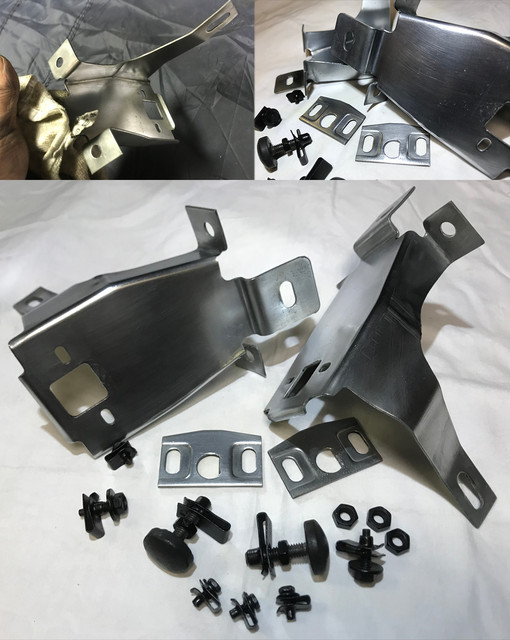
Also started work on the hood locks brackets, here the small lock/latches. I need polish them, but they have their original zinc layer back, twice actually, and should be bling bling by tomorrow.


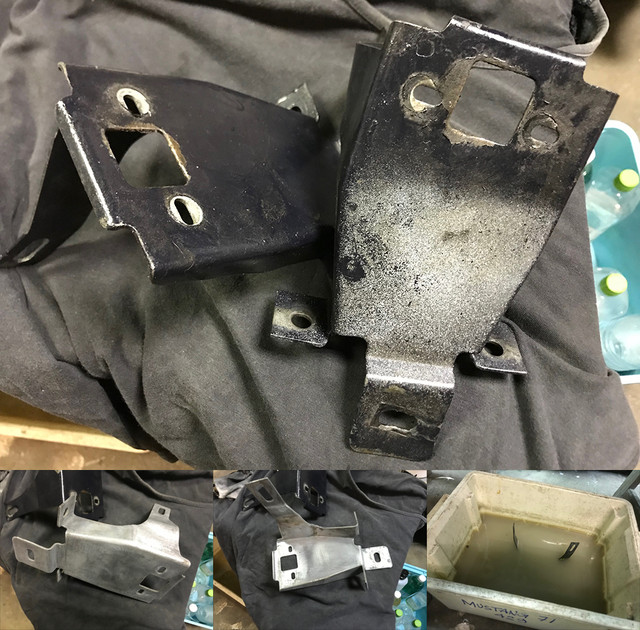
The other 2 brackets, got a paint removal, clean up and they are in bath for the night. Not much rust on these, only in the inside, but had to massage them a bit to have all the sides and fitting straight again. At leat one of them should look good tomorrow.

As a side note, I saw a few posts asking for the "grey" paint these brackets should have. From what I saw looks like these parts were originally zinc plated, not painted. Aside the passivation using blue/white chromate that I will skip for environmental/health reasons, that's how these should be treated vs painted.

@NotAT5, @JRANGER

I'm in no rush, some details simply demand lots of time, but at times I wish I could spend days non stop in a spacy garage and make big steps! :)

 
Last edited by a moderator:
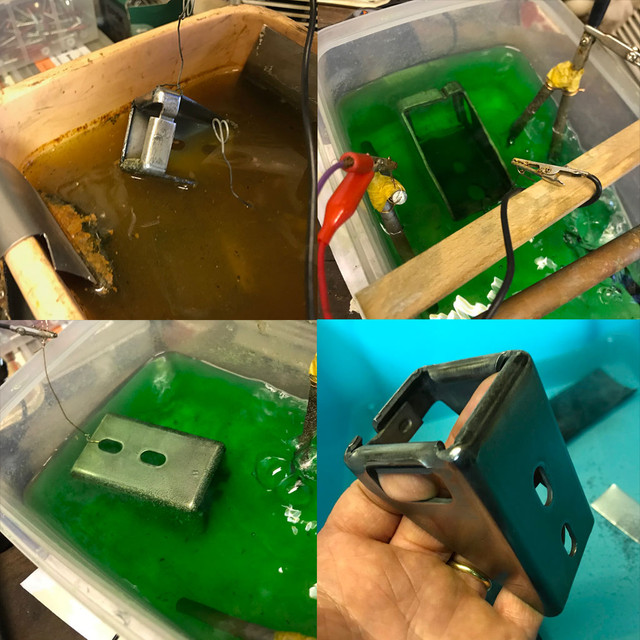
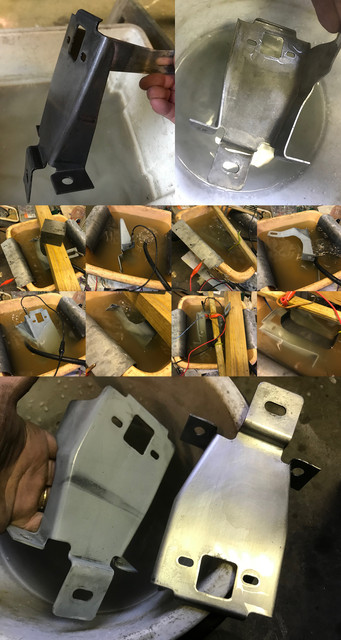
With the old paint removed, the brackets cooked all night. Time to zinc plate them...


They were rust free but covered in oxyde when out of the acid bath, so each on its time went over a cleaning session first in hot water, final removal of tiny paint left overs. Because of their weird shape from a conductivity point of view, I had to move them every 6 or 10 minutes till I got a thick layer everywhere. The last pict shows how dull the result is right after plating compared to the clean raw steel of the other one.


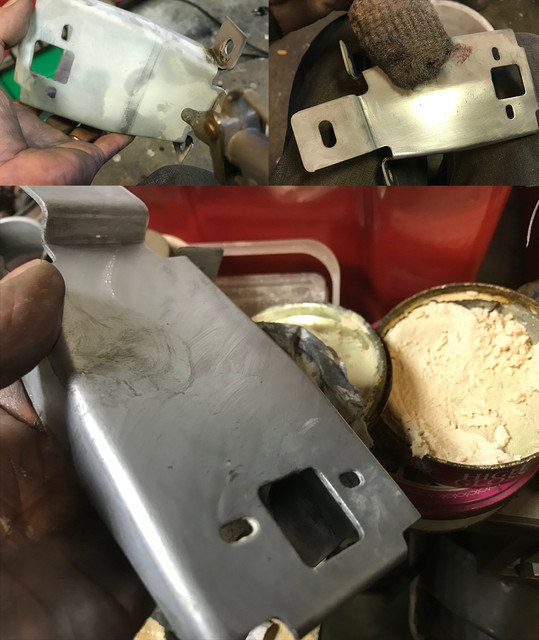
The next step is the "grandpa's" passivation (as done before Ford developped the process in the 1920's for mass production purposes) that I use over the toxic white/blue chromate type 3. The first step is to dry air the part, from a grey it turns to white. It's not just drying. The white colour is an oxidation layer that occurs as a reaction to cold air and is said to isolate and create a natural hard layer. Then to smooth the zinc crystals, a gentle brushing with wool with almost zero pressure is enough to bring up the shine of the soft metal. A cloth with nothing on it would do this just as fine, but would take longer.

Using chromate, it would have been time to dip it into the solution, rince it and let it dry for 24 hours. Instead, the parts were heated and waxed. The zinc deposit is so thick, it's not to protect the metal from rusting, it's just to isolate the top layer from the air. Note that the white/blue chromate, very thin, will not give you a much better protection, its just quicker and there is no labour involved. The most durable passivation of zinc is done by using the yellow chromate (as you see on carbs) but that's a very dangerous poison for all living things. I pass.


And after all this cleaning/polish, a bit of salt, a few volts and vinegar you end up with a 46 years old hardware that looks as if made yesterday!

May be not perfect, but looks much better than on last pict of my prev post. :)

To be continued...

 
Last edited by a moderator:
Back
Top