Fabrice's 429CJ 71 project

7173Mustangs.com

Help Support 7173Mustangs.com:

This site may earn a commission from merchant affiliate links, including eBay, Amazon, and others.
I dont know if they are sold at other suppliers but I'm sticking with Virginia Classic since the price is right and its what works.

Most sell generic all electronic and separate covers and then you need to make the cover swap. Price comes out about the same.

 
Hey Fabrice, if I were you I would go with an electronic voltage regulator, much more reliable since there are no contacts. You could swap out the housing to get a stock look. I think they are in the $40 range. Where'd you get that Borg Warner unit?
Oh totally, at some point I'll upgrade (as part of a bigger order somewhere). This unit was on the car and for now, saving for the parts that I don't have. So anything I have that is ok/that can be saved, gets a second life.

Nice little works, Fabrice. It is always better to do the little things than nothing ;-) 
thx, yes exactly, this is the time of the year where it's time to handle/prep all the details (and our cars are full of these). They have to be done anyway...

Like these... 

details.jpg


or these...


Btw, how do you remove the rest of the rear window trim? Are there clips? Tips on how to remove them are welcome.

 
Misery weather...

As its a new year, its time to try something new: time for MUSTANG SCIENCE!! :)


As said in prev post, past weeks I've been busy reading on plating and decided to give a it a try.

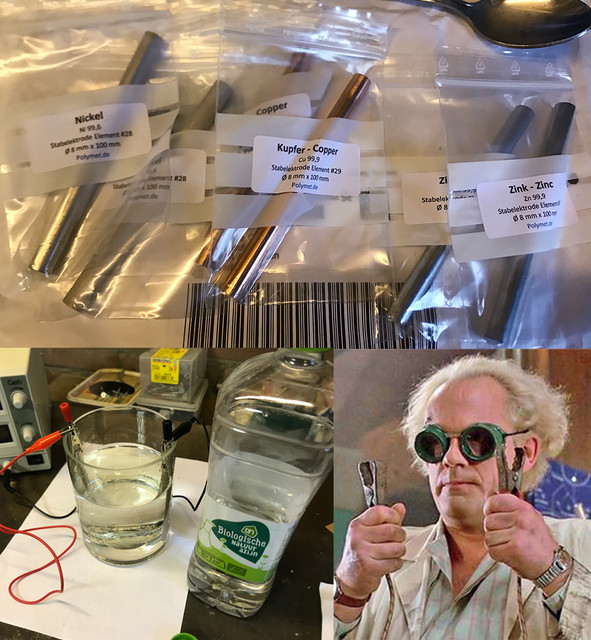
And this week, received my metal rods, all 99,xx something pure. I haven't checked if true and would not even know how to tell, except that all articles on the subject were clear on that point. If the used metals aren't pure, the expected color of the electrolysis will have a different coloration. Green for nickel, blue for copper and greyish transparent for zinc.

Just to be clear before continue: I have zero idea about what i'm talking about! Except I've eaten PDF's, red articles and seen tons of videos on the subject for the past month. The goal is first to see if I can really plate at home, get the kind of finish you'd expect to see on car parts, and if this is doable regarding costs and safety.

I just want get rid of the rust and get the bling bling back that painting only will never give back.
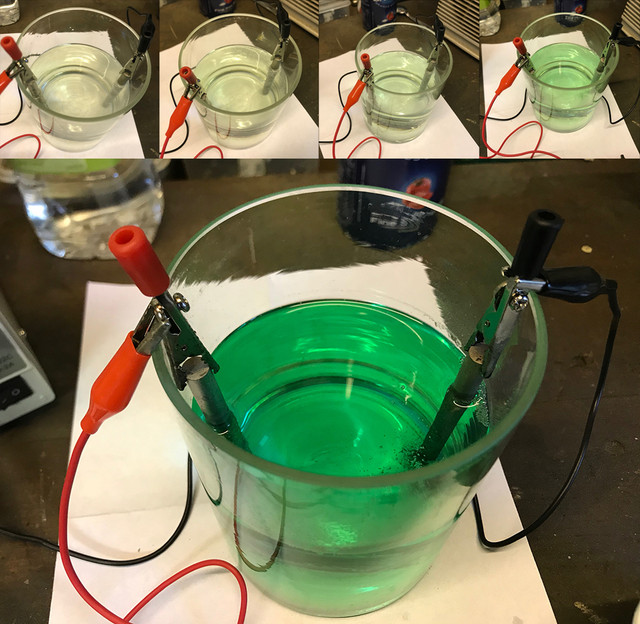


I started first with nickel. Not because its better than copper or zinc. Its just the part i've prepped to be first victims, would look pretty with nickel.

The first goal is to prep some solution, called nickel acetate.

There are companies offering some cristals, that you can dilute in distilled water, giving you a ready to use solution.

Fine, but what is the fun in that??? Plus, may the "from scratch" fail, I can always turn to these options later on.

So in case you wonder how that goes: its really easy. Take some distilled white vinegar (I usually use another more agressive one for rust, but its having added chemicals i don't want here)

Add a tea spoon of salt to increase the liquid conductivity. You need 2 electrodes to prep this juice. Thats why I've ordered a pair rods of each metals. Just connect each one to some power source, a phone charger or anything under 6v will do just fine. Then its a matter of waiting...

The same can be done with the 3 metals.

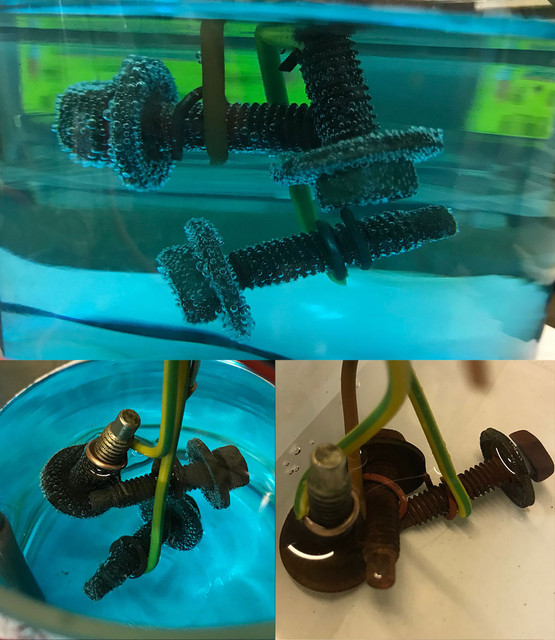
On the pict above, the small ones show from 1 hour (almost nothing) up to 8 hours (nice and clear green) and on the larger pict, the solution after 24 hours.

I was already very happy with this result, as it's not only the expected green for nickel, its also nicely saturated. It will continue to saturate and become darker as I plate stuff (and do not contaminate it) , but to plate something correctly, you need a good concentration to get nice even results. The darker the solution, the shorter the plating time too.
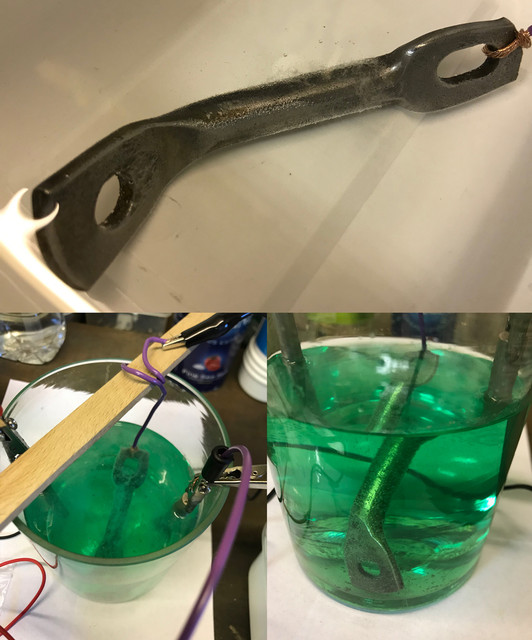


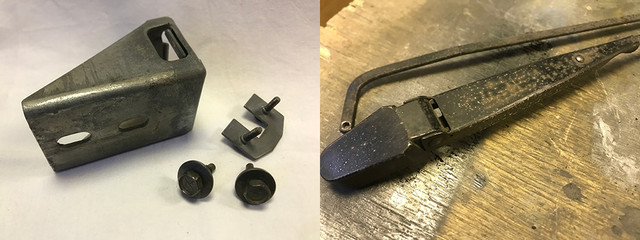
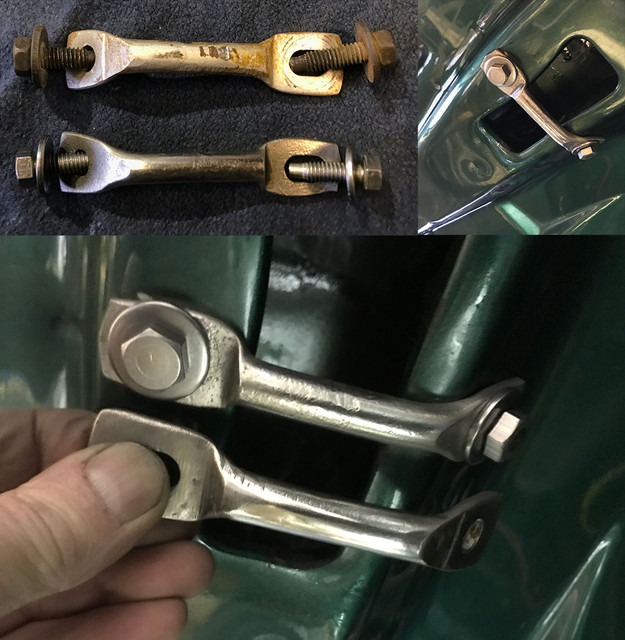
I do Mustang stuffs, so not planning to plate some coin or some grandma's ring as seen on many utube vids. If I can't plate a part like this hood latch right away, it's useless. So lets find out...

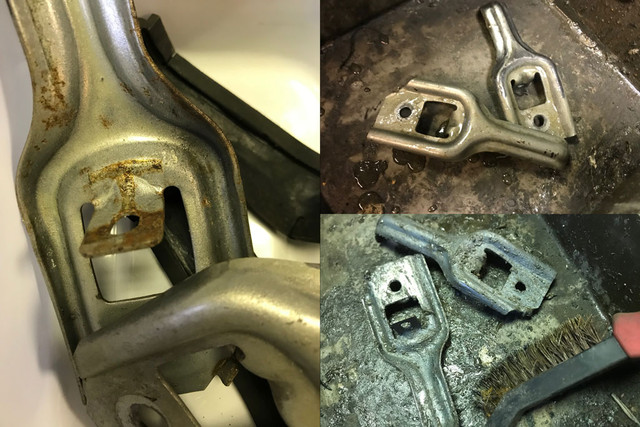
The part was really rusty and de-rusted during past weeks, and gave it to prevent contamination a good cleaning/degreasing and metal brushing, followed by a 1 minute bath in chloridric acid. (you can see on the pict after a few secs how that stuff is corrosive). Recomended in many articles, as it gets rid of the last bits of potential oil or grease and etches the surface. The one minute over, it went to another bath to be rinced with distilled water.

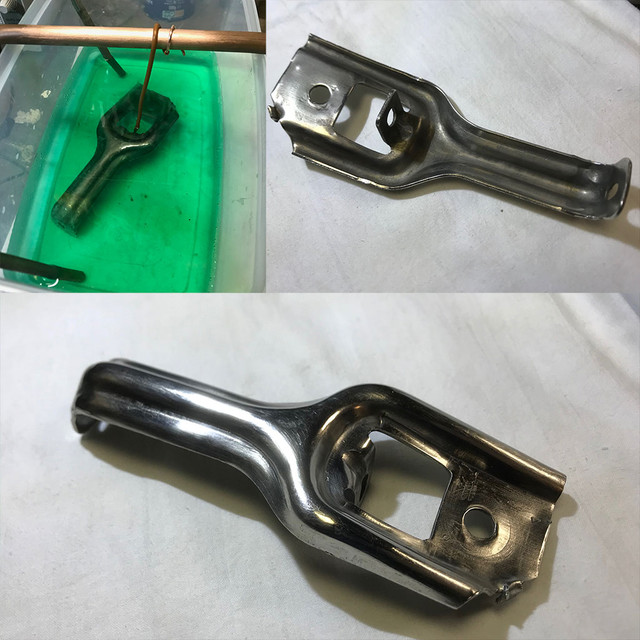
Then the unprepared me (need buy some copper wire and many other details) hooked the part so it was fully submerged and instead of using one rod, I've used them both, on each side (connected to each other). This time, they received the positive and the part itself the negative. It's said on many articles, the curent is set by dividing one amp by the surface of the to be plated object. My power source being totally new to me, I couldn't set it up as I wanted, so went by the trick given by many: best looking and durable results are obtained with the lowest voltage with little to no bubbles. There are too big bubbles on the above pict, this was corrected after the pict was taken...
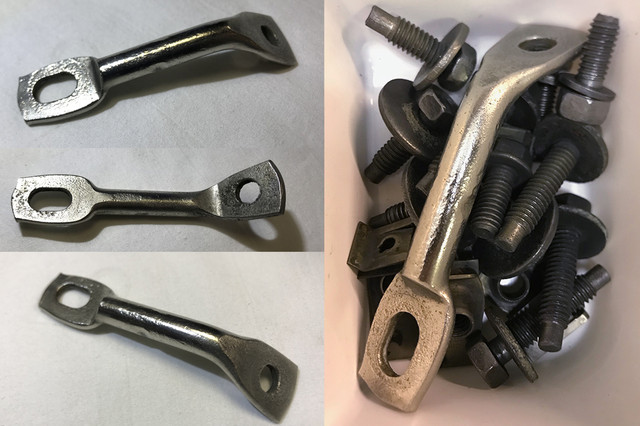


Based on some graph with power, acidity and surface (that I've totally ignored in practice :) ), I've let the baby exactly 2 hours into the solution, stopped at 1 hour to change the orientation of the part. So it would be facing or be near of the sacrificial rods.

I forgot take a pict before (only in acid).

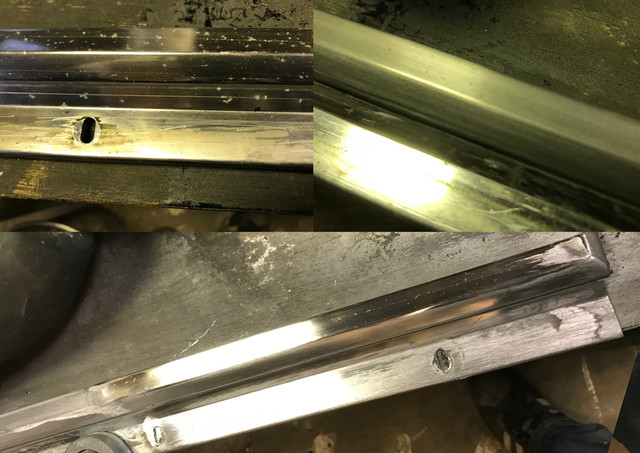
One thing is clear: it works! yeah! :)

The other clear part is that the result is defined by the polishing work. In this case, even if the small dents are magnified by the extra bright light i was holding to make the picts, it shows I did a poor job and wire wheel is far from being enough.

Also, using some polish paste did not remove any of the plating, meaning nickel really became the part and its not some layer that can be wiped away just like that. Something I was afraid of.

Even as is, its day and night compared to how it looked not 3 weeks ago. The right side of the pict, you can see the difference in 'blingblingness" with the other de-rusted bolts. It was having the exact same color/brightness.
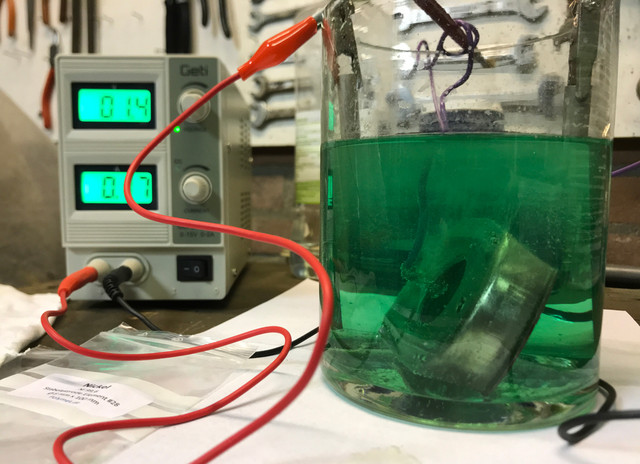


Totally electrified with the bling bling, while waiting, prepped another victim, one of the bracket holding the hood locks. Just like the hatch, I did not really polish much, and to see the effect, I did nothing (polishing/brush wise) on purpose to the inside to see how far you must go into the preparation.
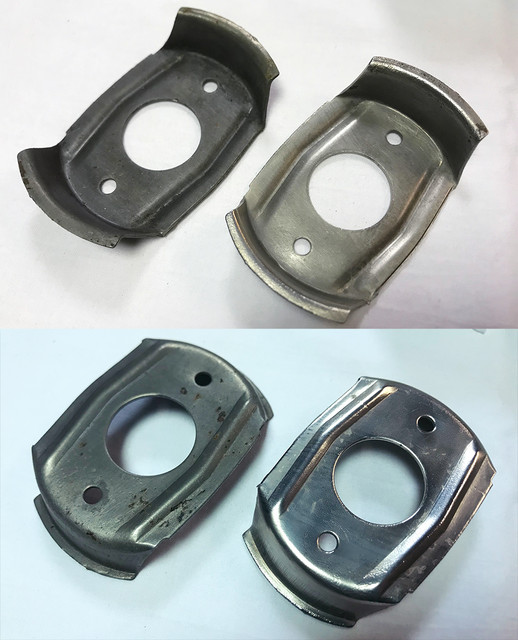


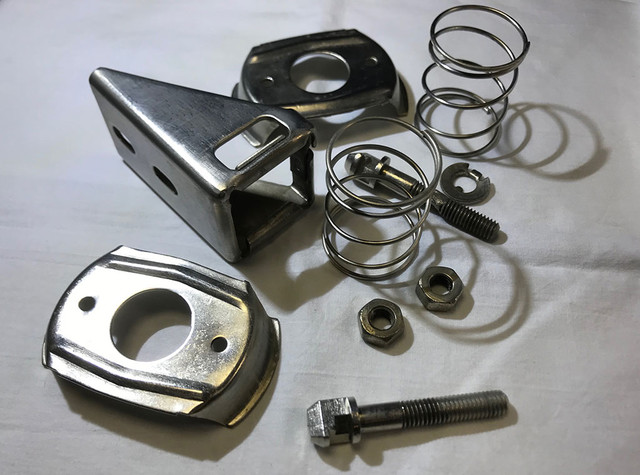
Because of the result of the latch, I wanted to see how that goes with a bigger part (surface wise) and the amount of deposit I could get after 1 hour extra. On left side, the other hood lock, on the right the plated result.

While the surface of the outside is ok (and showed again, that a poorly polished surface results in the exact same surface result), the inner side was practically not plated.

I could not understand why...
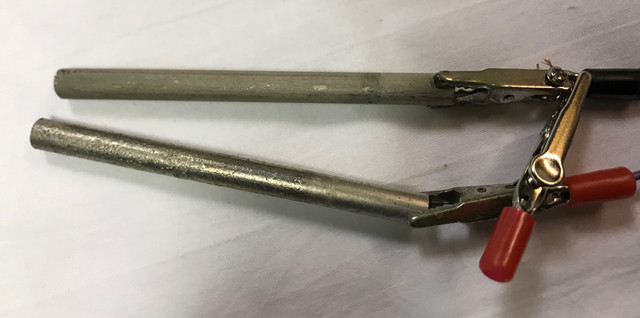


...till it was time to clean up. As I do not have yet solid/permanent connections and propper materials, it was clear that the second rod, supposed to be the positive was not having a good connection, if any. So the inner side received a much lower amount of nickel, not being exposed directly to a rod.

All with all 2019 starts very bright! Pretty happy with the results. No need to say that both will be repolished and get a new coating, but this first taste at home plating showed me that, at least for nikkel, its perfectly doable and easy, that good quality can be obtained once you have bits of experience and its very affordable. By the look of the rods, I know I can plate tons of parts before i need order a new one (15 euros). I also think I will later on invest in coils/wires and sheets, to ensure best coverages per parts.

Next step will be to buy containers to store these solutions, as once done, they can be reused over and over. And start think of making a bigger bath to handle multiple parts in one pass and also allow bigger parts...

To be continued...

 
Last edited by a moderator:
Dude, you need to swap your daily for a Delorean now OK?

That plating seems to work quite well. I thought it would need a lot longer.

Well done!

 
Dude, you need to swap your daily for a Delorean now OK?

That plating seems to work quite well. I thought it would need a lot longer.

Well done!
You'd need at least 1.21 gigawatts of electricity to make me want another car! :)

Thx, I must say I'm impressed at the results you can get with the very basic stuffs involved in the process.

Especially how robust and good looking the coating is (if you forget the poor polishing). Wish I would have tried this long ago.

 
brrr it's cold and its expected to be worse..

But who cares when you're doing Mustang Science? :)


I've been busy doing some bubbles, de-rust and polish a bit in past few days...


And then after few parts done, you think: are these the ugly corroded parts from not 3 weeks ago?

Day and night!


I need to invest in polishing stuffs as to clean a corroded metal surface back to an acceptable "plating" standard is quite more work than just de-rust...

But there is some reward when you add a tad of elbow oil.


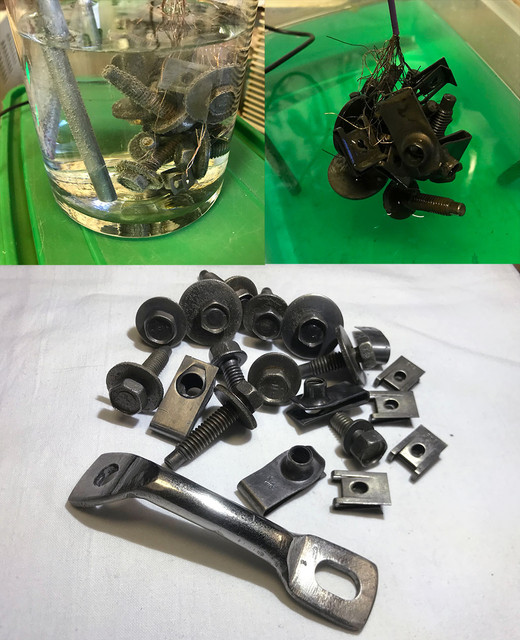
Its nice to handle relatively small objects, but it was too croudy in my small glass jar. The decklid latch was really the max, and it's not ok to be so near of the anodes, so I've produced more electrolyte (more is cooking as I type) and went over to a slightly bigger container to be able to try handle bits bigger parts.

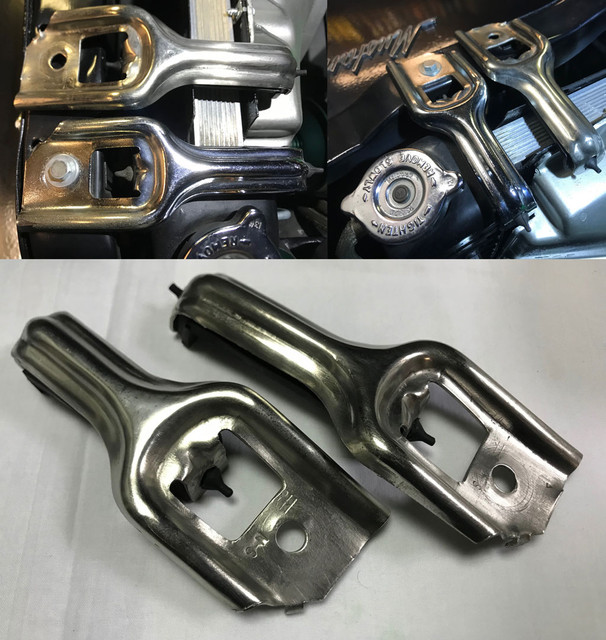
These radiator mounts were painted grey and in need of some love. May I fail, I can always paint them again, they'd then be extra protected.

So back to the usual dirty "make me beautiful again" process. Paint removal, de-rust...


One of the radiator mounts ended up this saturday with a new jacket! ( yeah I know I could have polished more ;) )

I've learned tons of what needs be better during this past days and I did not even had the time to try another metal. Many details I need to improve, like crocodile connections really need be stainless (You can almost see them rusting while they are not submerged), need a filter/bag (for the anodes deposits), need sheets of metal vs rods for flat sides, need some cheap aquarium air pump and most of all: I really need to go get a roll of thin copper wire, really tired of stripping car and house wires for this :)

 
Last edited by a moderator:
Bellow freeze point outside (-5C, 23F), garage was very cold.

It took a while before I got the baths to working temps.


Finished the pair of mounts, and placing them next to the chrome version that I have on the 73.

Aside nickel being a tad more yellowish, pretty pleased with what my cheap green soup did. :)


Time for a blue soup. Because some of the hardware are pitted. I tried add copper prior to a second pass of nickel to see if i could get a layer so I could polish in between to fill the damages...

Got some copper on them, but that's all I can say. It was not even near of the expected. Bad dark color and did not stick to the surface. I could remove the entire layer with my fingers.

Some readings told me, the alloys prolly being some mix of zinc and nickel (brass), I needed to use either one of the elements. Ideally, I should first do this, then try copper on top of that layer and then again nickel.

I will return on the copper later on, as the brown deposit aspect also tells me there is a prob with the bath. Temp, PH or power?? So will try plate some scrap bits to define what gives me the expected bright pinky result.

I'll prolly try an alkaline solution vs acidic in the next couple of days.


In between experiments, I could see the 73 was jealous, so mounted the bling bling hood latch lock on her and went prep the rusty grey painted 73 for the 71. End of the day, the 73 to become 71 was done. The bolts are cooking and I'll plate them tomorrow.


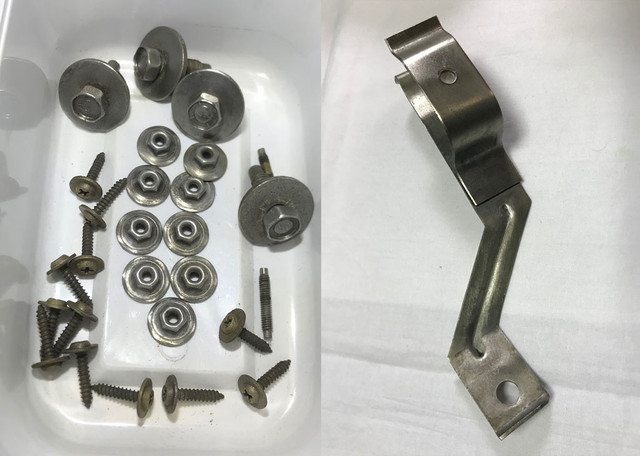
Then it was time to try zinc, (the electrolyte is greyish practically transparent) and also try to see how well that all works on a larger group of parts. Because zinc is much more durable with a chromate layer, most durable being the yellow chromate, the blue(white) and black being just a tad more corrosion resistant than zinc alone. I tried something else. The chromates for zinc passivation are of the dangerous kinds. The kind that is not even really known how dangerous they are for our bodies/health in the long term. As I don't want to touch this kind of stuffs, I went to plan b, that is first a layer of zinc and then nickel. A dull dark grey layer went ok on them. (I will try also an alkaline solution to keep it lighter) Then the nickel. I suppose some kind of "brass" alloy got created and it was not the lighter result that nickel alone produces on steel. More like some dark brass.

After cleaning & soft brushing, it was lighter and I could see that the deposit was strong. Just not the color I'd expected. The whole process took 2 hours, 1/2 for the two metals. Not the light clear result I'd wanted, but I know these will not rust again for a long while, which is the point of the whole thing. Keep in mind the above were very badly corroded/rusted.

and then it was really too cold in the garage... I got victims ready for tomorrow so called it a day.

 
Last edited by a moderator:
Weekend!

We got almost -10c (13F) and snow this past days and today temp was back few degs in positive.

Still way too cold to do big things...

So went back to plating.


Plated a few bolts and nuts of the ram air and a bracket that support hoses on the 429. Been lazy on the polishing, and result shows it, but still way better than they were :)

Also learned that bath temp are really important and got many "blanks" this past week. These will do, but they were also plated at way too low temp. mmm, I might dip them again :)


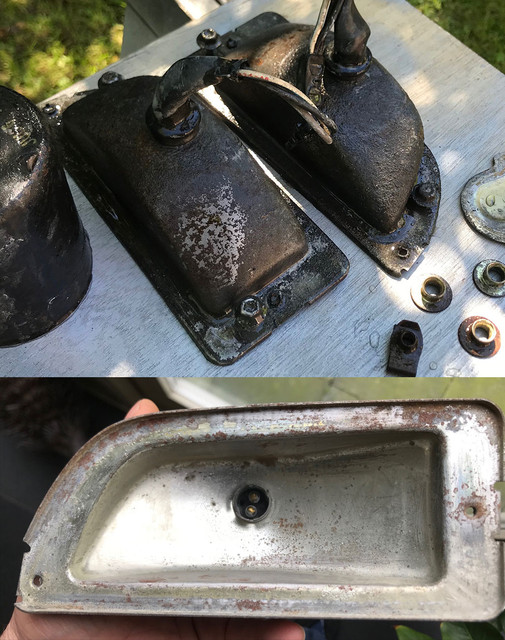
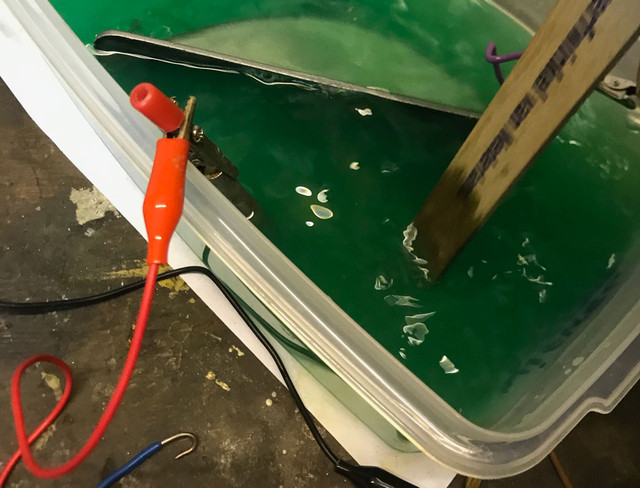
The victims for today were the front valance lights. Started this summer, that's how they looked back then. Since that time, they've been de-rusted and painted.

At the time I've painted the outside, the plan was to spray that magic silver chrome paint and needed paint the inside first in gloss black and apply...

But last week, I thought, what if I could plate them...


So they went into the magic bath. When I say magic, I should say, its 1/5 true. They went in and out 5 times. Removing the old chrome and get a relatively polished surface asked a fair amount of elbow oil but where the challenge really was, was to get the nickel inside the lights bed. The concave shape really made it hard. I also learned that placing the anode too near was bad idea as you get burned places forcing you to stop and redo. The key to get them covered inside was to manually stir and direct the flow inside, and have higher current while doing this. Each session of 1/2 hour stopped to polish by hand in between till I would get an enough reflective surface, which is what you want for lights. As LED's will be used, I could have simply painted white and be done. But hey, where would be the fun in that? :)


If you compare with the pict above, its obvious the 50 yo lights got some of their lost glory back!

With the lenses bought this past summer (one was broken), they will look as new in the restored front valance.

I didn't have the time to prep an alkaline solution this week, so one is now cooking. Seen some videos on both zinc and copper where the results were looking much lighter and shinnier than using vinegar/acid. I should have the juice ready to try by tomorrow and get my own opinion of what you get...

 
Last edited by a moderator:
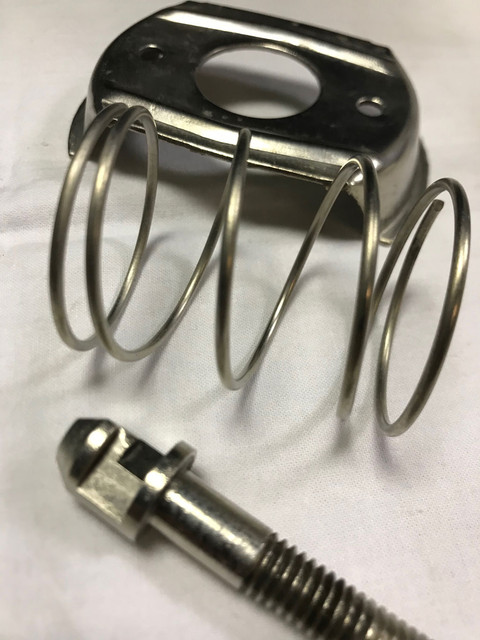
Plating without using electricity (electroless) is supposed to overcome some of the problems with electrolysis, especially on irregular surfaces like your valance light housings. But it does require heating to near boiling and non-metallic containers to cook the solution and parts in.

https://en.m.wikipedia.org/wiki/Electroless_nickel_plating

https://www.caswellplating.com/electroplating-anodizing/electroless-plating-kits.html

You are definitely making some old rusty parts look better than new. Good job.

 
Last edited by a moderator:
As usual some great work you are doing Fabrice despite the freezing conditions

The way you're going you'll end up with a new career as an industrial chemist!

Have you tried using cadmium as this is used in plating quite a bit?

Your efforts have inspired me to check out doing it myself if I ever find the time

While having a look on the internet found an Aussie website that sells DIY plating kits -

http://www.caswellplating.com.au/plating_kits.html

I'll have to invest in a white coat and glasses first, then grow some Einstein hair though

 
Plating without using electricity (electroless) is supposed to overcome some of the problems with electrolysis, especially on irregular surfaces like your valance light housings. But it does require heating to near boiling and non-metallic containers to cook the solution and parts in.

https://en.m.wikipedia.org/wiki/Electroless_nickel_plating

https://www.caswellplating.com/electroplating-anodizing/electroless-plating-kits.html

You are definitely making some old rusty parts look better than new. Good job.
thx Don,

Yes, you posted that link already a few weeks back when we were talking about the hood hinges springs (and how hard it is to go in between coils and inside)

I will probably at some point try one of their kits once I know much more about what I really need and what I can't do without using more complex chemicals.

For now, learning while restoring little things (and having fun in the process)

What I will prolly order soon from them(or from a UK similar company I saw) is one of their brighteners additive for nickel. Gives a really nice finish colour.

I also want to try plate on plastic at some point... Plenty to discover/play with before "paint temp" comes back.

 
As usual some great work you are doing Fabrice despite the freezing conditions

The way you're going you'll end up with a new career as an industrial chemist!

Have you tried using cadmium as this is used in plating quite a bit?

Your efforts have inspired me to check out doing it myself if I ever find the time

While having a look on the internet found an Aussie website that sells DIY plating kits -

http://www.caswellplating.com.au/plating_kits.html

I'll have to invest in a white coat and glasses first, then grow some Einstein hair though
thx OzCoupe72

Nah, I just like to try things from scratch, you know the new year res! :) 

For years I wanted to try and never did, somehow thinking you'd need some rocket science installation and knowledge.

While some professional plating can really be rocket science, its really not for our needs.

No haven't tried yet, just starting with the 3 metals, which is already enough to play with.

There are loads of metals to play/plate with once you know how... Here's where I bought my anodes.

http://www.ebaystores.com/Polymet-reine-Metalle

[Your efforts have inspired me to check out doing it myself]

All that photoshop copy/crop and typing in foreign language was not in vain after all! Glad to hear that! :)

Yes, their kits gives really nice results. But they are, at least for nickel and zinc using nasty chemicals, something I want to avoid unless I can't go around.

For instance for zinc, I will have to buy some passivation chemical (chromate), to prevent it to get this whitish powder (zinc rust) and it gets it very quickly. The less dangerous is the white/blue and is ideal for parts that are not directly exposed to water. But postponed to buy it, as nickel offers a better protection and can also be applied mat vs shiny using basic harmless chemicals. If I can manage to master a bit copper before applying nickel, that'd be even better and parts in the car would last much longer than with zinc.

All with all, its fun and as you can see, you can restore parts that you otherwise would paint or replace. Also excellent for medium sized parts to be bathed after de-rust before be painted. Totally worth a try! I know I regret not trying earlier.

If there is only one tip I can give you, is to buy a power source that you can regulate. Really a must have. The kits caswell sells, do come with some kind of rheostat supposed to be hooked to a batt charger. Nowhere near the finesse you need to tune the current based on the bubbles forming that you see. Bought one for 45 euros.

[i'll have to invest in a white coat and glasses first, then grow some Einstein hair though]

Prof Emmett Brown from back to future was my master :) Don't forget the rubber gloves!

 
man very cool stuff....FIll me in, how are you doing this plating or if you can direct me to a good article about doing this. Im very intrigued

 
Wow Fabrice, nice work!
Bedankt, niets bijzonder hoor, 

All the magic is done by the green soup.

Emmett Brown? What happened to Paul Bocuse and Dr Oetker?  :p
:)

man very cool stuff....FIll me in, how are you doing this plating or if you can direct me to a good article about doing this. Im very intrigued
There are tons of sources online. Just type electro plating nickel in search bar, and to get more in depth results, using different languages as Mr Google will serve you the same stuff over and over assuming the 3 experiments on coins from youtube, wikipedia and a few pros site is all you need to know, while much more is avail, and crazy enough the results showing up are in english too.

the short version to get u started:

You can buy by Caswell /others ready to be used kits. They will cost you an arm the first time, for nickel depending on kit its 250-400, but get you very nice results effortless for a few parts before you need order "refreshing/reactivating" chemicals. The chemicals used in their kits focusses on results and are not of the most friendly/harmless chemicals types.

The alternative, which I do, is to use relatively harmless chemicals solely that you can find at your local store. May something go wrong, you will be able to bring your waste at zero costs to your recycle point. The electrolyse can be reused over and over.

In both cases, you will need anodes of nickel. a 99,6%+ is what you need if you want bling bling results. You can buy same in 3 shapes: sheets, rods and pastilles/pieces (mainly for drums application where you plate xx items in one pass). I went for rods. They cost about 15-18 dollars a piece, and unlike sheets you will need 2 to get started. You could cut in half but you will then reduce the depth of your bath by doing so.

To do same as I did you need:

- a power source. 

An old phone charger + voltmeter could do, but I went for this one. Very handy, and i'd say a must have, as you will need to adjust a lot.

https://www.eleshop.nl/015v-2a-labvoeding-met-lcd-schermen.html

- regular white distilled vinegar. Start with 1 liter/quart. But buy say a gallon, if you plan do more than re-plating grandma's old ring.

- a spoon of table salt per quart (just to help make the liquid more conductive)

- a container for the solution while plating (and one for storage that you can close).

- 2 rods of pure nickel

- thin copper wire

- crocodile connectors, ideally stainless, (mine not stainless corrode really fast)

Before plating, ideally you'd need

- chloridic acid (1/2 quart used for PH levelling of swimming pools)

- distilled water.

- baking soda

- protection cloves & glasses

Aside the nickel source, depending on what you already have in house. You can plate for under 100 dollars for the first time.

Before plating you need to make the electrolyse, "nickel acetate" .

Simply connect both rods (or cut in half sheets) on both min and plus. Make sure ONLY the nickel is in the bath, not the crocodile connectors, as their metal would contaminate the bath with other metals. Let it on say 3 volts, 0.1 amp for 24 hours. It will turn green (see picts on my post). It doesn't have to be oversaturated to get started as it will saturate as you use it, but wait enough till you get a clear green. If its not light green, your nickel isn't pure and you need start over.

The practice.

Set the positive on the nickel anode (or more rods/sheets in daisy chain to distribute the plating), your part connected to negative. Ensure the connector is not touching the fluid for contamination. use only copper wires to hold your parts.

Set power on, and in a matter of second you will see bubbles of hydrogen gas forming on the surface. Adjust the power till you get the smallest bubbles you can. Within few minutes you will have a part plated. usually 20-30 minutes @3volts gives a nice layer but so far +-1 hour is where I got my parts to be where I wanted them.

No matter how poor the prep of the first part is, you will get a very nice result. The reason is that your solution is clean/pure, not having any contaminants (like rests of zinc or copper still on the surface of your part).

What I've learned and seen so far, is that prep is 95% of the work. This means that the parts need be immaculate, first de-rusted, then polished, then cooked in baking soda under boiling point, then rinsed in distilled water. then dipped for a minute in acid, then rinsed in water, and then placed into the solution.

Sounds a lot, but you'll be routined in matter of minutes. (its just 3 buckets/containers in front of you)

A quick test to know if you part is ready, is to spray distilled water on it, if the water beads, you still have grease or oil, and you need redo the cleaning as it will not plate well if it plates at all.

If you want a mat look, use wool to clean the surface, if you want shiny, polish your part. What you see before plating is what you get after plating.

I've been busy just 3 weeks with this, and made already lots of mistakes/experiments, like trying to plate at high current or let it way longer. You will then burn the nickel or have a deposit that can peel off.

I'm not going to pretend I know how to plate, really noob at this. But I know for sure after few days of practice, that with bits of patience and not skipping steps (which I did too) that you can get good looking and durable plating on many parts using relatively harmless common chemicals and for cheap. Using the expensive kits will not remove any step of the process, the diff is in the ready to be used solution, more complex and using other agents like brighteners.

 
Last edited by a moderator:
If you can come up with a way to plate plastic that will be awesome.
I work with plastics, and we see a lot of plastic light reflectors that have a shiny "plated" coat, or metallized. Actually, most reflectors now-a-days are plastics with a reflecting coat. I don't know all the details on how is this coat laid out, but it involves a kind of vapor deposition method, which may not be an easy DIY project.

I did a quick search and here are a few links to read:

http://www.vacuumplaters.com/metallizing-process.php

http://tennvac.com/wp-content/uploads/2015/05/Metallization-white-paper-%E2%80%93-Physical-Vapor-Deposition-Technology.pdf

 
Back
Top