Great progress Fabrice albeit not as much as you had planned. Any progress is welcome not matter how small the step is
You are using an out of date browser. It may not display this or other websites correctly.
You should upgrade or use an alternative browser.
You should upgrade or use an alternative browser.
Fabrice's 429CJ 71 project
- Thread starter Fabrice
- Start date


Help Support 7173Mustangs.com:
This site may earn a commission from merchant affiliate
links, including eBay, Amazon, and others.
Amazing work Fabrice!
- Joined
- Mar 30, 2017
- Messages
- 2,400
- Reaction score
- 892
- Location
- The Netherlands
- My Car
- 73 Grande 351C
71 Mach 1 429CJ
Thx Mike!
Rain, windy and cold, it even snowed in south of the country.
Not the kind of weather I'm counting on for the past 3 weeks...
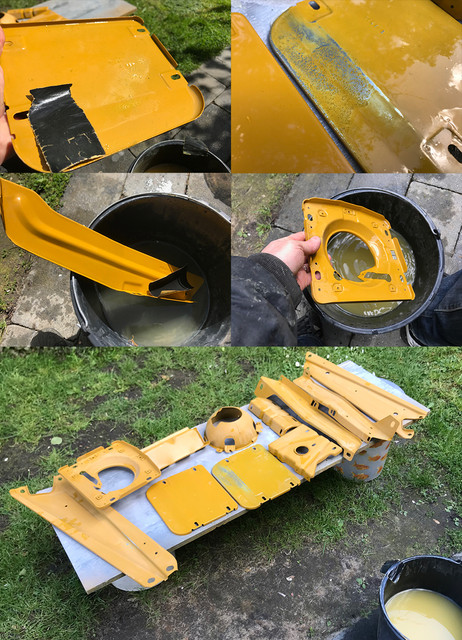
With this cold wind but nice sun in between clouds, I thought I should enjoy wet sanding in cold water")
All the parts that previously received an extra thick epoxy layer to cover the ancient corrosion pits still there after the zinc plating, were wet sanded. Once temp is higher, the next layer should hide them totally and should never be seen again for a very long time.
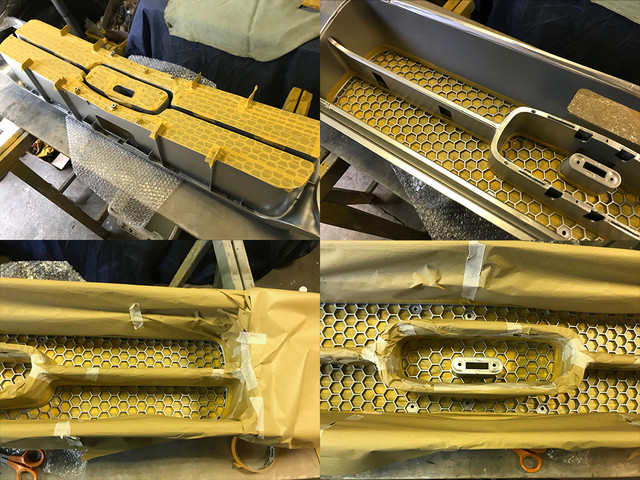
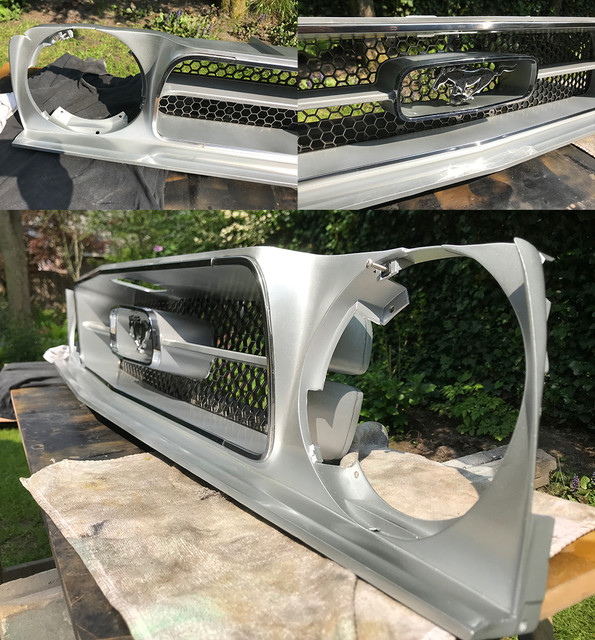
As I really need the space, I've continued on the grille. Started to mask it for the second colour.
Felt like one of these ladies with long nails in perfumeries, taking great care at make a nice packaging.. Only masking the honeycomb is far more tedious than packing some fancy bottle and with cold hands its even more fun.
Took ages to get all the lines respected by the tape, with no space for your hands and the tape wanting to stick on everything it could,
it took a long while but finally got it fairly ok... Hated myself for not wanting a uni black on the entire piece!
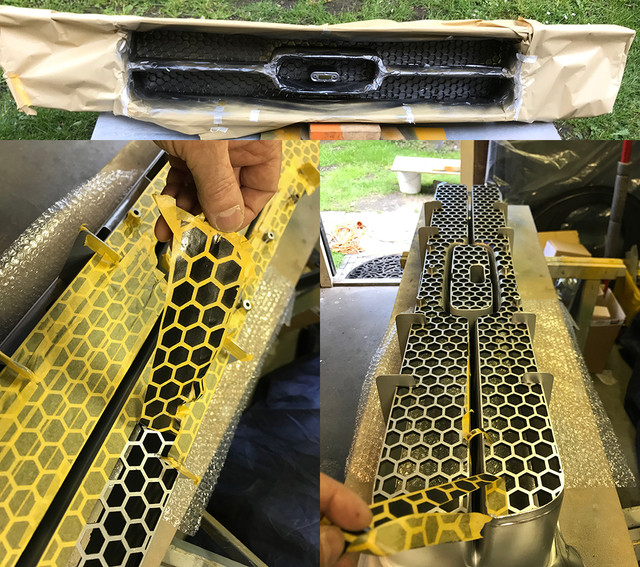
Waited till skies were clear, quicly applied the colour and dried it with heatgun from a distance.
Still soft but no hard, It took just a couple of minutes to remove the masking that took forever to be set.
The soft tape designed for paint masking did the job perfectly.
Curious to see how that will look with the pony in place (loose).
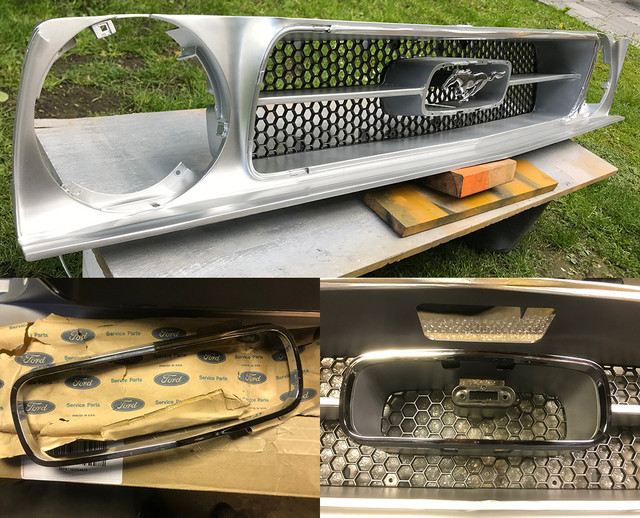
And then came the post with the molding that will replace the damaged and broken one that I could repair. First NOS part in the old Ford paper I see in a very long while...
Still surprised this piece is not made of metal but chromed plastic. My fellow plating friend @pegleg had a replacement for the damage left part of the bigger ring, that is in metal, still under way from England, so I think that after spraying a semigloss clear coat soon, all the trims/molding in place and bling bling, I should end up having a pretty nice 50 years old grille!
Rain, windy and cold, it even snowed in south of the country.
Not the kind of weather I'm counting on for the past 3 weeks...
With this cold wind but nice sun in between clouds, I thought I should enjoy wet sanding in cold water
All the parts that previously received an extra thick epoxy layer to cover the ancient corrosion pits still there after the zinc plating, were wet sanded. Once temp is higher, the next layer should hide them totally and should never be seen again for a very long time.
As I really need the space, I've continued on the grille. Started to mask it for the second colour.
Felt like one of these ladies with long nails in perfumeries, taking great care at make a nice packaging.. Only masking the honeycomb is far more tedious than packing some fancy bottle and with cold hands its even more fun.
Took ages to get all the lines respected by the tape, with no space for your hands and the tape wanting to stick on everything it could,
it took a long while but finally got it fairly ok... Hated myself for not wanting a uni black on the entire piece!
Waited till skies were clear, quicly applied the colour and dried it with heatgun from a distance.
Still soft but no hard, It took just a couple of minutes to remove the masking that took forever to be set.
The soft tape designed for paint masking did the job perfectly.
Curious to see how that will look with the pony in place (loose).
And then came the post with the molding that will replace the damaged and broken one that I could repair. First NOS part in the old Ford paper I see in a very long while...
Still surprised this piece is not made of metal but chromed plastic. My fellow plating friend @pegleg had a replacement for the damage left part of the bigger ring, that is in metal, still under way from England, so I think that after spraying a semigloss clear coat soon, all the trims/molding in place and bling bling, I should end up having a pretty nice 50 years old grille!
Last edited by a moderator:
- Joined
- Mar 30, 2017
- Messages
- 2,400
- Reaction score
- 892
- Location
- The Netherlands
- My Car
- 73 Grande 351C
71 Mach 1 429CJ
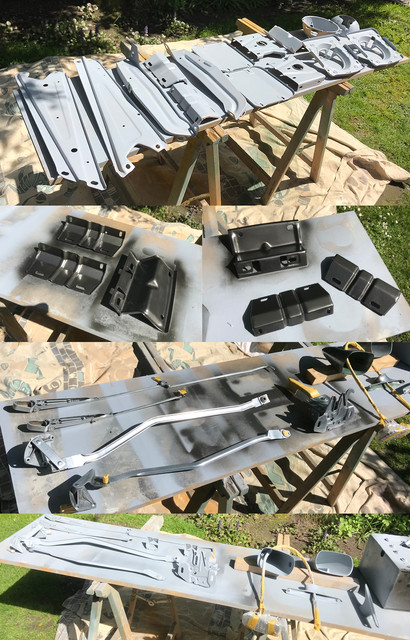
Not even double digits temp today: another no paint day.
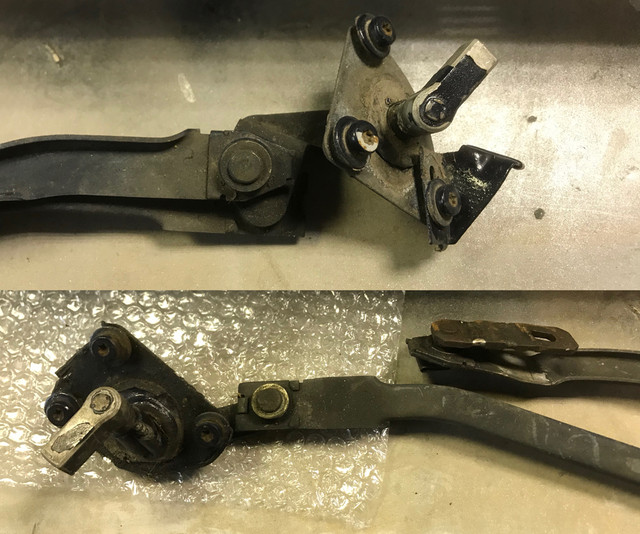
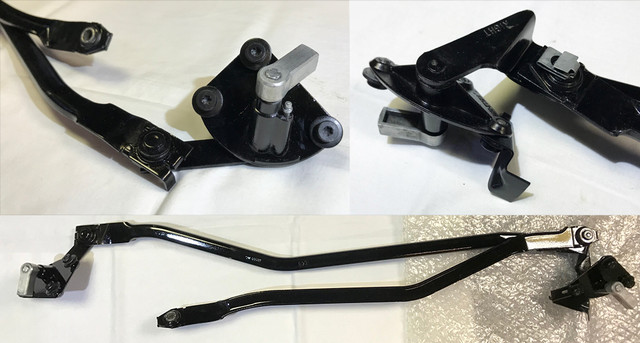
So picked my next victim: the wipers linkages
After seeing how nice Mike, aka @mach71351c did his last week, I thought they'd be a good alternative activity for paint and they need be done anyway...
As I've never removed these before, was wondering if there was some hidden washer, tricky nut that could fall or something etc... Mike confirmed the 6 stars screws is all that needs to be removed. Of great quality, the screws got loose with no efforts and the assembly was out in less than 10 minutes.
Mine still having the modified motor plate on them. As I've restored my motor a while back (many pages back in this thread) and also restored one of these, I will not need it. The offset done for using a wrong motor with extra holes, is also on this old plate. Someone cut it in half, and welded a piece in between of the same extra offset added for the motor holes on the cowl vent. Shows how hard it was to find parts back in the 80's in France...
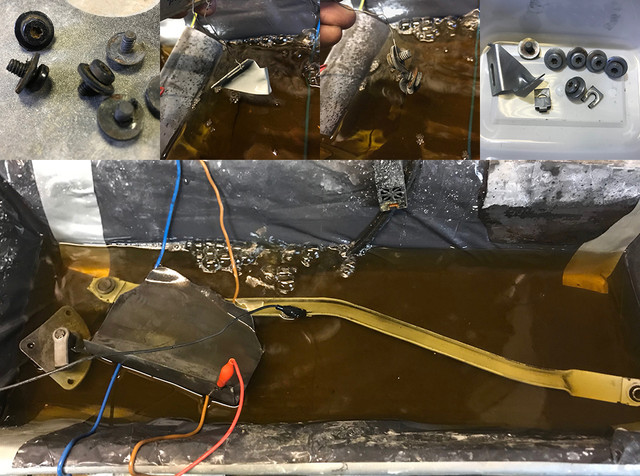
All the small hardware I could remove was treated first and while they cooked, I was busy prepping the long arms...
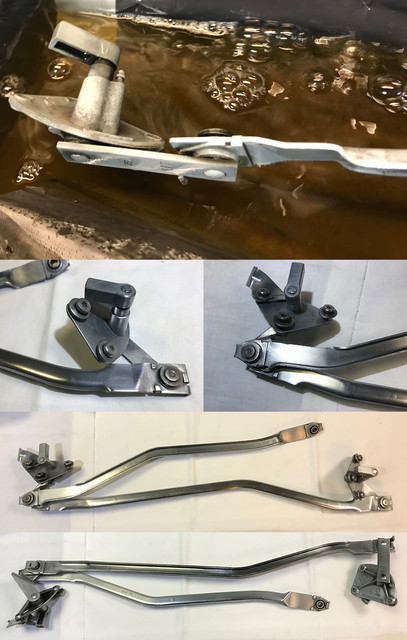
Few bubbles later, ended up with a plated wiper linkages. Some bits could be done better, but as its all about rust prevention and being something you don't see that will also be painted. It's more that enough. They've now joined my growing pile of parts waiting for a spray and the shafts will receive a good amount of grease after that.
And that's how another "little things" weekend passed.
To be continued...
So picked my next victim: the wipers linkages
After seeing how nice Mike, aka @mach71351c did his last week, I thought they'd be a good alternative activity for paint and they need be done anyway...
As I've never removed these before, was wondering if there was some hidden washer, tricky nut that could fall or something etc... Mike confirmed the 6 stars screws is all that needs to be removed. Of great quality, the screws got loose with no efforts and the assembly was out in less than 10 minutes.
Mine still having the modified motor plate on them. As I've restored my motor a while back (many pages back in this thread) and also restored one of these, I will not need it. The offset done for using a wrong motor with extra holes, is also on this old plate. Someone cut it in half, and welded a piece in between of the same extra offset added for the motor holes on the cowl vent. Shows how hard it was to find parts back in the 80's in France...
All the small hardware I could remove was treated first and while they cooked, I was busy prepping the long arms...
Few bubbles later, ended up with a plated wiper linkages. Some bits could be done better, but as its all about rust prevention and being something you don't see that will also be painted. It's more that enough. They've now joined my growing pile of parts waiting for a spray and the shafts will receive a good amount of grease after that.
And that's how another "little things" weekend passed.
To be continued...
- Joined
- Aug 14, 2014
- Messages
- 4,589
- Reaction score
- 1,630
- Location
- Madison, WI
- My Car
- 1971 Mach 1 w/408C stroker
You are very patient and detailed Great work and great thread.
Nice job! Attention to detail second to none.

$99.99
Polished Rocker Panel Sill Plate Molding Kit with Clips Compatible with 1964-1966 Ford Mustang - Authentic Restoration for Classic Car Enthusiasts
Classic 2 Current Fabrication


$9.00
2016 Hot Wheels Vintage American Muscle 1970 FORD MUSTANG MACH 1 die-cast 4/10
Cards and Bobbles


$37.69
$55.00
The Complete Book of Ford Mustang: Every Model Since 1964-1/2 (Complete Book Series)
Amazon.com


$13.75
$16.39
Ford Mustang: Trivia & Fun Facts Every Fan Should Know About The Great American Icon!
Amazon.com

$18.99
$19.89
Checkered Flag Men's Ford Mustang Cap Tri-Bar Pony Logo Adjustable Black Hat
BS STORE LLC


$29.70
Ford Mustang, Mach 1, GT, Shelby, & Boss V-8 (64-73) Haynes Repair Manual
Haynes Repair Manuals


$59.98
JH DESIGN GROUP Men's Mustang Logo Hoodie Full Zip Up Black Hooded Sweatshirt (X-Large, Black)
Affordable Family Clothing


$39.99
Lucky Ride Ford Hoodie Legend Lives Mustang Pony (Pocket) Full Zip Sweatshirt, Red, Medium
Giftware Shop Usa


$64.98
JH DESIGN GROUP Men's Ford Mustang Collage Black Zip Up Hoodie Sweatshirt (Large, CLG2-black)
Affordable Family Clothing


$24.95
Ford Mustang Pony Racing Stripe 5.0 Muscle Shelby Long Sleeve T-Shirt Front Back Print-Black-Large
Giftware Shop Usa


- Joined
- Mar 30, 2017
- Messages
- 2,400
- Reaction score
- 892
- Location
- The Netherlands
- My Car
- 73 Grande 351C
71 Mach 1 429CJ
Mike, Tony, thx guys!
In today's update: no bubbles, no ugly dirty textures!
Because today I was able to spray something! Finally a dry day!
Still cold but just enough in the sun.
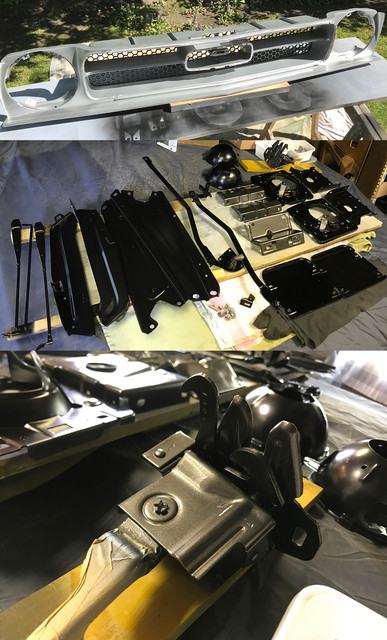
Started with the primer, most parts were already in epoxy and had been water sanded. Some received primer for the first time. The last visible zinc bling bling disappeared today.
Some received a dark grey, which in the sun on this pict looks like a basic dark grey, but its a warm metallic that was picked to mary with my dark green. Same as I've sprayed on the grille honeycomb last week instead of a classic black.
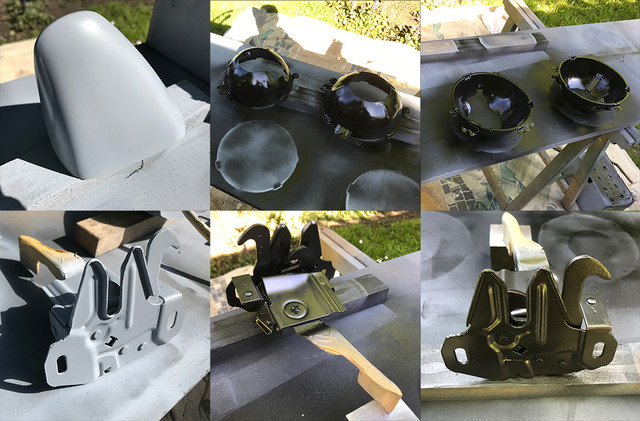
Both side mirrors were also primed, but will wait bits more for the next green spray. Headlights brackets, the lights cups.. received semigloss black, the latch mechanism the warm grey but kept the handle polished zinc as its visible into the grille. I might spray it same light grey colour as the grille, but wait first to see how that marries together.
Another series of parts, some like the wipers arms will receive an extra clear coat just to say bye bye to rust for a very very long time as these did not receive an epoxy layer like the others did.
Very happy I could paint today. Tomorrow if weather still permits, more will be receive a coat and I might even be able to get back to the 73 too.
We'll see.
In today's update: no bubbles, no ugly dirty textures!
Because today I was able to spray something! Finally a dry day!
Still cold but just enough in the sun.
Started with the primer, most parts were already in epoxy and had been water sanded. Some received primer for the first time. The last visible zinc bling bling disappeared today.
Some received a dark grey, which in the sun on this pict looks like a basic dark grey, but its a warm metallic that was picked to mary with my dark green. Same as I've sprayed on the grille honeycomb last week instead of a classic black.
Both side mirrors were also primed, but will wait bits more for the next green spray. Headlights brackets, the lights cups.. received semigloss black, the latch mechanism the warm grey but kept the handle polished zinc as its visible into the grille. I might spray it same light grey colour as the grille, but wait first to see how that marries together.
Another series of parts, some like the wipers arms will receive an extra clear coat just to say bye bye to rust for a very very long time as these did not receive an epoxy layer like the others did.
Very happy I could paint today. Tomorrow if weather still permits, more will be receive a coat and I might even be able to get back to the 73 too.
We'll see.
- Joined
- Jul 6, 2015
- Messages
- 4,451
- Reaction score
- 281
- Location
- Iowa
- My Car
- 1973 Mustang Grande 351C 2v
Wow. Amazing work.
- Joined
- Mar 30, 2017
- Messages
- 2,400
- Reaction score
- 892
- Location
- The Netherlands
- My Car
- 73 Grande 351C
71 Mach 1 429CJ
thx @73pony
Can't beleive it was raining again...
A quick look at a radar app showed the last cloud on top of my town was about to leave and sun should be back soon after that.
So while waiting for the last drup, went improving the surface of one of the wipers, that was really corroded previously and as plating doesn't repair anything, it was the time to fix it, just before the next batch of parts to paint black..
If rain wasn't enough, the moment I start spray, wooosh, got some back pressure in the gun and bam 2 parts ruined. Raaaaaaaaaa!
Heat dried that and 1/2 hour later could wet sand the damage away. Gun inspection, showed me I've placed back the membrane inverted after cleaning it yesterday. Let me tell you i've checked twice before each session after that.
From that point all went smooth, bad luck gone, sun was back and paints & clear coats gloss and semi-gloss went without problem one after the other. I let them get hard and will remove the many little masks somewhere this week. Really curious about the hood latch with zinc handle..
Bit pitty weather was late on me, did not spray any green as I was hoping to do.
Went back on the car and removed a few things, like the trans cooling lines, that will be replaced later on by teflon lines like on the 73, much nicer. Some rusty bolts that were supposed to be a replacement for the original ones. Lost 1/2 hour just to loose the upper bolts of the passenger fender, just to illustrate the quality of that bolts kit.
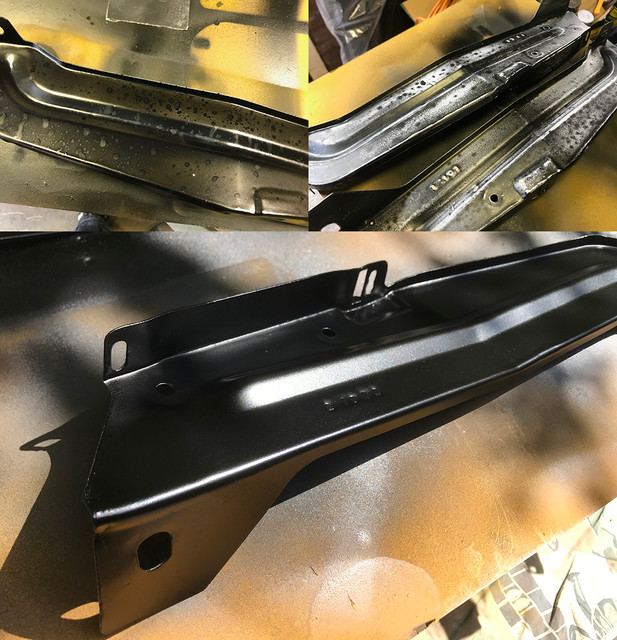
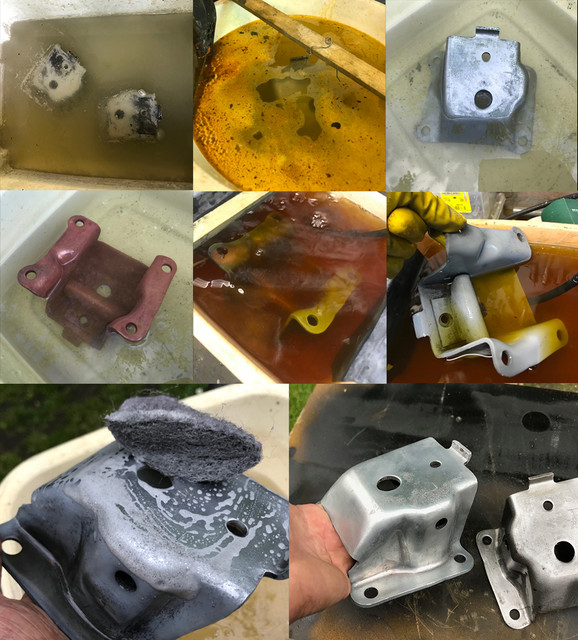
So removed the last two victims: the engine mounts, the other sides being on the block and as new now.
2 bolts took forever to get loose, again that ****** bolts set, the others 6 were original and all went relatively smooth. Rusty and dirty of course, but shows once more that it's a very bad idea to toss these for newer. I''ll do more than that, but all they need is being cleaned up and greased. A quality I wish I could find overhere.
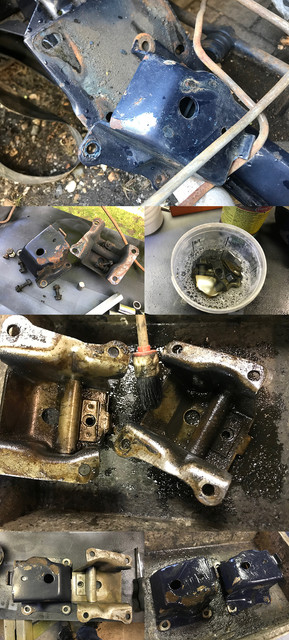
Unlike yesterday, here some nasty ugly textures again! I needed to first degrease them, before I can apply the paint remover, and later give them an electro bath before plate them. It's time consuming, but no sandblasting can beat the surface finish once done. The bolts and nuts are cooking in vinegar and should be done tomorrow.
For the first time I've realised today, that I've actually reached a point where I have nothing left to restore in engine bay! Aside the throttle cable that I need replate, everything else left over just for ref, will be replaced in time, like the brakes&fuel lines, master cylinder. The steering box needs a good cleaning but looks like I can now start think about the engine bay itself.
One question:
I will remove the C6 soon and because its dipstick is high, I wanted to remove it to save a few inches of lift, not to mention it's rusty and could use a makeover anyway. I see it turns, but it did not really want to get out. Not knowing if there is something inside preventing it to get out, left it in for now. So question is: do I need be more of a man and its only some stubborn o-ring giving hardtime or it it really hold from within?
To be continued...
Can't beleive it was raining again...
A quick look at a radar app showed the last cloud on top of my town was about to leave and sun should be back soon after that.
So while waiting for the last drup, went improving the surface of one of the wipers, that was really corroded previously and as plating doesn't repair anything, it was the time to fix it, just before the next batch of parts to paint black..
If rain wasn't enough, the moment I start spray, wooosh, got some back pressure in the gun and bam 2 parts ruined. Raaaaaaaaaa!
Heat dried that and 1/2 hour later could wet sand the damage away. Gun inspection, showed me I've placed back the membrane inverted after cleaning it yesterday. Let me tell you i've checked twice before each session after that.
From that point all went smooth, bad luck gone, sun was back and paints & clear coats gloss and semi-gloss went without problem one after the other. I let them get hard and will remove the many little masks somewhere this week. Really curious about the hood latch with zinc handle..
Bit pitty weather was late on me, did not spray any green as I was hoping to do.
Went back on the car and removed a few things, like the trans cooling lines, that will be replaced later on by teflon lines like on the 73, much nicer. Some rusty bolts that were supposed to be a replacement for the original ones. Lost 1/2 hour just to loose the upper bolts of the passenger fender, just to illustrate the quality of that bolts kit.
So removed the last two victims: the engine mounts, the other sides being on the block and as new now.
2 bolts took forever to get loose, again that ****** bolts set, the others 6 were original and all went relatively smooth. Rusty and dirty of course, but shows once more that it's a very bad idea to toss these for newer. I''ll do more than that, but all they need is being cleaned up and greased. A quality I wish I could find overhere.
Unlike yesterday, here some nasty ugly textures again!
I needed to first degrease them, before I can apply the paint remover, and later give them an electro bath before plate them. It's time consuming, but no sandblasting can beat the surface finish once done. The bolts and nuts are cooking in vinegar and should be done tomorrow.For the first time I've realised today, that I've actually reached a point where I have nothing left to restore in engine bay! Aside the throttle cable that I need replate, everything else left over just for ref, will be replaced in time, like the brakes&fuel lines, master cylinder. The steering box needs a good cleaning but looks like I can now start think about the engine bay itself.
One question:
I will remove the C6 soon and because its dipstick is high, I wanted to remove it to save a few inches of lift, not to mention it's rusty and could use a makeover anyway. I see it turns, but it did not really want to get out. Not knowing if there is something inside preventing it to get out, left it in for now. So question is: do I need be more of a man and its only some stubborn o-ring giving hardtime or it it really hold from within?
To be continued...
Last edited by a moderator:
- Joined
- Jan 1, 2012
- Messages
- 8,559
- Reaction score
- 1,439
- Location
- Eugene, OR
- My Car
- 1971 Mustang Sportroof M code
Regarding the dipstick tube, it should just pull straight up out of the hole, nothing holds it in. There is an o-ring on the end of the tube that may be stuck to the transmission.
Everything you have done looks great, you're an inspiration.
Everything you have done looks great, you're an inspiration.
- Joined
- Jul 19, 2016
- Messages
- 2,140
- Reaction score
- 173
- Location
- Omaha, NE
- My Car
- 1971 Mustang Convertible
Awesome work Fabrice, I vote chef of the decade
Hey Fabrice i havent been around for 2 weekends and i come back and you done lots and lots of fantastic work. Glad the weather held out for you. Now you can fit all your parts back on the car and finally get some valuable space in the workshop so you can fill it up again with more parts
- Joined
- Mar 30, 2017
- Messages
- 2,400
- Reaction score
- 892
- Location
- The Netherlands
- My Car
- 73 Grande 351C
71 Mach 1 429CJ
Lol, takes a few soups and baking soda to get there!Awesome work Fabrice, I vote chef of the decade
Thx Steve, I wish but not quite yet, the engine bay itself and suspension side needs be done first and the bumper hardware as well before I can think of unloading the garage. But now that nicer weather arrives, I can put things outside while busy, so I should be fine for a couple of months. Big garage owners have no idea how lucky they are!Now you can fit all your parts back on the car and finally get some valuable space in the workshop so you can fill it up again with more parts
That's what I thought but as 429 parts are like gold, I wanted be sure. Thanks for the info Don. Will make some cork plug so no crap lands in there while busy...Regarding the dipstick tube, it should just pull straight up out of the hole, nothing holds it in. There is an o-ring on the end of the tube that may be stuck to the transmission. Everything you have done looks great, you're an inspiration.
As about inspire. I hope my updates are showing its not complex, its just my attempt to durably save these ancient parts without using spray-on miracle products. Hope the raw old fashion "hands dirty" approach will help others to do similar vs tos and replace these mostly well made parts.
Last edited by a moderator:
- Joined
- Mar 30, 2017
- Messages
- 2,400
- Reaction score
- 892
- Location
- The Netherlands
- My Car
- 73 Grande 351C
71 Mach 1 429CJ
Started late today and with a deja vu ...
Thx to Tom aka @vintageman, I've received his 73 used grille to replace mine at some point that was damaged by fire (salvaged in junkyard many years ago). I've heated it back in shape back then, but is still bits warped. You can't see it, but I just know it. So getting one in one piece was attractive, not to mention, some light OMS goodies could enjoy a free ride too.
The ride was rough tho. Not only dutch post kept the package at customs 7 days extra for nothing, the careful people at USPS or dutch post or both did not really handle the package well, and as a result, it was missing a piece (found it back in protection) and was broken in 2 other places. Despite the really rich protection inside the package. It was simply thrown too hard a few times.
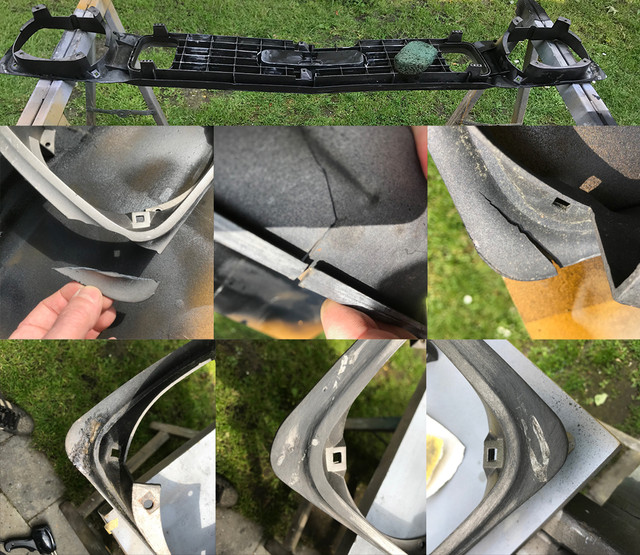
So here we go again: Grille surgery take two!
After a good cleaning and degreasing on the broken places, I've used the 71 donor grille to provide a good piece of plastic and soldered all back. I must say 73 repop plastic smokes a lot more than OEM 71!
I still have to prime/paint it but wanted do that first. I should not have to solder any grilles any time soon now I hope.
In between, was busy with the engine mounts. After cooking for a week, one of them went thru few bubbles and after a soapy wool massage, one was ready. It will receive an epoxy layer may be tomorrow if the other one is done too.
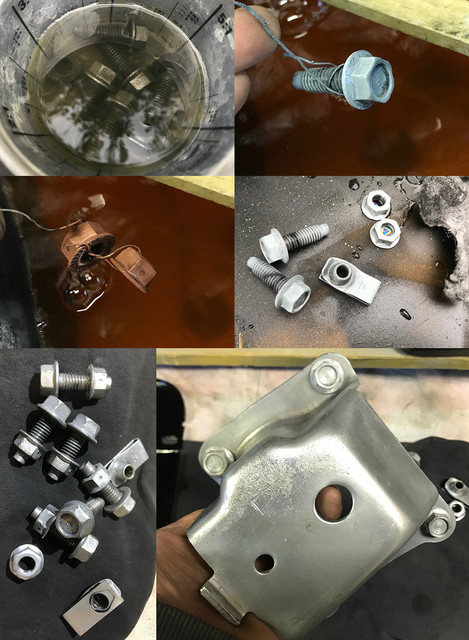
In between took care of the hardware, and while 2 pairs were replaced by crappy aftermarket bolts from a kit. At least 6 pairs are saved and will hold the 429 in place for another 50 years or more. They'll also receive soon epoxy and will be greased.
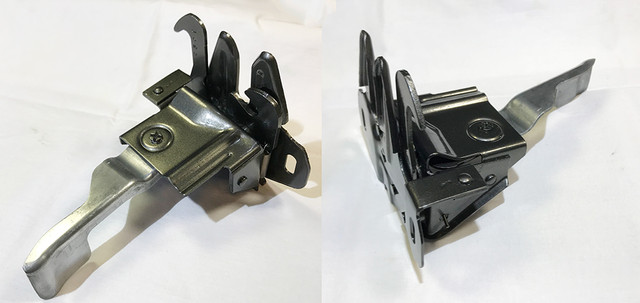
While stuffs were under bubbles, started put back together some of the parts painted last week.
SS Spring back in and white grease on all moving parts: I can mark the hood latch as done.
Thx to Tom aka @vintageman, I've received his 73 used grille to replace mine at some point that was damaged by fire (salvaged in junkyard many years ago). I've heated it back in shape back then, but is still bits warped. You can't see it, but I just know it. So getting one in one piece was attractive, not to mention, some light OMS goodies could enjoy a free ride too.
The ride was rough tho. Not only dutch post kept the package at customs 7 days extra for nothing, the careful people at USPS or dutch post or both did not really handle the package well, and as a result, it was missing a piece (found it back in protection) and was broken in 2 other places. Despite the really rich protection inside the package. It was simply thrown too hard a few times.
So here we go again: Grille surgery take two!
After a good cleaning and degreasing on the broken places, I've used the 71 donor grille to provide a good piece of plastic and soldered all back. I must say 73 repop plastic smokes a lot more than OEM 71!
I still have to prime/paint it but wanted do that first. I should not have to solder any grilles any time soon now I hope.
In between, was busy with the engine mounts. After cooking for a week, one of them went thru few bubbles and after a soapy wool massage, one was ready. It will receive an epoxy layer may be tomorrow if the other one is done too.
In between took care of the hardware, and while 2 pairs were replaced by crappy aftermarket bolts from a kit. At least 6 pairs are saved and will hold the 429 in place for another 50 years or more. They'll also receive soon epoxy and will be greased.
While stuffs were under bubbles, started put back together some of the parts painted last week.
SS Spring back in and white grease on all moving parts: I can mark the hood latch as done.
Last edited by a moderator:
- Joined
- Nov 15, 2016
- Messages
- 652
- Reaction score
- 15
- Location
- Australia
- My Car
- 1972 Mustang Coupe 302 Auto RHD
Great work again
Your vehicle when done is going to last longer than FoMoCo would ever have dreamed it would
Your vehicle when done is going to last longer than FoMoCo would ever have dreamed it would
Great great work Fabrice. Nice to see things being re-assembled. How did the new spring fit in the hood latch?
- Joined
- Mar 30, 2017
- Messages
- 2,400
- Reaction score
- 892
- Location
- The Netherlands
- My Car
- 73 Grande 351C
71 Mach 1 429CJ
Thx, I'm in no rush with this car, it's more work than just paint and it takes more time, but I kinda enjoy giving these old parts a second life that should be even longer than their first.Great work again. Your vehicle when done is going to last longer than FoMoCo would ever have dreamed it would
Thx Steve, yes feels like you actually make progress for a change! The spring does fine, I have a few spares and one a bit more strong that I could use may that one be too soft in practice. So far tested, all works fine.Great great work Fabrice. Nice to see things being re-assembled. How did the new spring fit in the hood latch?
Weather was super nice, I was productive as a bee today!
In between activities, finished the second motormount.
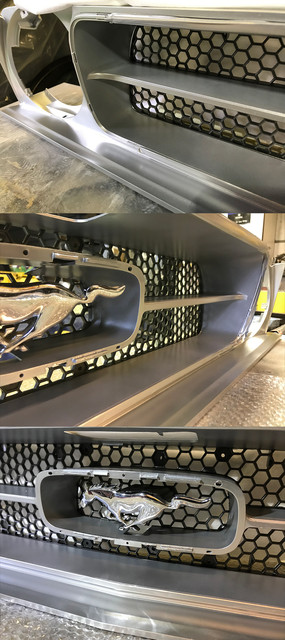
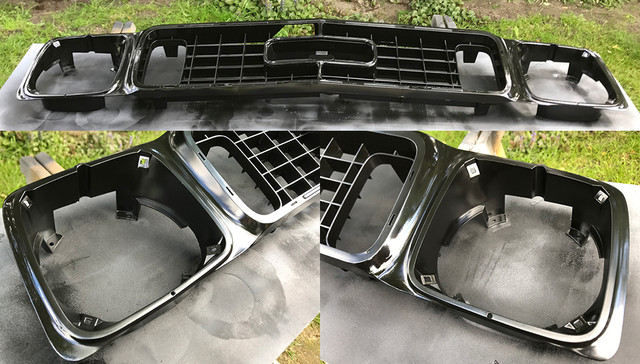
Then reassembled the 71 grille. Hard to imagine now that this baby was a broken mess a few weekends back. Very happy with the results.
Grille: done!

As it will not be set back on the car soon, as I want maximum space for the engine lift
i've packed it. Meanwhile I had the 73 grille in primer to see the remanining defects of yesterday's surgery.
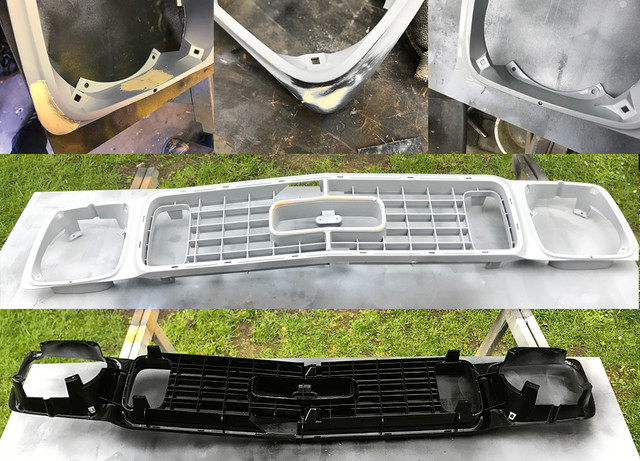
As this plastic is same as the 71 and doesn't allow fine sanding very well, added some corrective bondo, wet sanded and reprimed it. Moments later after quick water sanding, it received its semigloss black on the back and will get the front layer next week.
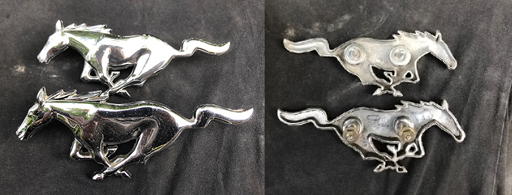
Also learned something today: Always thought the ponies on the grille were of the same size. They're not. The 71's is bigger.
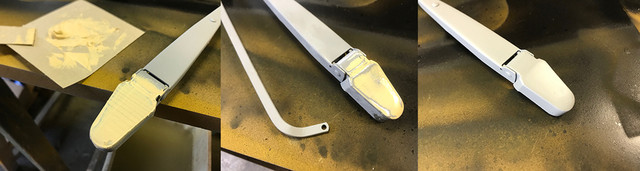
Then after searching ages for that little little "S" lock that I knew I've bagged after I've plated it, I've reassembled the wipers arms assembly. Greased every restored star screws and pivots so all move like butter. Wipers arms assembly: done!
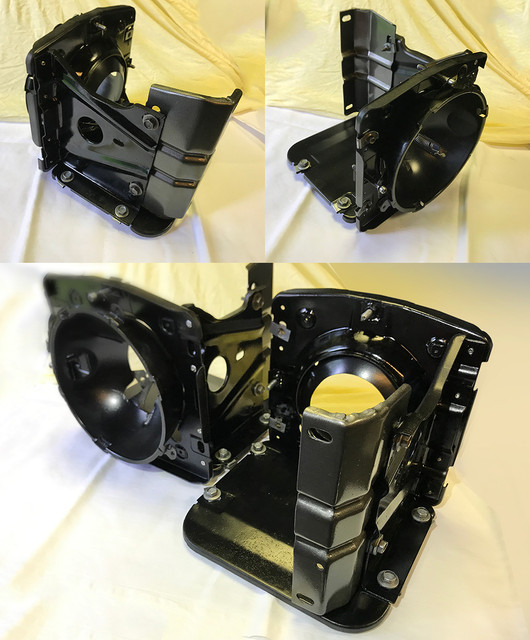
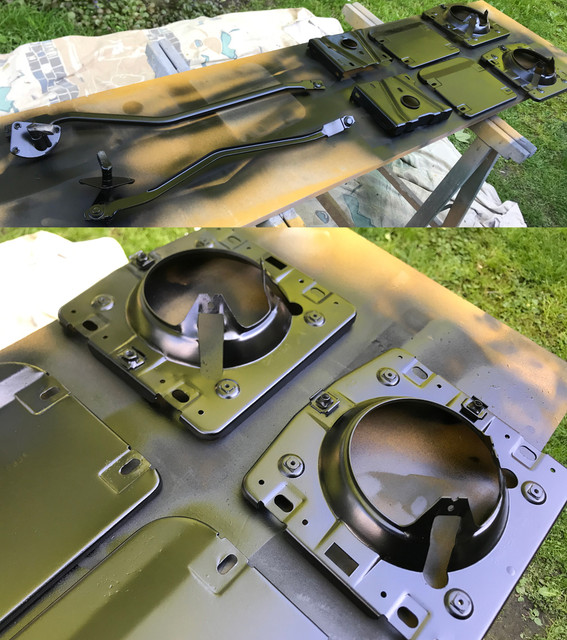
Then it was time for reassembling the headlights brackets.
Dang. That was some work to get there!!
They have marks of ancient corrosion here and there but very proud I could save them down to each j-bolts. Headlights brackets: done!
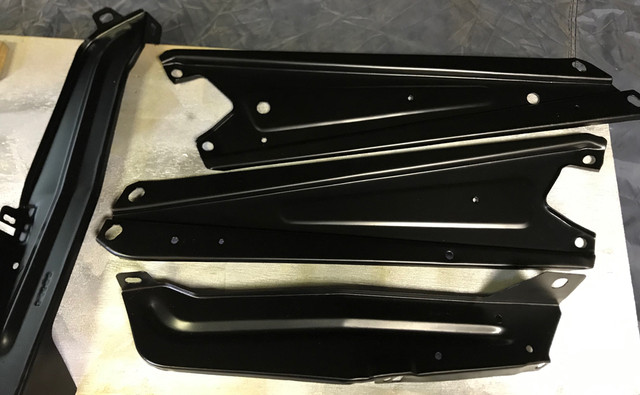
And finished the braces and grille brackets too. Tho, semi finished, as I was out of semigloss coat. grrr.
They'll receive a final layer as soon as I don't forget to order a liter like last week.
To be continued...
Last edited by a moderator:
Its amazing how much preogress can be made in such a short time. Re-assembly is the best feeling
- Joined
- Mar 30, 2017
- Messages
- 2,400
- Reaction score
- 892
- Location
- The Netherlands
- My Car
- 73 Grande 351C
71 Mach 1 429CJ
Yeah man, when its weekend its time for real work!Its amazing how much preogress can be made in such a short time.
- Joined
- Mar 30, 2017
- Messages
- 2,400
- Reaction score
- 892
- Location
- The Netherlands
- My Car
- 73 Grande 351C
71 Mach 1 429CJ
Amazing what you can do when weather is nice.
Today was very productive!
First finished paint the front of the 73 grille. (@Tom, as you can see its as new now! Thank again m8! )
So started by go get the "menu du jour".
I wanted the throttle cable to be out, so needed do first some under-dash gym to get it loose. And while in the interior, also took a few things, like the gloxbox (it will not return as cheap cardboard), the bracket for the electrics. Then outside, took the very corroded radiator mounts out, the C6 dipstick, the suspension plate and the passenger fender and more details...
As weather is announced wet tomorrow, I thought a mix of big and small items should prevent me to get bored in the garage if it rains!
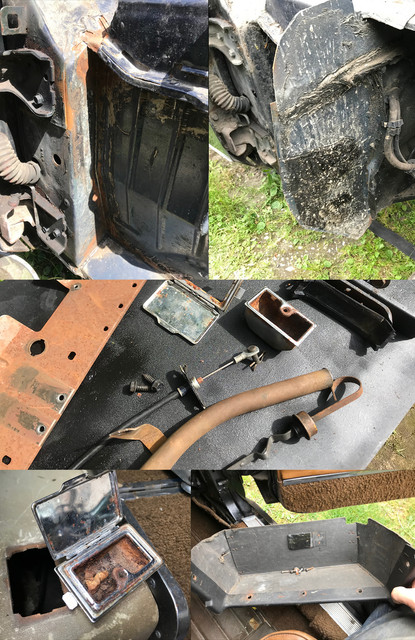
Seen lots of misery today, like a selfmade splash screen made by a junior splash screen maker. An ancient cigarette in a very rusty ashtray, a carboard glovebox with a different screw per hole.
Good news too was that the body side, after removing tons of kit, was surpringly ok, the rust is very light.. I could have done more there, but it's not on today's todo.
For today's jobs, I've bought 75% pure phosphoric acid, as its the main component of most expensive de-rusters and costs 1/10th of these.
I thought I'd give it a try... seeing this as a good pilot for my corroded doors.
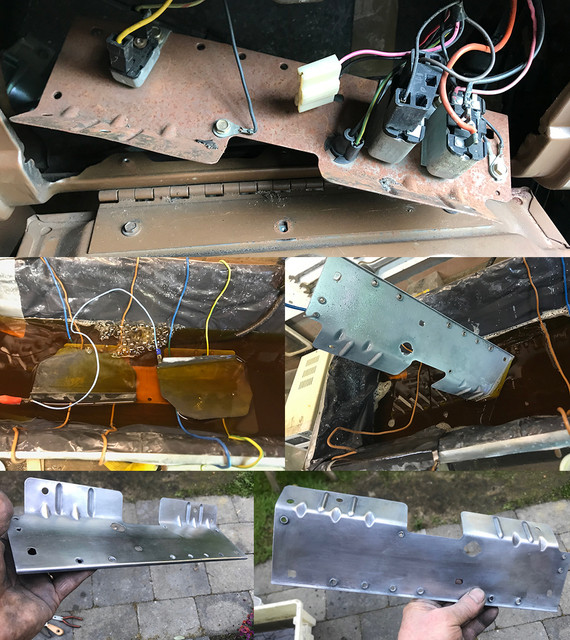
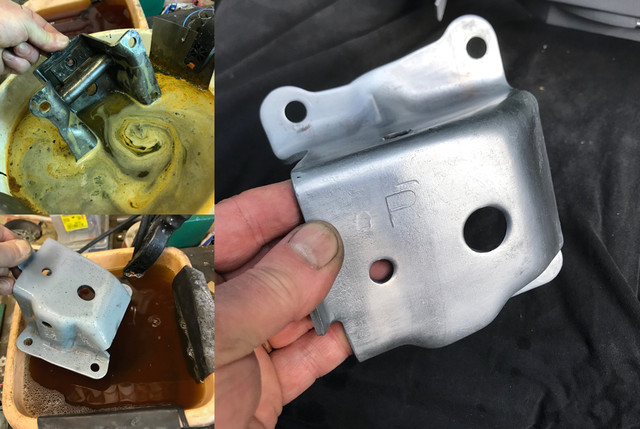
Done some Midlife porn again, same as for the 73 not 2 weeks ago, but there was more rust on the 71, also less components on it.
As experienced today, it worked much better, as I was able to define the concentration per item, vs the 5-10% of the expensive brands.
Some metal work was needed as well as it was somehow bended in 2 places... sometimes I wish I could see thru some crystal ball back in time and find out how on earth someone can bend on two places this part.
Anyway, not long after it was rust free, it was plated and is now looking much better!
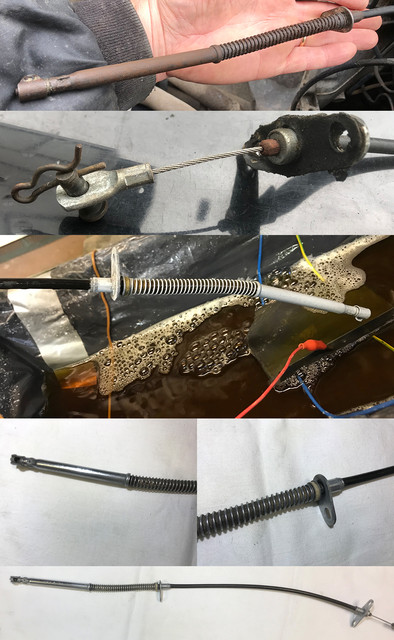
Same soups for the throttle cable: as new and bling bling now! I will grease it tomorrow.
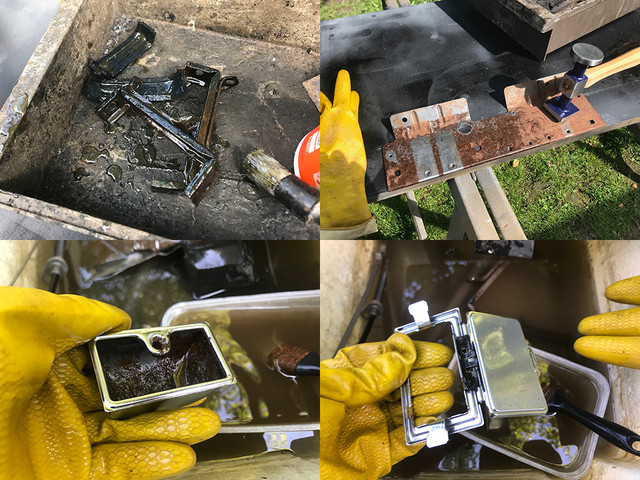
That was my day, toggling between soups and bubbly baths. The de-rust worked so great, the top part of the ashtray, was done after just 1/2 hour. Same for the C6 dipstick(in and out)... The engine mount, the ashtray very corroded, the suspension plate and radiator mounts will stay in there whole nite.
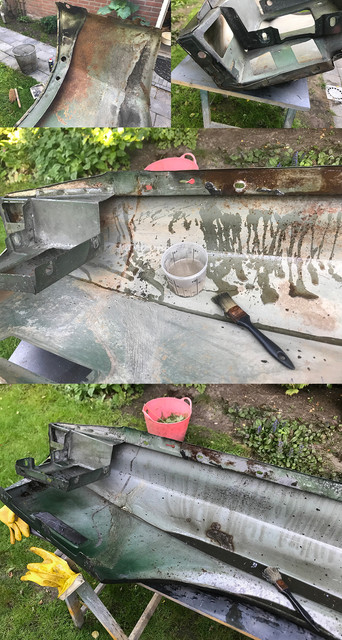
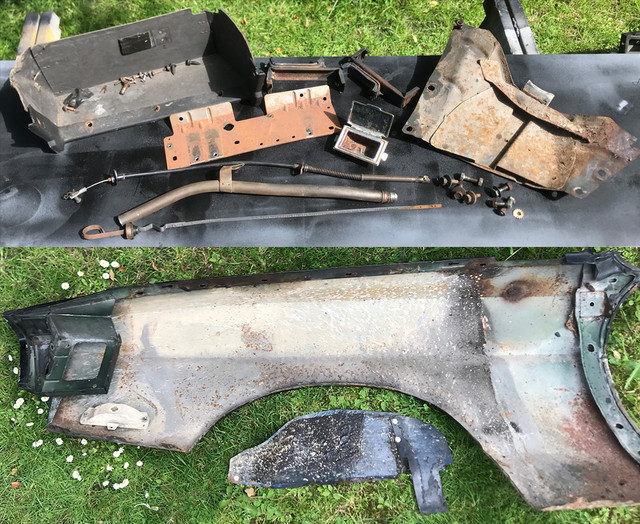
In between all activities I was busy with the main course: the fender. As I want treat the inside before even look the outside, I wanted try the soup on it, very curious to see if I need a plan B for my doors as its much more difficult to access the rust .
The fender itself wasn't too badly corroded, tho rust was there, especially on the rear. If the chemical fails, this would mean lots of work.
So after a quick wash/dustings, started apply first with no dilution on the most corroded places, and then added water later on. Amazingly rust was literrally melting before my eyes! All I needed do is brushing and ensure it stayed wet all the time.
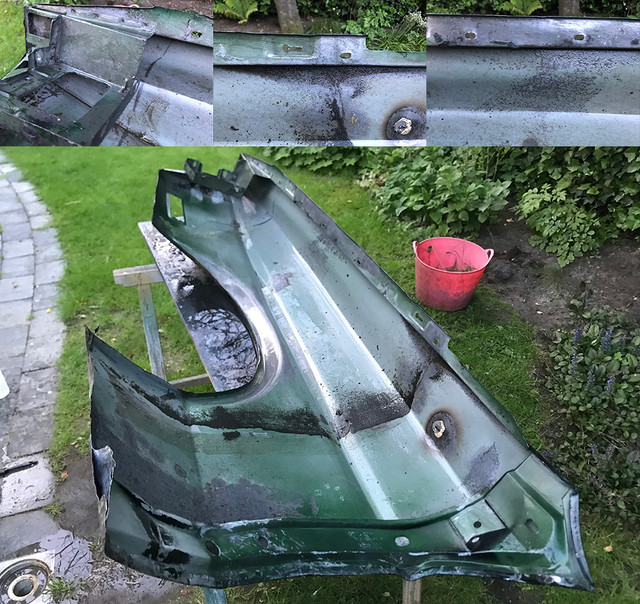
After a while. All rust was gone. The brown you see is actually paint that was burned during an ancient welding/torch work , like during the brasing of the antenna hole.
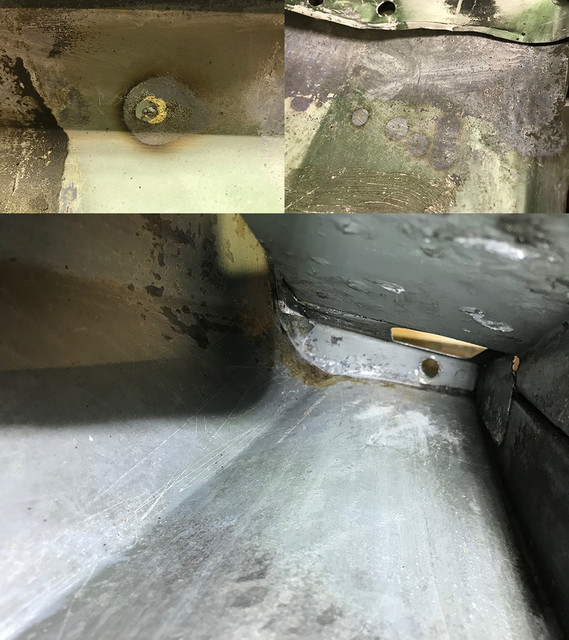
Once the soup was transferred to my de-rust bath, I've washed with water and gun heated it dry.
All the rust is gone, excepted on the end, in front where there is a small remain. I'm gonna re-apply some or sand that bit away tomorrow. Very happy it turned this way, this is very good news for my doors!
Out of light called it a day.
Today was very productive!
First finished paint the front of the 73 grille. (@Tom, as you can see its as new now! Thank again m8! )
So started by go get the "menu du jour".
I wanted the throttle cable to be out, so needed do first some under-dash gym to get it loose. And while in the interior, also took a few things, like the gloxbox (it will not return as cheap cardboard), the bracket for the electrics. Then outside, took the very corroded radiator mounts out, the C6 dipstick, the suspension plate and the passenger fender and more details...
As weather is announced wet tomorrow, I thought a mix of big and small items should prevent me to get bored in the garage if it rains!
Seen lots of misery today, like a selfmade splash screen made by a junior splash screen maker. An ancient cigarette in a very rusty ashtray, a carboard glovebox with a different screw per hole.
Good news too was that the body side, after removing tons of kit, was surpringly ok, the rust is very light.. I could have done more there, but it's not on today's todo.
For today's jobs, I've bought 75% pure phosphoric acid, as its the main component of most expensive de-rusters and costs 1/10th of these.
I thought I'd give it a try... seeing this as a good pilot for my corroded doors.
Done some Midlife porn again, same as for the 73 not 2 weeks ago, but there was more rust on the 71, also less components on it.
As experienced today, it worked much better, as I was able to define the concentration per item, vs the 5-10% of the expensive brands.
Some metal work was needed as well as it was somehow bended in 2 places... sometimes I wish I could see thru some crystal ball back in time and find out how on earth someone can bend on two places this part.
Anyway, not long after it was rust free, it was plated and is now looking much better!
Same soups for the throttle cable: as new and bling bling now!
I will grease it tomorrow.
That was my day, toggling between soups and bubbly baths. The de-rust worked so great, the top part of the ashtray, was done after just 1/2 hour. Same for the C6 dipstick(in and out)... The engine mount, the ashtray very corroded, the suspension plate and radiator mounts will stay in there whole nite.
In between all activities I was busy with the main course: the fender. As I want treat the inside before even look the outside, I wanted try the soup on it, very curious to see if I need a plan B for my doors as its much more difficult to access the rust .
The fender itself wasn't too badly corroded, tho rust was there, especially on the rear. If the chemical fails, this would mean lots of work.
So after a quick wash/dustings, started apply first with no dilution on the most corroded places, and then added water later on. Amazingly rust was literrally melting before my eyes! All I needed do is brushing and ensure it stayed wet all the time.
After a while. All rust was gone. The brown you see is actually paint that was burned during an ancient welding/torch work , like during the brasing of the antenna hole.
Once the soup was transferred to my de-rust bath, I've washed with water and gun heated it dry.
All the rust is gone, excepted on the end, in front where there is a small remain. I'm gonna re-apply some or sand that bit away tomorrow. Very happy it turned this way, this is very good news for my doors!
Out of light called it a day.
Last edited by a moderator:
Similar threads
- Replies
- 16
- Views
- 765
- Replies
- 10
- Views
- 706
- Replies
- 16
- Views
- 568
Latest posts
-
 1973 Convertible Project: Coupe Parts Swap Begins
- Latest: Steve McMahan
-

-
 Anyone ever find a drag coefficient for our cars?
- Latest: Hemikiller
-

-