Fabrice's 429CJ 71 project

7173Mustangs.com

Help Support 7173Mustangs.com:

This site may earn a commission from merchant affiliate links, including eBay, Amazon, and others.
Thx Tom!

Back to the misery and in the sun, somehow Mr Weatherman had it all wrong again.


Started with the C6 dipstick. graduation now oiled and o-ring back. I will prolly change it when I'll refresh the trans, but I preffer to have all in place vs seeking at what goes where.

For now, the dipstick is nowhere near the way it was yesterday :D


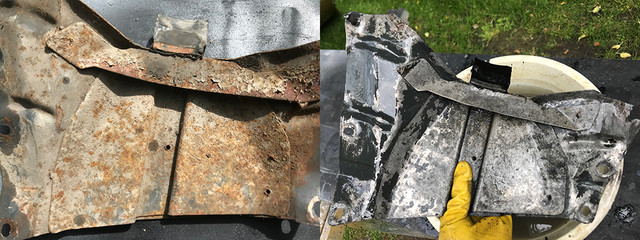
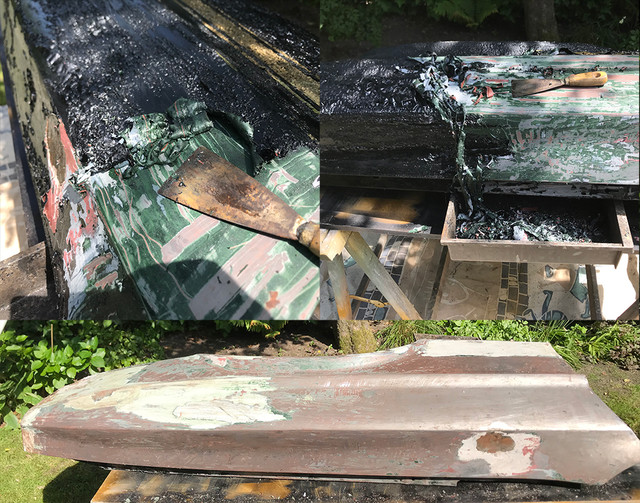
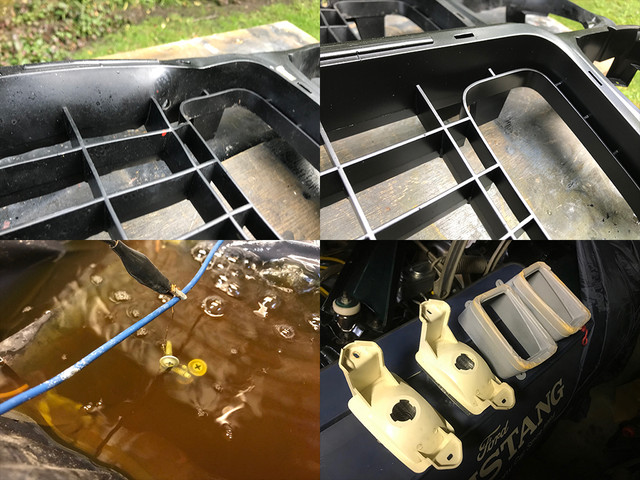
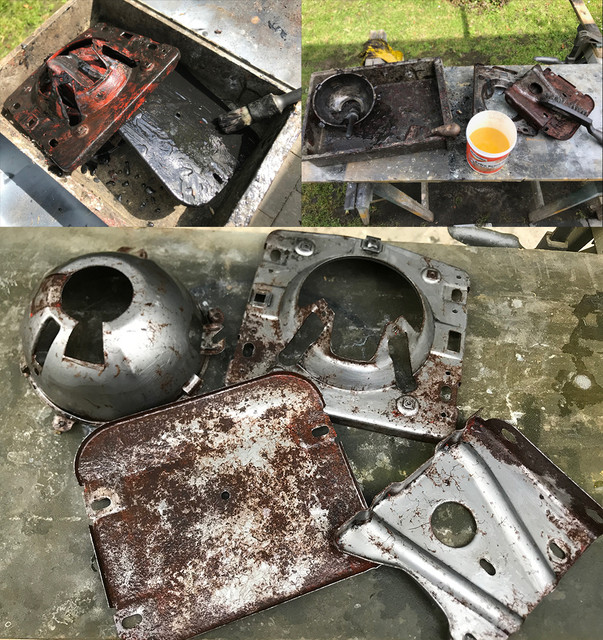
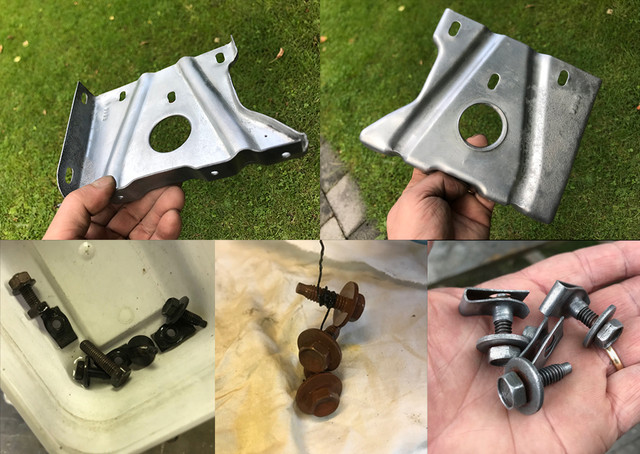
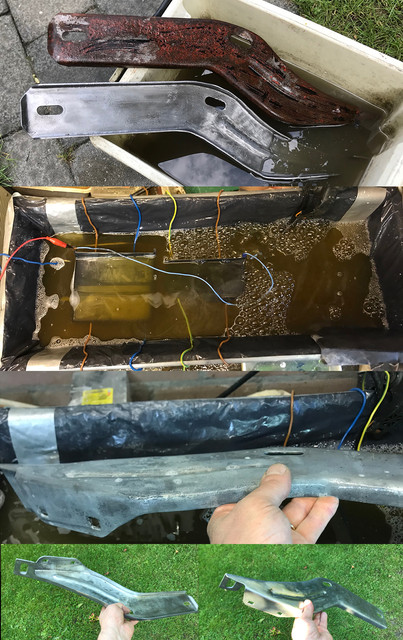
then in between small stuffs like greasing the throttle cable or prepping its small hardware for the plating, I've finished both the radiator supports. They were very corroded and spent the night in bath (second pict left). The metal is pitted but strong enough to hold 10 radiators. Because they are low on the car, prone to receive water&salts, I've plated them longer and they will receive an epoxy layer when I'll spray the engine mounts and the fender as well. Also restored the rubbers, which were hard to get back to new as they were under 2 or 3 layers of paint. Their respective original bolts were copper and zinc plated, ready for another 50 years round. They too, look much better than yesterday!


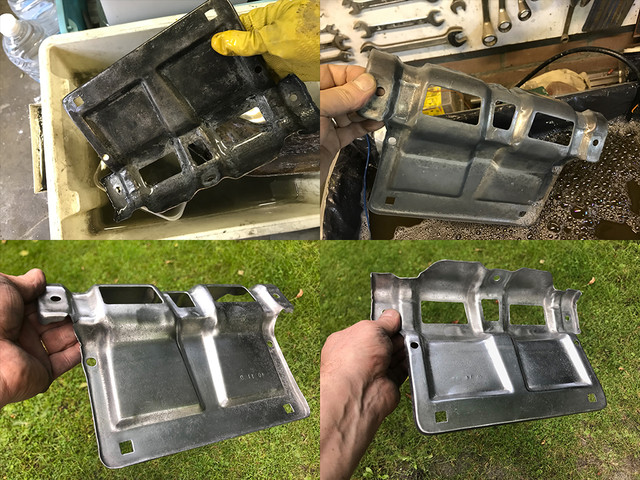
The plate, which also spent the night in bath is now rust free. The same acid I usually use as a branded de-ruster work the same, but would never have got it rust free in one nite like this. I've ordered only one quart to test, but it's clear, I can order a bit more and should be able to get my doors rust free by just looking at them! :)

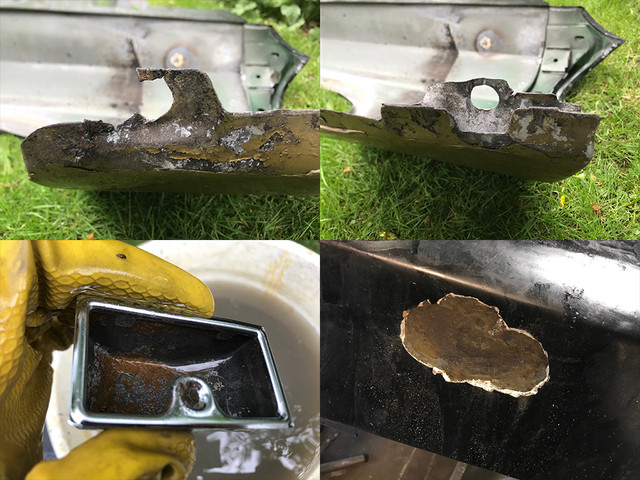
I did not continue on the plate as it will need some massage first. I don't know what happend to it. One bits of metal for one hole at the corner (TR on pict) is half way gone and several small holes were drilled for some reasons.


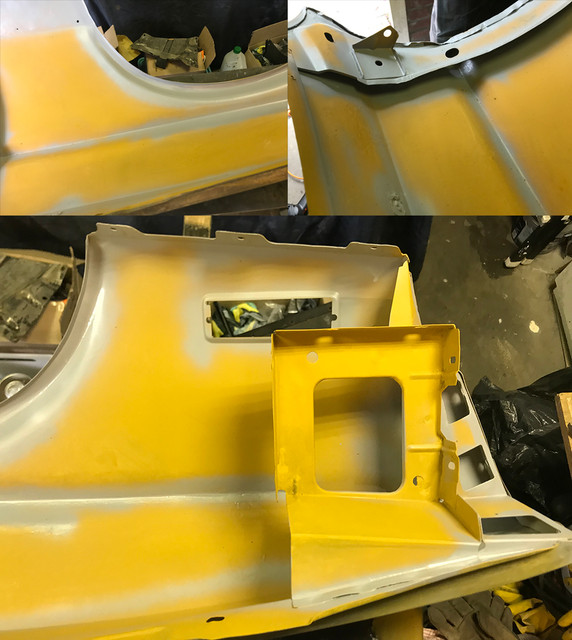
So I already have a todo for next weekend: making and welding missing bits. On the plate and the fender.Repair one side of the fender and start remove the paint on the outside. Tho when I say paint I should say Bondo. lifted some cracks and looks like someone liked Bondo very much and applied it direct on metal. Strange because on the other side, I've noticed 2 dents, one on the front not repaired and one behind as an ancient repair but I see no reason for using such a thick layer. I guess I'll know more next week.

The thick layer of rust in the astray is now gone for 80%, but as I don't want to electrolyse the chrome, I'll leave it a couple more days.

All with all, another busy weekend passed, glad I return to work tomorrow so I can rest. :)

To be continued...

 
Finally a nice day. Did small and big things...


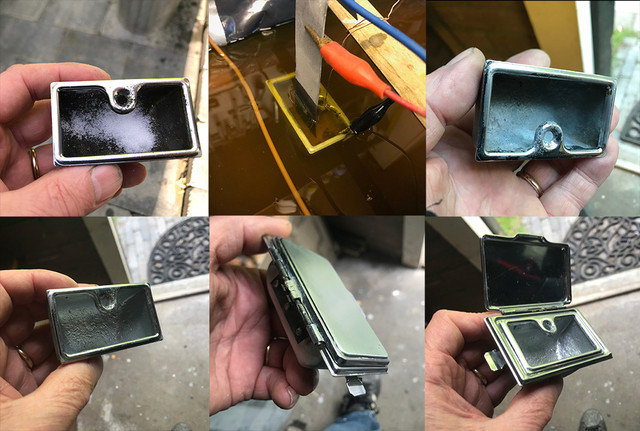
First finished the ashtray. It was pitted beyond repair, it's now rust free, plated and painted. The bezel/lid is fine. also opens/cloeses smoothly now. Its clear, if I can find one in a better state, i'll replace it.

I've tried :D


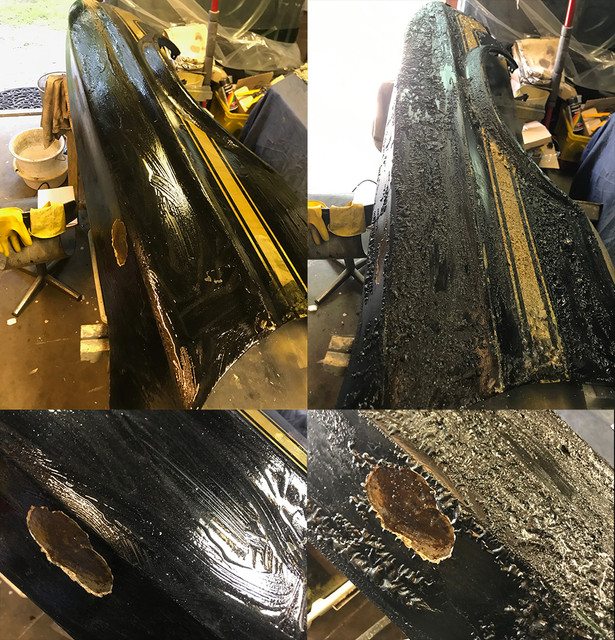
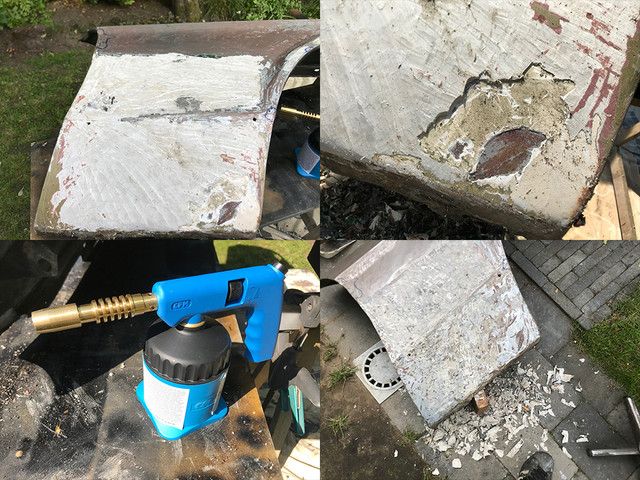
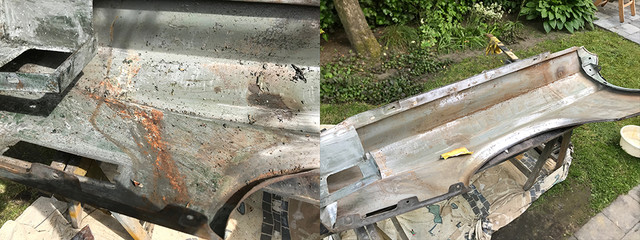
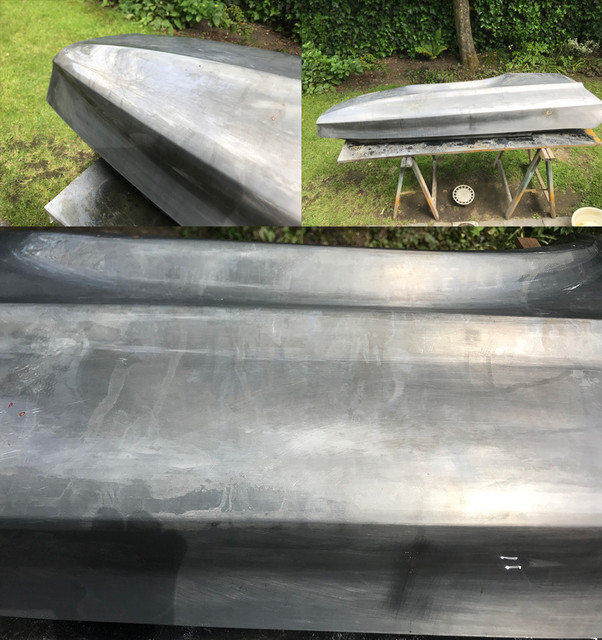
The passenger side fender was on menu for the weekend, so applied last nite a layer of paint remover. As stuff like Aircraft isn't to be found here, it's all about temperature for this environment friendly alternative. And unlike on my hood done late in the year, it did something useful!


Needed use some elbow oil here and there, and even re-apply on some places, but came to a point where most was removed without too much efforts.

That was the black & the green paint...


Of course, during the past 50 years, the car seen some talented body guys using their magic on her and they proudly apply thick quantities of bondo like if it was makeup... Last week, I couldn't place the thickness for the light damages I saw. Now I know. Why hammer down a high or a low when you can level with bondo!

Top right on pict, different bondo on bondo, layered with love...

Because I knew there was lots of magic going on and that my remover would not even soften it. I've bought a new weapon last week. Set on lowest temp and staying not too long on same places to prevent distorsion, I've managed to get rid of most of the ridiculous amount that was applied.

Done around dinertime, while I thought "nice barbecue smell", I bet my neighbours thought "nice cooked bondo smell" :)


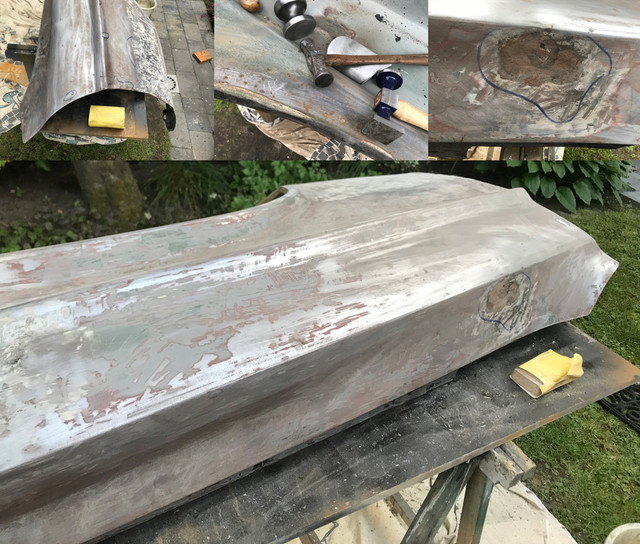
Lots of hammering done already, but far from done. Many small dents, very poor repairs too, like the brazing of the antenna hole that was done using a washer but its not even fully closed, even worse, too much heat was used creating a down around the hole (but hey no prob 1/2 kilo bondo did it). So I'll have to heat/cool it quick to shrink it back in few places... The "nose" also has many unrepaired dents that were drowned in bondo.

For now the fender is in and out in remover for the nite again, as I want to hammer & weld on clean metal tomorrow. I'm sure people around my house will love me for my hammering music tomorrow :D

 
Last edited by a moderator:
32c (90F) in the garden, I should be able to do lots!

At least thats what I thought...

The main problem of such temperature/nice weather, is that it attracts women...

And when you have 3 women in the sun, they do not like the sound of a hammer on a big piece of metal, neither they like rotating tools...


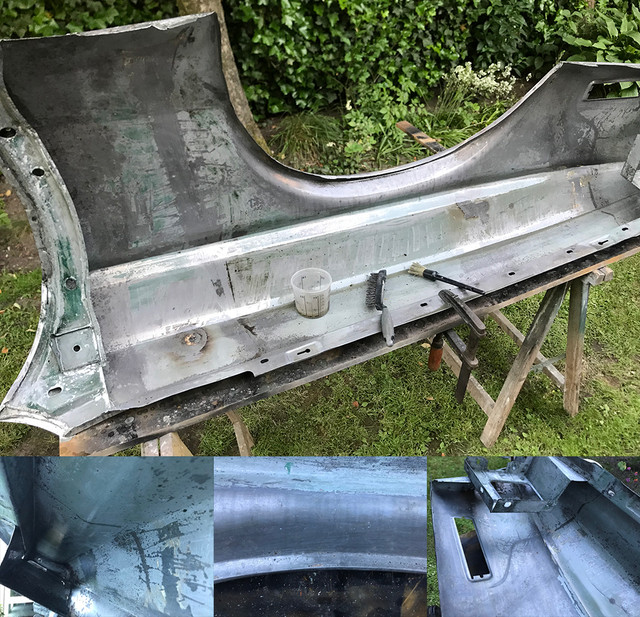
Despite the many "are you done yets", finished to remove the residues of the original primer, hammered back tons of small dents that were filled with bondo. heat/cooled schrinked back few places. Ended up with a shape where I should be able to reduce bondo to a minimum.


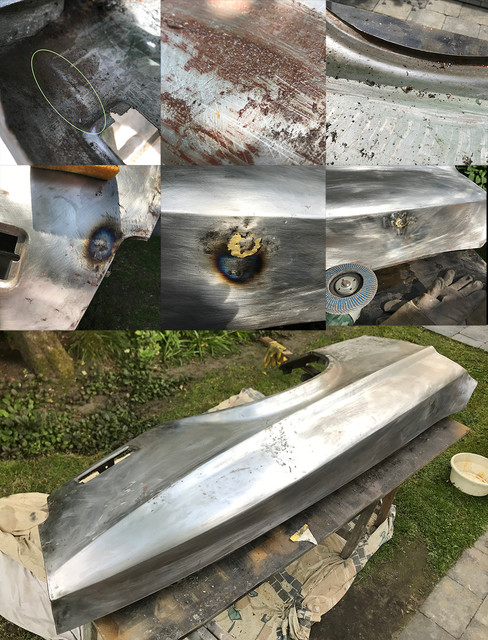
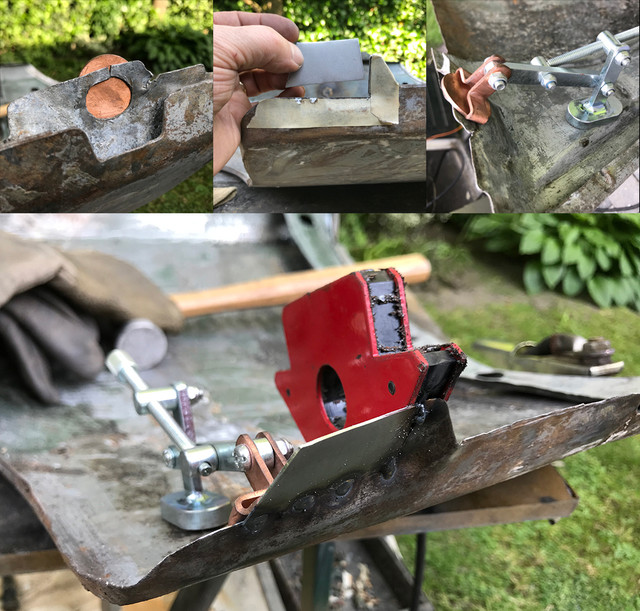
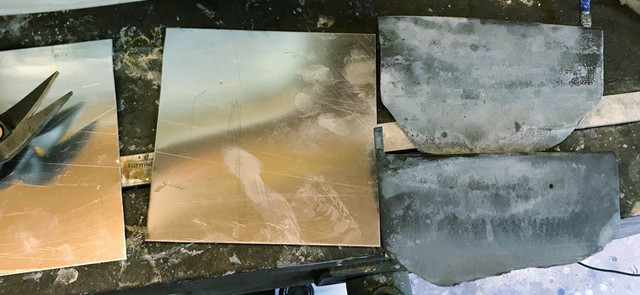
Did some welding too, there was a crack at the arch, and the two ears beneath that were damaged, one gone for 1/2. For the job, I used an helper that I bought a while back. The idea of the thing is to take off the heat. Well, it worked quite well, the foot has a very strong pair of magnets and its it also quite handy as an holder. I was done in no time, cooling the copper part in water each spot.

I used before a piece of aluminium for this, but I must say, copper works better.


As I've removed more "stone" protection, I've discovered hidden light rust, especially in the arch/lip and near the marker light hole.


So as I really hate that stuff, went to bare metal in all the places that were not treated saturday and left only bits of the original primer where it was still strong to resist sanding and felt flat.

Finished without light.. tired and with a red neck! :)


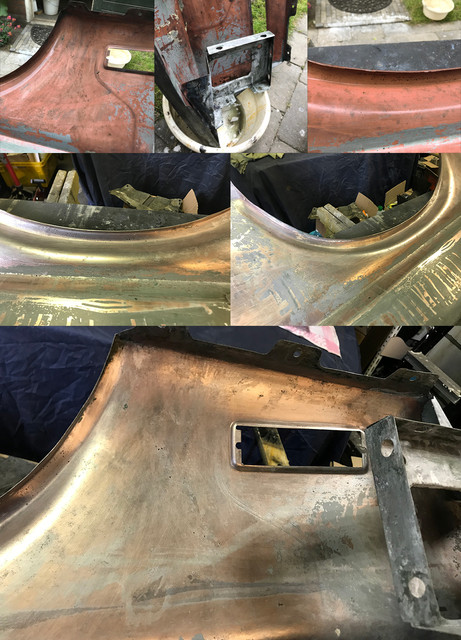
Today, with bit of rain announced, I thought, I'd take 2 or 3 hours off, (one of the few advantages to be own boss). No way I'm gonna let rust come again after so much work, so cleaned it and coppered all the places where the rust was found. Then soda washed it, rinsed it and hot dried it.


Before it even had the time to cool down, sprayed an epoxy layer, once dried to the touch, poured/injected additional epoxy on both front and end. The white/grey is bit of left over epoxy from another brand.

This weekend I'll be able to concentrate on the outside without to worry the inside starts to rust again. I'll spray an additional thicker primer layer for stones later on.

To be continued...

 
Last edited by a moderator:
Looks like plenty of success during last 2 weeks Fabrice. I was looking at your piece on the ashtray and found interesting as i have just pulled mine out and it looks as bad as yours.

 
@Pegleg,

Mine will not rust for a long while, but it's not smooth inside now. too many pits. No rush for finding one, as nobody smokes anymore, it looks alright when closed :)

@Midlife, NOT A T5, OzCoupe72

ahaha, I don't think they'll ever see my activities as interesting, they couldn't care less :)

I should have stayed in bed today...

Started with the fender, was busy hammering a bit more, prepping as I wanted spray the epoxy today, but had to go back inside in a hurry,

as weather turned stormy in matter of seconds and it started rain like crazy with lots of wind... Stayed so whole day.

So as my mini space inside is overcrowded, I thought I'd do the 73 grille swap today. Was planning doing it much much later, but didn't want loose mustang time..


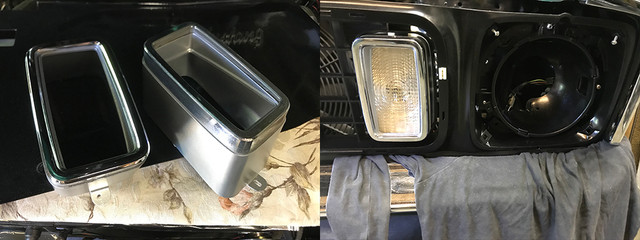
Removal from the car started badly, on one side, despite the penetrating oil, 3 of the grilles small bolts with fine thread broke. I was very careful, but they were simply so corroded they would not handle any torque. Once the grille was out, I was happy to see a straight grille vs my old salvaged. Only took me 30 years to have a straight one :) Then plated the lights screw, cleaned the lenses, primed and refreshed the lights covers... all was good.


Then the bad luck continued, the plastic clips of the grille molding were just breaking on me by just looking at them. Then as no pliers would make move the broken bolts, had to heat the lights bracket to remove them. I need redo the paint on these now :(

So for that I needed remove the adjustment screws. poff, the base of one broke on me... grrrrr. I was just thinking I was lucky the heat worked well.

Short story, had to use the restored headlights brackets from the 71 and now I have to restore these as well.... pfff wasn't planning that at all, I just wanted spray my fender!!! (@Don OMS, if you read this, check your mail!)

Hope the weather will allow me to epoxy prime my fender tomorrow and that the bad luck will be gone!

 
Sun was back, wind gone, no dry time to waste!


Finished to paint the 73 lights casings, you actually don't even see them, but hey who cares, I know they are painted and they look nice in the restored grille next to the 71 restored headlights brackets :)


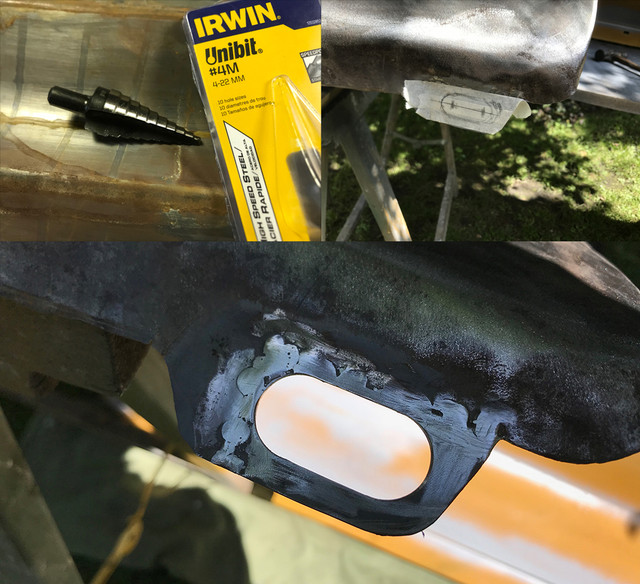
Before paint anything, I had to make a descent hole to the piece that fasten the fender on lower body that I've welded without last week.

When I buy furnitures, I usually buy 1 tool or extra that I don't need now, but likely will need later. For many years saw these drill bits but never actually tried them. Until today. Marked/pre-drilled a tiny hole and finished the shape with a tiny dremel cutting disk. Not desapointed at all, in fact this drill might become a good friend of mine. Was pricy (when its US made it's always expensive kus of our lovely extra taxes) but worth every penny. Result almost look machinal! :)


Pfff, a déja-vu. Because the restored 71 are now on the 73, I need do a second set. These were done like 30 years ago but not plated: rust was back. Despite the paint quality, I know now it's all about prepping the metal... anyway, these needed 2 passes of paint remover. Paint free they are now in bath for the nite and should be cooked by tomorrow so I can start plate them.


In between activities, prepped the fender with a good degrease, then phosphoric acid and got the metal pristine.


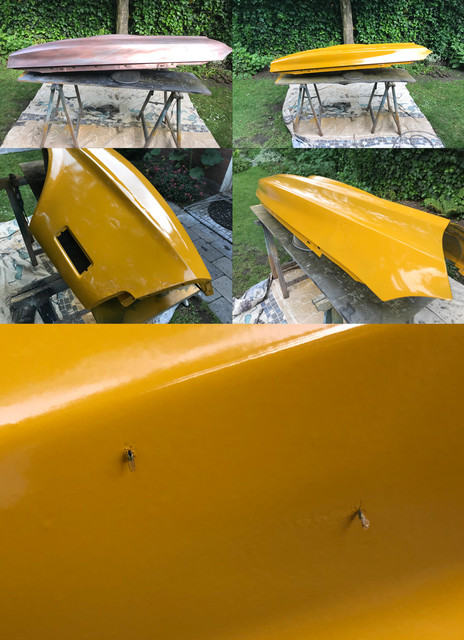
Then coppered the fender, followed by a good clean and wash, dried it hot, and sprayed a good layer of epoxy. Finally.

While it dried, my bug friends came back. I know from the deck lid that they like the very funny smell of his brand. No less than 20 payed a visit.. No biggy as I need spray filler primer and start do some bondo magic, may be tomorrow if the announced rain comes late... For now, I'm happy the entire fender is now encapsulated in its epoxy jacket, totally rust free, I hope for a very long time.

To be continued...

 
Last edited by a moderator:
I know that two steps backwards feeling Fabrice. My molded screw hole at rear of black glove box front have snapped.

Looking at your work last weekend i saw you tackle the ashtray. Just wondered why you didnt attempt to remove the top chrome piece. I did attempt mine and failed. Those 4 lugs inside the ashtray are stronger than they look.

 
I know that two steps backwards feeling Fabrice. My  molded screw hole at rear of black glove box front have snapped.

Looking at your work last weekend i saw you tackle the ashtray. Just wondered why you didnt attempt to remove the top chrome piece. I did attempt mine and failed. Those 4 lugs inside the ashtray are stronger than they look.
I hate when stuff brakes on me, especially when I'm careful. These screws and clips were just so weak I wonder how long it would have take for them to break alone.

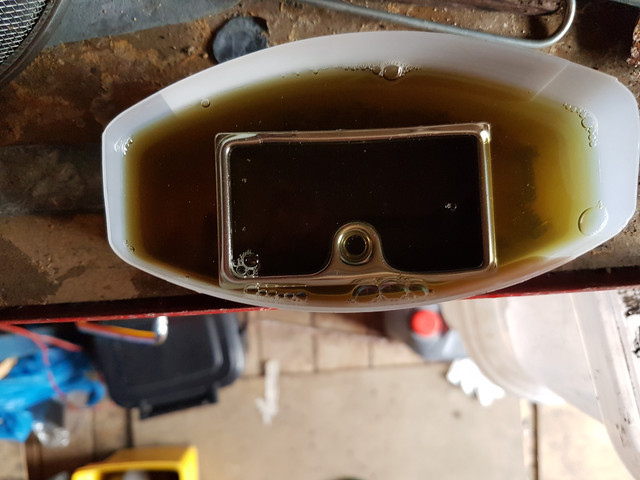
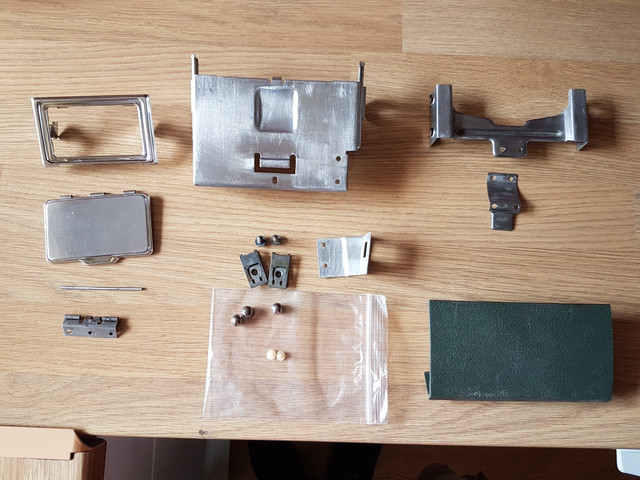
For the ashtray, the top/cap is looking fine now, rust was only on mechanism which is now restored and greased. It's the insert, the actual ashtray that you can take out, that was pitted beyond repair, I saw on one place the rust devoured the metal so much I could see the plating from the other side! Thats the part I will replace by a new/better one eventually.

There are 4 bits of metal pressed, but they didn't look like a good idea to play with on mine. If you do it this way on yours, please send some picts.

That will not really change anything for this one, but as I want go take a look at my 73's as well, much less rusted, It might come handy if I could re-plate only the bottom.
 
Last edited by a moderator:
I know that two steps backwards feeling Fabrice. My  molded screw hole at rear of black glove box front have snapped.

Looking at your work last weekend i saw you tackle the ashtray. Just wondered why you didnt attempt to remove the top chrome piece. I did attempt mine and failed. Those 4 lugs inside the ashtray are stronger than they look.
I hate when stuff brakes on me, especially when I'm careful. These screws and clips were just so weak I wonder how long it would have take for them to break alone.

For the ashtray, the top/cap is looking fine now, rust was only on mechanism which is now restored and greased. It's the insert, the actual ashtray that you can take out, that was pitted beyond repair, I saw on one place the rust devoured the metal so much I could see the plating from the other side! Thats the part I will replace by a new/better one eventually.

There are 4 bits of metal pressed, but they didn't look like a good idea to play with on mine. If you do it this way on yours, please send some picts.

That will not really change anything for this one, but as I want go take a look at my 73's as well, much less rusted, It might come handy if I could re-plate only the bottom.
I had to go same route as you for rear ashtray and soak it in sauce because the chrome top was bending as i tried to remove it. If i had carried on i know it would have broken.

However, the lid was a differant story. The two parts just clip together and easily seperated. I then drilled out the rivets and used a pair of grips to remove the hinge pin.

I am working on both front and back ashtrays. Thanks to Don, Ohio Mustang, i bought a replacement front ashtray(dont think rear is available yet). There are a few more parts to the front ashtray. First off i drilled out the rivets that hold the front of the drawer then i pried the outer runner from the inner runner. I then drilled out the rest of the rivets from both the runners and removed the 2 plastic plugs. They are 90% ready for plating. I just have to clean in the hard to reach places.


Still looking for the 4th ball bearing that rolled across the kitchen floor


@Pegleg

I don't have these. The one on the left I have and are ok, and the ashtray itself, now restored but pitted.

The rest I don't have. Is it may be because it's a coupe vs faskback? My 73, also doesn't have these, it's 2 little clips that sandwich the plastic. No guide.

Never seen these parts.

-------------------------------------------------

As it was a long weekend here, guess what I did?


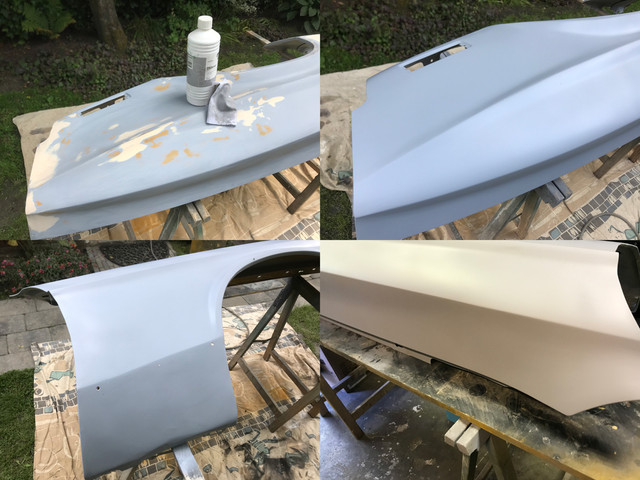
Not in the chronological order of this update, worked on the fender again, first it's been water sanded, then as weather was nice, a filler primer was sprayed and later on after 4 hours, started bring some bondo on the many places not looking straight, then 1 hour later, roughtly sculpted it to bring to a minimum, I'll continue next weekend on the back, then prime again. I'll probably repeat this a few times till I have the shape ok and not kilos of bondo.


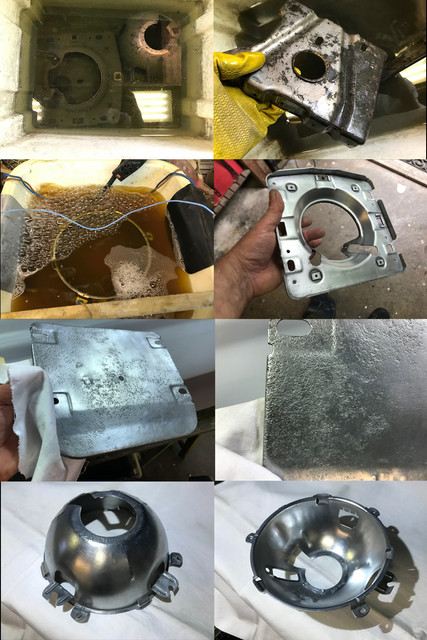
In between, welded the headlight bucket before start plate it and fixed the suspension plate. The corner was damaged (see middle) so reconstructed it using both my new friends: the copper helper and the "cone" drill. The nice thing about the copper thingy, aside really sucking the heat, is that the back of the weld remains level to plate, flat. I think this will come very handy many times. If you weld and don't have one of these, they are really worth the 30 buxx.


As I might have plated one or two items in past months, I saw my anodes were not only missing a few inches (they were both same as the new bit), they are now razor blade thin! :)

So cut a new bit to use it today. If you ever do zinc plating one day, get yourself one of these plates (1 meter x 20 cm x 1.1 thick) vs boats anodes or these expensive super thin ones you see on ebay. Not only its much cheaper, its also super handy to cut out whatever shape you need to get nice coverage in hard to reach places. The older ones are reused in smaller bits for that. No waste, super results.


Now becoming expert in headlights brackets (read: tired doing these same parts over and over), I did de-rust and plate all the parts but one for this side. Its ready, waiting in soda but as it needs at least 2 hours, I'll do it tomorrow.

The lower plate is now probably the most pitted rust free bling bling plate on the planet :D

By the way, if you ever are on table with a hard purist, the MCA judge type, ask him how to tell the diff between headlights brackets from 71 vs 73. The 73 has a small hole in the middle on the lower plate. This hole is for the pin that is part of the headlights harness. It keeps the connector at bulb steady. In 71 no hole. Lets hope he doesn't ask you about 72's unless you know if there's a hole or not! :D

Will epoxy spray these next weekend and start handle the last one...

 
Last edited by a moderator:
Thats some serious pitting Fabrice. I am sure nobody will even know once you have weaved your magic.

I noticed you use yellow epoxy primer. Any reason why you use yellow? or did i mis-read you previous post a week or two ago?

Once i have zinc plated the hinge on the ashtray i wil re-assemble it and post a picture. Still unsure how best to deal with the hinge pin going forward as the diameter of the pin is determined by the rounded pieces they slot into and a zinc plate may be too thick to allow free movement of the lid. I may need to invest in a micrometer to get the diameter of the pin and try and find a miller or chromed replacement.
The chrome top on the ashtray itself that has the four clips holding it in place is so tough to remove for two reasons. Firstly you cant get any purchase behind the clips so you cant pry them up. Secondly if you look on the outside of the ashtray you will see a small dent where the casing was dented to tighten the casing to the chrome top so both ashtray and chrome top come free when you pull out the ashtray to empty it. With the ashtray being so small i imagine it would have been pulled out and emptied on a regular basis. 5 or 6 cigarette butts and its full

Maybe the ashtrays are different fastback/coupe/year. Someone may be able to shed some light on the differences

 
Thats some serious pitting Fabrice. I am sure nobody will even know once you have weaved your magic.

I noticed you use yellow epoxy primer. Any reason why you use yellow? or did i mis-read you previous post a week or two ago?

Once i have zinc plated the hinge on the ashtray i wil re-assemble it and post a picture.
The pits are rust free and zinc protected now, after a thick coat of epoxy and filler primer, bits of sanding, color and coat, they'll belong to the past ;)

I use yellow because I was using white/greyish before and changed brand (used the last bits of the whitish on the inside), discovered that its really handy when you sand your primer, as you see right away when you're having a high (time to stop), revealing the orange bellow the grey primer. Now I only want orange or red. I never spray color on epoxy and always prime before colour, either thin primer or filler or both that I also usually water fine sanded so it feels like silk to the finger tips. Just old monkey habits, I'm sure blue or black would do just fine :D

Yes, please do, really curious about the results you got. Mine as said was corroded so bad I could see the nickel under the chrome on the other side :)

The 4 lips, didn't inspired me to even try loose it up. As said, if i find a new one, I'll replace it, or if I'm bored to death one day and don't have one yet, make one myself with a plywood shape and press it out of a sheet of 0.3 mm aluminium.

 
Last edited by a moderator:
Rain till half in the afternoon :(

So after last bondo/sanding session on my fender, no way to spray and had to stop working on it.

Weather should be dry tomorrow so I'll hopefully be able to spray new filler on the fender, sand, repeat...

Finished zinc the last headlights bracket part, but no picts ( mac Mojave deleted them during import. If you're on mac and not yet on Mojave, whatever MasOS you run, it's better than this misery full of bugs, do not update unless you really can't avoid it)

Anyway, went pick my next vicitims.


So next on the todo is the bumper assembly,

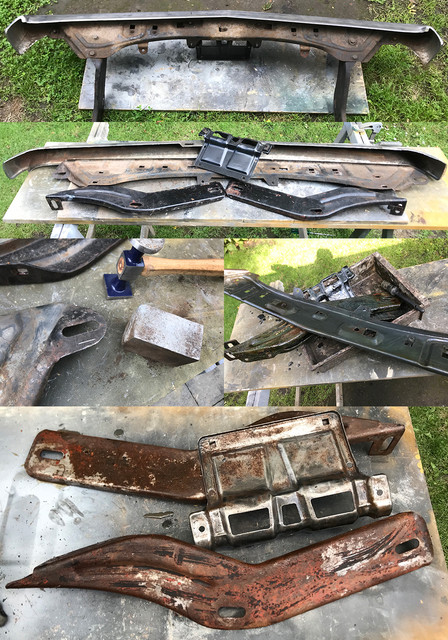
I saw there was something wrong for a while, as the bumper wasn't aligned properly to the fenders, found out that the front kiss it took long ago, was not fully repaired. The bumper brackets were in need of a small massage, good to recover +- an inch over the width of the car. One of the guys who repaired the car long ago, thought washers added by the nuts would do just fine and there was no need to correct the brackets that were bended a bit at the end where they hold the bumper. The car rail and brackets bases were fine, which is a relief.

So annoyed my neighbours once more with nice and loud metal sounds to correct these :)

Despite some heat and bits of force the huge j-nuts wouldn't want to let go. As the bolts themselves were having butchered heads and the j-nuts corroded to death, I've cut everything. I knew this already and have a replacement kit in house for this later.

The hammering on multiple parts took a while, so end of the day had only half paint free, half in de-rust bath.

I hope to have at least 2 or 3 ready for some epoxy tomorrow together with other parts waiting...


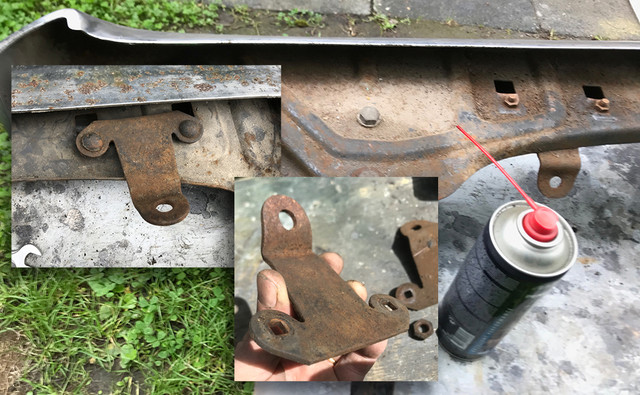
I've found 2 strangers. Looks like some extra lights brackets or something else?? Like guards? I know the hardware used wasn't original, (nuts were used as spacers to level with the bracket fold and not even same on both sides). They are also bended, prolly to hold the lights or guards at the right angle despite the wrong hardware. I dought these are originals. Are they?

Anyone knows?

 
Last edited by a moderator:
Thanks to rain coming every 1 or 2 hours, couldn't spray anything that doesn't dry fast like the planned epoxy.


But was able to resume work on the fender and sprayed another layer. Its now starting to look better. 90% of the upper, front and engine side is near where I want it, tho water sanding it will tell me more soon. Next iteration focus will go on the lowest part where its nowhere near where I want it to be. Might work on it in the eves this week as nice weather is announced.


With that bracket done, is the 73 driver side headlight bracket done. I have to start the passenger side, but there were enough candidates to work on to not add to the mess...

So next was the licence plate holder and while waiting on the primer to dry, re-plated its hardware that stayed in bath for a couple of days.


Corroded and worned, after a massage and few electrons, got it ready to join the to be epoxied parts club.


One of the parts I wish I had a sandblasting solution at home for. Thick layer of rust to get rid of and they do not need to be nice.

A cabine, even small, isn't possible space wise for me, so thinking to buy some soda gun.

Anyone has/use one of these? https://valkenpower.com/en-gb/soda-blasting-gun.html

Is it crappy or really usable?

Anyway, got the most damaged one paint and rust free, and as it was as long as my biggest plating container length even been able to plate it.

And so will the other, once I get it in a better state (diff is noticeable on pict)

All with all, weekends are hard work :D

Working on the fender reminded me once more why a good body/paint job cost so much. Amazing the time that goes into these things.

To be continued...

 
Last edited by a moderator:
Back
Top