Fabrice's 429CJ 71 project

7173Mustangs.com

Help Support 7173Mustangs.com:

This site may earn a commission from merchant affiliate links, including eBay, Amazon, and others.
At the beginning of the year, you complained about cold and rain; now you complain about high temperatures. Next, you'll be complaining about not having anything to do.

 
@Midlife

I'm not complaining all the time!

Take today for instance: Dry, warm enough to be in t-shirt AND most important, not sunny enough and a tad too cold to attract the ladies in the garden!

The perfect hammer day!!! :D


Started by correct the wheel lip and spent quite a few to correct that crease. The metal was twisted in a way it took me a while to restore the surface to something that felt and looked good for the entire region. I should practically need no bondo. Much better than the 1/2 kilo that was used to hide it.


Then when to the front. After some closer inspection, I saw there was some curve to the top line that I could not place. As lots had been bended. Straitened the headlights bracket bits to fender, then corrected the main surface (where the bolts are). Once traightened, it was more obvious something was repaired with bit too much enthousiasm.


Had to flatten and move the lip up and redraw the fold following the line of the rest of the fender. Much better :D


All fine except now that the entire bracket and region were straightened back, the poor repair made of tin and brazing decades ago didn't like the stress much. Heard a metal crack and was able to pass my ruler thru it. Not long after the entire repair broke appart. The fender took her shape back with no respect for the ugly repair she had to suffer for decades :)


Not really happy with this. Bit scary considering the costs for a new fender may I'd fail. I had no choice but go plan B and had to use the big guns: one of the pizza boxes that I always keep for their handy soft cardboard! :)

As the shape is quite complex, nothing is really straight and there is some curves everywhere, I decided to work in different orders as I usually do. Where I'd cut, then make a print of the hole and make a patch based on that. The reason is because the shape I need to restore isn't the one I need to cut. Its been shorted few mm on the height and compensated with tin. So measured on the other fender the expected height, 3.5cm and mixed the print I did on the fender with the measurements. Cut my plate and worked the metal slowly with a plastic impact hammer... Few tic-tocs later, Got my basic shape with the important fold at the top with a nice curve into it.

Left enough metal around it to be able to add more curve to it if required.


Next was the point of no return: used my fresh part and cut the fender. Yet kept enough material to be cut later for what is practically a flat surface on the fender... Once the sick bit was out, its clear something bits weird was done long ago.


Not enough good day light to continue today, ended up with a patch practically flush everywhere.

Need to hammer it further tomorrow and give it more crisp on the top fold, but if weather permits it, I might be able to let the welding machine speak tomorrow...

 
Last edited by a moderator:
You're turning out some great work and becoming quite a good panel beater

Sometimes will need to apply heat and cold to shrink some high spots especially when you get that annoying "tin can" effect

I have a shrinking disc I put on the sander, it is more subtle than using flame, takes a little getting used to but certainly worth it

Like me you will do everything to avoid buying a new fender and paying huge shipping costs, not to mention having to rework the repop panel

 
@Mister 4x4

Thx, a no choice situation here. The repair with the corrosion on other side was already making the previous thick layer of bondo crack, no way I'd bondo that again weak as it was. As most of the panel is ok despite many tiny dents, the pus had to go out :)

@OzCoupe72

I usually use heat and cooling fast to shrink a bit but here its hard as most of the nose part where it would be handy, as I've discover last week during bondo removal, is full of tin and it melts at relatively low temp and most damage is of course there...

[i have a shrinking disc I put on the sander]. I have to try one of these before I run out of dents... A shrinking hammer is also on my wish list.

[Like me you will do everything to avoid buying a new fender and paying huge shipping costs, not to mention having to rework the repop panel]

Yup, same boat. Tho there is also the hobby aspect. I've decided to save this car from the crusher and restore it with my hands, not my credit card (tho, it will not remain undamaged ) . Even if its lots of (dirty) work and frustrating at times, I still enjoy doing this. Not to mention you learn tons by doing everything yourself. I keep repops & new for the cases I really have no more options or simply because I miss the part.

@NotAT5

Man, having these is 1/2 the restoration!! Used them again today lol! :D

Everyone has its prefs, I see for instance a guy that I follow on youtube, "urchfab", uses cereals boxes. Different diets, same goal :)


Finished that patch and even took the hood print to check if curve would fit.

Then very tediously welded it in. Tedious because I've discoverd that for the ancient repair the metal had been grounded and having corrosion on the flat part on the other side, made it difficult to weld. Got quite a few holes on the top where it was thin. The most important on the middle went fine.

So was really one weld at a time, cooled with water and a piece of copper was really a massive help. Took ages and after a quick grinding session, welded again where I've left tiny spaces.

I still have to grind and hammer it, but it was too late to make noise, already been a nasty neighbour most of the day... So will do this during the week when most are at work.


No prob, while many dents are now gone, even one nasty on the lower part where I had to kind of press the metal while beating it, there is still plenty to do on it on the lower front part. Mostly hard to be reached places because of the huge bracket behind. Using a file, got the remaining tin that melted when I've removed the bondo with heat back in shape and started to prep the inside (removing the rough corrosion) for next week rust removal & epoxy prime inside...

Amazing the time that goes into these things...

 
Last edited by a moderator:
Weekend! Storm, rain, yeah!!


Really, I was happy it was raining for a change, as today de-rusting the fender was on the todo.

With phosphoric acid, I get best results starting "pure", then diluting with water while helping the process with brushes otherwise it dries/evaporate. Now thanks to the rain, it was automatic! Once done, rain stopped too. Perfect timing :)

While the fender was dripping into my de-rust bath, prepped a soda bath to balance Ph and finished with water. As flash rust may occur in matter of seconds when wet, air dried and heat gunned it. Still warm, applied a layer of rust protective epoxy.


As the inside was going deep purple, started on the other side. Most paint already gone, it was time to remove the hardest: part: the original primer. As we can't buy Aircraft like products more powerful over here, just like for all panels done already, all I can get out of that mild stuff for this red primer is a soft paste. Had to inject some elbow oil to the mix to get it done.


Eventually, like every time, the elbow oil got me where I wanted to be: a pristine surface!

I've still have some hammer time tomorrow before applying epoxy, but was glad to see all big dents, pigeon nest style, are now gone. Even the extra antenna hole is practically invisible. With two thick layers and a tad of bondo, I should get it to a very acceptable state. At least I hope I will.

Another plus doing the paint removal this way vs sand blating, aside keeping the metal thickness original, is that I start look like the cool kids, you know those with too big pants. Had to add an extra hole to my belt this past week as I was loosing my pants! Saw I've lost another 2 kilos last month :)

I tell you, don't pay for gym, get yourself an old car to restore!

Now, lets hope tomorrow will be dry...

 
Last edited by a moderator:
Fabrice:

You're simply not drinking enough adult beverages to keep your weight up.

We don't want you to simply fade away, now do we?

 
Great work Fabrice. You could give quality lessons to experts.

Maybe you need to eat more pizzas? You must be running out of materials for making patterns, that way you get more pattern material and put some weight on at the same time. :)

 
Last edited by a moderator:
I think you need to move to North Carolina and be my new neighbor, lol. 

It is great to see someone just get in there and do it. You do it right and seem to enjoy it also.

I have the same issue with loosing weight. I seldom check my weight but was shocked the other day when I did. I forget to stop and eat when I get into something. When I came back from my work in China in 2015 I had gained to 235 lbs. I am 6'5" so was not over weight at that. I am down to 165 lbs. now that is 70 lbs. I have lost. I drink lots of drinks with the minerals I need to keep from cramping also. 

I went to Dr. once when I lost 40 lbs. in 3 weeks without trying. They did every test known to man and can find nothing. 

I did the Mach 1 in the 10 weeks furry in the spring and then put in a big garden this year. I am going to have to slow down or waste away to nothing. 

I was getting ready to roll the 72 Q code vert into the work room but that might kill me.

I have started trying to eat like 5 times a day but cannot gain. Lots of cheese and bacon and just cannot gain.

Again it is great to see you doing all this fantastic work and I am sure you are going to inspire other members to get going on their projects. Much better for you than sitting on sofa watching TV. Glad you have family that lets you do it also.

Cheers,

 
@Midlife

Don't worry, its not like my six pack is exposed or something. There is still plenty protection on it! My one pack as I call it, is still there, just thinner! :)

@Don C

ahahaha, excellent hobby/diet advise!!!

@CMM

[i think you need to move to North Carolina and be my new neighbor, lol. ]

Oh you would not like it, I'd be squatting your space and borrow your rotisserie all the time :)

[it is great to see someone just get in there and do it. You do it right and seem to enjoy it also.]

I don't know if I do it right but at least I try to. I don't think you can save an old car by hiding misery, spray a shiny coat on top of the old layers and hope it will look good and last for many years to come. I know I can't.

[Again it is great to see you doing all this fantastic work. Much better for you than sitting on sofa watching TV. Glad you have family that lets you do it also.]

thx David, I make a living programming realtime 3D graphics. I spend my days sitting for hours, staring at a screen. The only exercise I get is in brain and fingers tips.

So the weekends full with de-rusting and hammering are a welcome nice contrast. I surely enjoy revive old parts.

My wife married me and my mustangs. Too late for second thoughts :)

---------------------------------------

Practically no wind today and sunny: epoxy day!


First sprayed the inside and 4 or 5 hours later, it was hard enough to the touch to turn it fast and been able to spray the outside too.

All was fine, finally I was really busy on the 73 again.

And then wife came home from shopping with a surprise on the Mini.


Mmm, there goes precious Mustang time again :( See David? When you say, she lets me do it also... she has her ways to let me do something else!

From the manual, already saw, you kinda need to remove the wheels, remove tons in trunk just to access the dang bolts of that polyurethane bumper thingy... Like I don't have enough projects running. grrr. Fixed it roughly, so nothing touch the tires anymore.

Anyway, as I will not have parts for that thing next week, I should be able to apply primer and prolly do some bondo woodoo on the fender and mark it done till it gets a silver and green jacket.

To be continued.

 
Hmmmm...I want to see zinc plating of the polyurethane bumper thingy once it is repaired.

 
@Randy

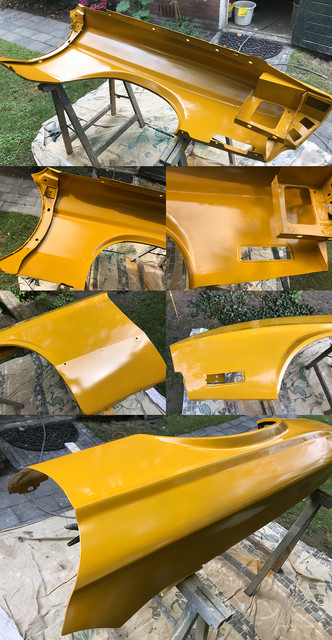
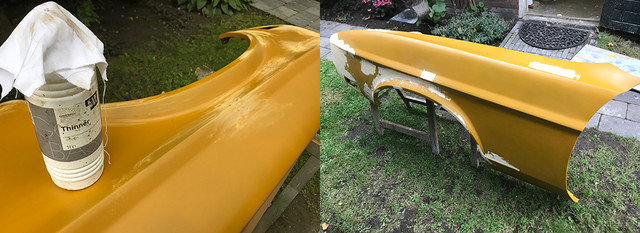
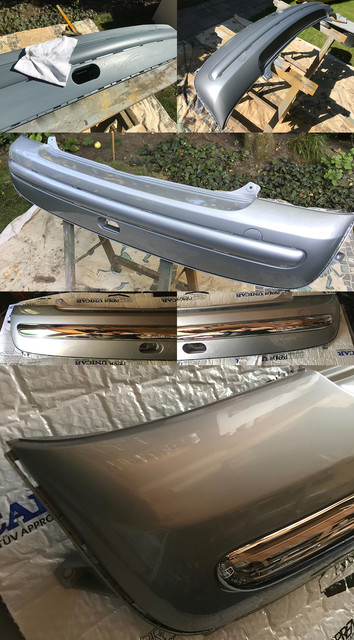
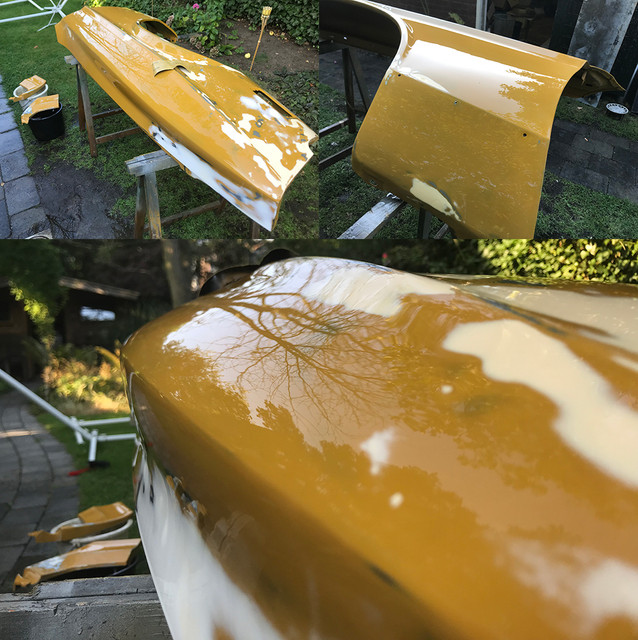
Ahahaha, well, unlike US cars where you need search far away land, I've located some place in Germany with OE parts for lots less than via BMW/Mini channel over here (when I say lots less, I mean LOTS less), and have a primed + chromed bumper underway for 80 buxx. Been to my painter this week, got my green mixed for the 73 and the silver paint for the mini. The bumper should be here by Monday, so I should be able to spray it somewhere next week if weather permits. Then I'll need find time somehow to remove the old one and install it...

------------------------------------------

20% chances of rain said the weather app...


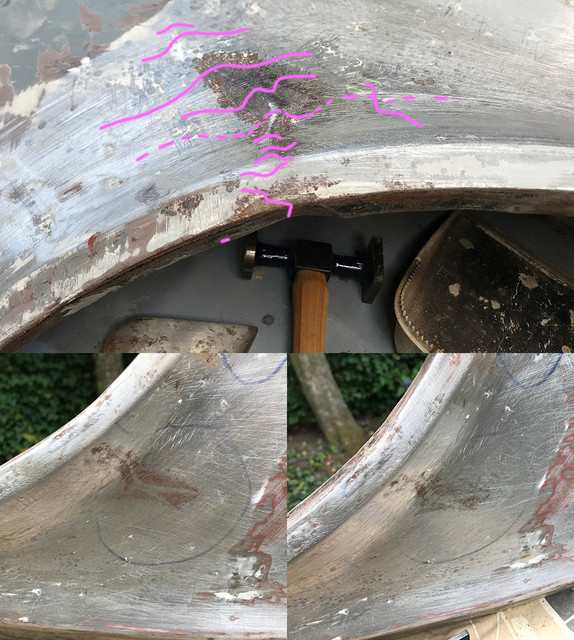
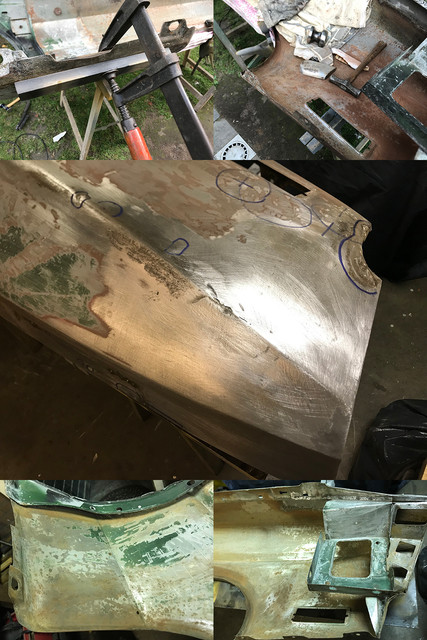
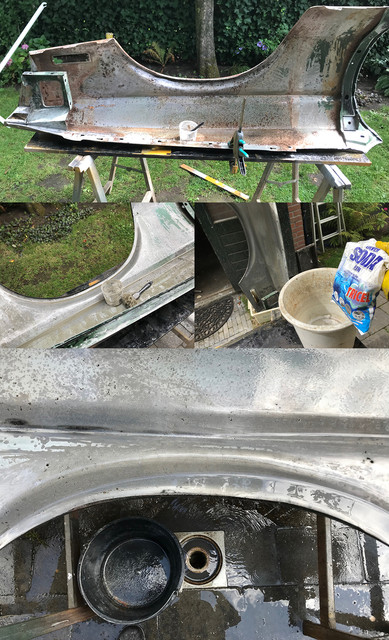
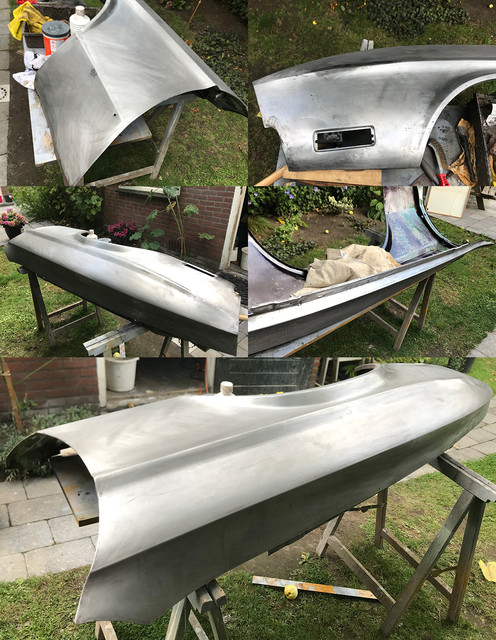
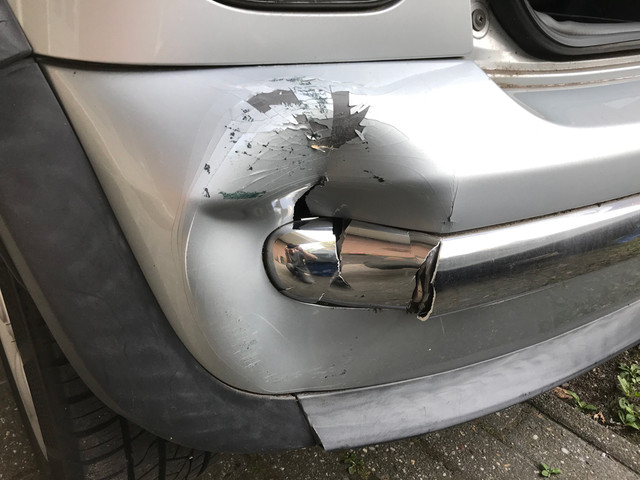
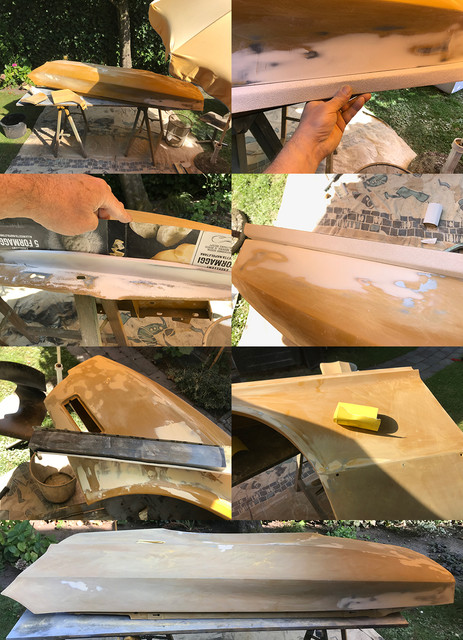
I was just installed and ready to get to the next step on the fender... poof, the 20% came down :(


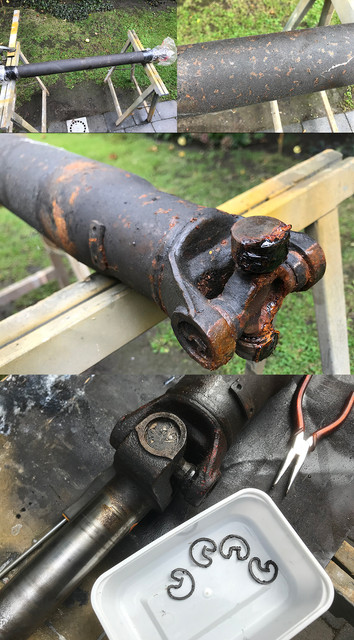
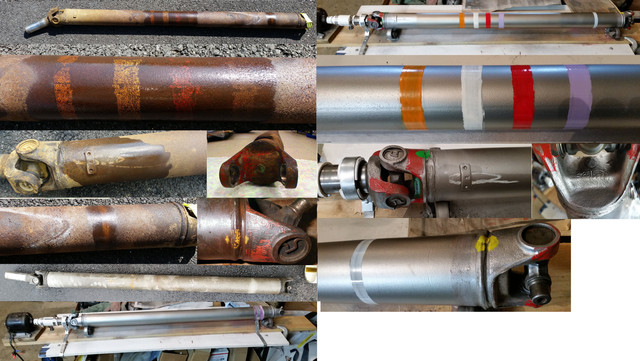
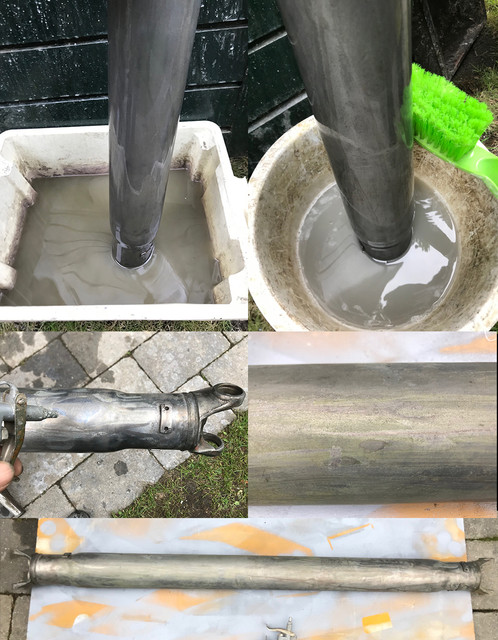
As I can't go further on this baby, can't work on the 73 either. Went pick my next patient: The transmission shaft/ drive shaft. I've removed it a couple of weeks ago and needs to be done anyway. Just like many original parts on this car, it's all in its juice. Totally no play on both u-joints, aside the corrosion, it could be reused as is and there would be no problems. But I see its return on the car one day in another state :)

Started by spraying lots of penetrating oil and removing the lock clips. Two of them were not happy to leave their rusty grooves, so had to get them free by first ticking them so they'd turn a bit before get them out with pliers.


Then after a good quick clean up and again penetrating oil, the rear u-joint removal was next.

Often ignored in maintenance, these are in 99% of cases the reason why you get a "klunk", often from going front to back gear or if light, a droning sound and/or vibes when the car reaches a certain speed...

So for those with vibs and klunks, here's how it goes to remove them. If unlike mine your car got new one since 71, it should go even more easy.

At first sight, it looks like a puzzle: how the hell do you remove these??? The trick is, once the clips are out, to push from one side for say 0.5 inch/1.5 cm. Doing this in a big vice is super easy, but mine being too small and even partly broken (need order a new one yesterday), I've used a 19mm socket to push (fits the hole perfectly) and a larger one so the other side could go inside the socket. Once out, you can remove one of the covers/cups acting as bearings. Try keep these up while doing it. This give you enough play to remove the u-joint.


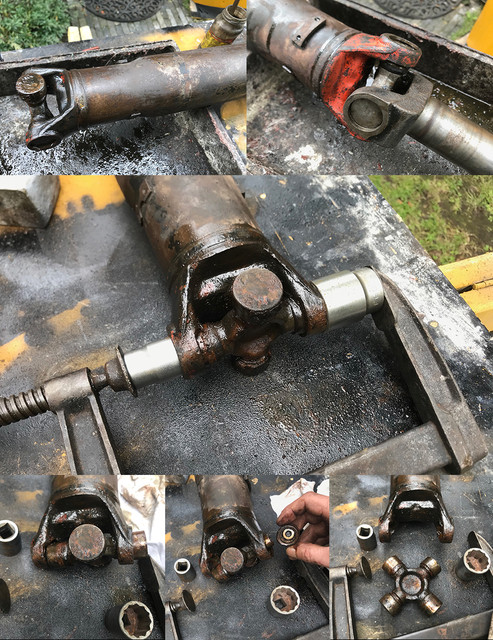
Then did the yoke side. Because mine were corroded and in there since 71. My "press" wasn't strong enough to get some movement. So had to use a big hammer to unseal them. Placed on hard surface, in my case blocks of iron, and level , it's all about give them that tick that will free them. No need to slam like an ogre (even if the hammer i've used looks like an ogre hammer), but its not made of crystal either. Just a good tick, and with the penetrating oil added before they should not resist. Both articulations needed a tick on mine. Removal was same as the above, pressed out with my sockets. Once they are free and there is oil, not much force is required.

I plan to replace the u-joints, but kept them as they'd only need a good clean and grease to be as new again in case I would not find the ones I need. For now, they went in a box...


The yoke, is in ok condition, but showing some corrosion on the shaft. As these go inside the trans and are in contact with seals, they have to be smooth as baby butts to the touch, so started by removing the raw rust with 80 grid, slowly and finished gradually up to 400. Then after a good clean and brushing, it went 15 minutes in de-rust bath, then soda bathed, and after good rinse, few secs of hydrochloric acid to etch the surface for plating. At this point the metal was pristine and ready to enter my zinc bath.


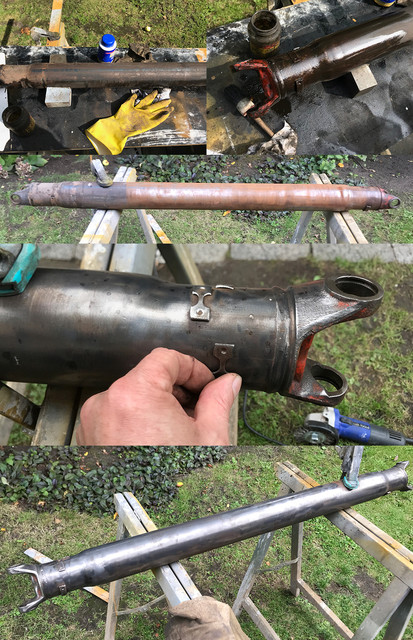
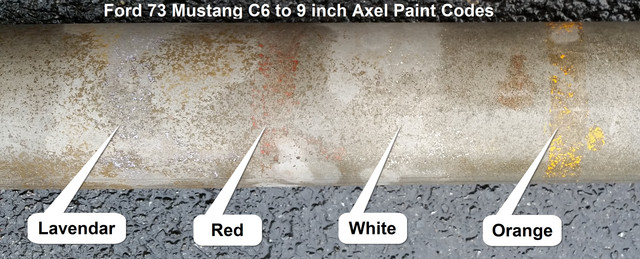
While the yoke was enjoying a 3.5- 4 volts bath (the voltage I find giving me best results for zinc), went busy on the big shaft. Man that thing is big, Peterbilt sized!! Much bigger than my 73 351/fmx one. Aside red paint applied on both extremities, only a long blue stripes was found. For the rest, looks like Ford did not apply anything on it. If they did, it's gone long ago, and entire shaft was under a layer of rust, but not pitted as it was very greasy, probably so for years. It didn't took me long to get it to bare metal and I'll de-rust it tomorrow further in phosphoric acid for a durable removal before paint it. I'll have to spot weld one of the weight that got loose when I've wheel brushed it. Bad luck, but no biggy.


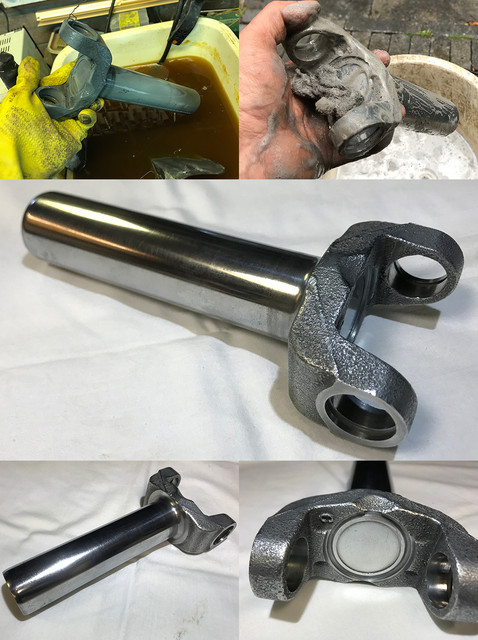
After +- 2 hours and many positions in bath to get it cover everywhere in a nice coat of zinc, wooled it and got myself a nice bling bling yoke! :)

Part of it will be painted, the rest dipped after that in trans oil.

and so ended this rainy Saturday for me... Hope to spray something tomorrow, but looks like chances are very very slim I can..

 
Last edited by a moderator:
Looks great! When I removed the surface rust from my shaft by soaking it in a long 4" PVC tube with Evaporust, I found all the original paint marks. I built a lathe like device with caster wheels so I could spin it to sand and paint it.  I see there was still red on the ends on yours. There should ha e been 3, 4 or 5 stripes in the middle to. These would match your cars buildsheet.


Last edited by a moderator:
@Randy, @mach71351c

Thank guys.

@NotAT5

Everyone likes a good yoke :)

@rackerm

Its funny, I actually remembered your very nice driveshaft and that's why I've added the few notes about the colours found. I've first degreased and inspected in search for these marks, for the orange in the middle (which looks pretty yellow to me), I've found a few bits in the middle, but not enough to even think it was part of a ring. Only red at extremities and a blue line going from front to rear. That's all I could detect.

Your driveshaft is for the elite upper original restoration class, I play in the much lower "try save the car from crusher" custom class! :)

So mine will be simply painted. For my 73, did some endless loop on it, like you see on planes propellers noses. Totally useless as nobody sees it it action, but I might do same stupid thing again on this shaft. Not decided yet. I like your metal finish, clear coat on the bare metal after fine sanding?

Btw, regarding evaporust and many other rust killers, they use as main ingredient phosphoric acid. You can buy this "fertiliser" in a much more concentrated form, I buy mine 75% in quarts for 10buxx vs the 10 to 25% max found into the expensive brands that I used to buy before. The plus vs the others is also that it goes way faster. I now routinely apply pure and dilute as I go, finishing with soda to balance ph, then water to be left with protective iron phosphate. And all used is collected into a bath that i reuse over and over. Very handy for all the smaller parts that can be immerged completely.

------------------------------------------------------------


The afternoon started with applying thin layers of bondo after some sanding and degreasing that I couldn't apply yesterday.

I'll sand and spray some primer on this baby next week.

Today was about protecting the driveshaft.


There was this thread last week, with a totally sandblasted car in Australia. On the left you can see we're far from Sydney weather over here: in one night inside, the driveshaft was already covered with a light layer of rust...

So gave that baby a phosphoric acid bath, cleaned up and derusted the groove that were full of thick rust that would take ages to get rid of letting the chemical do the work alone. On right side, the worst part with starting rust pits was totally rust free.


Alternating both ends into the bath and massaging the middle, once the "good enough" point was reached, it went in yestersday's soda's bath. After a water rinse and air dried, the surface was clean left with the protective phosphate with its iridescent colours.


Next was to set the weight that came off back onto the shaft. Drilled the spot welds and prepped both surfaces for a short but hopefully nice weld. In the middle, now that the surface was clean, its obvious the weight has not been spot welded properly, only one side was holding it, hence why it came off easy when the wheel brush came on it. On the right, both weld came so round and flat, I decided to not even touch them aside a little brushing.


As the weather was still dry, despite the late hour, quickly thought of an holding construction to allow me to paint the shaft in one go and eventually be able to move the part quickly inside may the rain come back. Taped the ears inside and passed some tube and wood thru each sides.

Prepped some epoxy, and as my todo box had some epoxy candidates waiting for a while, painted them together. One of them needs a tad of bondo to cover some ancient damage done to the pot metal long ago. With bits of luck, I should be able to prime these as well next weekend.

Despite the bad weather, it's been a productive weekend after all.

To be continued...

 
Last edited by a moderator:
@rackerm

Its funny, I actually remembered your very nice driveshaft and that's why I've added the few notes about the colours found. I've first degreased and inspected in search for these marks, for the orange in the middle (which looks pretty yellow to me), I've found a few bits in the middle, but not enough to even think it was part of a ring. Only red at extremities and a blue line going from front to rear. That's all I could detect.

Your driveshaft is for the elite upper original restoration class, I play in the much lower "try save the car from crusher" custom class! Smile

So mine will be simply painted. For my 73, did some endless loop on it, like you see on planes propellers noses. Totally useless as nobody sees it it action, but I might do same stupid thing again on this shaft. Not decided yet. I like your metal finish, clear coat on the bare metal after fine sanding?

Btw, regarding evaporust and many other rust killers, they use as main ingredient phosphoric acid. You can buy this "fertilizer" in a much more concentrated form, I buy mine 75% in quarts for 10buxx vs the 10 to 25% max found into the expensive brands that I used to buy before. The plus vs the others is also that it goes way faster. I now routinely apply pure and dilute as I go, finishing with soda to balance ph, then water to be left with a protective iron phosphate. And all used is collected into a bath that i reuse over and over. Very handy for all the smaller parts that can be immersed completely.

_________________________________________________________________________________________________________________________________________

Hi Fabrice,

I thought at first the orange paint mark was yellow too, but when I compare it to the buildsheet color codes, it was identified there as "OR". The driveshaft color codes were one of the few areas on the buildsheet that was still readable. So I figured that orange being a secondary color, had just faded/washed out to the primary color of yellow. The same was true with the lavender which looked whiteish.

Thanks for the chemistry lesson!  I did not know that about Evaporust. I have been in awe of the refinishing work you have been doing on parts and have wanted to try it but I have not out of fear I would blow myself and burn down the house up in the process. Maybe someday I'll get up the nerve to attempt it as I finish up the 70 Mach I.

Regards,

RIch

 
Last edited by a moderator:
Not replying to Rich aka @Rackerm now, kuz we had some PM exchange during past week: short story, we might see some of Rich bling bling stuffs very soon! ;)

------------------------------

Fantastic weather, but it was an "unpure" mustang weekend!

Had to work on the Mini's bumper and check the T-bird for the annual tech control..


@Randy, you wanted to see...

Most Saturday went into that stupid piece of plastic! Started bad too, bumper sticker said, comes primed, fine sand and degrease before apply. They only forgot to mention that degrease can't be done with MY degreaser. So had to sand more as the so called primer melted away creating an ugly surface to paint on.

Eventually managed to spray the silver and coat it. This morning added the chrome, which is another piece of plastic, more expensive than 2 new bumpers! :)

Now need find some time to install it, as you basically have to dismantel the entire rear of the car to do this! :(


Finally I was able to work again on the 71 parts... Came back to the rear extensions epoxy primed last week. As they had some ancient dents, I started to hammer a bit now that the problem were more visible with the even epoxy and water. They look like hugely strong, but truth is, in between reinforcements behind, the pot metal isn't that thick, pressing them and helping with a hammer got their shape almost back to the original, tho 2 dents being on the reinforcement, still had to do some bondo magic. Very little. While at it, also handled the rear side and took care at freeing the rubber channels so the rubber seal will be able to do its work properly. Primed them on one side and alternating with the fender work, have them ready for a primer on the front side that I'll do may be tomorrow.


Under at hot sun, the entire afternoon went into sanding the fender. First with raw 80 using long straight guide a file, as I refuse to listen to the thick layer bondo demon and end up with "some" smooth shape. To get the fender in its shape back with a minimum of bondo was tedious. Alternating checks with my templates made before the welding so the hood aligns hopefully perfectly with it later on. Made few patches and redid some places and ended up with with a good enough surface to move to 200 dry.


After a good clean, it was time to let the water speak and fine tune with 600. Took another hour to get the surface with natural reflections everywhere. Air blowed and dried everything for the next step: filler primer.

Aside one or two spots above the light hole that will require extra primer thickness and be water sanded again, I think I should not be too far off a clean surface. As it was too late to spray, I guess I'll have to wait a bit to know for sure :)

One thing is sure; after 3 fenders done this year, just like my light brackets, I'll be done doing fenders for a while! Man they are big! :)

To be continued..

 
Last edited by a moderator:

Latest posts

Back
Top