Fabrice's 429CJ 71 project

7173Mustangs.com

Help Support 7173Mustangs.com:

This site may earn a commission from merchant affiliate links, including eBay, Amazon, and others.
Fabrice, thank you for continually posting such informative and well photographed posts! I plan on using your posts for a guide in much of my future work! Great job! Keep them coming!

 
You have done a great job getting that wiper motor done

Too late now but I used tiny cable ties to hold the brushes in then once I had it most of the way just carefully cut the cable ties

Pity I didn't realise I must have popped one of the springs, DOH!

 
@Fredensborg

thx, many times I saw great results posted here and there but nothing about the in-between work/how to, which is basically what you're after while busy.

and having pictures in between texts soften the pain to read my bad english too :)

@OzCoupe72

[i didn't realise I must have popped one of the springs, DOH!]

Ah so you got my PM. Well, on the pict I've sent you, where you see the brush is still inside the guide that's what I thought you did too. But while busy mixing both units to get the best parts, I saw the spring was still in there, because of the pressure of the entire length+brushes, it was stuck at the small hole by a tiny sharp edge at the end of the spring. Once pushed back into the guide, it was free again. If the spring would have been rotated on its own axis by 1 degree, this would never have happend and you would never had a spare motor for me :)

It was really bad luck (for you) because I've played a bit with it, pushing it back in to max load a few times, it never got stuck again.

As about using a small cable, yes its a good alternative to the tape. I'm curious to know how that thing was assembled at the plant exactly, they must have used some kind of a thin flexible stick with a round ring at the end, with an opening of the shaft diameter to keep the brushes and maintain them in place while body is presented.

It was really not designed to be maintained. Glad they used durable parts to build them.

 
Weekend!

Was expecting the alternator kit to arrive later next week, it was delivered yesterday.

As I have many boxes full of alternator parts, lets start the weekend with this baby to clear some room.

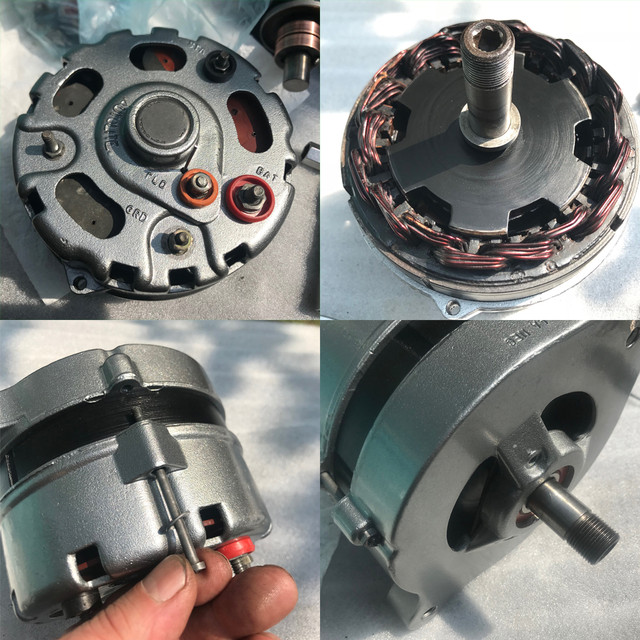
All its out- & inner parts being restored & painted, it should not take ages...


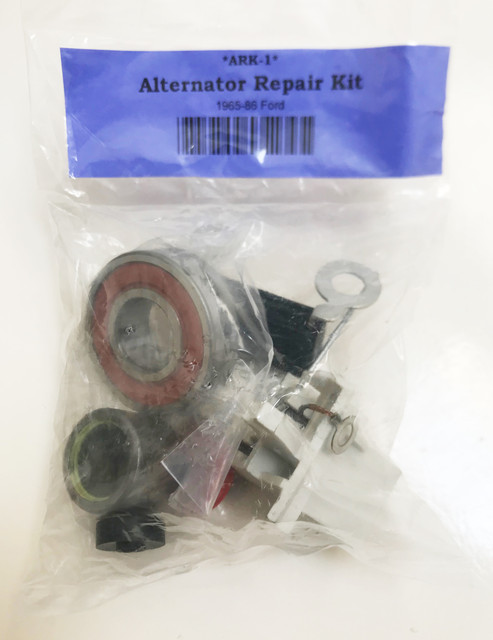
What a nice surprise! Unlike the kit picture (see prev posts) where only the regulator/diode and both bearings were offered,

The kit they sent me contains more than expected: new plastic insulators and the brushes assembly.

Now that all is clean and as new, its easy to put it back together. However, CJP doesn't know that I forget all within a few days, and its been several weeks since i've started on it and I was glad I took one or two pictures...

Here's a detailed recap of the reassembly.


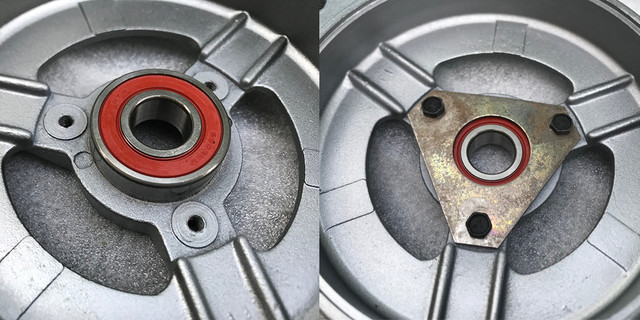
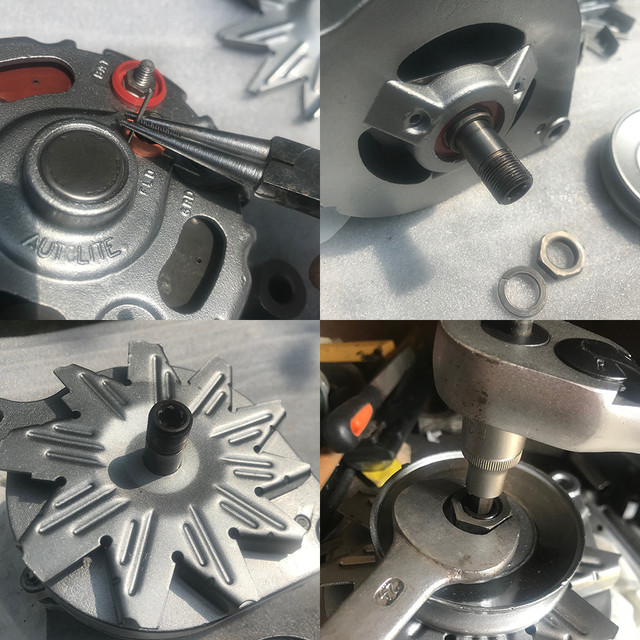
The old bearing that was looking fine was already removed so pushed the new one in place and secured it with the plate.


The bearing on the back body wasn't planning go anywhere and would have probably done the job for another 45 years.

So pressed it out with a 18mm socket that matches the diameter. Compared both and there were no differences except the shape of bottom. The new one, flat bottom, seams to be stainless steel.

As an alternator revs in the 10k RPMs, these have to be of good quality, that's probably why the old ones are still in great shape.

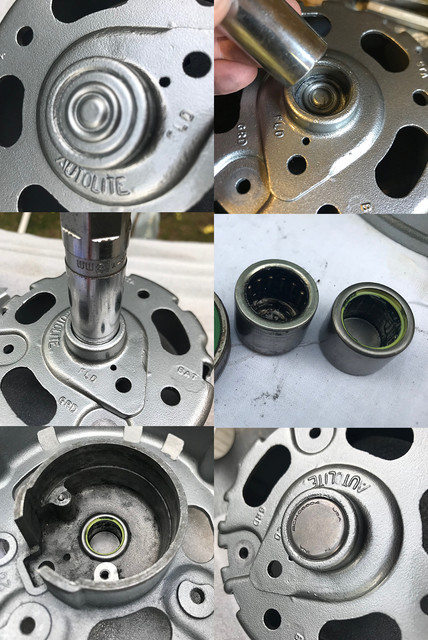
Installing the new one is the same, except done from the inside and due to reduced space, had to pick another socket to have a good flat start, as all was cleaned and greased, not much force was necessary, but it has to go to the bottom, aligned with the body.


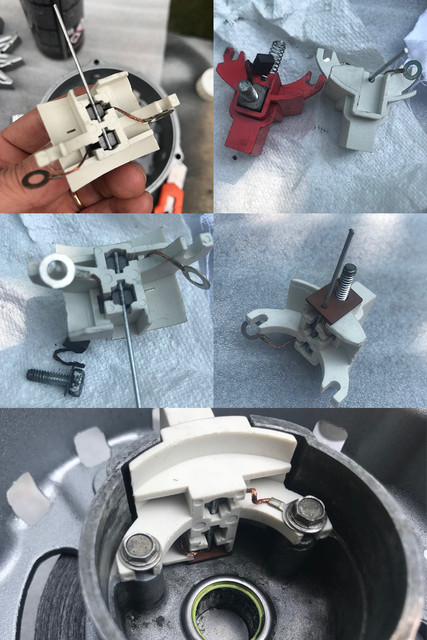
The brushes set is delivered pre-assembled and locked, awesome! Not need for the tape trick as with the wiper motor! :)

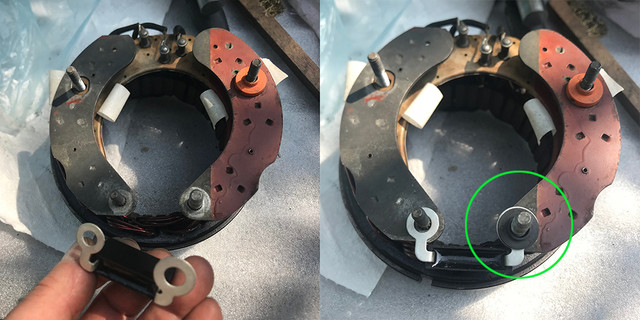
The little tube retaining the brushes under load, will go thru the hole that I've freed again before painting the casing and its where I was happy to have made pictures: The kit comes with zero doc, like if everybody knows the internals of an alternator on the top of his head and some b&w copy of some exploded view is considered a luxury. With their round shape the connectors of the brushes, you can easy forget the brush contacts do not go both to the 2 screws, but one needs go underneath and have a small insulator plate in between (not part of the kit). The original brush connector is square-ish, not round.

Bellow on the pict the left screw has no connection, the right one does, the upper one, the brush underneath connects to the port behind the casing (next pict)


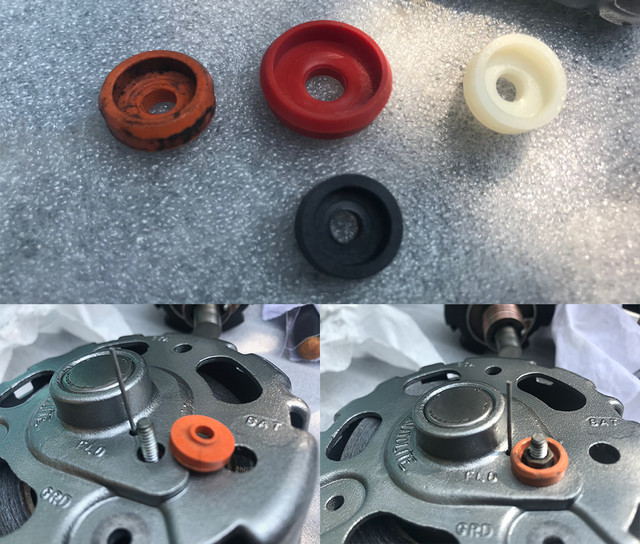
The kits comes with new insulators, tho not all. The ones on the diode are not provided, and the orange one is white. While the old black one was cooked, the orange one was dirty but fine. So cleaned it and used it again instead of the white one. Also a detail, its important to not tighten the studs/nuts fully, first ensure the insulators are well center. You don't want power or false grounds on the casing!


One last cleaning of the diode assembly on the stator, as I can now "sandwich" back everything, the studs can fall, so taped them.

To put back the ballast/ diode, they is no possible error, the holes diameters prevents you to inverse the contacts, however, another missing item of the kit is the black insulator to the casing. Don't forget add one or like me, reuse the old one that should be ok.


After the diode assembly/stator is set back into the rear body, removed the tape and ensure all the insulators were centered.

As the brushes are not in the way, you can let the rotor take its place, not before adding a tad of extra grease on the shaft at the bearing and cleaned it with a very light layer of white grease just to prevent future corrosion.

Don't forget to add one of the spacers (ring) on the shaft. There is one on each side of the bearing! That's also something easy to forget!

Then its time to degree the alternator. Meaning, thx to my picts, I can set the front back onto it, being sure it will meet the original brackets for my engine.

Once secured, the casing and most important part of the alternator unit is done.


Its time to test if all rotates freely with no resistance and eventually reopen it if it doesn't.

Smooth as butter! I can continue my sandwich by adding the second spacer, then the fan. The pulley much more easy than getting it loose, this is now just an alen socket and to unscrew to screw it till you can't anymore. I didn't have doc on the torque required, tho pretty sure it's not going to get loose anytime soon! :)


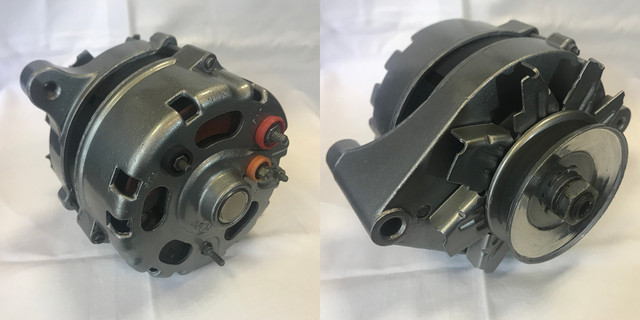
Weeks after I first open it, the alternator puzzle is finally complete! YEEEEA!

At $20 the kit, more complete than expected, even if you do not paint or restore it (tho I hope you see it makes a massive diff), It's really worth it.

You are also way cheaper than buying a new alternator. Know that with a replica/restored version of this exact one, you will see costs rising between 200 and 400. (ex taxes and shipment).


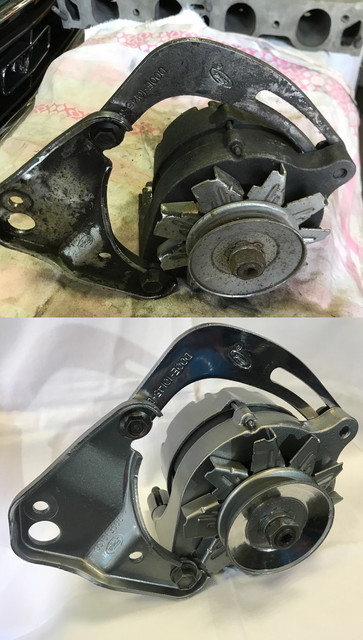
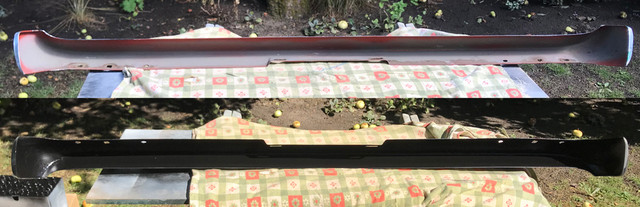
The before and after pict! :)

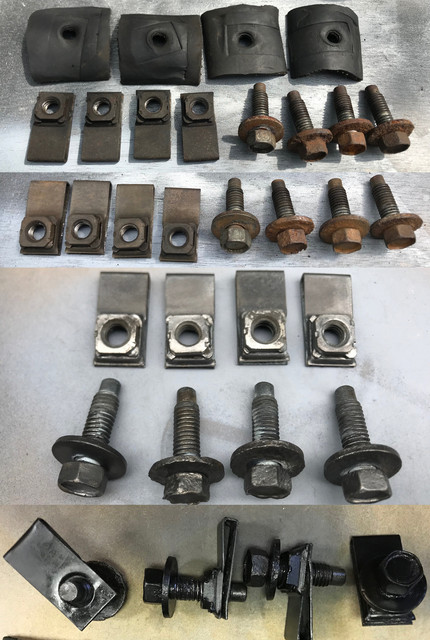
With all the brackets, bolts and nuts restored as well, I finally can say: Alternator: done!

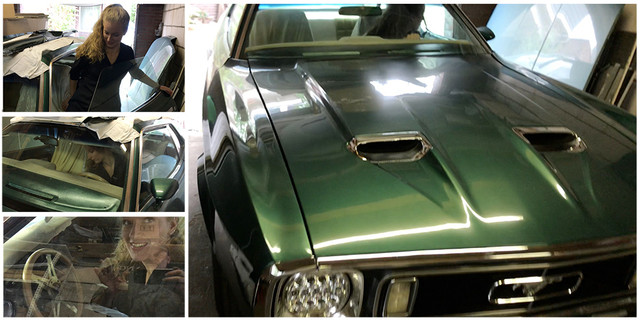
Rest of the day was for the 73 and probably a big chunk of tomorrow...

to be continued...

 
Last edited by a moderator:
After a very warm and dry week, average 40ºC (104ºF)

The weekend started bits cooler, much better for the stuffs on the todo.

Most time went on the 73 tho, but as I want the 71 to move on even by few bits every weekend, I've continued where I've left it last weekend. Very monotone (boring) todo: mostly sanding, sanding, & sanding but needs be done and weather was perfect for it.


So went back to finishing the front and rear valance and also took the spoiler as they all will receive the same colour.


Another step of the many repeating tasks...


The spoiler, full of many very small dents and tiny craters, only in need of 2 repairs at the extremities where a small chunk of the material was gone, I've restored both side broken corners and flat surface using fiber resine. With the hot weather it dried in just a few minutes, and not long after that, the original shape was back.


Followed again by a boring session of sanding, primer, sanding....


Eventually end of the weekend, got all three ready and they will prolly get painted next weekend.


In between always have some bolts and nuts in chemicals that need few minutes of attention. Here the 71 bumpers bolts/retainers. After a week in vinegar and rust dissolver. Painted and greased, perfectly ok for their use now, 2 bolts are so badly corroded, I'll replace them as soon as I find some new ones with their unusual size.


Bumper cleaned and painted on other side, wax sprayed. Also removed my 73 valance to build some plate under the grille. As it was looking less than the now good looking 71, gave it a cleaning massage and sprayed it here and there.


Also nice, my oldest daughter got a very large smile on her face when I asked her to move the car out of the garage for me. Priceless :)

Next weekend, probably some welding on the todo unless my engine gaskets set arrives. To be continued...

 
Your work is exemplary. Cant wait to see the car all buttoned up and finished
Thank you @pegleg, unfortunately due to a massive lack of space (and time), its gonna take a looooong while.

For now enjoying getting sun burns while sanding :)
Fabrice,

I just went back and read all the posts from the beginning. Amazing work. You have taken the definition of a "nut and bolt restoration" to a new level. Your attention to detail and the patience you have with the restoration of each part is unbelievable!

I look forward to seeing what you plan to do on the car....

 
Your work is exemplary. Cant wait to see the car all buttoned up and finished
Thank you @pegleg, unfortunately due to a massive lack of space (and time), its gonna take a looooong while.

For now enjoying getting sun burns while sanding :)
Yeah i know what you mean. I am past 2 years now and probably half way. Space and time arent the issue for me. Its hard cash holding me back plus the regular 3 week wait for parts with every order

 
Great work as usual

If I had your patience I would probably be only 20% done by now

So far nearly 2 years into mine and hoping it will be on the road after xmas, about the time I should be getting sunburn!

 
Great work as usual

If I had your patience I would probably be only 20% done by now

So far nearly 2 years into mine and hoping it will be on the road after xmas, about the time I should be getting sunburn!
Totally, if the 71 was the only focus, at this pace I'd be done when i'm nearly 150 years old :)

For now the 73 gets most of my available time (and space). Once back on the road, the 71 will take the premium space in garage and have the focus. I then should be able to progress much faster. Having all these time consuming parts done will allow me to put it back together so it can move on its own much faster. Not to mention, that restoring these parts on my own is a very effective way to reduce costs. Allowing Piggy meanwhile to recover a bit so it can regain enough fat when I'll need to order expensive parts like brakes, EFI etc...

 
Weather is still great, mustang weekend again!

Did little on the 71 in past 2 weeks, tho, spent hours on it to get few little things done...

Like access all the rusty bolts and nuts and retainers for the fenders and bath them in penetrating oil

to get them loose without too much efforts next time. Sorts some parts, cry by looking at others..


Or loose 2 hours to remove the brake booster, as the bolts were rusty as hell, and of course the more rusty ones were the 2 top ones where you can barely see or put a descent wrench. Not to mention this forced gym session was done with almost 104F outside (38 c) , to finally discover its toasted or better said bathed in brake fluid... Found one and a new MC on the carid site (same offer as on E-bay). Found out they have this 50 extra for recycling the old one, great, but not very helpful or fair from a european perpective... Anyway, these babies should fly to my place very soon, so I can give them the same finish as on the other accessories. Also payed a visite to my fav "brake lines" tailor. He showed me his new machine for stainless steel brake lines... (shut up and take my money!)


So as I had stuffs to do on the 73, but want to do at least a few bits every time I can on the 71, removed the rusty hoodlocks (or whatever these called), few other rusty brackets... These have to be done at some point anyway, and I can't handle big items right now for the 71.


As my t-bird needed go to the annual tech control, gave it some love (and fresh oil too) . Costed me plenty Mustang time, but the 25 year old lady passed yesterday once more without even a detail noted. Next weekend need do my wife car as well :(


While I work during the week, my chemical friends are working too. I feed them the ugly stuff I collect during weekends and here is what they did for me on bumper, hoodlock hardware, lights fasteners, brake booster nuts...

May sound crazy when you can buy these at your local store, but If you live on this side of the pool, specific to 7173 new ones arrive here like if made of silver. So what's good after de-rust/clean up gets reused, if not, new ones are ordered. I takes just a few moments to brush/clean them from one bath to the other over the week. So its now part of my mustang todo and its a very effective way to save budget for bigger or must have parts. You'd be amazed what 50 cents worth of cleaning vinegar can do for you.

After 4 weeks waiting, my full gasket set for the 429 finally arrived, but before I can focus on the engine next time,

I needed do something that bugged me for years. Even more lately as I saw @robSweden and others who did the conversion bumper for the 73 as I did.

Many times the "plate" subjet came on. So before do anything else, I wanted to do this plate.

Its not the right place to post, but didn't want to start another thread for it. So here it is!

Just to explain the prob: on a 73, if you remove the huge bumper that I dislike a lot on a coupe, you end up with a space between the bumper and the grille, that let you see underneath, the valance lights at certain angles. 71/72 grille have an extra "L" of plastic that prevent this but going "into" the bumper. Its annoying and for a reason I forgot, when I did the swap decades ago, I did not do that plate and regretted that for years. Always annoyed by this gap.. NO MORE!


So started this week by removing the bumper (and zink/paint its backside while at it) and took some measurements, scratched my head a few times, made some cardboard to define the folding angle and went to my fav local truck shop. Came back home with enough to keep me busy this weekend..


2 folded plates of 2mm thick, 720mm long. I requested 2 instead of a longer single once, because at the center, you have 3 angles at play, and you have no benefit to have one piece. You would have to cut anyway.


Based on my template, I've started to cut/round the sides, so they meet the bumper shape and rivetted the 2 sides together...


After lots of fitment tests, finally settled on a shape for the brackets. The idea is to not touch the grille, have something lightweight but strong reusing the main bumpr support bolts and in the end get something you don't see, unless you know there should be a gap...

So cut my 2 brackets and did my best to have them with matching angles and riveted them (reminded me once more that I need buy/learn alumimium welding)


Few moments later, the new plate was primed and painted. Sun was up and hot, so all dried pretty fast.


After all these efforts, I finally got that plate that you don't want to see but always see its missing when its not there :)

To be continued...

 
very nice build. Also instead of aluminum welding you can use 3m 8115 Panel Bonding adhesive. The stuff is super strong. Its what im using to bond my 2 pieces together with the top plate. Love the stuff for things like that. The gun is expensive but i have fond many uses

 
Last edited by a moderator:
thanks @JRANGER

Yes, I know you can glue, its just I want make parts (and one day my grille) in aluminum, I just like this metal and I postpone for ages to actually try. My Mig should allow me to do this without much effort (wire/gas change) and may be later on a TIG if I manage to do ok with the MIG. For now, the rivets are fine, and it feel very strong. It not going anywhere for sure.

Anyway, was weekend again, received my gasket set, soooo

I should have the engine closed by the end of the weekend... right?

Turned out differently as I got some issues. Me being a total noob regarding 429 and my last rebuild, a 302, was at least a decade ago...

Posted here some of my issues and got help from our forum heros...

https://www.7173mustangs.com/showthread.php?tid=32485

So aside the probs I've encountered, mostly because I don't have any clue about this engine, and even more as I have just buckets of dirty bolts and parts supposed to be a 429 to guide me... I was able to make some progress in the end.


As there were 2 pumps and I knew one was new (almost), checked both for clearance and also I needed check the clearance for the custom oil pan baffle . All fine, the high volume pump went in clean, checked and with new gaskets.


The new bolts I've found to replace the missing ones in the middle were torqued and all others checked again.

The timing chain is also back on (see thread above) and the problem of lobe alignment fixed.

Lost hours on this.. but its finally spot on.

I was out of gasket paste/sealant to install the front cover and water pump, so will do this next week...


No dirty "de-rusting" pict to show this week, just a result! :)

These were ugly, dirty, corroded and no way I would have used them as they were.

So clean, oiled and even painted. Threads in blocks tested till all would rotate like butter, they were ready to hold the heads once again.


Last inspeaction cleaning/degreasing, heads went on. The 140 fp of torque required for these babies will surely be reminded tomorow :)

I was also happy to see that the 2k paint I've used is very strong, no to almost zero damage from the torque session.


Cleaned/tested all threads for the exhaust bolts so they are super easy to engage and turn smooth all the way in. I know I will value this a LOT when the time will come to install the headers with limited space...

Its lots of work on details, but it pays off, when all is clean, all fits so nicely. One could think its a new engine :)

Next time, I should have it all closed. If anyone knows if the pan should be placed back as last or before the chain cover to have the best leak free results at the front and rear gaskets, let me know...

For now, tired and happy, I call it a day :)

 
I installed the timing cover first then the pan but I think it can be done either way. 

Also if you are using an aftermarket double roller timing chain you will not be able to use the factory oil slinger.

Great job on the build.

 
I installed the timing cover first then the pan but I think it can be done either way.   

Also if you are using an aftermarket double roller timing chain you will not be able to use the factory oil slinger.

Great job on the build.
thx, I think I will do the pan last..

I haven't seen that oil slinger, it's supposed to be some ring in front of lower gear right? I guess it was removed before, as there was a double roller chain already on it.

Glad I miss a part that I don't need for once :)

 
On the menu today: the engine

First on the todo, set back the restored front cover and the pump..

Got a few questions...


Started by the usual ritual: de-rusting, clean up, paint, grease session and prep a blanc assembly.

Saw while placing a new bearing (was bichy) on the cover that I was missing a spacer, so clean/de-rusted it as well and its now with its key under a nice coat of lube so the damper will glide on it easy later on..


As the old plate was corroded, I've ordered a while back a new plate. Whoohoo not rust for a change! :)

I wonder why there is no 2 gaskets in the full set I got from Felpro?

Is this pump + plate not ment to have a gasket on both sides? I'm surprise FelPro did not set a pair in the kit. Without one extra the plate would need to receive loads of paste to act as one...


Unlike most parts, seems that 429 water pump gaskets are growing in my garage! Got 4 extra of these!

So if it needs be 2 (if any one knows) I'm loaded!


Blanc assembly to see if I have all and make a war plan to prevent end up with a gasket paste mess. The restored harware fits all nicely but there is one guy missing.

Its at the hole where the pump and plate fit on a pin. The pin is visible from the outside. Is it some kind of inspection hole? What is the expected bolt to go there, just a shorter bolt? Is it holding a bracket or something? If anyone has a pict or knows...


Needed find answers first. So started to cook the hardware for the next patient: the intake that I should place back may be tomorow too.

These are the only candidates i could find that matched what I see on the intake and the block. I'll see tomorrow.

My big bucket of unknown hardware is now a much smaller one, and its almost empty. Yeah!

If anyone knows about the missing bolt and if I need 1 or 2 gaskets...

 
Back
Top