Fabrice's 429CJ 71 project

7173Mustangs.com

Help Support 7173Mustangs.com:

This site may earn a commission from merchant affiliate links, including eBay, Amazon, and others.
Weekend!!

And what normal people do on weekend???

I really don't know!

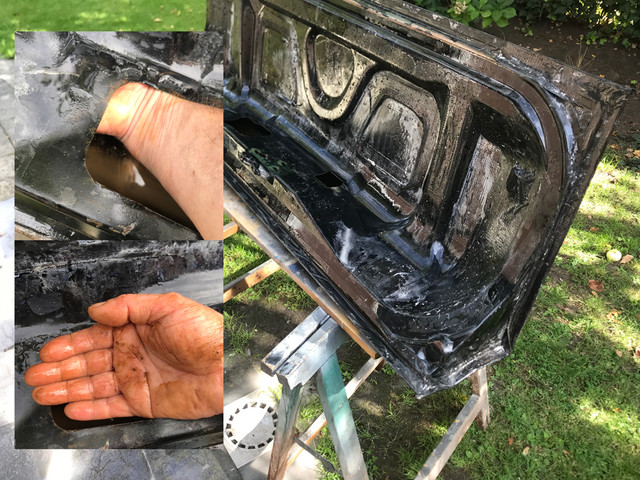
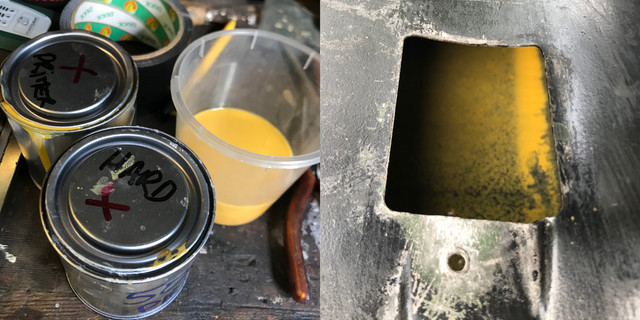
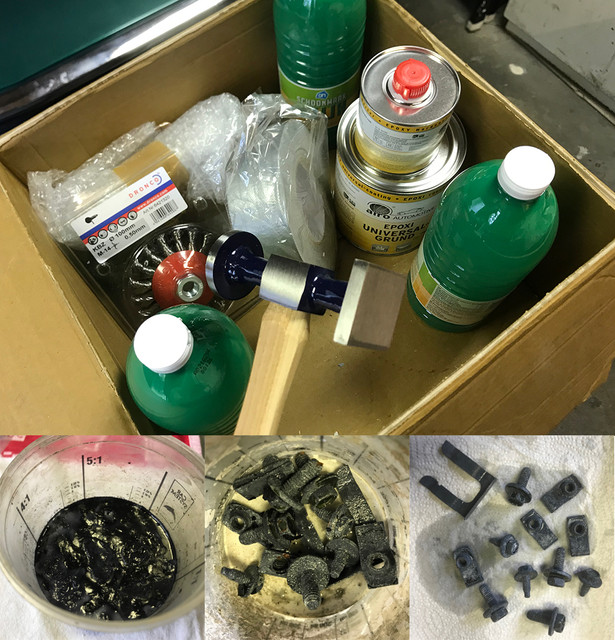
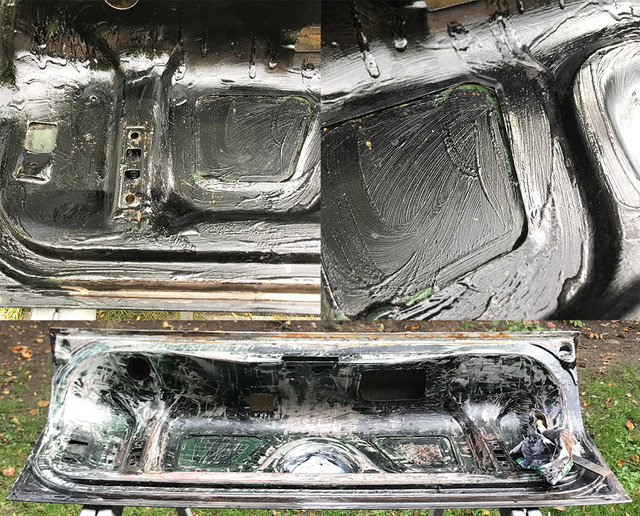
On my part I went check my week's brew!


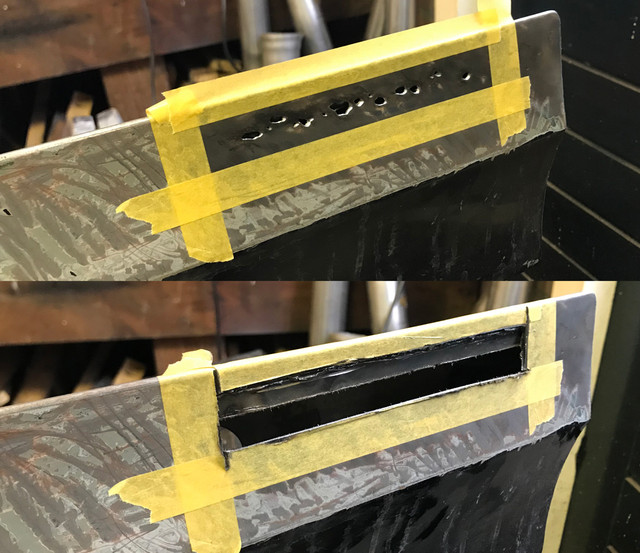
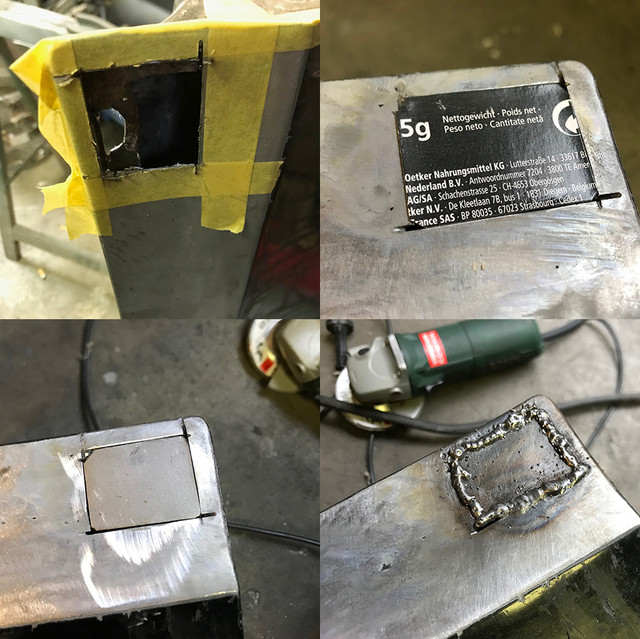
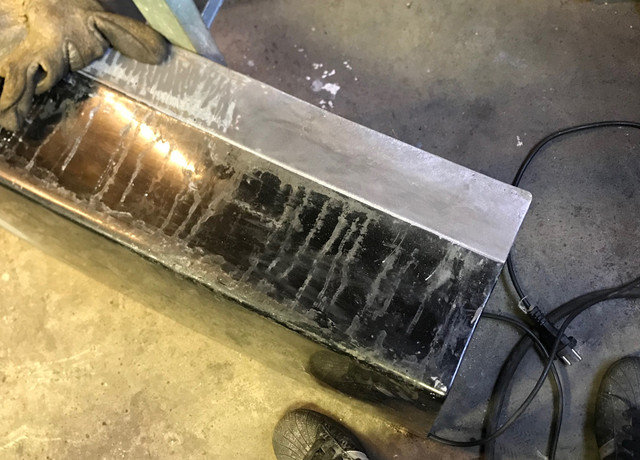
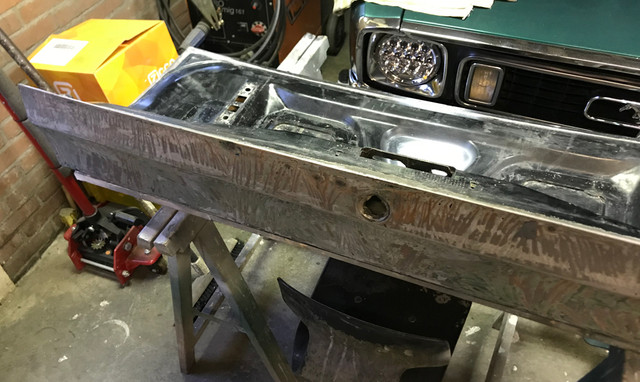
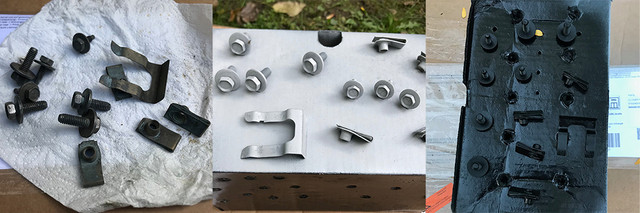
As I got lots of empty holes supposed to hold something, did a selection from my rusty spares last week on block, accessories etc...

Let them cook and as the nasty layer above suggest: they were ready! :)


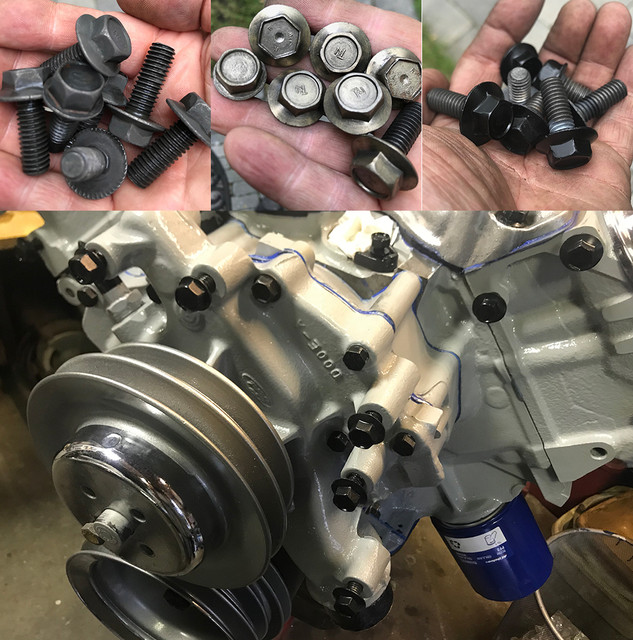
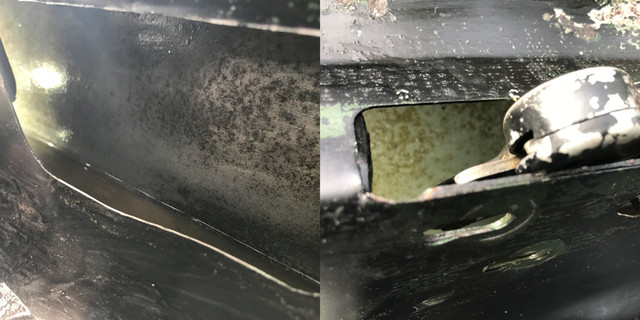
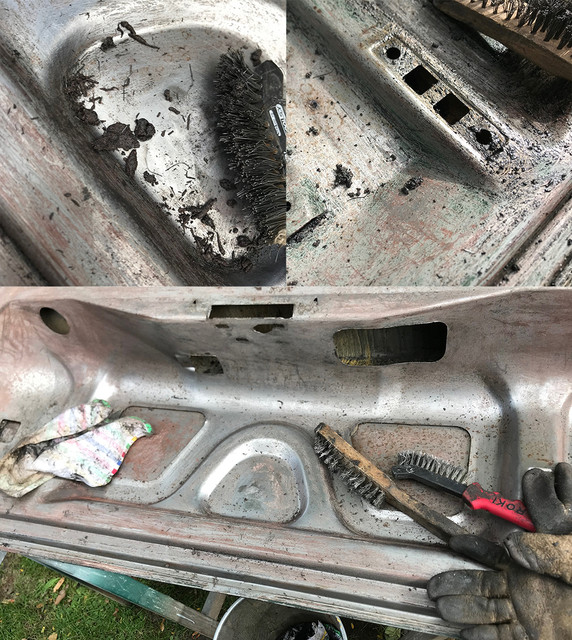
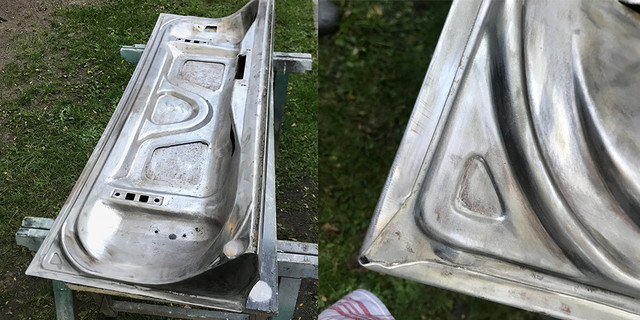
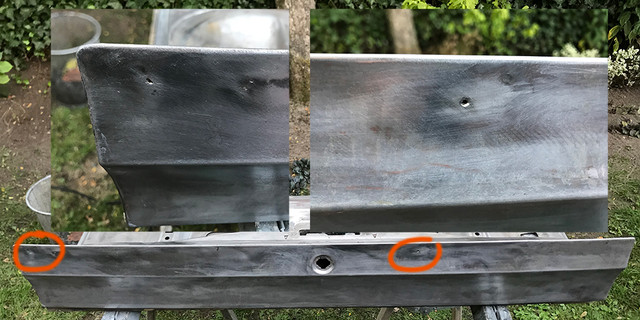
Here some details of the rusty bolts out of bath, cleaned and prep. Finally got most holes used.

Some come from my 73 and some from god knows where. But these are all original Mustang bolts that I've kept over the years.

It's been said a few times: do not throw anything away, even if that looks bad!

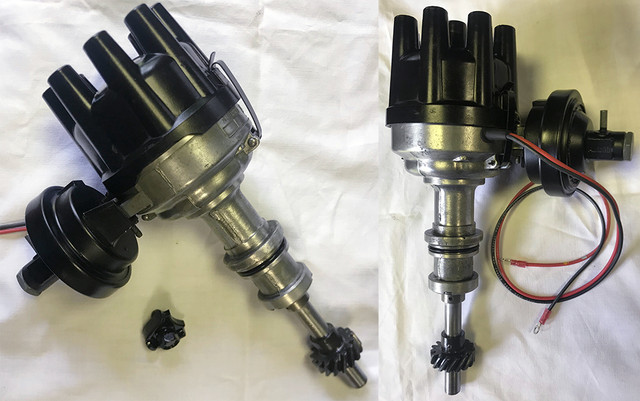
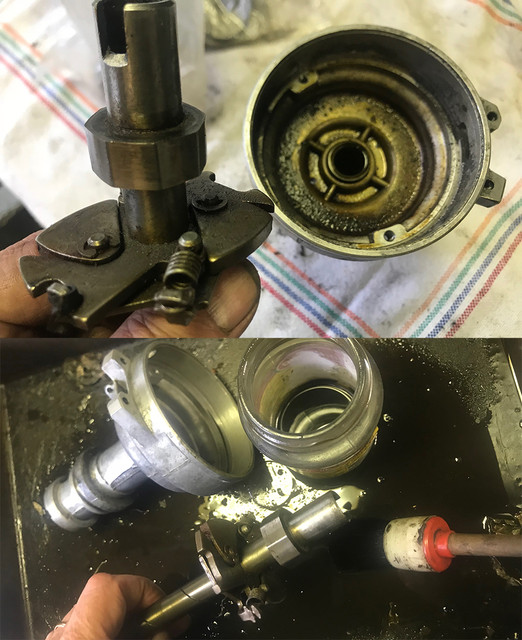
And then moved on to the next candidate in line: the distributor.


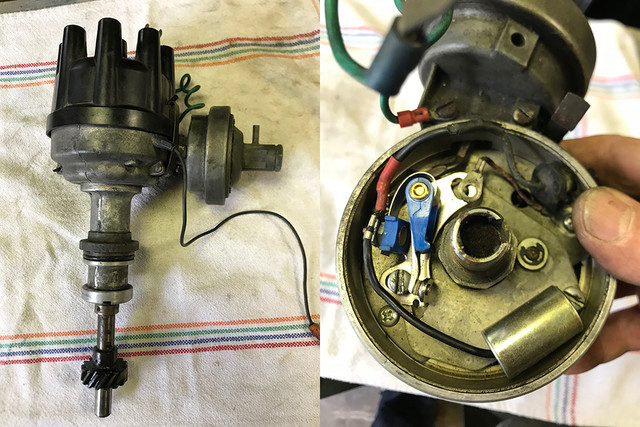
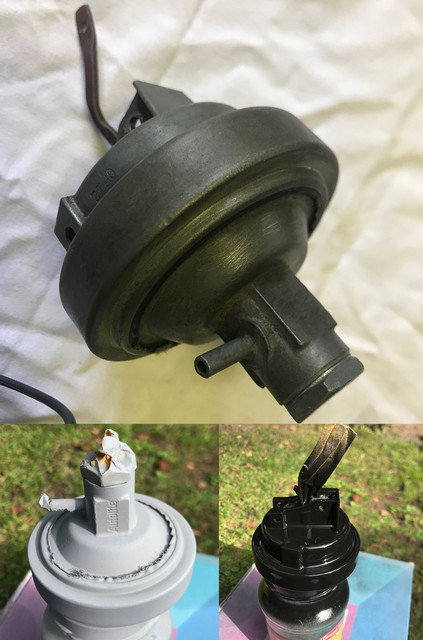
Thanks to Steve, aka @secluff. He searched (and of course he found) that the serial that I've provided him, was a match for the expected original distributor for the car. A 71 dual vac Autolite. I'm actually after making it a single for my EFI needs but for now, the goal is to see/inspect if this baby is worth keeping/restorating or if i should look at a replacement. Ranging from 80-250 for an average mechanical single vac diaphragm in the states, I would then be at my door for at least the double. The rotor and cap, while "ok", will be replaced if I keep it. So its worth looking at this survivor that was kept with the car parts while replaced on the car by some early 90's "electronic" dist that I do not trust for a second with a weird MSD box that is having modified electrics...

The only way to know is to open and inspect it, from gear to bearing, plates, weights etc..


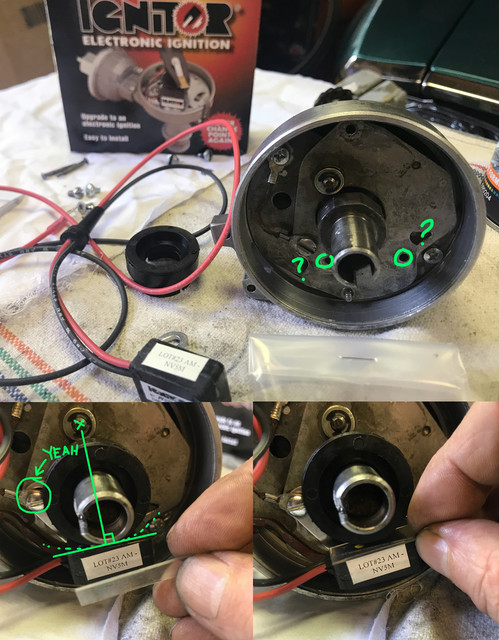
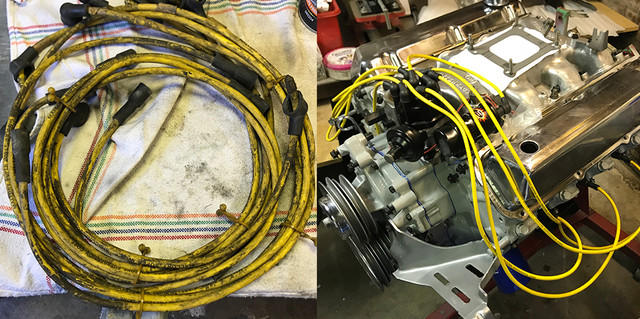
As I have a new Pertronix waiting for a dist. The points, wires, condensator were removed and will not come back.

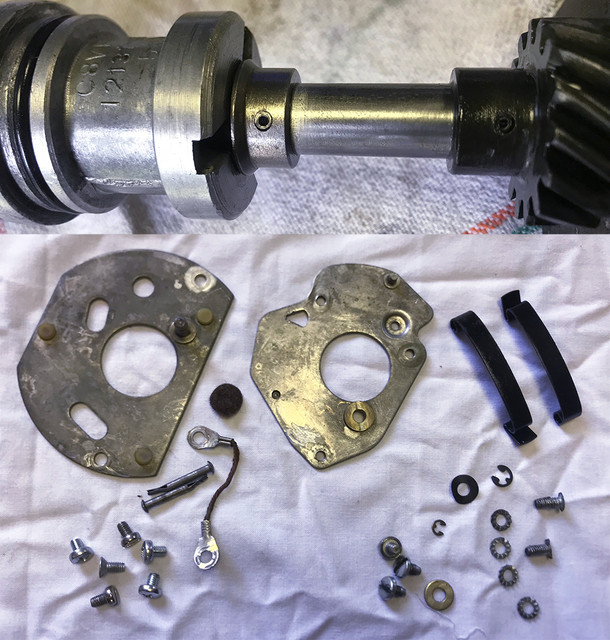
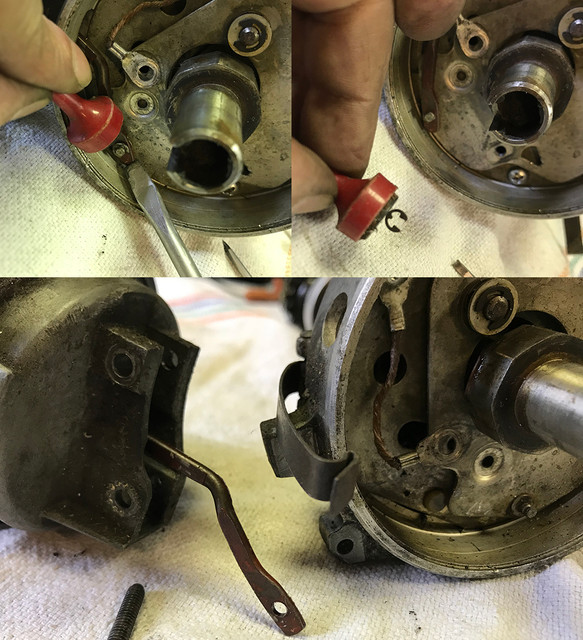
Once out it was time to disconnect the dual vacuum advance by loosing the tiny ear washers. I've used a magnet as they are very small and I was really not planning to go search for them somewhere on the floor.


Same treatment for the plate bellow, this plate has 3 pressure points so it can move/rotate with practically no friction.

So far, no play, no damage or excessive corrosion. Lots of dirt.


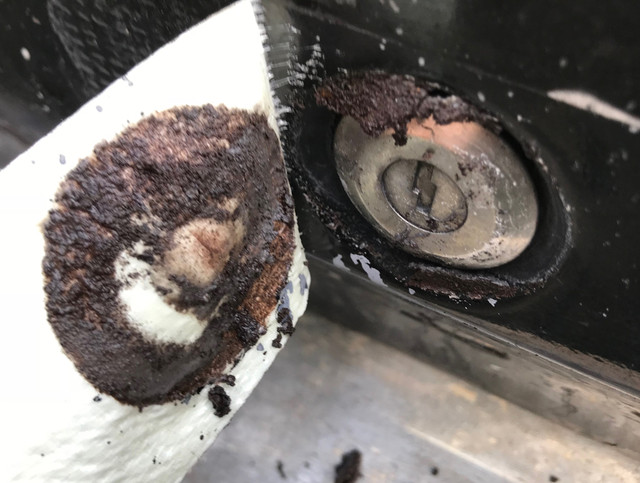
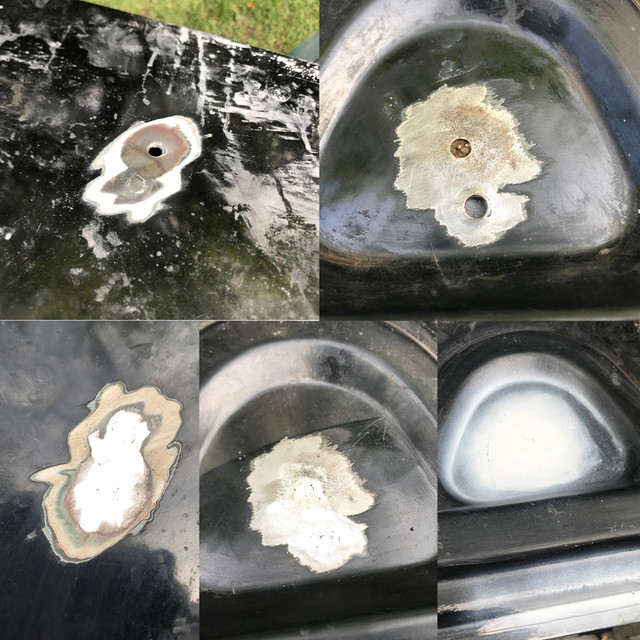
As all was looking good, quickly degreased and dipped the cap locks while busy on the first problem.

Someone at some point installed soft metal screws and did not bother oil them... decades later, no way to get them loose.

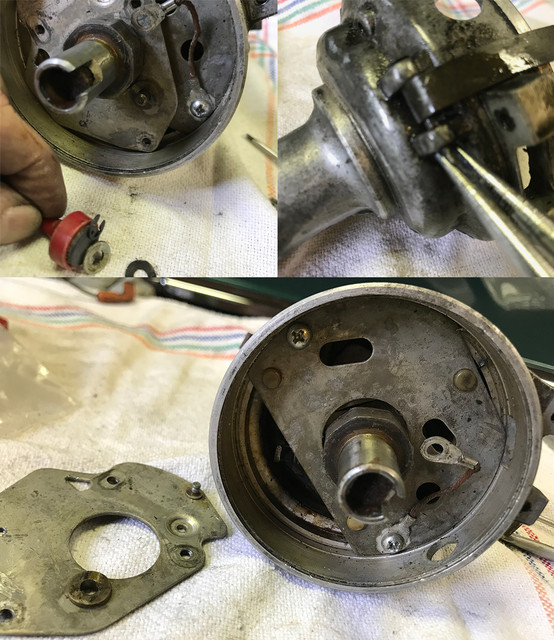
The heads totally gone no matter how good the screwdriver fits. I went to plan B and Mr Dremel entered the game.


4 tiny discs later, I won! Plate out I could inspect the weights. All ok. So I could consider remove the shaft.


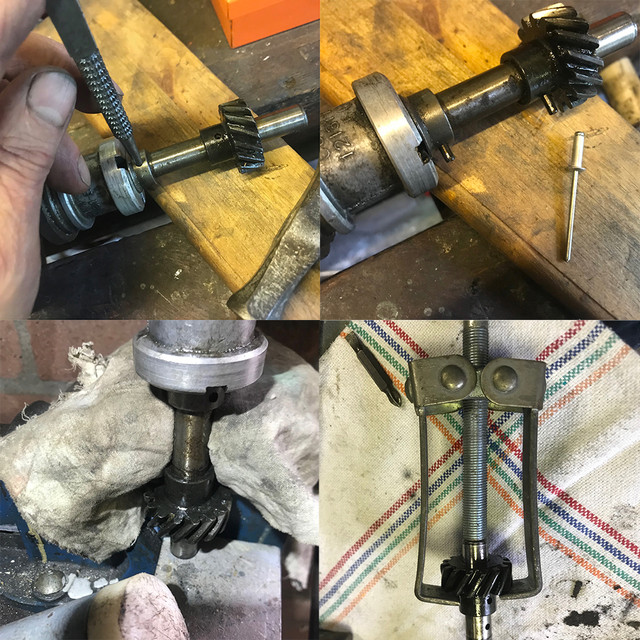
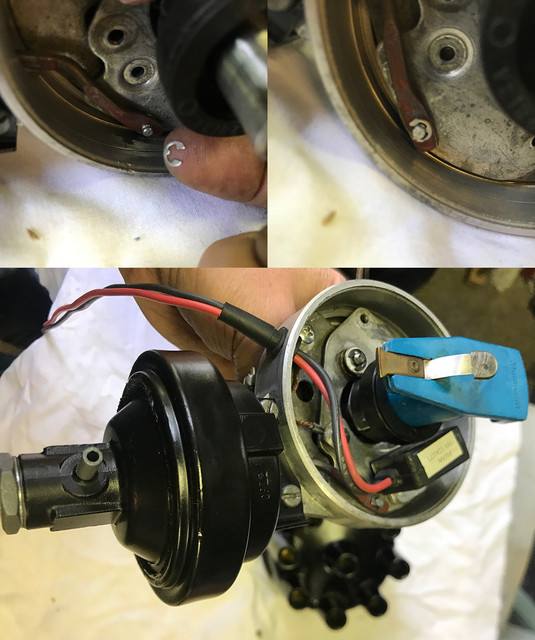
To remove the shaft, you need to gently hammer out the retainers/pins. They go straight from one side to this other.

Too tiny to be pushed out for my tools, found out that an unused rivet does the trick perfectly. Slightly smaller than the pins themselves and strong enough to take the punches. The gear, very dirty but looking fine, needed be helped to get started. Once it moved a bit, finished the job with a lightweight 2 arms puller. Not much force required, but you would not be able to pull it with bare hands. Unlike the examples of autolite shafts I saw before, this one isn't having the same diameter and its slightly larger where the gear is...


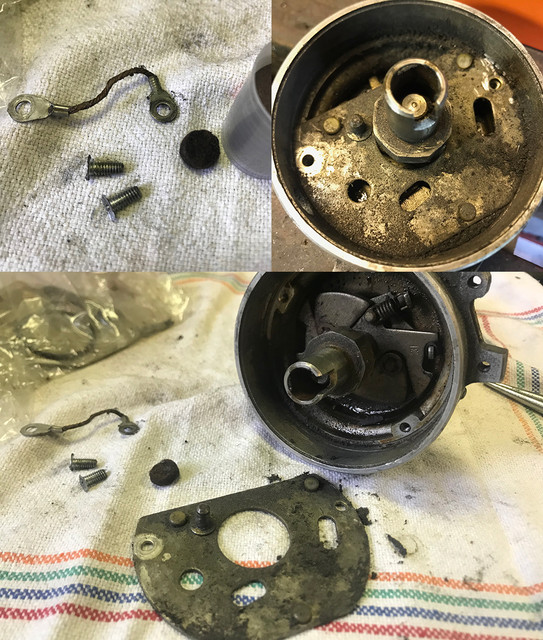
Now that the entire dist was in parts, it was cleaning time....


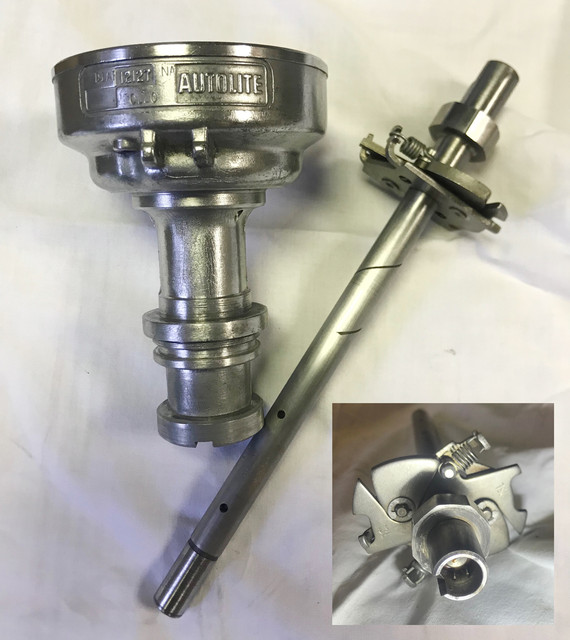
Lots of cleaning, degreasing, polishing, sanding, cleaning, polishing further.

Thats how the ins and out started to look like: bling bling! :)


My full engine gasket set having a new o-ring for it. I've installed it and started to assemble the shaft back.

All in assembly lub and brushed with fine oil before being put back together, I got the shaft almost back in.

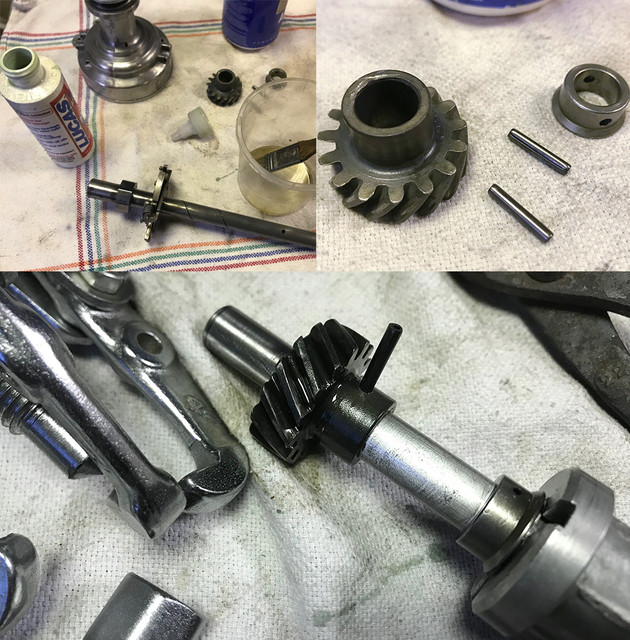
The ring and the top pin went back first and tried set back the gear, but forgot check alignment first.

Because they drillthe hole a tiny bit off center, there is a 50% chance you need to rotate the gear.

I've lost :)

So re-puller, turn 180 deg, re-press in, almost but no quite aligned yet..

Too dark to see the tiny bits of metal and starving, I called it a day...

I'll finish this tomorow...

 
Last edited by a moderator:
The day started with this pin refusing to align...


Removed one more time the gear and measured. This time with good daylight, the aligment was easy and the pin was pushed back in few gentle punches.

The plates and hardware clean, I was ready to put these back.

I did not push to polish the plates as nobody sees them, The partial remains of phosphate and a thin layer of white grease will do the job.

As a side note, the little foam demper that comes under the rotor was cleaned in soap and smells lavender :)


In between, went busy with the vac unit, and by the lack of hand vacuum pump, sucked on it like crazy, and could see it was holding the arm if I would press it back in and keep the nipples closed. So after a good cleaning, without solvants as I didn't want to damage the membrane. Masked and painted it.


The plate with the 3 plastic guides nicely gliding on top of each other, the next on the todo was to install the Pertronix.

Placed it on and got swet on my for head! Sh...!!, got the wrong one!

Used to my other unit for my Mallory dist, I forgot that on the 73, the rotating plate is circular and center onto the shaft, on this Autolite, it's rotating from an arbitrary axis. So the two possible screw locations where a no go. Once rotating with the plate, the unit was in contact with the magnets or way too far.

The remarquable nonexistent doc that Pertronix provides with the unit not really helping, I've asked a couple of my best neurones to figure that one out and happilly they did it!

I needed to use the same screw as the ground wire.

Down right on the pict, a bit later (once the vac arm was placed back first ), setting up the unit is a piece of cake (hence the lack of doc). Place the plastic plate that they provide in between magnet and unit, turn screw: done.

Some go for P2, P3... I have this extremely simple and reliable P1 unit for 3 decades and working like a charm in combo with my EFI. As they say you do not change a winning team, so I did just that.


I have not made picts for everything, let just say some parts are just increddibly small and a real pita to be set back.

Meanwhile the pin and locks on the side, the vac unit were back together with the "to_be_soon_replaced" cap and rotor (but clean for the sake of being here)


TADAAAAA!

The old little guy looks like new, if not better. It rotates like butter and should be perfectly ok for a long while again.


Installed it and obviously the engine wanted to say thx as the gear and oil pump shaft went straight in rotor pointing at cyl#1 on first try! :)

Placed back the newly restored coil bracket and the new coil to see the combo. Not sure that's the ideal location...


And then open another box and found this really dirty set of wires. First thought was to disregard but by looking closer I saw it was a perfect set of Mallory wires and even recall I've actually ordered them for my friend. The car ran only few miles with these on. One can wonder how they ended up that dirty...

Totally high from the thinner, I got them like if out the box and then spend a while to have them match their length to the firing order on the cap.

They were not cut as I would have wanted them to be and I need to some holders, (I like 4x4 paralel wires from cap), but for the price they'll do perfectly fine!

To be continued...

 
Last edited by a moderator:
I'm in the loop Fabrice ;)

Still French plate on that car?

(For the short story, I met Fabrice while I was driving back home from North of Holland).

 
@Vinnie, You're right, I did not, I feel bad about it! :)

@Manu, No dutch plates = no money to dutch gov. So for now, it stays french!

@PegLeg Thanks.

Weekend yeah! And today being my birthday,

I've decided to "cook" something else than the usual nuts and bolts... tho I did some too :)


Tired of hitting my head on the deck lid while busy inspecting and cleaning the rusty mess to see what's really needs to be done in there. (Still looking everywhere for a way to get a floorpan here without paying a golden shipping)

I decided to try something that if turns ok, could be repeated for the hood and may be the doors: If I can de-rust bolts and nuts, I could try that as well on the inside of the deck lid.

There are holes, yes, but I have Duck tape!!

(note the hole taped in the middle of the deck, where someone in the 80's added an extra antenna for I think a car phone)


A taping session after a good degreasing so surface would be waterproof as possible, I've injected a nasty sauce of dissolver and vinegar in there.

And then it was shaking, shaking and shaking..

One of the moments you enjoy to have a garden with some privacy!

I can tell you deck lids were not designed to be shaken and you look really stupid while doing it! :)

As I kept one hole open to see what was going on, I was happy to see that the mix after a few sessions started to have the expected effect.

On the left, this is the orange rust (rough to the touch) before I've started, and on the right side, tho from another hole but with same level of corrosion, I was able to see healthy metal (soft to the touch). The picture doesn't have the focus right and the color is mainly due to the liquid almost saturated, but its the metal!

All these shakings were not in vain! (and I might even have lost some weight too!)

Its still busy... tomorrow I'll power wash it as much as I can access inside and will probably refill for a few days if its not enough "cooked". But I'm already very happy to see its doable. That's a very good news for my hood also full of the same crap. I'm already wondering how I will manage to shake that hood properly.


I've been busy in the trunk area mainly because this baby that came this week, so of course I wanted to see how matching it is. Aside a small dent it should do just fine. The metal is only less thick for the lights supports but the rest looks pretty ok and is a nice rep of the original shape, as far as you can tell by placing it above the old rusty one.

The small dent, even if small should not be on it. especially when you see how over protected the piece was in the box. You know it was packaged with the dent. No biggy as it is a small repair and it will be behind the honeycomb and its affordable, but still: It should not be there!

What is really surprising and why I'm not pissed at the small dent is that this enormous package, from JEGS via e-bay was delivered all inclusive for just 50 above the price, while I got last week a few grams, not even a handful of extensions nuts/fasteners from CJP for a whooping 110 euros instead of 36 dollars. Somehow say 300 grams of nuts cost way more than a huge heavy massive box. Go figure...

Unfortunately, I haven't seen a rep of the floor pan offered by JEGS on e-bay :(


In between shaking session, I did some dusting on my practically rust free trunk floor, removed extensions, took pictures, some measurements for later, labeled and packed removed parts.


I've let it on for now, as its stainless, but how do you remove this ring around the cylinder? I tried from the inside, but obviously I need to do something else as I could not remove the lock mechanism either. I did this long ago once on my 73, but could not recall how. Tips/hints welcome.

Tomorrow's gonna be a wet mess, I know it already!

 
Last edited by a moderator:
You have to reach in through the hole in the lid and pull out the retainer clip.


You really can't take the trim ring off, it's crimped onto the body of the latch.

 
Last edited by a moderator:
Happy birthday! Mine was Thursday! :)

I’m very curious to read about your rust removal procedure on the deck lid and hood. After trying your “cooking” on my own screws I’ve already been thinking about creating a vinegar swimming pool for my own rusty nasa hood.

Did you rinse with soap waterafterwards?

 
I knew I will be doing dirty stuff whole afternoon, so started first with clean stuff as another detail came this week,


The one I was having, in aluminium and chromed, was too ugly and corroded to be restored.

And since this baby was the last one for this E-bay price... sold!

Its nice to place new stuffs without doing a thing for a change! :)

And then was time for the dirty stuff...

I've left the sauce whole night and because the shape is a L, I've turned it about every hour or so till I closed my eyes yesterday.


So this morning started with spooling, with loads of clean water, the crap kept coming out.

As I couldnt shake it while sleeping, the liquid did not stay most of the night on the front most surface, and there was still bits of rust, tho it was so disolved, just touching it was removing it.


So rinced one more time and get on step 2. Here after a fair amount of clear water and a tad of kitchen soap.


It was also time to remove the latch mechanism that I've let in yesterday. You can see the kind of crap that came out.

Here just on the duck tape, but the muddy rust came out from everywhere while I've rinced with water.


Time for step 2: because the surface is then clear of acid and raw metal fairly exposed and degreased, there is chance of flash rust, so next was to add a big glass of pure disolver, no vinegar. Reclosed the openings, with tape and shake again to distribute the liquid everywhere inside and went back to other stuffs in between.

This product evaporates slowly after its done leaving a protective layer deep into the metal.

Of course it would take ages before its gone as its a closed shape. So once I was happy, when the rag wasn't showing any rust anymore, I've helped the process with a heat gun.

On this pict, its clear that grey is the new orange :) The crap trapped inside for decades, the rust, everything is gone!


Even if the product is supposed to leave a protective layer behind. I've prepped a bottom the raw metal primer to close metal pores, used according my paint guy on heavy duty trucks. So poured it in and one last shaking.

10 minutes later, the inside is now not only rust free, its also protected.

I was out of epoxy primer so I did not start prep the outside, it was too late anyway and as I needed to do some welding, it was no problem. I'll spray some inside next time and probably some wax after that too.


So there was this hole made for an ancient tech, even two, one hole strangely off center.

Welded both sides taking my time, with a wet rag so the deck lid would not warp. Finished with a quick and dirty primer to protect till I'll do the visible part of the deck lid.


In between shakes and prep steps, I also installed a new 4.4cm led for the dome light in my 73.

I don't know if I'm the only one, but this is I think my third light lense that went south with a hole, not to mention the base that was also replaced once totally distorded, caused by the heat of the incandecent long bulb. Tired of it, ordered a new lense and a set of 4 leds in China, payed 5 euros and forgot about it. It took I think almost 7 months for them to arrive. You really don't want to be in a hurry when you order there...

I would have expected a more yellow light, but one thing is sure, I'll be able to read in the car :)

I've let the door open with light on for a while and could not really feel heat, it wasn't cold, but nowhere near the heat that the original bulb was producing. So I think that was the last time I had to replace a lens with a burned hole in it.


And then of course, did that poor thing. The pig who painted the car long ago, did not remove or masked the latch mechanism (or anything), so gave it bits of love and massaged it in white grease. The retainer that was bits corroded is taking a bath and I'll paint it somewhere this week and then they'll land in a plastic bag waiting for the day I will put them back on a shiny painted deck lid.

All with all, it was another productive & dirty weekend. But rust is gone, yeah!

@Vinnie HB to you too with delay!

I think you got you answer! You gotta shake it! That's all! :)

Seriously, Its really messy but now I know i'll do the hood very soon before the cold days and may be the doors too. Well worth it and even a must as I don't think it could stay much longer as is.

 
Last edited by a moderator:
got epoxy primer,

got vinegar for the hood, Duck tape

got a new hammer.

So started with the usual de-rust ritual with the deck lid hardware.


Got new weapons: Lets remove the paint on the deck lid and lets prime it!

NOT!


All rust treated last weekend is gone but when I've let the wire wheel speak on the lips found out some sealer was applied on ancient holes and underneath some bad news :(


Ok then, lets cut the desease out, treat the metal, add some fresh metal.

Kinda bitchy to weld as metal was around the latch area very thin and had to cut/replace more.

but eventually: Done!


Nope :(

As it started to rain when repair was just finished, went in inside and started to burn/remove the old paint out to discover more bad news!

I guess I know what I'll be doing tomorrow, not at all what I was planning to do... but hey, that's part of the game!

 
Weather was miserable today...

So needed work inside, as I have limited space, all takes ages to free enough to work a bit properly..


I was able to see bits inside and saw where the corrosion (now stopped) had affected the metal

So defined a region around the holes and cut it out. Turned out later on, I would regret to not remove more..


A quick look inside, as I could not see inside nor access that far with my hand to feel.

There too, no more rust!


One thing I've learned to not spend ages making a patch that matches, is to use a piece of cardboard and draw the contours with my nails. Had a pizza in the fridge, so recycled the box and took a print.


Ported that shape onto my sheet of metal and cuted it. Of course slightly smaller than the hole, the patch felt twice inside... plan B: use the right tools! Looked for my welding magnet and it turned out really made for this job. Like yesterday, welding had to go with great caution, the metal was easy to punch thru, so set my power on the low power and wire feed slower. You don't get the best beads this way, but as long as it melts thru and make no extra holes, I'm happy with that.


All was done and was hammering a bit when I've noticed the metal that I've just grinded a bit next to the patch was feeling very very thin. Dang!

Re pizza box, re fit, re cut, re weld.

Got some ugly beads as I could not stay long and needed cool with a wet rag, went thru at least twice, but I could see on other side all was fine and thru.


After this extra work was done, I finally got my patch in place and the amateur welder in me was kinda pleased too.

I will not need tons of bondo either. But I know for sure I will inject quite a layer of protection in this lower region.


Looking at what I did this weekend, not much, I decided try more of that paint removal with heat as seen on a u tube vid... That works, doesn't make dust, all nice and true but takes ages.

I now can say that I've tried, that's about it. Tomorrow I'm gonna look for some paint removal chemicals, I don't see myself do this on a larger scale.

To be continued...

 
He's wife (or gf) eat it :p just because Fabrice is too busy with his car that he forgets to eat :D

And great work as always! keep it up!

 
Last edited by a moderator:
Weekend!


As usual gave some massage in between activities to the hardware bathed past week.


Not impressed with the heat removal last week. Bought some paint remover.

Here the first layer, it stayed 20 minutes on it and nothing much was happening, till at some point the paint started to become soft. I wasn't happy about the speed.


Not into the description of the chemical, but observed during the first coat, I've applied a second one and used a metal brush right away, all started work a lot better and the paint was rolling itself on the surface.


At some point I got all out and most my time went into removing the old rests of sealant. Not reacting same way as the paint to the chemical, had to use other tools, but eventually got to see all the metal.


So did the front part and f... !

These were not visible when I've burned/removed the paint last week, Guess I have an idea of what I'll be doing tomorrow...


The top was a pain. Needed to apply 3 times. I couldn't really get why it wasn't reacting. Till found out it had been repainted, not 1, not 2 but 3 times in green and one in black. The primers used in between layers stopped somehow the effect of the chemicals. I have now most out, but need finish it. mainly some bondo left overs in the middle around where these 2 antenna holes were made.


Because its not a Delorean and air isn't that dry, and it started to get late. I've rinced all with water, (as said on the chemicals notice) then heat gunned it dry, in and out. Hand sanded a bit more, degreased, and removed the last few bits left overs of the original red primer and sprayed a thin layer of epoxy primer on the inside. I will respray once more I have these holes done and applied some sealant. I'll also inject some inside.

It was nice to finish the day with something that was looking good for a change! If the welding goes ok, I might have a restored deck lid by tomorrow eve... we'll see.

 
Last edited by a moderator:
Back
Top