Fabrice's 429CJ 71 project

7173Mustangs.com

Help Support 7173Mustangs.com:

This site may earn a commission from merchant affiliate links, including eBay, Amazon, and others.
Point of no return reached, checked all one more time and open the "blue tube"...


War plan prepped yesterday worked!

As the metal plate needs to be sandwitched in between 2 gaskets with both silicon paste. Same on cover and block. No way I could have hold all by hand.

So I've first semi assembled the pump on the cover as I saw 3 bolts were having threads but not to the block, used the others long bolts to align the 5 elements together. In paralel, applied the cover gasket on the block. Once pump assembly was tightened just a bit, Set some paste on the block gasket and using the long bolts already inserted, the pump was installed with practically no effort and no mess! Never thought that would go so easy.


Was time for the pan gasket. Turning the engine to have a flat surface wasn't as easy as a week ago. Heads and pump now on, weight isn't the same, not to mention its also bigger, much bigger.

Cleaned/degreased pan and block where the gaskets are supposed to be. Added a coper ring to the drain plug and set back the 2 brass plugs in the block.

Worked on a blanc assembly to find out the Fel pro gaskets were not precise. Arrived at my door for $170, I'm not impressed at all by the way they are cut.

You "could" count on the force and use extra paste but as I got a leak that made me mad for years in the past, I've ensured both rubber and cork gaskets would fit the metal and in each other. Look on the down-left pict for instance. the cork is supposed to fit the rubber shape. Yeah right..


After playing surgeon with a cutter, ended up with an almost perfect fit, added of course the extra drup on both sides to compensate the pan less sharp shape.

Once install I started cut the too much of gasket but it was still soft, so will cut next week.

Unlike the hard to find or too expensive hardware, I've used a new set for the pan. Yes I do use new stuffs too! bling bling :)

The intake bolts and nuts set to cook yesterday were still not as I want them to be. Not going to rush on the last bits. So after a cleanup and brush session, they are now back into a fresh bath. Lots of gas bubbles after a few minutes, so they should be "done" in 1 or 2 days max.


The engine rotated back again, this time with some help, I couldn't resist to try and see for the first time the "big" picture...


Wow, this thing is enormous! Its really a monster. Much bigger than I could remember a 429.

Very pleased with the first impression at what once was a bunch of rusty & dirty parts in boxes and buckets.

Next week, intake and valve train back on. 7 quarts of break in oil from Millers should be added by then too.


Meanwhile if someone can id these holes for me, what they are ment for, would be very handy, as I want apply second coat of paint on the block...

Regarding H, I haven't pushed the damper back in fully (needs go +1 inch toward engine) , but is it normal that you see this spacer that much?

is there nothing around it, do i miss some casing? Will remove it again, and paint it... Thought it was not visible and lubed it, duh.

To be continued...

 
the detailed work you have put into this are just amazing. Keep up the good work. Its looking good

 
Hi Fabrice!

I can answer on some points as I got running 429. I attached a picture I found and I can take better picture when I get back home from work.

A - need to check, empty?

B - need to check, empty?

C - I got my engine ground on it

D - Altenator bolt

E - Empty

F - Empty

G - Altenator adjustment bracket/holder

H - I cannot see much space behind damper, I'll get better pic.
Thanks, 

A and B make me think there was some kind of exhaust part located there. or may be other brackets if the engine was placed in another car.... Still looking for these

C, got also ground there on my 351

D and E, yes found out they match the bracket

F will be handy to lift the engine I think, same on 4 sides.

G, yes also found out

for H, if I would virtually add +-1 extra inch toward the engine, I get same as on your pict. So really need paint it

I haven't pushed it much as I was not sure,  so I don't need a puller to extract it again.

Its weird Ford did not extend the chain cover to protect this part. Tho, its so strong, one could say it is the protection of the shaft.

Looking great Fabrice. I admire your skills
No need really, its just the vinegar and other rust killers who did the real work!

Looking good and great work as usual

I'd help with the bolt holes but it's been 30 years since I had a big block and my memory has somewhat deteriorated since then
Thx, by the look of your thread, you are not doing bad yourself! Very very nice build!

Ah yes aging is a bitch. Starting the second half, I got some misfires myself :)

 
Last week got @manu Mach 1 stopping by on his way back to France

and today @Vinnie came all the way from Amsterdam to see my rusty things.

Very nice, the hours went like if time counts double when you talk 7173 :)

thx for stopping by guys, lets do this again!

and then it was time to do some boring things..


The intake, pump brackets bolts not ready last week, spend the week cookin and they were done.

Not an hour after @Vinnie left, they were painted, and greased. Ready for the intake that should be installed tomorrow.


Another misser from last week, so damper out, paint, quick mask/paint session. Damper back in.

Even tried the restored pulley, and then realised I would need 4 bolts for it... but where are these 4 F...rz??


The gaskets from Felpro installed last week now dry, probably ment for lots of different years and variation of the 385 engine series not really fitting the contours of the installed parts. You can't paint on gaskets when they are that off sized, so I've cut all the extra material, ready for when I'll spray the second final layer of paint.


Received this week 10 liters of this hard to find running oil for our old engines in Europe, rich in zinc and many other super protective components. The people at Millers Oil, in both UK and NL were very nice, (not your average sales dudes) and they have really good stuff for our old ladies...

In case you search for it, here the breakin/running in oil that I've used from them.

https://millersoils.nl/webwinkel/cro-10w40-inloopolie-rollerbank-2/

They also offer this one, which is according to them, having similar qualities,

https://millersoils.nl/webwinkel/inloopolie-classic-pistoneeze-running-oil-30/

Except the CRO offers superior lubrification when cold and bit more thick, even at low temps as its the Netherlands and I might start it during winter...

The parts on the engine and lifters passages already massaged with Lucas assembly lube, the new lifters got their first kiss with the new cam after they've, one by one, been pumped full of oil and inspected for too sharp edges.


and then another boring session. As all the valve train is either original or has already run many years ago. Each and every parts needed be cleaned up to remove old deposits, inspected and after a bath in running oil, placed back on their final destination. Did one side, and save the other for tomorow. Tedious and dirty, but I just can't put back dirty things in there :)

@Steve, your nut lives now at cyl#4 intake, thx again! ;)

All with all, ended up doing quite lots of the "must be done" little things today.

Also started this week a few other things, but that's for another post...

 
Last edited by a moderator:
Fabrice:

Just wanted to drop you a note that I love your weekend updates and how lovingly you document all of your fine work. Please continue; I will miss these updates tremendously once all is done and the car is completed.

Thanks again.

Mid.

 
Fabrice, Great to hear that my nut...errrr Hardware is working fine on your engine!! :whistling:

All of us understand , but I sure would like to see the look on peoples face when you tell them you are cooking nuts, bolts and hardware! Something you already know, if you had to purchase all new hardware for you engine, you would have to work the rest of your life! Good thing you know how to cook "Hardware"!

I really miss Pastel Blue's updates on his 71 J code vert we used to get weekly. But now we have you!!

Am working on some numbers and parts for your distributor, will let you know soon!

Everything looks great as usual Fabrice! ::thumb::

 
Who is this “Winnie”? ;-)

Thanks for showing me around and giving me lots of tips and ideas yesterday! I don’t often have a chance to see engines out of cars, not to mention a 429 block.

Your passion for the 7123 is very inspiring, now I can’t wait to rebuild my own engine :)

Cheers Fab!

 
Who is this “Winnie”? ;-)
Great to hear that my nut...errrr Hardware is working fine on your engine!! :whistling: 
Hahaha, sorry guys, I swear I did not drink a drup, @W... @Vinnie is my witness!. I should not write anything when I'm tired! :)

Fabrice:

Just wanted to drop you a note that I love your weekend updates and how lovingly you document all of your fine work.  Please continue; I will miss these updates tremendously once all is done and the car is completed.

Thanks again.

Mid.
Thx Randy, glad you enjoy this serie B like I do enjoy making it :)

Its a bit like in these bad series, where nothing much happend, yet you look at them and the show fills one hour!

Hope you can wait till I enter the electrics chapter!


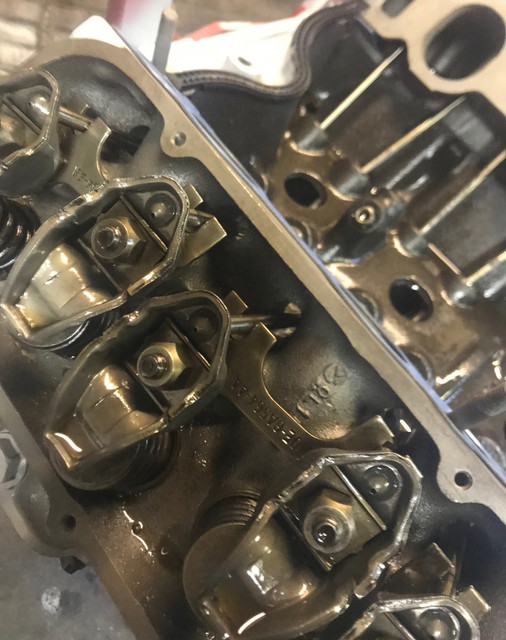
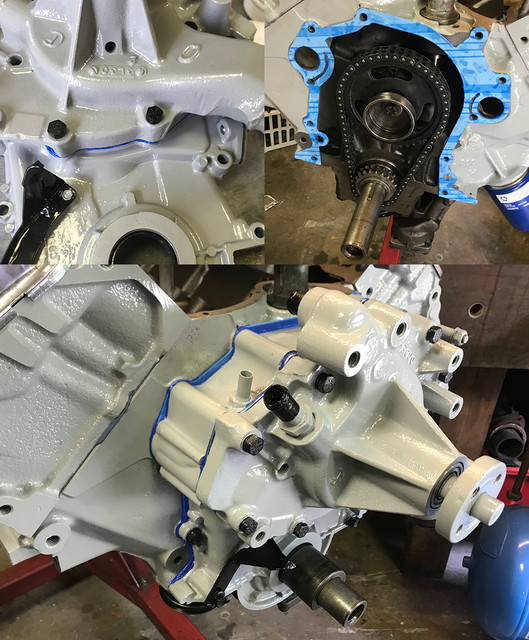
The day started with finishing the boring clean ups and installs of the rockers, pushrods... of the other side

Here a nice close up at these US made quality parts in fine oil.

They weight a ton and have stupid corners in their shape where deposits are hard to get out..

but they surely show off that in 71, the stuffs Ford was making was no mickey mouse stuff like you see today.


Let's add a tad of drama to this sunday episode...

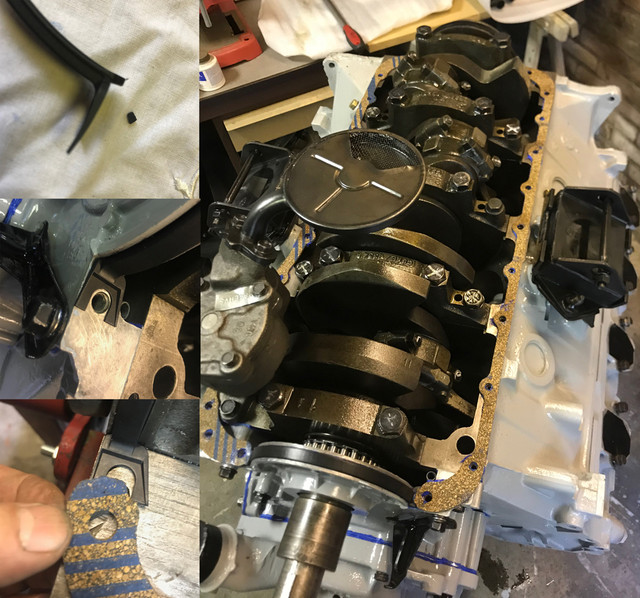
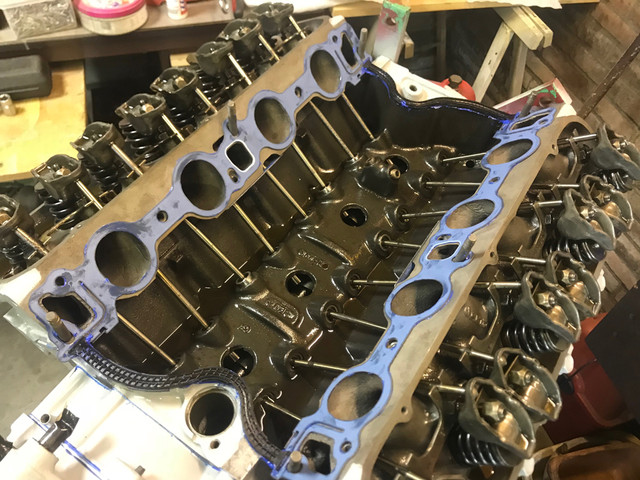
All was installed and next was the intake, so I went check all again, went thru each one of the pushrods and one of lifter wasn't "pumping" as the others.

Just a small pressure was enough to bring it to its max spring compression. It was more a solid than an hydraulic lifter.

Because I've pumped them with oil yesterday using my thumb, the pressure wasn't enough to feel the difference.

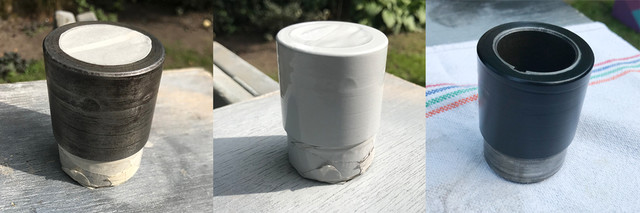
As I throw away only the used parts for my wife's car. I had the previous set of lifter's, Crower or Lunati from the previous config somewhere..

Way less ferm than the new one, I decided to take one and open it to see how these things are put together. They all have these clips/retainers

and it took just 1 broken nail to open one. (up on the pict).

Because it was easy and because I could not stand the idea to close the engine with a weird lifter, I've bravely ignored the fact that if I would F... up that one, I'd need to wait 3 weeks to get a new one.

I open the new one and aside the clip, they are totally different inside. The Summit one has some inner cylinder, and wasn't springy at all.

While trying to get that cylinder out upside down with some circular motion, I felt something and it was springy as it should have been.

The spring underneath the cylinder engaged properly on the pin underneath when pressure was released. The little guy was simply not correctly put together at the plant, it was somehow sandwiched. Placed back the small valve, the oil "nozzle" and set back the clip. Dip it again in oil..

Back on the engine. Fingers crossed: all fine and just like the others! yeah!


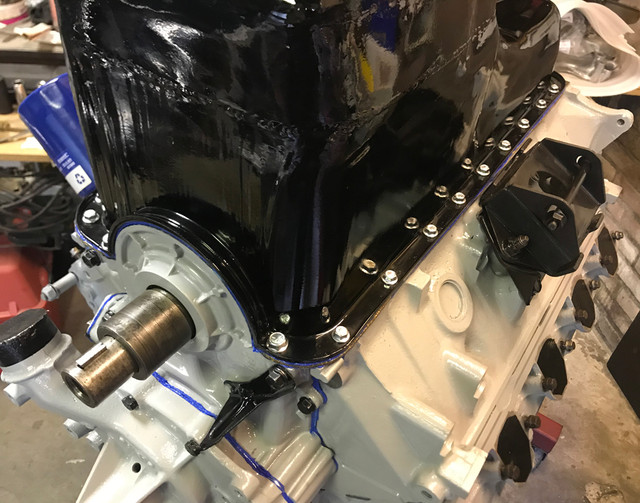
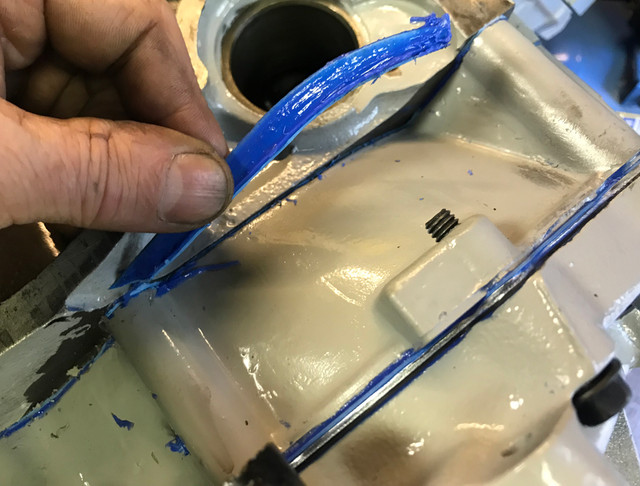
After a blanc test, I was happy to see that the rubber and metal gasket were this time cut ok, and even the lips to lock them together were fine.

One last inspection of the lifter bay. All fine and super clean.

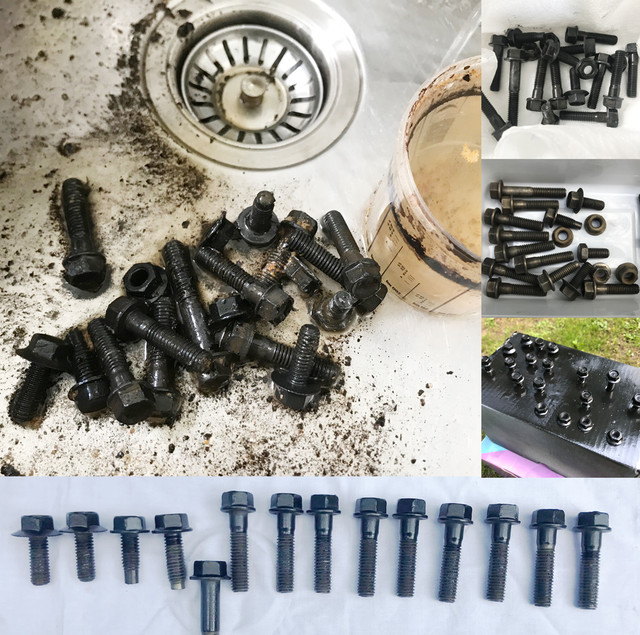
Blue Loctite smel in garage... 


A few minutes later, the restored hardware under 2.5 to 4.1 kgf was in place. Because all was well cut this time, very little cleanup of the paste was necessary.

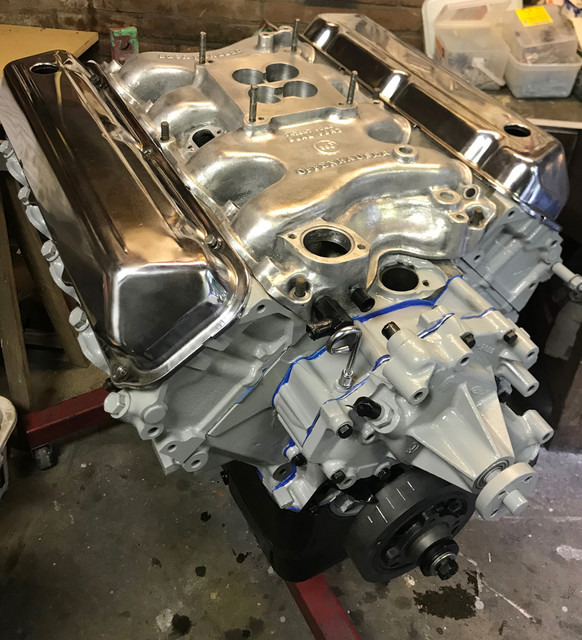
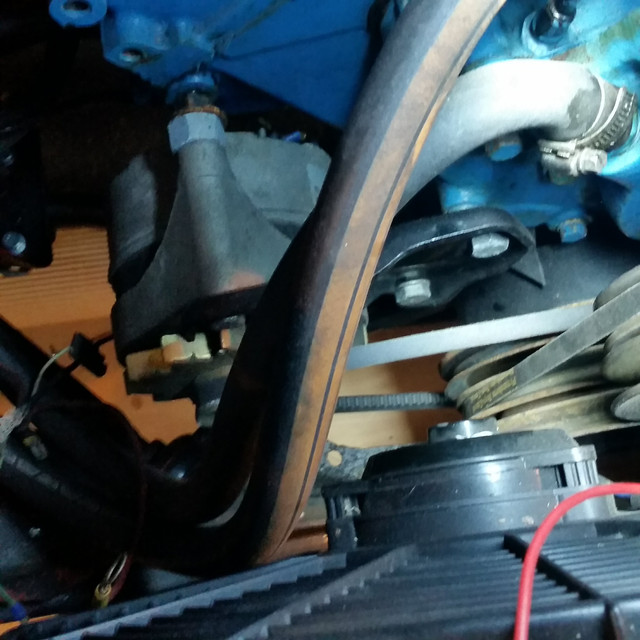
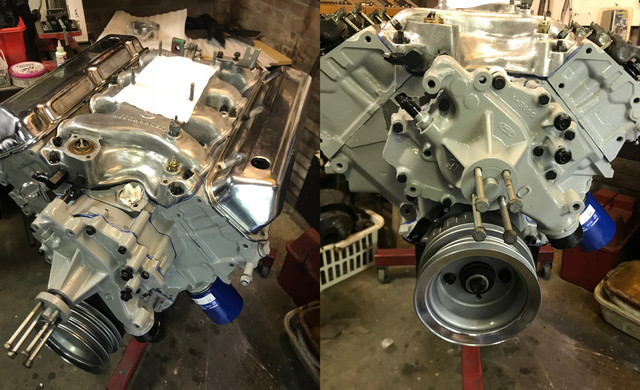
Started place back some of the accessories. And I now can see i'm almost there. 

Just a few unused holes left, but pretty sure the missing bolts are with the restored brackets.

The water neck, will be replaced with a new one. The aftermarket in aluminium is badly corroded and the original weird electric 3 ways vacuum thingy on top of it has no reason to be for an EFI and as I need a place for a second temp sensor somewhere...

All with all looks like i'm almost done with the engine. I will adjust the valves just a bit more but will not set the prings under pressure. I'll do this right before putting back the engine into the car.

To be continued...

 
Very impressive Fabrice! Wish I had all those skills!
No skills here, just bit of common sense and litres of vinegar :)

If the parts would have been organised, clean and if I knew this engine. It all could be done in matter of hours.

But restoring and guessing where all goes from buckets/boxes adds extra time.

It's coming along nicely, I like it. That's an elephant motor!  :p
It's ridiculous so big! A 351c fits this car so much better. To put this fat baby back into the car alone will be something I will really need to carefully prep ahead...

 
Fabrice:

Just wanted to drop you a note that I love your weekend updates and how lovingly you document all of your fine work.  Please continue; I will miss these updates tremendously once all is done and the car is completed.

Thanks again.

Mid.
We will just have to coax Fabrice into another build


Latest posts

Back
Top