Sound deadener behind rear seat back?

7173Mustangs.com

Help Support 7173Mustangs.com:

This site may earn a commission from merchant affiliate links, including eBay, Amazon, and others.

73429mach

Well-known member
Joined
Feb 1, 2011
Messages
665
Reaction score
50
Location
IL
My Car
1973 Mustang Mach 1
1972 Mustang Mach 1 under construction
On a fastback non fold down rear seat, Is there supposed to be some kind of sound deadener behind the top part of the rear seat back going to the trunk? Or is the back of the rear seat visible through the trunk? If someone has a picture of the back of the rear seat through the trunk this may help. Ryan

 
On a fastback non fold down rear seat, Is there supposed to be some kind of sound deadener behind the top part of the rear seat back going to the trunk? Or is the back of the rear seat visible through the trunk? If someone has a picture of the back of the rear seat through the trunk this may help. Ryan
Ryan, I could be wrong, but I don't think there was any sound deadener there. On my car, I know the back seat had been changed, but there was nothing there when I stripped the car. I added a panel of the deadener I used on the rest of the interior. Seems to make a bit of a difference. Can't hurt to add some imo.

 
Last edited by a moderator:
There was sound deadener behind the rear seat back, the package tray, and the inner wheel house inside the car. It was a multi-color, shredded, and reconstituted cloth material. I found a very close match at a furniture reupholstery store. The same material was also used behind the kick panels in the front. Chuck

IMG_0672.JPG

 
Thanks guys for the quick replys, that helps a lot. I have some extra material left so I think I'll use it there. Ryan

 
There was sound deadener behind the rear seat back, the package tray, and the inner wheel house inside the car. It was a multi-color, shredded, and reconstituted cloth material. I found a very close match at a furniture reupholstery store. The same material was also used behind the kick panels in the front. Chuck
Oh that sh*t!! I remember now. Mine was long gone from behind the seat. The stuff I used was a similar material, but with the heat barrier foil. There are better materials on the market, but way more expensive I expect.

 
There should be a black plastic insulated pad there. It should have some over spray of the gray trunk spatter along the trunk floor and wheel wells. The closest appearing product I've found to match the original is a fender cover material sold by " Snakeoyl" they sell it by the foot also.

 
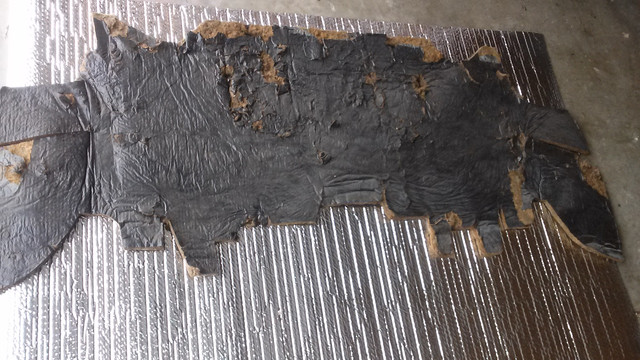
I had a similar problem. The original sound and heat barrier was ripped, shed particles like crazy, and looked horrible from the back side of the trunk. I thought there must be a better way to do this now that its 2017. I found a product at our local hardware store, Orchard Supply Hardware, called Reflectix. It is a foil-sprayed layer over two thin layers of bubble wrap. It has a lot of uses, primarily as wall insulation between studs. It has a R-value of 10. I used the old sound barrier as a pattern for cutting new material to fit behind the seat. It has a shiny surface which looks good. To jazz it up a bit, I first put a layer of green shade material (the stuff that you put over your patio gazebo to create partial shade) as the first thing you see. Then, the shiny material partially shows thru giving a neat effect. Here is the photo of cutting out the new material using the old as a pattern.


The cost was 2.17/foot. Roll was 4 feet wide. I needed 2-3 feet.

 
There should be a black plastic insulated pad there. It should have some over spray of the gray trunk spatter along the trunk floor and wheel wells. The closest appearing product I've found to match the original is a fender cover material sold by " Snakeoyl" they sell it by the foot also.
[i had a similar problem. The original sound and heat barrier was ripped, shed particles like crazy, and looked horrible from the back side of the trunk. I thought there must be a better way to do this now that its 2017. I found a product at our local hardware store, Orchard Supply Hardware, called Reflectix. It is a foil-sprayed layer over two thin layers of bubble wrap. It has a lot of uses, primarily as wall insulation between studs. It has a R-value of 10. I used the old sound barrier as a pattern for cutting new material to fit behind the seat. It has a shiny surface which looks good. To jazz it up a bit, I first put a layer of green shade material (the stuff that you put over your patio gazebo to create partial shade) as the first thing you see. Then, the shiny material partially shows thru giving a neat effect. Here is the photo of cutting out the new material using the old as a pattern.]

A lot of good ideas here, thanks! Ryan

 
Last edited by a moderator:
I should probably think about replacing mine too. 20 years ago (a year after I bought my car), after the car sat in storage for a year I could not get the trunk unlocked with the key. I had to remove the back seat, push through that layer of insulation, destroying it in the process, and pop the latch with a long screwdriver. What a mess it made all over me as it disintegrated.

 
I had a similar problem. The original sound and heat barrier was ripped, shed particles like crazy, and looked horrible from the back side of the trunk. I thought there must be a better way to do this now that its 2017. I found a product at our local hardware store, Orchard Supply Hardware, called Reflectix. It is a foil-sprayed layer over two thin layers of bubble wrap. It has a lot of uses, primarily as wall insulation between studs. It has a R-value of 10. I used the old sound barrier as a pattern for cutting new material to fit behind the seat. It has a shiny surface which looks good. To jazz it up a bit, I first put a layer of green shade material (the stuff that you put over your patio gazebo to create partial shade) as the first thing you see. Then, the shiny material partially shows thru giving a neat effect. Here is the photo of cutting out the new material using the old as a pattern.

You should make a pattern of your original material and sell a copy to those looking for pattern and shape. It is like the cowl insulation with the thin plastic they all just fall apart to nothing. For those trying to go concourse it helps to have a pattern to at least start with.

 
I had a similar problem.  The original sound and heat barrier was ripped, shed particles like crazy, and looked horrible from the back side of the trunk.  I thought there must be a better way to do this now that its 2017.  I found a product at our local hardware store, Orchard Supply Hardware, called Reflectix.  It is a foil-sprayed layer over two thin layers of bubble wrap.  It has a lot of uses, primarily as wall insulation between studs. It has a R-value of 10.  I used the old sound barrier as a pattern for cutting new material to fit behind the seat.  It has a shiny surface which looks good.  To jazz it up a bit, I first put a layer of green shade material (the stuff that you put over your patio gazebo to create partial shade) as the first thing you see.  Then, the shiny material partially shows thru giving a neat effect.  Here is the photo of cutting out the new material using the old as a pattern.

You should make a pattern of your original material and sell a copy to those looking for pattern and shape. It is like the cowl insulation with the thin plastic they all just fall apart to nothing. For those trying to go concourse it helps to have a pattern to at least start with.

That is a good idea!!!
 
Back
Top