Sounds like you got your work cut out there and a sensible plan to make it right
You are using an out of date browser. It may not display this or other websites correctly.
You should upgrade or use an alternative browser.
You should upgrade or use an alternative browser.
Summer deadline - 72 Mach 1 Build thread
- Thread starter baz70
- Start date


Help Support 7173Mustangs.com:
This site may earn a commission from merchant affiliate
links, including eBay, Amazon, and others.
baz70
Well-known member
things are progressing slower than i would like so i will stop putting timescales on effort and just keep moving along, we call it plodding over here ")
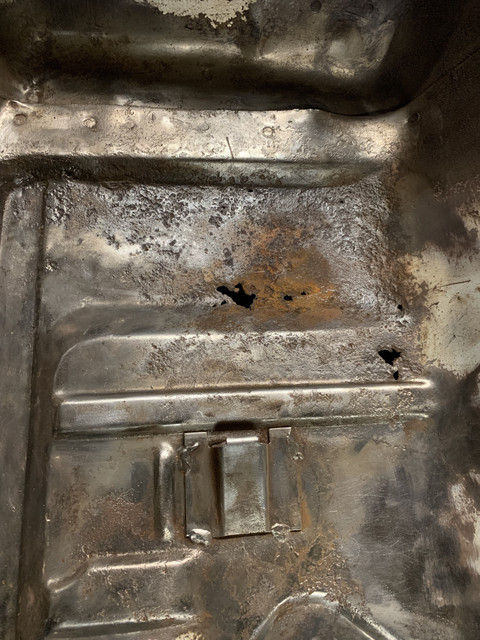
ok so I've welded in the patch. next steps, patch in the top lip section that I cut to cure the rust underneath, will need to mock spot welds, grind, weld in pinholes, grind, fill, smooth and primer,Also discovered another pinhole that grew and need to fill it too. Once this patch is done will do other side rear floor patch, then roof interior rust before moving back to floor pans.
ok so I've welded in the patch. next steps, patch in the top lip section that I cut to cure the rust underneath, will need to mock spot welds, grind, weld in pinholes, grind, fill, smooth and primer,Also discovered another pinhole that grew and need to fill it too. Once this patch is done will do other side rear floor patch, then roof interior rust before moving back to floor pans.
Last edited by a moderator:
Good to hear you are positive about progress. As long as you can picture the car finished you will always makes steps forward. Some will be giant steps and some will be small
- Joined
- Mar 30, 2017
- Messages
- 2,400
- Reaction score
- 892
- Location
- The Netherlands
- My Car
- 73 Grande 351C
71 Mach 1 429CJ
Wow, you've done a lot already!
Not setting any time scale is the way to go.
These cars are like this game where you have music playing, and 1 chair misses each round. The music stops. One is out.
Previous owners got the chairs, now there's is no more chairs left and rust has to be fixed for real. No more quick rust makeup or no makeup at all.
One part at a time at your own pace will get you there!
How do you plan treat the roof?
Last edited by a moderator:
baz70
Well-known member
thanks. The roof, its keeping me up at night lol part of me is thinking i need to remove all the support panels, they are only thinly welded. this will then give me full access to the roof. So, I was planning on wirewheeling it, then treating it with Kurust, then using POR15 or FE123 Rust Convertor then POR15 then prime....Wow, you've done a lot already!
Not setting any time scale is the way to go.
These cars are like this game where you have music playing, and 1 chair misses each round. The music stops. One is out.
Previous owners got the chairs, now there's is no more chairs left and rust has to be fixed for real. No more quick rust makeup or no makeup at all.
One part at a time at your own pace will get you there!
How do you plan treat the roof?
what looks like has happened to cause the rust in the first place is that condensation has settled in the roof and dripped onto the felt lining and this created an environment for the rust to bed in, and the thinly painted roof didnt help protect against rust, ... I literally had to scrape away the lining it was stuck to the rusty roof....
baz70
Well-known member
Agreed thanks, i do sometimes think I've got too deep into this, but to be honest, i can see the end of the welding, my bigger concern will be putting everything back together correctly, that will take time and involve a lot of posting on this forum for help!Good to hear you are positive about progress. As long as you can picture the car finished you will always makes steps forward. Some will be giant steps and some will be small


$37.69
$55.00
The Complete Book of Ford Mustang: Every Model Since 1964-1/2 (Complete Book Series)
Amazon.com


$9.00
2016 Hot Wheels Vintage American Muscle 1970 FORD MUSTANG MACH 1 die-cast 4/10
Cards and Bobbles


$64.98
JH DESIGN GROUP Men's Ford Mustang Collage Black Zip Up Hoodie Sweatshirt (Large, CLG2-black)
Affordable Family Clothing


$99.99
Polished Rocker Panel Sill Plate Molding Kit with Clips Compatible with 1964-1966 Ford Mustang - Authentic Restoration for Classic Car Enthusiasts
Classic 2 Current Fabrication

$18.99
$19.89
Checkered Flag Men's Ford Mustang Cap Tri-Bar Pony Logo Adjustable Black Hat
BS STORE LLC


$24.95
Ford Mustang Pony Racing Stripe 5.0 Muscle Shelby Long Sleeve T-Shirt Front Back Print-Black-Large
Giftware Shop Usa


$13.75
$16.39
Ford Mustang: Trivia & Fun Facts Every Fan Should Know About The Great American Icon!
Amazon.com


$29.70
Ford Mustang, Mach 1, GT, Shelby, & Boss V-8 (64-73) Haynes Repair Manual
Haynes Repair Manuals

$59.98
JH DESIGN GROUP Men's Mustang Logo Hoodie Full Zip Up Black Hooded Sweatshirt (X-Large, Black)
Affordable Family Clothing


$39.99
Lucky Ride Ford Hoodie Legend Lives Mustang Pony (Pocket) Full Zip Sweatshirt, Red, Medium
Giftware Shop Usa

Very well said Steve. I could not agree more.Good to hear you are positive about progress. As long as you can picture the car finished you will always makes steps forward. Some will be giant steps and some will be small
If you take any more parts off make sure to take pictures and label EVERYTHING you take off with a note attached giving instruction of where it came from.Agreed thanks, i do sometimes think I've got too deep into this, but to be honest, i can see the end of the welding, my bigger concern will be putting everything back together correctly, that will take time and involve a lot of posting on this forum for help!Good to hear you are positive about progress. As long as you can picture the car finished you will always makes steps forward. Some will be giant steps and some will be small
- Joined
- Aug 14, 2014
- Messages
- 4,589
- Reaction score
- 1,630
- Location
- Madison, WI
- My Car
- 1971 Mach 1 w/408C stroker
A small step for your car a giant leap for the builder....
Keep the good work. It takes time to get it done right but what is important is to be proud of your work and tou can say thay you did it. Good work takes time.
Sent from my SAMSUNG-SM-G930A using Tapatalk
Keep the good work. It takes time to get it done right but what is important is to be proud of your work and tou can say thay you did it. Good work takes time.
Sent from my SAMSUNG-SM-G930A using Tapatalk
baz70
Well-known member
ground down the welds on upper side this evening. Next i will fill the hole to the right which i drilled out to extend onto good metal, using copper backing hopefully it will work. Then grind down underside and finally patch strip metal and then fill and prime.....
Thats another job ticked off the list. Is the small hole the last of the welding or is there more to do?
baz70
Well-known member
On the piece i just welded there is a small strip of metal to join up at the top where it was spot welded, plus the hole. I'll try to do that tomorrow evening. Then onto the passenger side I will need to fabricate and weld a similar panel.Thats another job ticked off the list. Is the small hole the last of the welding or is there more to do?
As my welding gets back up to speed I should pick up momentum .....
Other welding jobs to do that I am aware of ....
both side floorpans - driver side ready to go, just holding off until roof rust sorted and windscreen taken out
Trunk floor - 3 patches. One section cut and ready to weld, othrers are small pieces.
Battery fender apron. I need a spot welder for this, so will do this last, trying to locate one I can borrow locally
Driver side rear wheel arch behind rear fender there is a rust hole - its a small section that commonly gets the rot, will have to cut out and fabricate.
Oh and the dreaded cowl. I dont think i need to weld here but will check by inspecting from under dashboard or cutting section out from top to see into cowl.
Once that's done its onwards and upwards !
- Joined
- Aug 14, 2014
- Messages
- 4,589
- Reaction score
- 1,630
- Location
- Madison, WI
- My Car
- 1971 Mach 1 w/408C stroker
All those are the same places i found rust in my car. Very typical.
Are you butt welding the floor panel?
To inspect the cowl a snake camera should do the job. You can look at about 3/4 of it through the air inlets back of the hood and the other 1/4 through the drain hole that is hidden by the front fender. From the inside you should be able to inspect the rest. Good luck.
Sent from my SAMSUNG-SM-G930A using Tapatalk
baz70
Well-known member
Yes, will be butt welding the floor pans, in fact its really the only welding i do when joining panels.All those are the same places i found rust in my car. Very typical.
Are you butt welding the floor panel?
To inspect the cowl a snake camera should do the job. You can look at about 3/4 of it through the air inlets back of the hood and the other 1/4 through the drain hole that is hidden by the front fender. From the inside you should be able to inspect the rest. Good luck.
Sent from my SAMSUNG-SM-G930A using Tapatalk
Thanks, yes i noted from an earlier post the snake camera for the cowl will definitely get one, also want to get into the torque boxes to see what's lurking there.
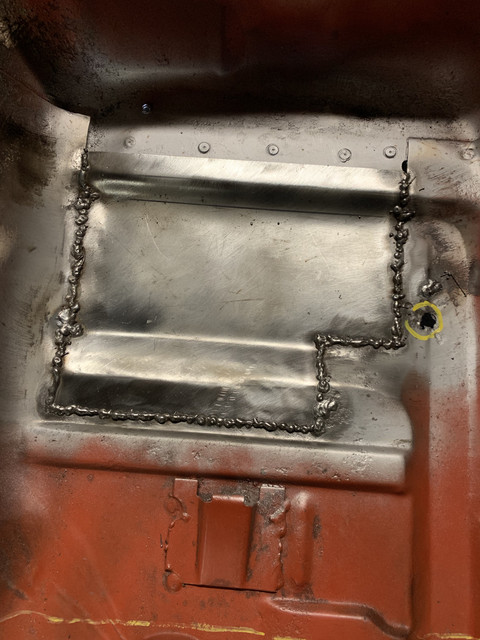
Tonight i did very little, cut the lip section for the patch to fit in, and ground down the underside welds on the patch panel. Not all the welds have penetrated through but enough for solidity, and i i will use seam sealer then primer on the underneath.
baz70
Well-known member
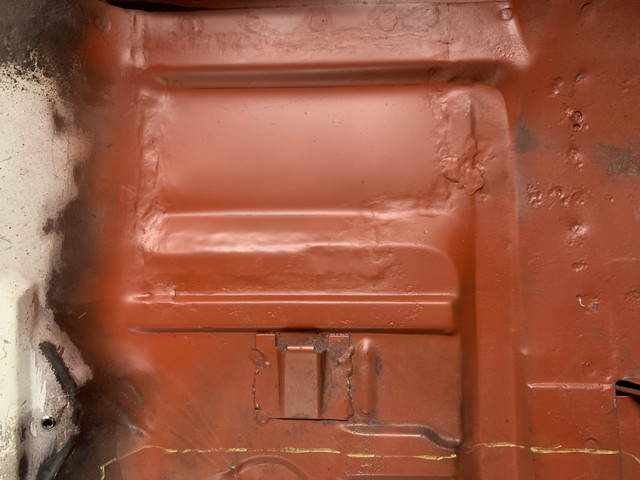
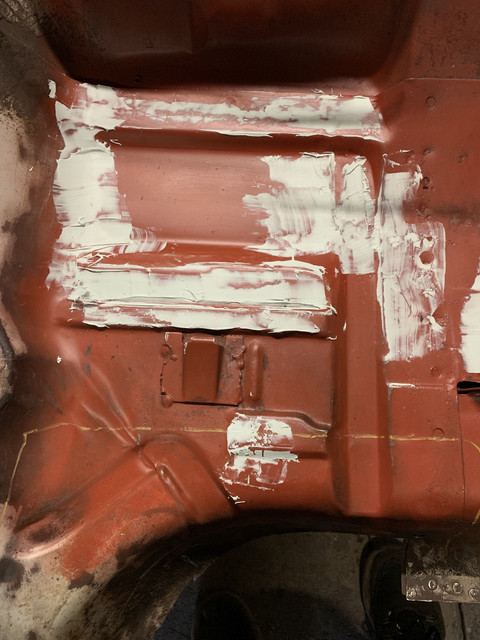
Today, I finished off the driver side panel. Painted and primed top and bottom sides. I then discovered some pinholes which were due to me grinding the underside and exposing weld gaps due to lack of penetration. I wanted to get the primer on to avoid rust returning, and will weld in later. I will also use seam sealer to fill around the areas where i filled holes to make it look factory.
Now onto the other side.
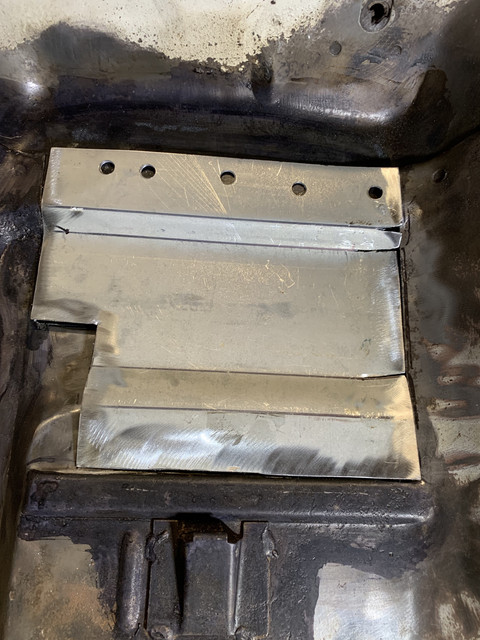
I made a template and folded some zinc coated sheet metal (slightly thicker gauge about 0.1mm thicker as its harder to get the correct sheet metal thickness in the UK)
I then lay it over the original and marked around the edges and cut. I also took out spot welds to avoid having to patch a piece at the top. Still have some fettling to do, for some reason this side took longer and had more issues than driver side.
Now onto the other side.
I made a template and folded some zinc coated sheet metal (slightly thicker gauge about 0.1mm thicker as its harder to get the correct sheet metal thickness in the UK)
I then lay it over the original and marked around the edges and cut. I also took out spot welds to avoid having to patch a piece at the top. Still have some fettling to do, for some reason this side took longer and had more issues than driver side.
Last edited by a moderator:
Well done Baz. Wise choice using zinc plate
baz70
Well-known member
Started welding the patch panel, bit of hammering needed to get aligned, not perfect. Welder started playing up and then had to get back in to watch Game of Thrones so will complete later in the week..

baz70
Well-known member
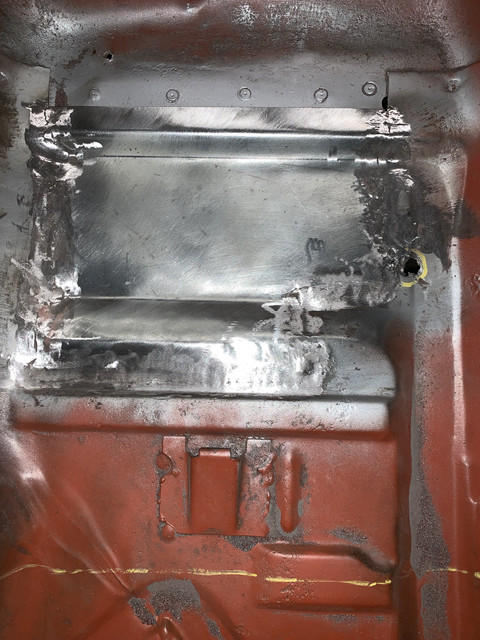
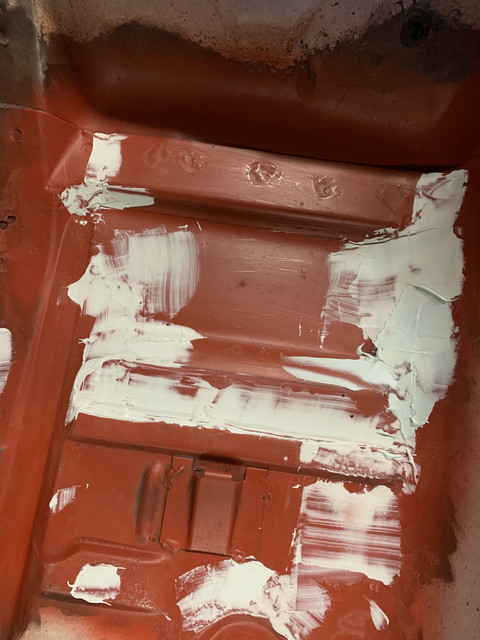
both sides now welded and pinholes gone, applied some filler, probably overkill but want to make it look factory. Sanding discs have gone awol, ordered some more, hope to complete during week, then more rust removal inside roof skin before tackling floorpans....
Great work Baz. What you using on the roof to remove rust?
- Joined
- Jul 19, 2016
- Messages
- 2,140
- Reaction score
- 173
- Location
- Omaha, NE
- My Car
- 1971 Mustang Convertible
WHAT??? You don't have a TV in your garage???
Similar threads
- Replies
- 32
- Views
- 2K
- Replies
- 22
- Views
- 765
- Replies
- 16
- Views
- 765
- Replies
- 11
- Views
- 617
Latest posts
-

-
 1973 Convertible Project: Coupe Parts Swap Begins
- Latest: Steve McMahan
-

-
 Anyone ever find a drag coefficient for our cars?
- Latest: Hemikiller
-

-