Nicely done.
You are using an out of date browser. It may not display this or other websites correctly.
You should upgrade or use an alternative browser.
You should upgrade or use an alternative browser.
Travails of the Trailer Queen
- Thread starter mach1mama
- Start date


Help Support 7173Mustangs.com:
This site may earn a commission from merchant affiliate
links, including eBay, Amazon, and others.
I put an offer on a house. After I move, I'll document what the motor is when I tear it down.I'm interested in knowing if you have a four bolt main and what carburator came stock with your '73.
Moar updates please! :banana:
More than likely they used up whatever supply of leftover large valve heads were on hand before switching to the D3 small valve heads.Hmm. I've seen the small valve '73 heads before, but I read differing things... That it was all 73, or late 73 had small, and that some early '73 had large valves. guess I'll find out when I swap my quench heads on what I had..
More on small valve heads here:
http://351cleveland.wetpaint.com/page/Q+Code+and+Cobra+Jets
- Joined
- Feb 12, 2011
- Messages
- 3,150
- Reaction score
- 6
- Location
- in a VAN down by the RIVER !!!
- My Car
- 71 Mustang Mach I
351c 2v
highly optioned
67 Mustang Convertible
1 of 35 Diamond Blue
Survivor
Okay .... I'll admit...when I read "trailer queen" :s I usually don't bother. I USE my cars and I have a huge appreciation for those of us that enjoy feeling the road with technology of the 70's. I dont care much for checkbook restoration folks.
But with 7 pages....I knew it had to be worthy of checking out. WOW..... he MUST have read the "show me the pic's " comments in the Introduction section!!!! and I'm glad MachIMama/hubby DID!! awesome story.
But with 7 pages....I knew it had to be worthy of checking out. WOW..... he MUST have read the "show me the pic's " comments in the Introduction section!!!! and I'm glad MachIMama/hubby DID!! awesome story.
mach1mama
Well-known member
- Joined
- Jan 8, 2012
- Messages
- 156
- Reaction score
- 1
- Location
- nova scotia, canada
- My Car
- 1973 Mach 1, 351 cleveland cobra jet engine. Gold glow, ginger interior. Long tube headers. completely rebuilt engine. Forged piston, roller rockers. lifters. Comp cams. Edelbrook carb and intake. Trush mufflers stainless steele custom exhaust. Added air conditioning, SSBC disc brakes. Rebuilt transmittion. pretty much anything you can do and a BUNCH of body work, functional not cosmetic.
My favourite saying is "it is a car, not a couch". I purchased my car to enjoy and I drive it as much as possible. I am very happy you appreciate the story and the work my hubby put in to writing it. I really think the styling of these cars is under appreciated. Thank you for taking the time to read the write-upOkay .... I'll admit...when I read "trailer queen" :s I usually don't bother. I USE my cars and I have a huge appreciation for those of us that enjoy feeling the road with technology of the 70's. I dont care much for checkbook restoration folks.
But with 7 pages....I knew it had to be worthy of checking out. WOW..... he MUST have read the "show me the pic's " comments in the Introduction section!!!! and I'm glad MachIMama/hubby DID!! awesome story.
")
- Joined
- Jul 5, 2010
- Messages
- 6,687
- Reaction score
- 389
- Location
- Grand Rapids, MI
- My Car
- 73 Convertible
This story just gets better all the time.


$39.99
Lucky Ride Ford Hoodie Legend Lives Mustang Pony (Pocket) Full Zip Sweatshirt, Red, Medium
Giftware Shop Usa


$37.17
$55.00
The Complete Book of Ford Mustang: Every Model Since 1964-1/2 (Complete Book Series)
Amazon.com

$59.98
JH DESIGN GROUP Men's Mustang Logo Hoodie Full Zip Up Black Hooded Sweatshirt (X-Large, Black)
Affordable Family Clothing


$64.98
JH DESIGN GROUP Men's Ford Mustang Collage Black Zip Up Hoodie Sweatshirt (Large, CLG2-black)
Affordable Family Clothing


$24.95
Ford Mustang Pony Racing Stripe 5.0 Muscle Shelby Long Sleeve T-Shirt Front Back Print-Black-Large
Giftware Shop Usa


$13.75
$16.39
Ford Mustang: Trivia & Fun Facts Every Fan Should Know About The Great American Icon!
Amazon.com


$99.99
Polished Rocker Panel Sill Plate Molding Kit with Clips Compatible with 1964-1966 Ford Mustang - Authentic Restoration for Classic Car Enthusiasts
Classic 2 Current Fabrication


$37.95
$39.95
2015-2024 Ford Mustang Bulge Acorn Lug Nuts & Wheel Locks Kit 14 mm x 1.50 Thread (Black)
West Coast Corvette / Camaro


$18.99
$19.89
Checkered Flag Men's Ford Mustang Cap Tri-Bar Pony Logo Adjustable Black Hat
BS STORE LLC

$9.00
2016 Hot Wheels Vintage American Muscle 1970 FORD MUSTANG MACH 1 die-cast 4/10
Cards and Bobbles
mach1mama
Well-known member
- Joined
- Jan 8, 2012
- Messages
- 156
- Reaction score
- 1
- Location
- nova scotia, canada
- My Car
- 1973 Mach 1, 351 cleveland cobra jet engine. Gold glow, ginger interior. Long tube headers. completely rebuilt engine. Forged piston, roller rockers. lifters. Comp cams. Edelbrook carb and intake. Trush mufflers stainless steele custom exhaust. Added air conditioning, SSBC disc brakes. Rebuilt transmittion. pretty much anything you can do and a BUNCH of body work, functional not cosmetic.
Part 8 (Originally posted 2 Mar 2011)
It’s been a while since my last up-date so I’ll cover what’s happened. But before I start I have to state that due to some miscommunication between myself and my wife I made some minor errors in describing the current rebuild. The first one is in regards to water in the trunk, the water was not coming from the wheel well as I originally wrote but was in fact getting in from the two longitudinal body seams of the top corners of the trunk. A quick scrape of the old sealant and a quick application of new sealant cured the problem. Secondly, I mistakenly said that the engine cylinder walls would only have to be honed. Truth be told it needed to be bored out 0.030. Finally, along with the heads, crankshaft, and engine block it was decided to retain the original connecting rods which the engine builder assured us would be more than adequate for the estimated engine output.
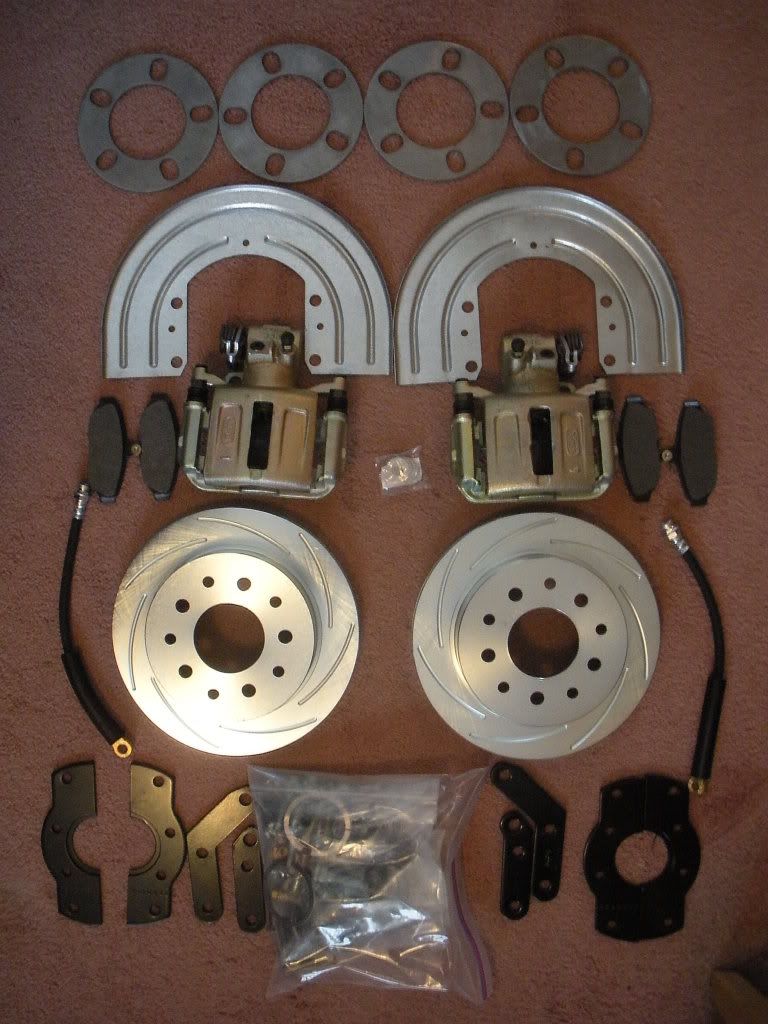
The current status of the “Trailer Queen” is as follows. All body and paint is complete and the car has been brought to the assembler (Big Block Larry) who is working on renewing the engine bay wiring harness. He decided to re-do the harness because he could not find an OEM style harness for “71 – “73 Mustangs and absolutely hates trying to make universal harnesses fit. He should be mocking up and installing the air conditioner soon as well as the new brake booster and master cylinder. My wife’s disc brake package have finally arrived and delivered to the assembler with the exception of the four callipers and rear dust shields which are going to be powder coated (black) before being installed.
The final remaining engine components have also arrived. The engine has left Trick Engines and is with the engine assembler for final machining and assembly; he will also be responsible to have the engine dynoed at Armstrong Brothers. The engine builder is finding out the joys of trying to find aftermarket Cleveland parts, one problem deals with the valve keepers. The stainless steel exhaust/intake valves required a larger diameter valve keeper than originally thought. They where of such a size that they interfered with the new roller rocker arms. To solve the problem a small relief will be machined in the rockers to clear the keepers. The Cleveland engines where known to bend push rods, with this in mind we purchased slightly shorter, extra strong rods and will lightly machine the rocker pedestals to make up for the difference in length, this will shorten the rod distance from the valve guides to the roller rocker and thus decrease the bending forces applied to the push rods. Another change from stock configuration is the use of flat top pistons vice the dished OEM pistons to give us a slight boost in compression
And now, more photos.
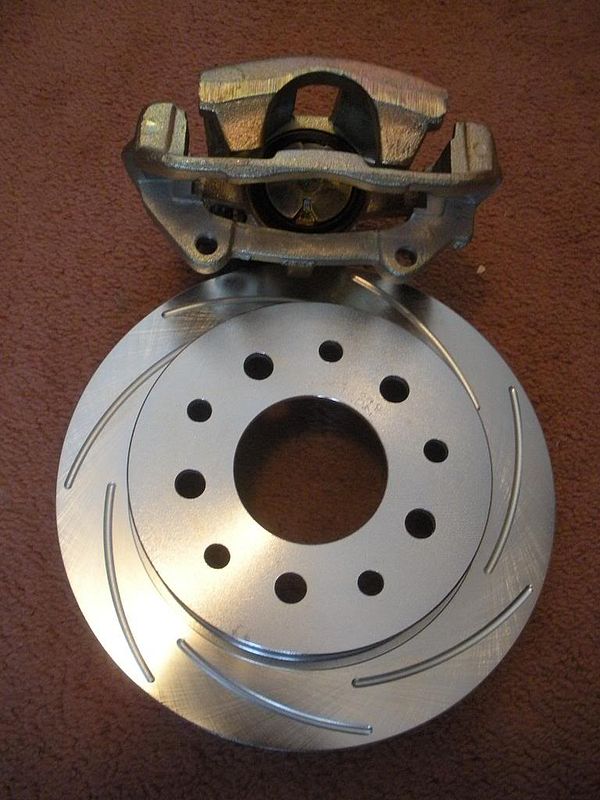
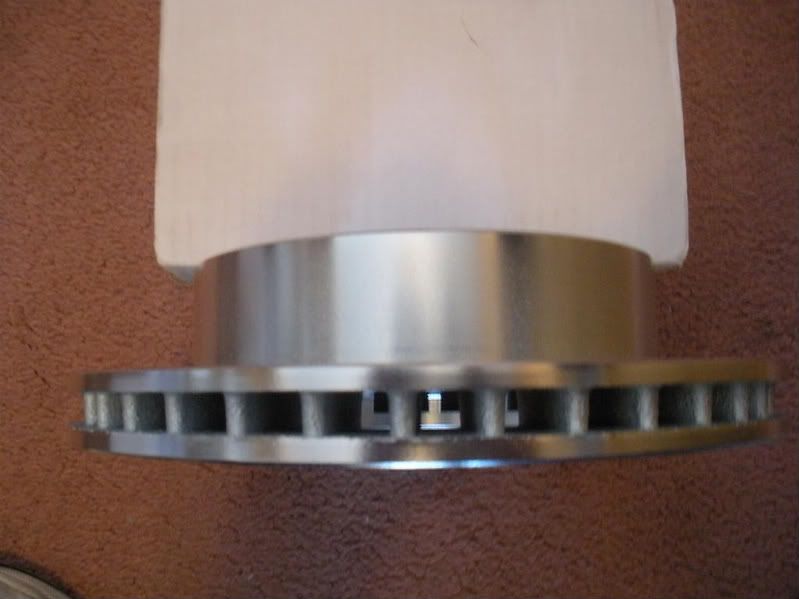
Front SSBC brake kit less pads (on order)
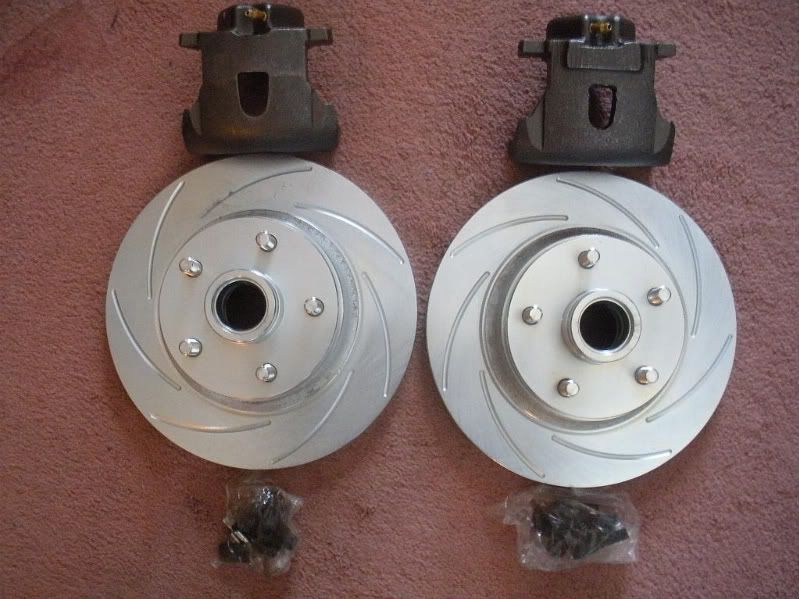
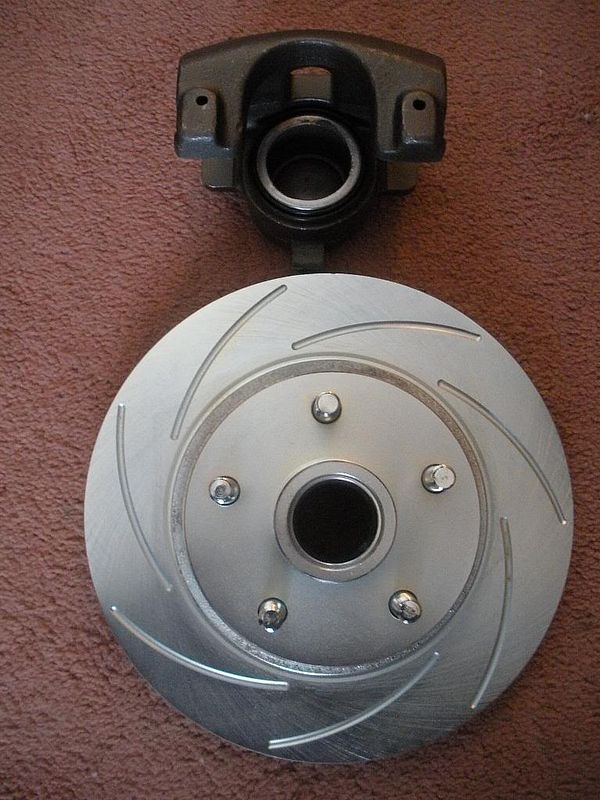
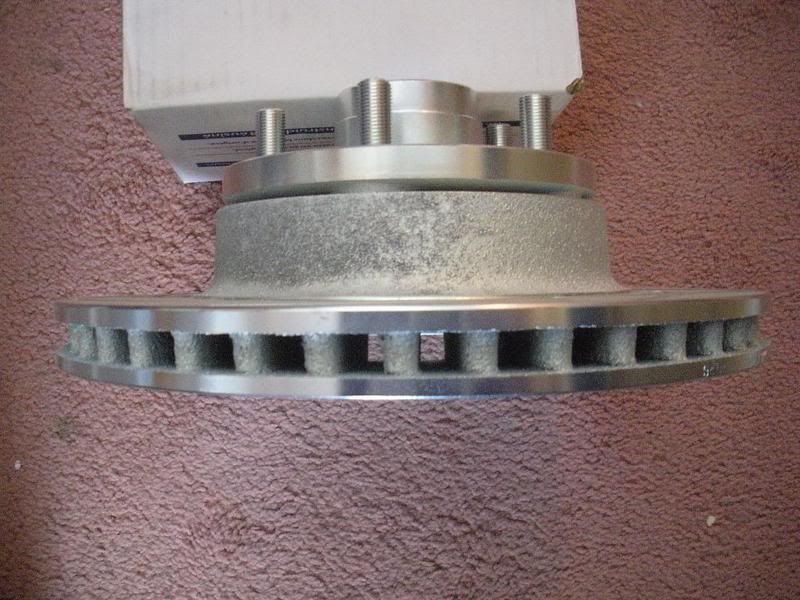
Rear SSBC disc brake conversion kit.
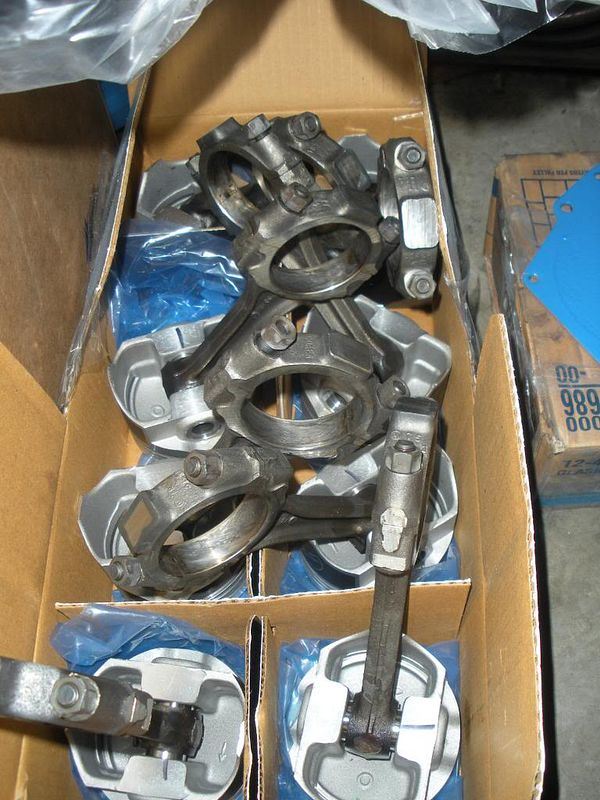
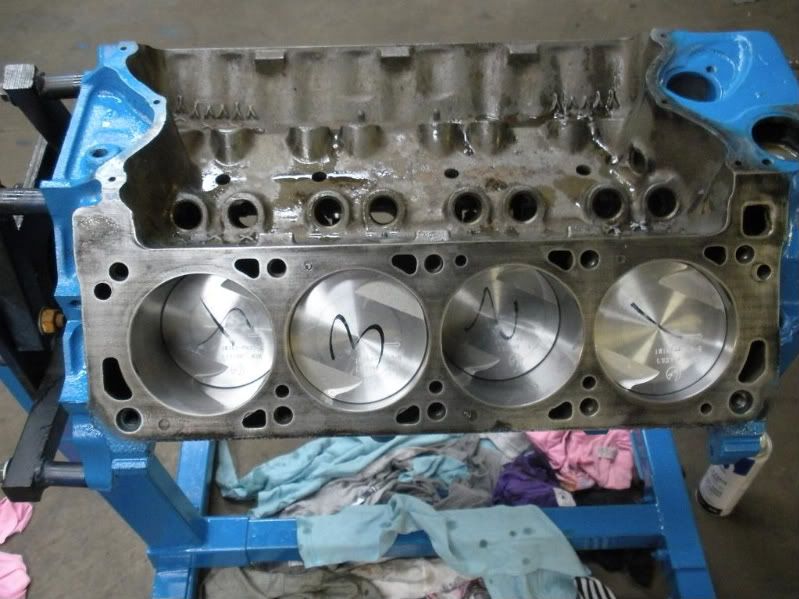
Box of Speed Pro (from Summit Racing) flat top piston overbored by 0.030 with stock connecting rods.
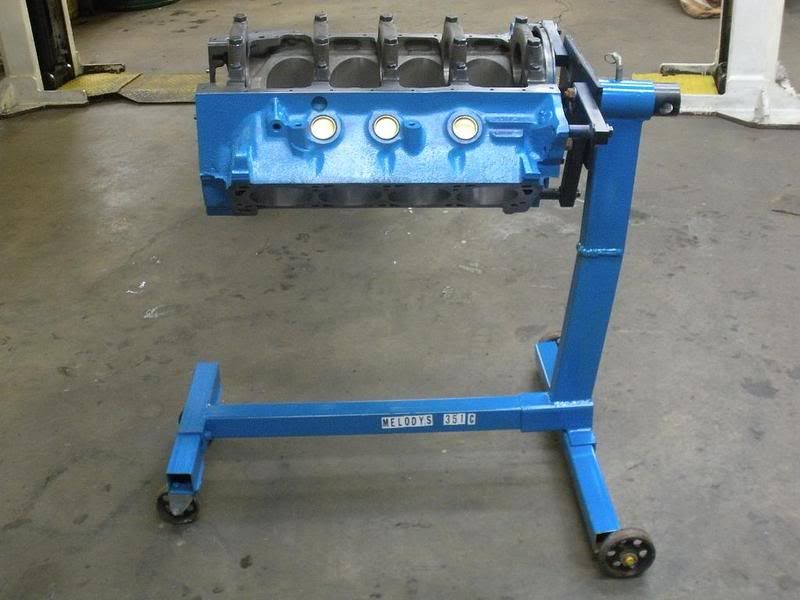
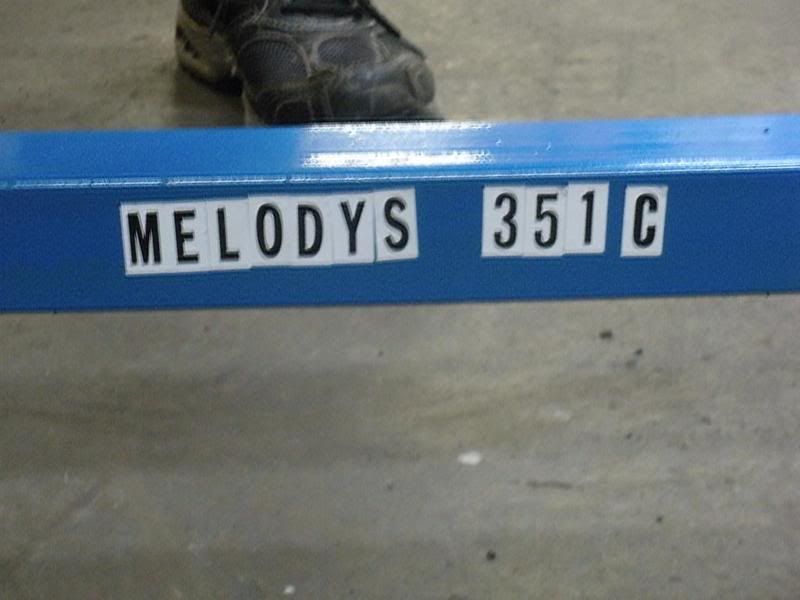
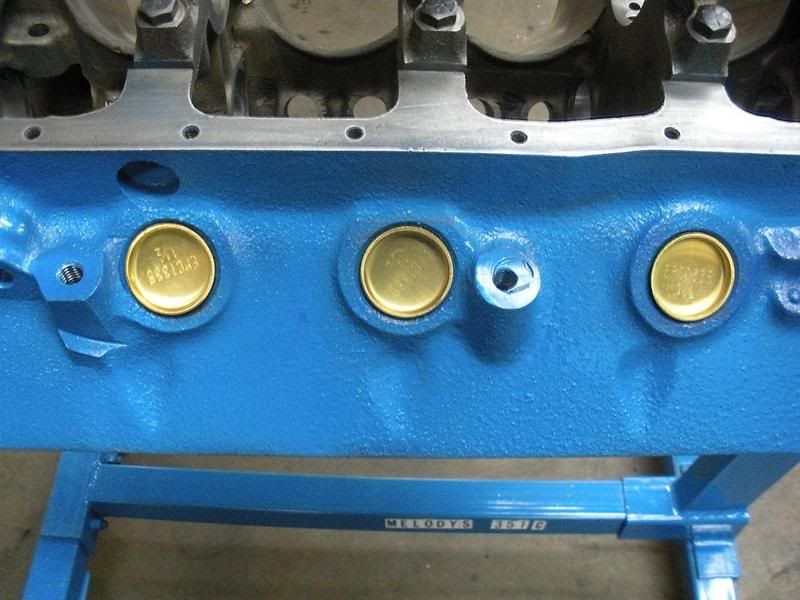
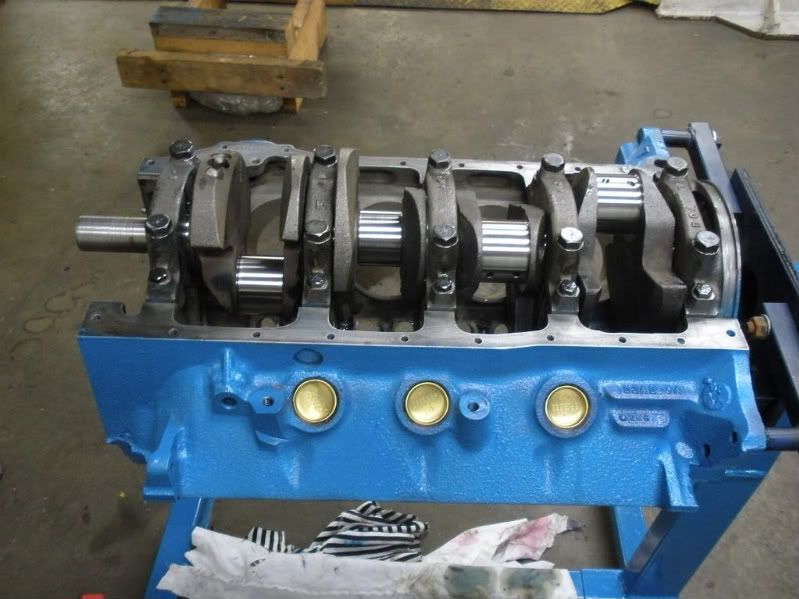
Painted block, although the engine assembler is a big GM fan he customized one of his engine stands for my wife’s engine (check out the legend on the base).
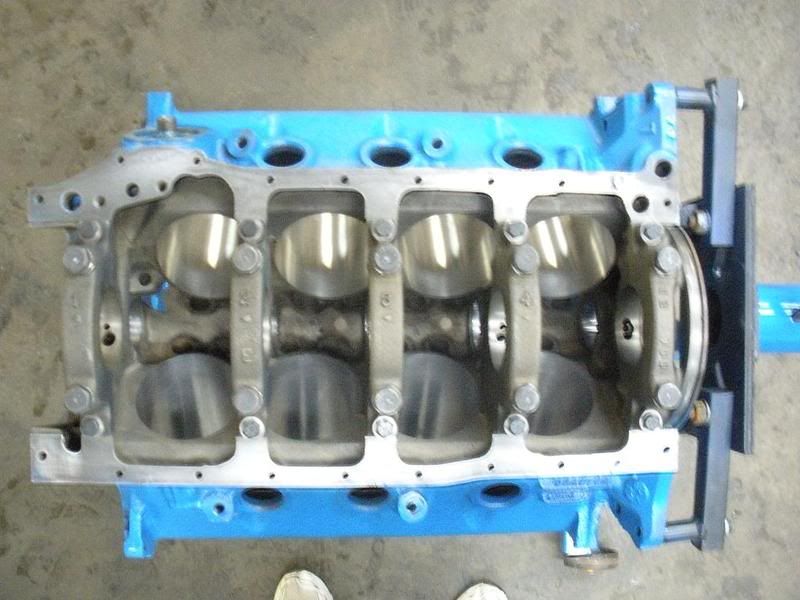
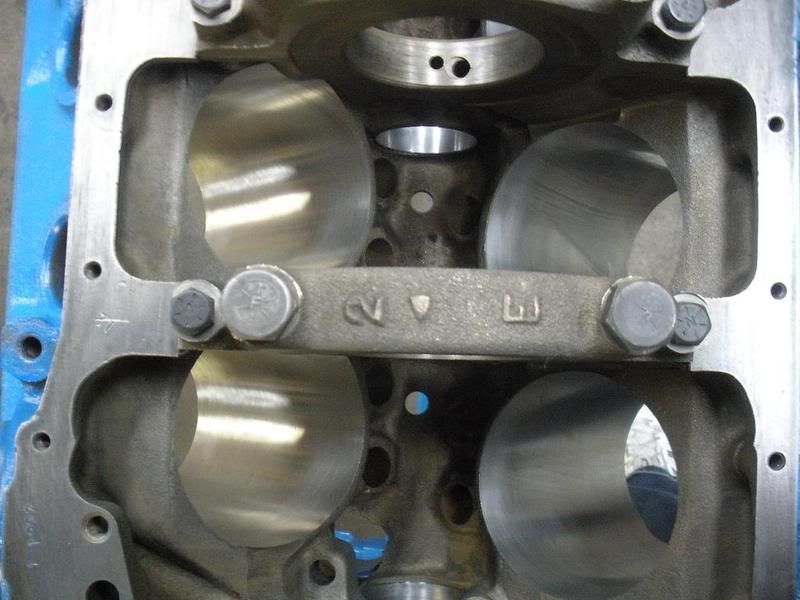
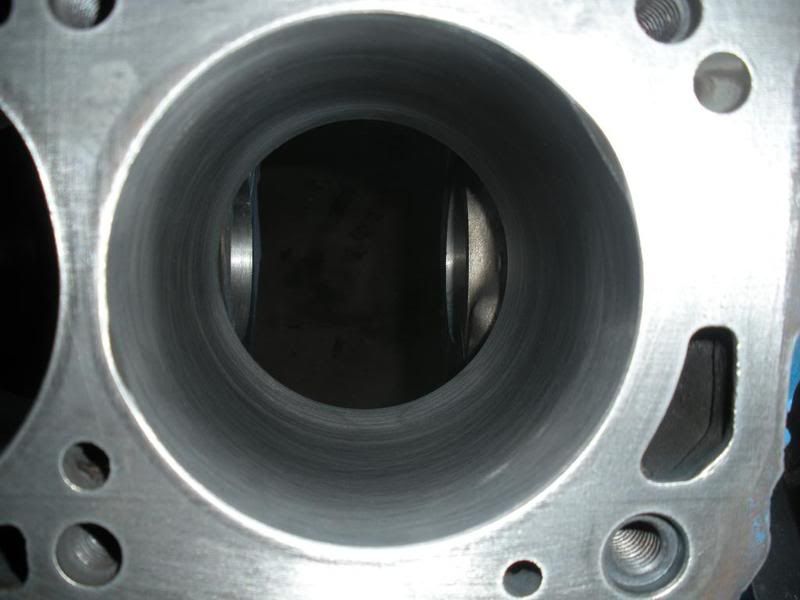
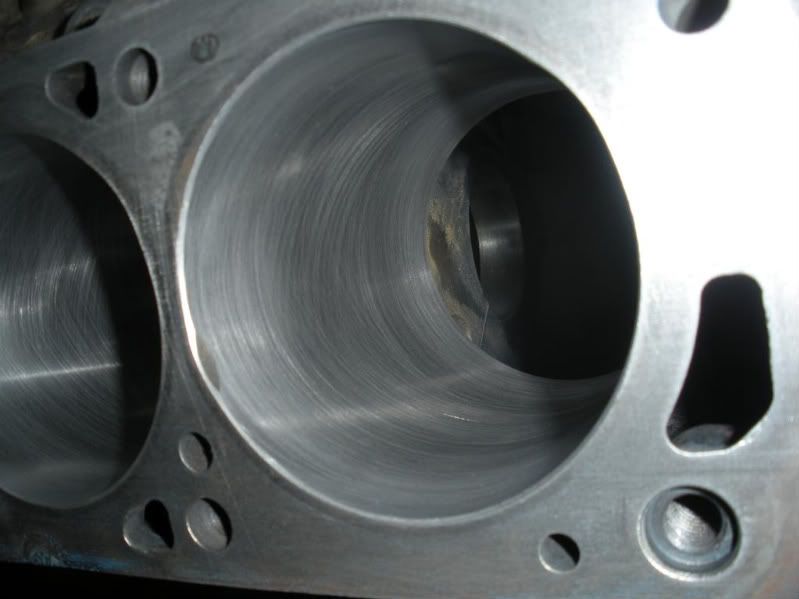
Internal block and cylinders.
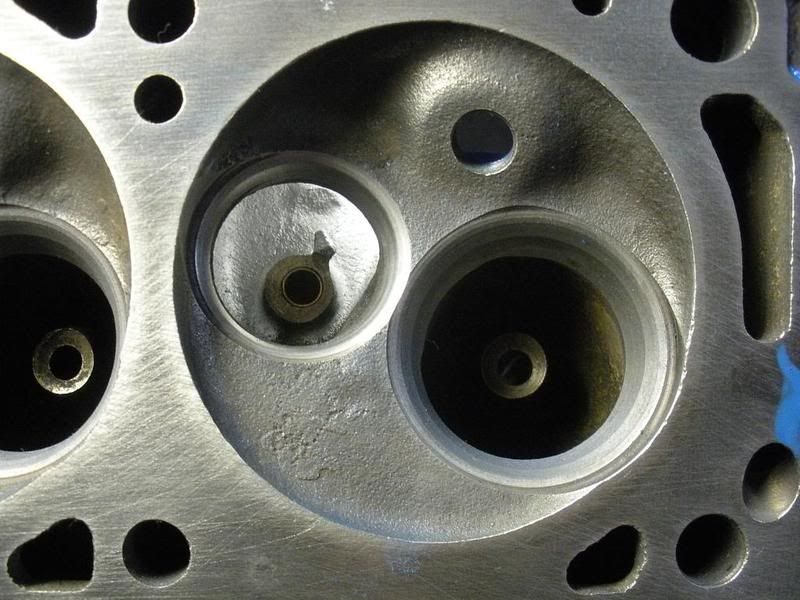
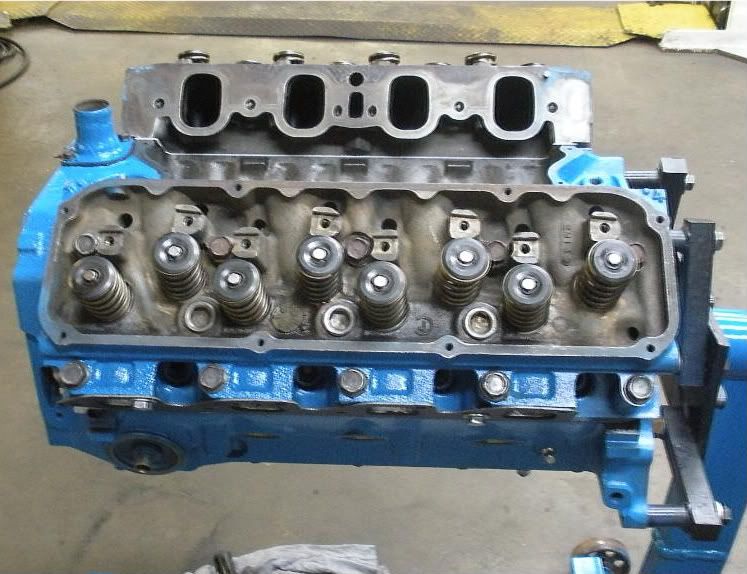
Stainless steel valves.
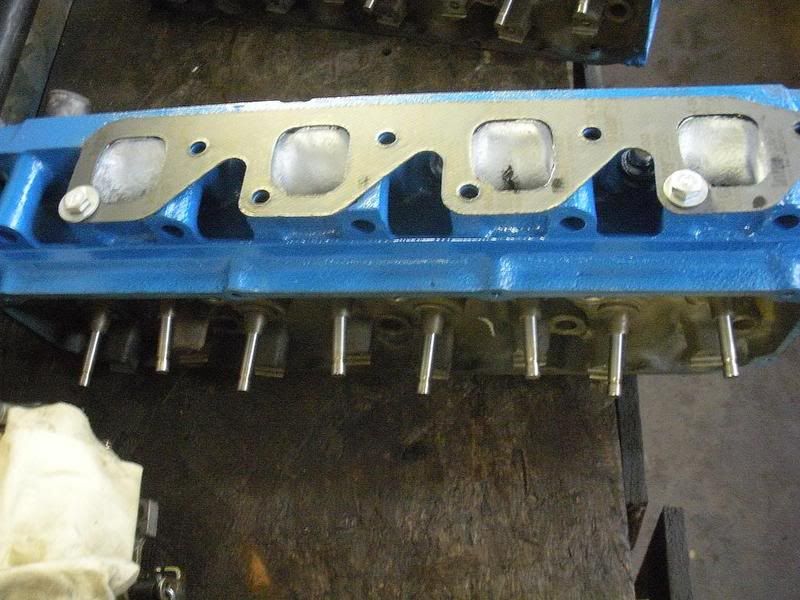
From this angle you can see the canted valves.
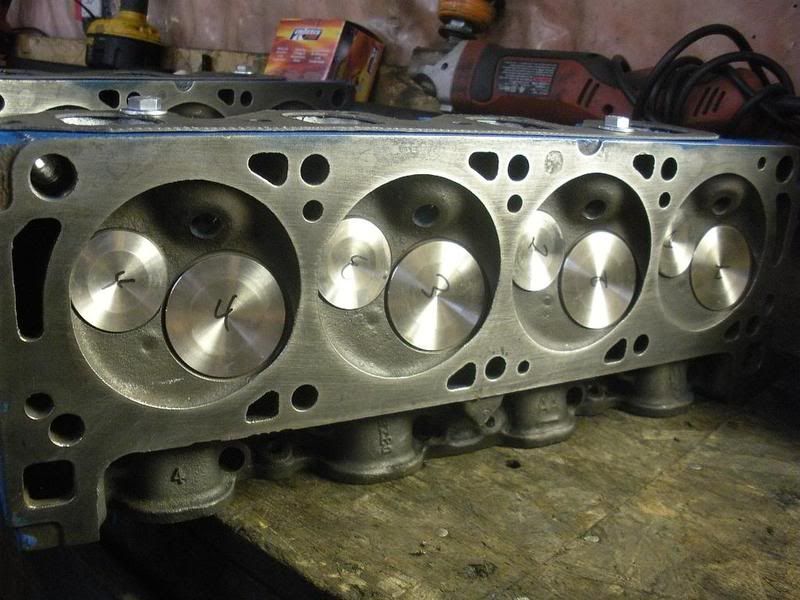
More views of the head.
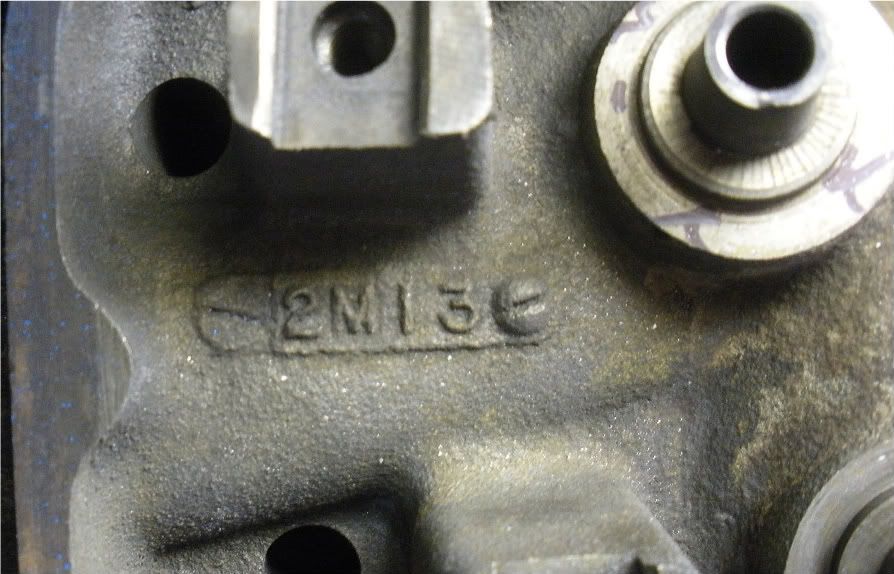
If I’m reading this casting code correctly these heads where cast December 13 1972 (another Wednesday, very lucky wife)
Push rods.

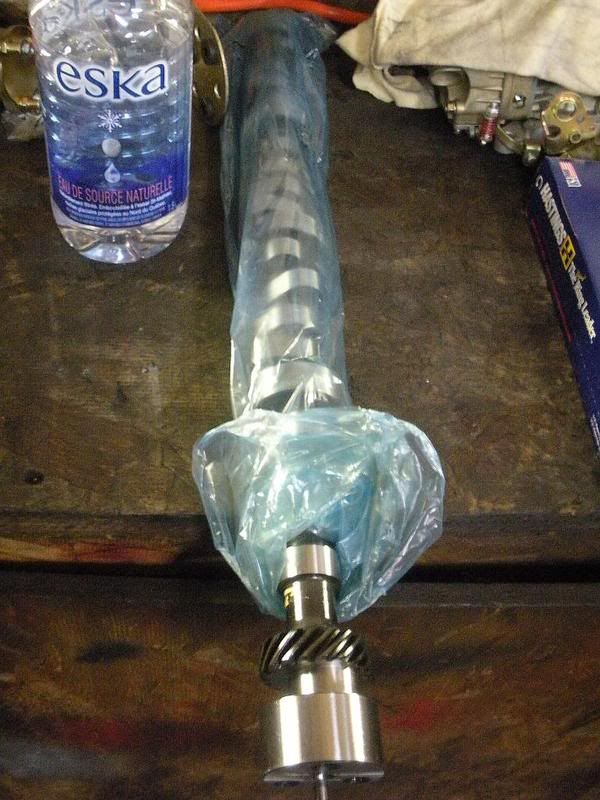
Cam shaft
Finally, my wife’s birthday present (she LOVED IT) thanks Bill.
End of part 8. Part 9 to follow.
It’s been a while since my last up-date so I’ll cover what’s happened. But before I start I have to state that due to some miscommunication between myself and my wife I made some minor errors in describing the current rebuild. The first one is in regards to water in the trunk, the water was not coming from the wheel well as I originally wrote but was in fact getting in from the two longitudinal body seams of the top corners of the trunk. A quick scrape of the old sealant and a quick application of new sealant cured the problem. Secondly, I mistakenly said that the engine cylinder walls would only have to be honed. Truth be told it needed to be bored out 0.030. Finally, along with the heads, crankshaft, and engine block it was decided to retain the original connecting rods which the engine builder assured us would be more than adequate for the estimated engine output.
The current status of the “Trailer Queen” is as follows. All body and paint is complete and the car has been brought to the assembler (Big Block Larry) who is working on renewing the engine bay wiring harness. He decided to re-do the harness because he could not find an OEM style harness for “71 – “73 Mustangs and absolutely hates trying to make universal harnesses fit. He should be mocking up and installing the air conditioner soon as well as the new brake booster and master cylinder. My wife’s disc brake package have finally arrived and delivered to the assembler with the exception of the four callipers and rear dust shields which are going to be powder coated (black) before being installed.
The final remaining engine components have also arrived. The engine has left Trick Engines and is with the engine assembler for final machining and assembly; he will also be responsible to have the engine dynoed at Armstrong Brothers. The engine builder is finding out the joys of trying to find aftermarket Cleveland parts, one problem deals with the valve keepers. The stainless steel exhaust/intake valves required a larger diameter valve keeper than originally thought. They where of such a size that they interfered with the new roller rocker arms. To solve the problem a small relief will be machined in the rockers to clear the keepers. The Cleveland engines where known to bend push rods, with this in mind we purchased slightly shorter, extra strong rods and will lightly machine the rocker pedestals to make up for the difference in length, this will shorten the rod distance from the valve guides to the roller rocker and thus decrease the bending forces applied to the push rods. Another change from stock configuration is the use of flat top pistons vice the dished OEM pistons to give us a slight boost in compression
And now, more photos.
Front SSBC brake kit less pads (on order)
Rear SSBC disc brake conversion kit.
Box of Speed Pro (from Summit Racing) flat top piston overbored by 0.030 with stock connecting rods.
Painted block, although the engine assembler is a big GM fan he customized one of his engine stands for my wife’s engine (check out the legend on the base).
Internal block and cylinders.
Stainless steel valves.
From this angle you can see the canted valves.
More views of the head.
If I’m reading this casting code correctly these heads where cast December 13 1972 (another Wednesday, very lucky wife)
Push rods.
Cam shaft
Finally, my wife’s birthday present (she LOVED IT) thanks Bill.
End of part 8. Part 9 to follow.
Last edited by a moderator:
- Joined
- Jul 2, 2010
- Messages
- 6,612
- Reaction score
- 121
- Location
- Warrenton, Virginia 20186
- My Car
- 73 Mustang Conv.
01 Mustang Bullitt (my son owns now)
04 Oxford White Mach 1
04 Azure Blue Mach 1 (sold)
You still got my attention. Great photos!
- Joined
- Aug 7, 2010
- Messages
- 5,074
- Reaction score
- 10
- Location
- McDermitt, NV
- My Car
- 1973 Convertible H Code, 351C 2V FMX
What a nice build thread. I remember well my Cleveland engine build (um, I guess I'm still IN the build).
Nice story and pics!
Doc
Nice story and pics!
Doc
::goodjob:: Still enjoying your updates and pictures::thumb::
Once again....great posting!
Once again....great posting!
mach1mama
Well-known member
- Joined
- Jan 8, 2012
- Messages
- 156
- Reaction score
- 1
- Location
- nova scotia, canada
- My Car
- 1973 Mach 1, 351 cleveland cobra jet engine. Gold glow, ginger interior. Long tube headers. completely rebuilt engine. Forged piston, roller rockers. lifters. Comp cams. Edelbrook carb and intake. Trush mufflers stainless steele custom exhaust. Added air conditioning, SSBC disc brakes. Rebuilt transmittion. pretty much anything you can do and a BUNCH of body work, functional not cosmetic.
Part 9 (Originally posted 16 Mar 2011)
Again, nothing much to report due to ongoing delays in assembling the “Trailer Queen”. The shop assigned to re-assemble the Mach 1 and upgrade the brakes, exhaust and AC system lost one his employees for a couple of weeks which is putting him way behind schedule. At least all the parts have arrived and are on hand.
Since part 8 of this write up there has been one change to the engine dealing with the roller rocker arms. As explained the original rocker arms sourced for this rebuild did not clear the valve spring keepers requiring minor machining. It turns out that the reason they didn’t fit had to do to the fact that the engine builder ordered the wrong ones to begin with, instead of getting pedestal mounted rockers he mistakenly ordered stud mounted ones. Once this was sorted out and the right pieces arrived the rest of the engine was finally assembled. This was about two weeks ago. However, the shop contracted to break-in and dyno the engine cancelled our appointment not once, but twice, we have a firm scheduled appointment for next Tuesday. Hopefully I will be able to post a video of the engines’ first cry of life and the dyno run.
In the meantime here are more photos to keep you interested.
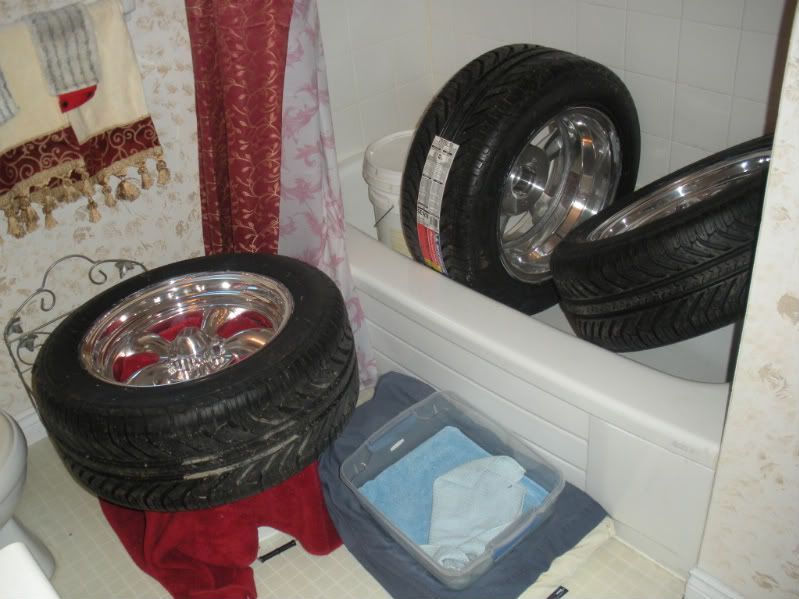
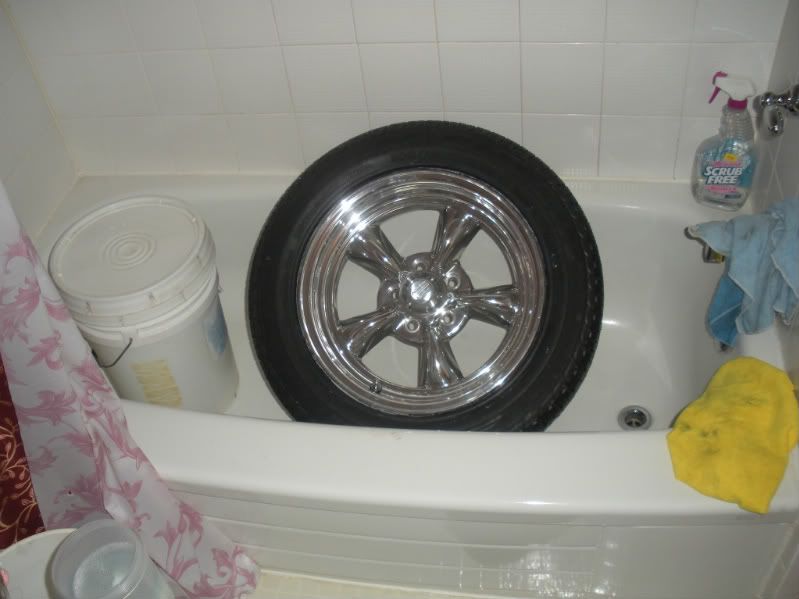
!!! Damn you woman !!! use your own tub to clean/polish your wheels! Thanks Bill, now I have to take a sponge bath.

Shock tower cover and brake parts fresh from the paint shop and ready for installation (ignore the nosy cat).
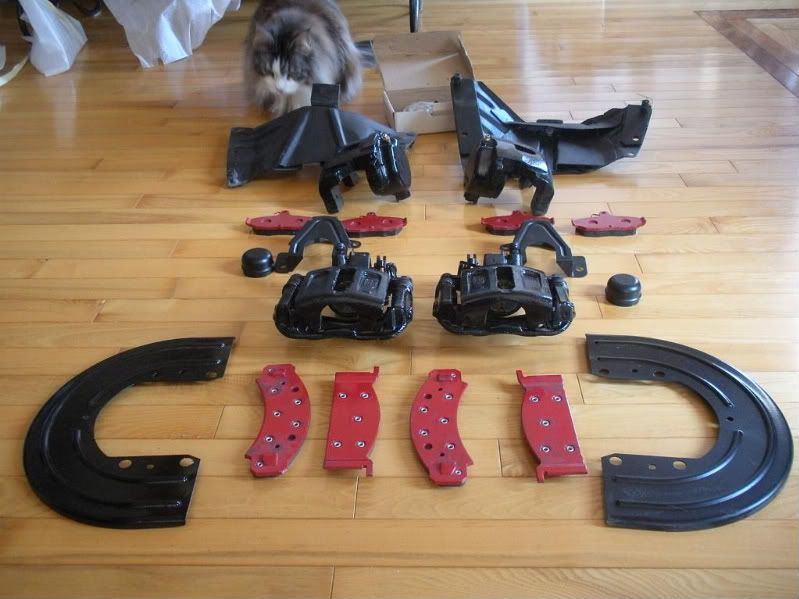
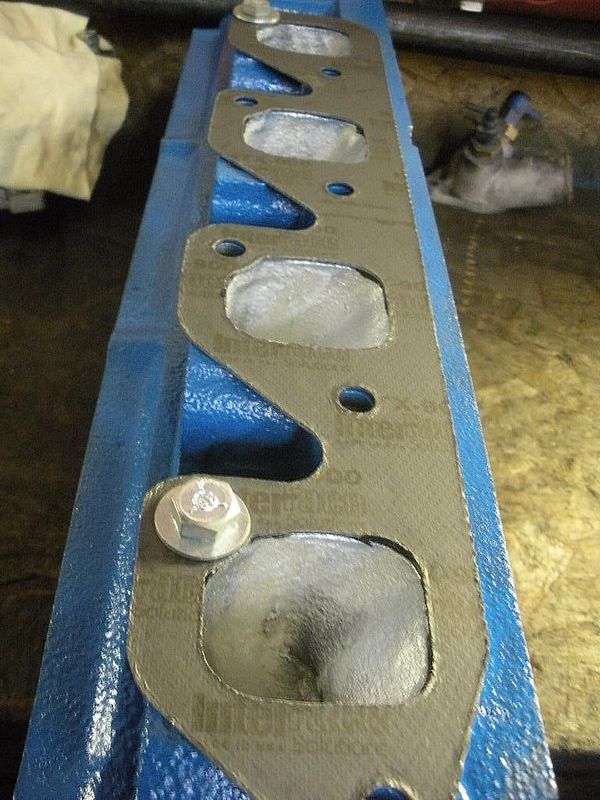
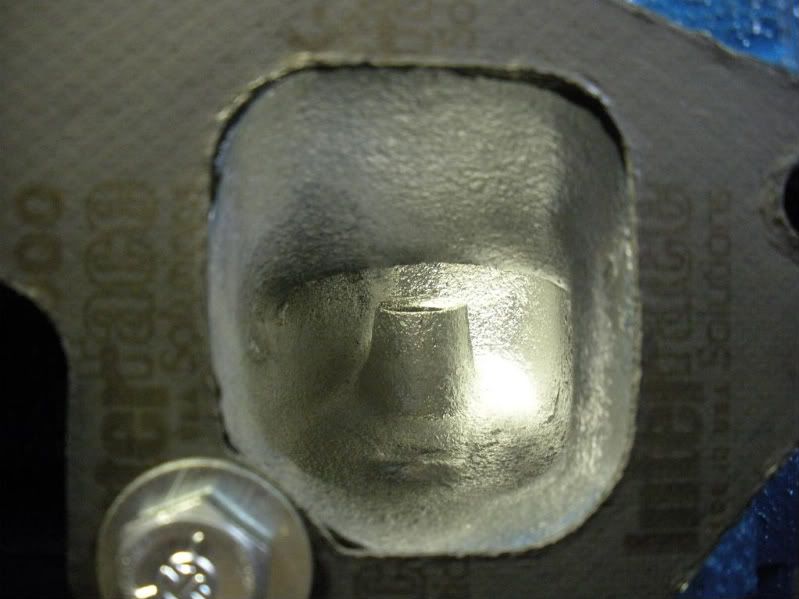
Gaskets, valves, valve springs etc…
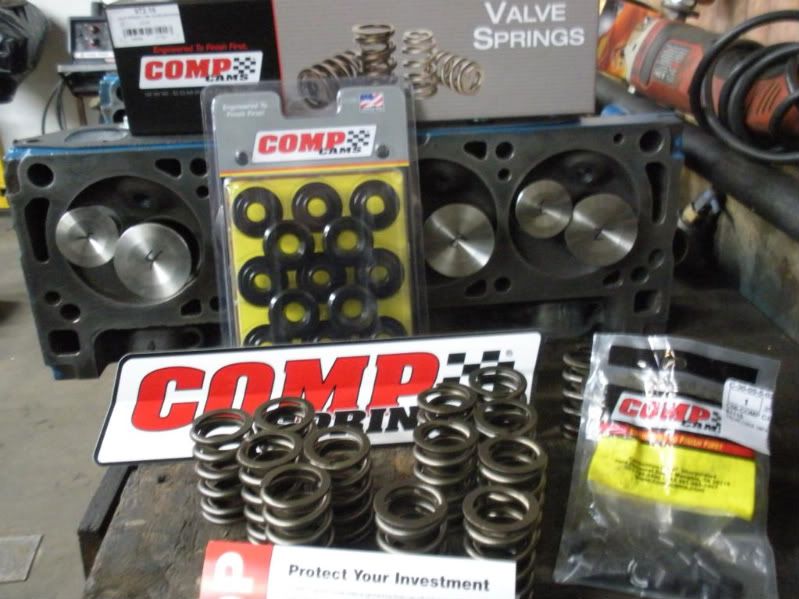
Gaskets.

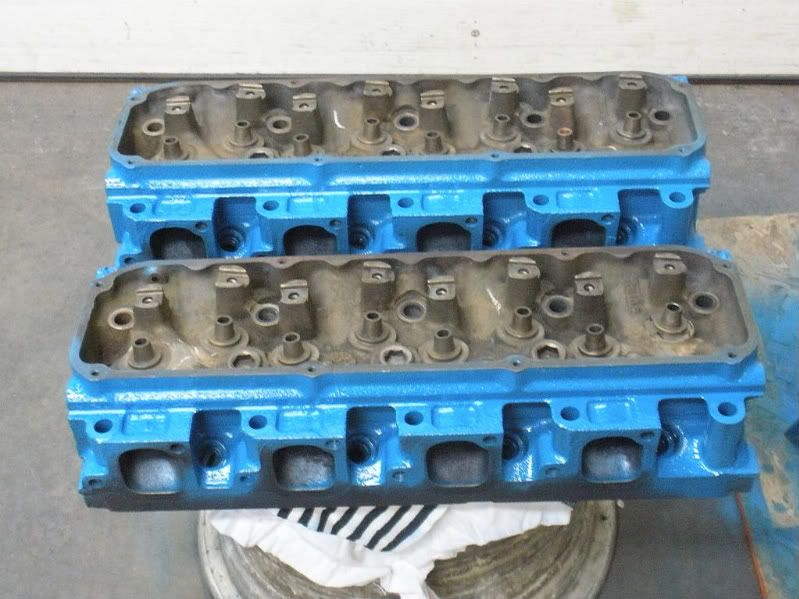
Painted heads
Engine assembly
Crank in.
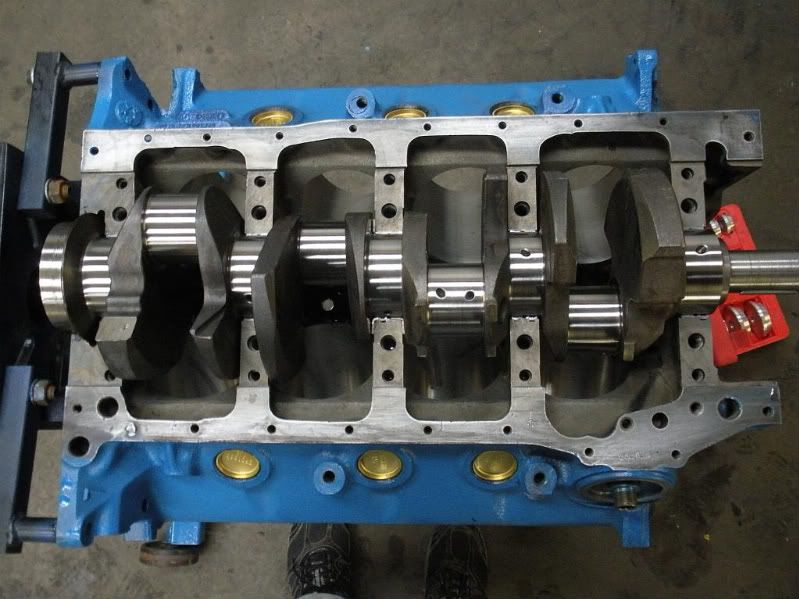
4 bolt mains attached.
Forged pistons are in.
Heads attached to block with valves and valve springs fitted.
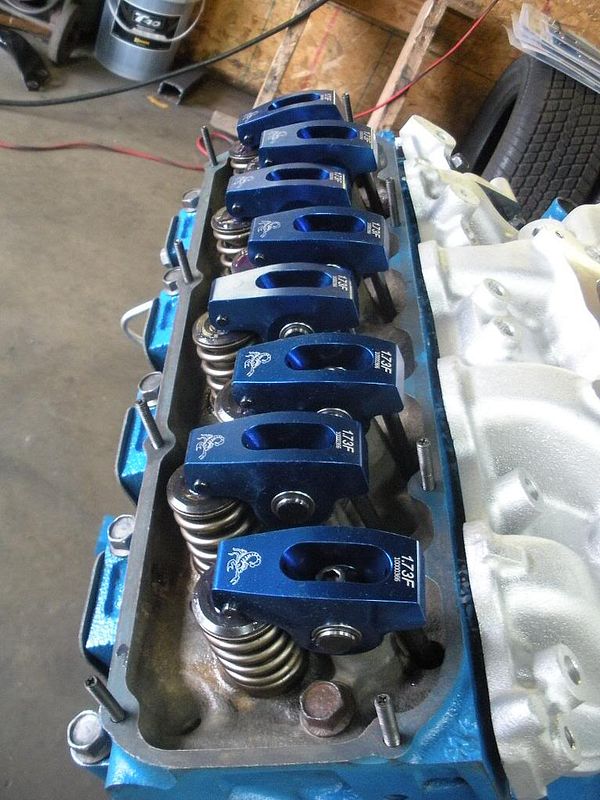
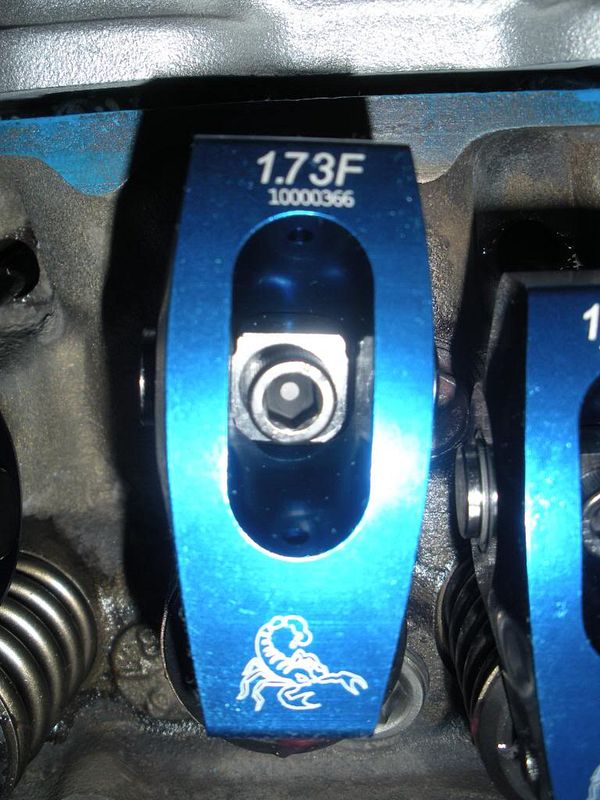
Roller rockers installed.
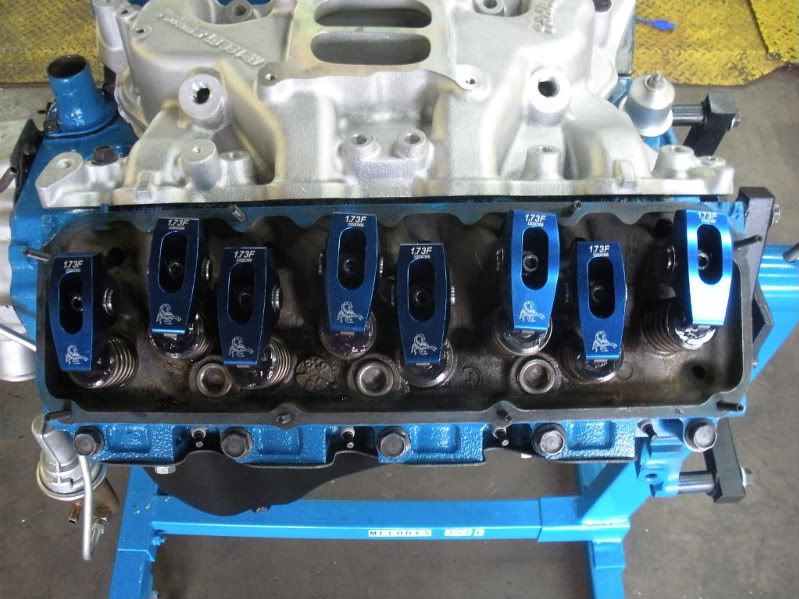
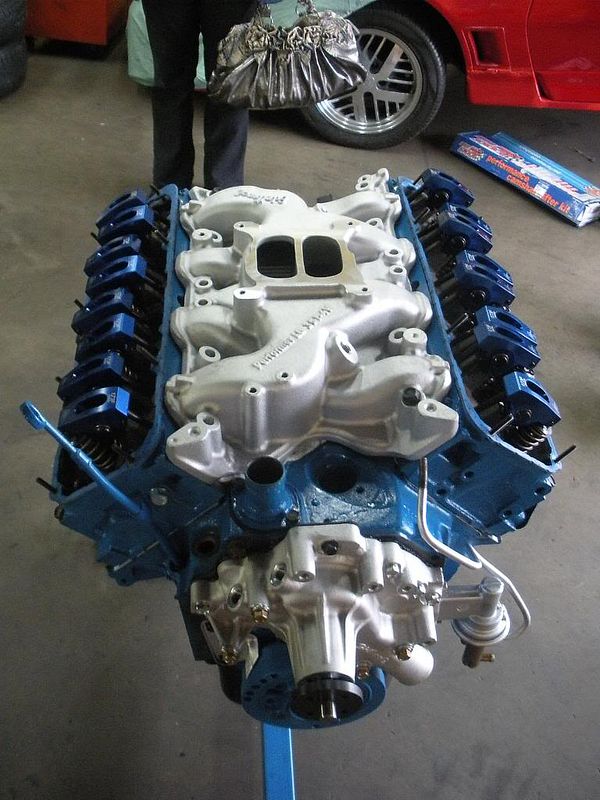
Intake on.
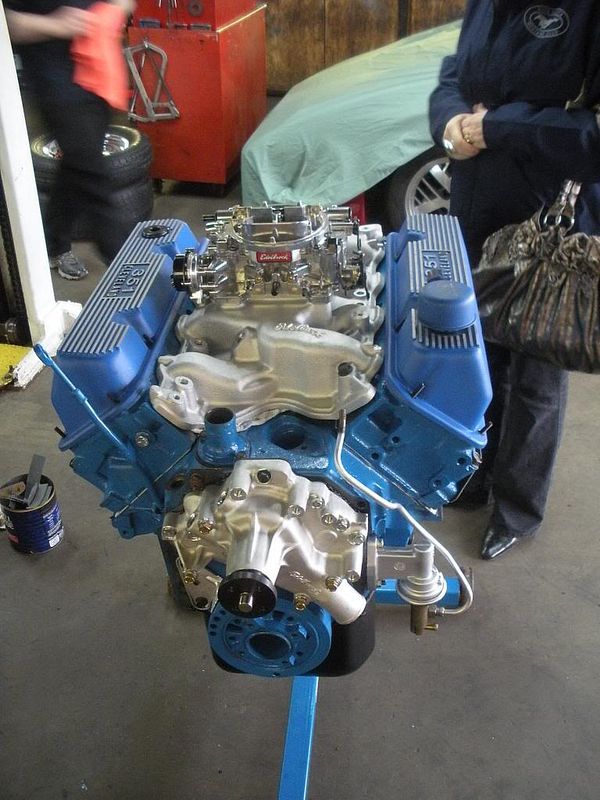
Carburator and valve covers.
Almost ready to race (missing distributor)
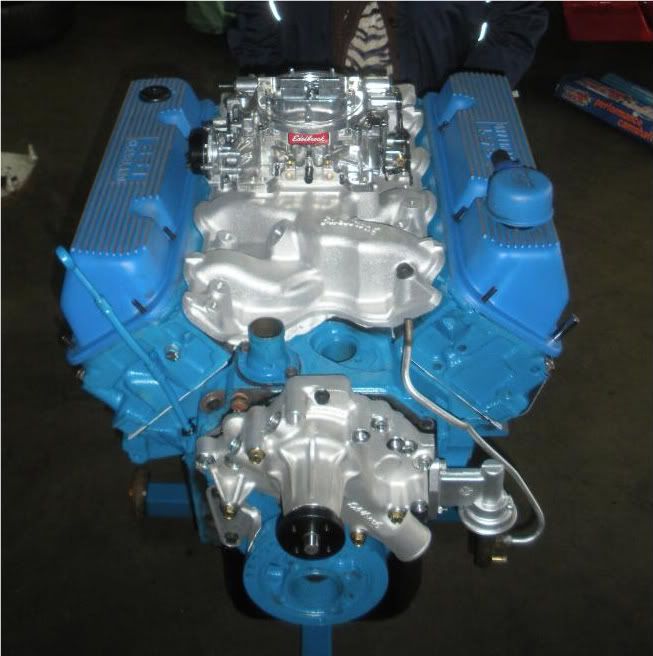
End of Part 9. Part 10 to follow.
Again, nothing much to report due to ongoing delays in assembling the “Trailer Queen”. The shop assigned to re-assemble the Mach 1 and upgrade the brakes, exhaust and AC system lost one his employees for a couple of weeks which is putting him way behind schedule. At least all the parts have arrived and are on hand.
Since part 8 of this write up there has been one change to the engine dealing with the roller rocker arms. As explained the original rocker arms sourced for this rebuild did not clear the valve spring keepers requiring minor machining. It turns out that the reason they didn’t fit had to do to the fact that the engine builder ordered the wrong ones to begin with, instead of getting pedestal mounted rockers he mistakenly ordered stud mounted ones. Once this was sorted out and the right pieces arrived the rest of the engine was finally assembled. This was about two weeks ago. However, the shop contracted to break-in and dyno the engine cancelled our appointment not once, but twice, we have a firm scheduled appointment for next Tuesday. Hopefully I will be able to post a video of the engines’ first cry of life and the dyno run.
In the meantime here are more photos to keep you interested.
!!! Damn you woman !!! use your own tub to clean/polish your wheels! Thanks Bill, now I have to take a sponge bath.
Shock tower cover and brake parts fresh from the paint shop and ready for installation (ignore the nosy cat).
Gaskets, valves, valve springs etc…
Gaskets.
Painted heads
Engine assembly
Crank in.
4 bolt mains attached.
Forged pistons are in.
Heads attached to block with valves and valve springs fitted.
Roller rockers installed.
Intake on.
Carburator and valve covers.
Almost ready to race (missing distributor)
End of Part 9. Part 10 to follow.
- Joined
- Jul 2, 2010
- Messages
- 6,612
- Reaction score
- 121
- Location
- Warrenton, Virginia 20186
- My Car
- 73 Mustang Conv.
01 Mustang Bullitt (my son owns now)
04 Oxford White Mach 1
04 Azure Blue Mach 1 (sold)
Great update and pictures as usual! I never thought about bringing my wheels in to clean them in the tub! Not sure I would get away with that with my wife without minor injuries! Anyway, I'm sure you didn't mind a few sponge baths while your wife cleaned her wheels! They look great!
- Joined
- Jan 4, 2012
- Messages
- 417
- Reaction score
- 2
- Location
- Australia
- My Car
- 1966 coupe - 347w
1971 Mach 1 - J code
1972 Mach 1 - Q code
Excellent read, really enjoy it so far.....
- Joined
- Aug 7, 2010
- Messages
- 5,074
- Reaction score
- 10
- Location
- McDermitt, NV
- My Car
- 1973 Convertible H Code, 351C 2V FMX
Great stuff! Keep 'em coming!
Doc
Doc
mach1mama
Well-known member
- Joined
- Jan 8, 2012
- Messages
- 156
- Reaction score
- 1
- Location
- nova scotia, canada
- My Car
- 1973 Mach 1, 351 cleveland cobra jet engine. Gold glow, ginger interior. Long tube headers. completely rebuilt engine. Forged piston, roller rockers. lifters. Comp cams. Edelbrook carb and intake. Trush mufflers stainless steele custom exhaust. Added air conditioning, SSBC disc brakes. Rebuilt transmittion. pretty much anything you can do and a BUNCH of body work, functional not cosmetic.
Using the bathtub was my idea. Although, I have had a couple of "remarks" about that from other women. I just thought it was the most efficient. Besides, it was the spare bathroom.Great update and pictures as usual! I never thought about bringing my wheels in to clean them in the tub! Not sure I would get away with that with my wife without minor injuries! Anyway, I'm sure you didn't mind a few sponge baths while your wife cleaned her wheels! They look great!
- Joined
- Sep 13, 2010
- Messages
- 7,933
- Reaction score
- 440
We are gonna have to get you and your husband signed upUsing the bathtub was my idea. Although, I have had a couple of "remarks" about that from other women. I just thought it was the most efficient. Besides, it was the spare bathroom.Great update and pictures as usual! I never thought about bringing my wheels in to clean them in the tub! Not sure I would get away with that with my wife without minor injuries! Anyway, I'm sure you didn't mind a few sponge baths while your wife cleaned her wheels! They look great!
I stay confused on who I'm talking to:huh:- Joined
- Jul 19, 2011
- Messages
- 4,829
- Reaction score
- 22
- Location
- Pittsburgh, PA
- My Car
- 1973 Mach 1 Q code 4 speed
1973 Chevelle 454 SS
2005 Magnum RT
2008 Colorado
Read this from start to finish tonight. Way to go!!! Congratulations on doing the job right! :goodpost:
I like what I see. Nice Job.
- Joined
- Aug 7, 2010
- Messages
- 5,074
- Reaction score
- 10
- Location
- McDermitt, NV
- My Car
- 1973 Convertible H Code, 351C 2V FMX
I agree. Plus, two accounts cost the same as one!We are gonna have to get you and your husband signed upUsing the bathtub was my idea. Although, I have had a couple of "remarks" about that from other women. I just thought it was the most efficient. Besides, it was the spare bathroom.
Doc
- Joined
- Feb 19, 2011
- Messages
- 1,228
- Reaction score
- 4
- Location
- Southern Arizona
- My Car
- 1971 Mustang Grande,
1973 MAch 1
Great combined effort in keeping us updated.
Like a great book - hard to put down.
Like a great book - hard to put down.
Similar threads
- Replies
- 16
- Views
- 769
- Replies
- 22
- Views
- 788
- Replies
- 16
- Views
- 573