Travails of the Trailer Queen

7173Mustangs.com

Help Support 7173Mustangs.com:

This site may earn a commission from merchant affiliate links, including eBay, Amazon, and others.
Just letting you all know that I've joined this website so that should help in avoiding confusion between who's posting, Myself or mach1mama.

 
Last edited by a moderator:
Using the bathtub was my idea. Although, I have had a couple of "remarks" about that from other women. I just thought it was the most efficient. Besides, it was the spare bathroom. :)
We are gonna have to get you and your husband signed up:D I stay confused on who I'm talking to:huh:
Sorry about that, I believe he has and will be posting the rest of his write up under his own user name. That was me "Mach1mama" who answered. :angel:I agree. Plus, two accounts cost the same as one! :)

Doc
 
Part 10 (Originally posted 27 Mar 2011)

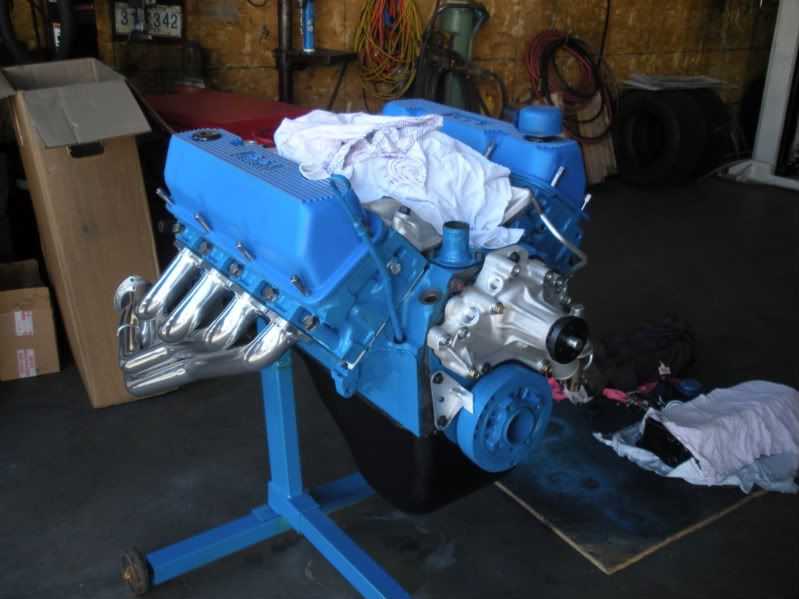
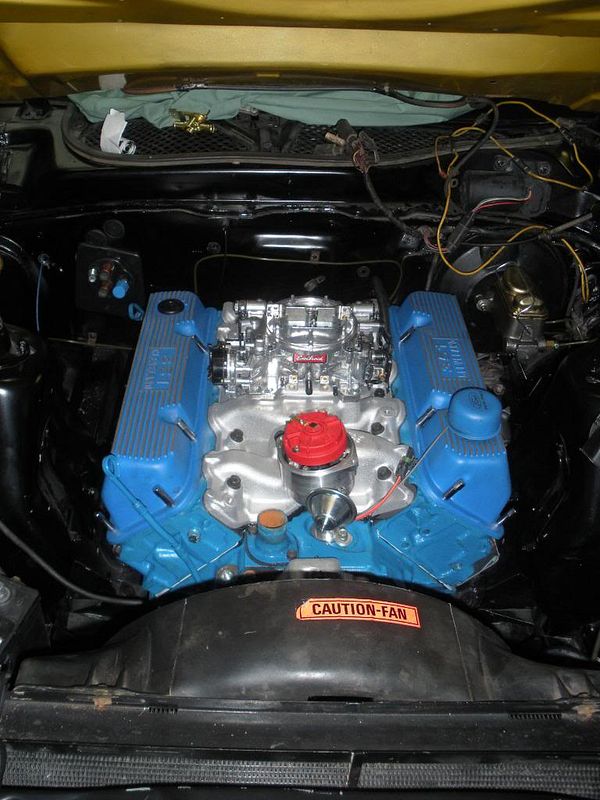
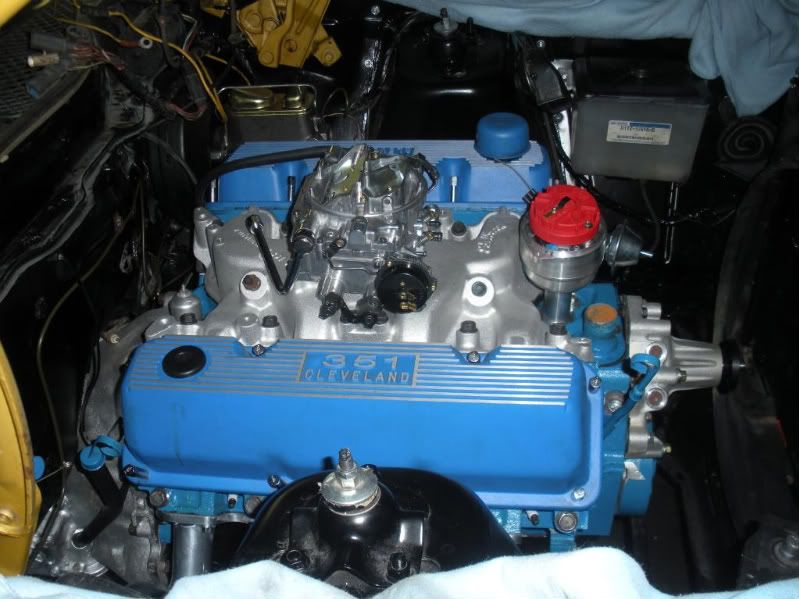
Before we start let’s show more pictures of the engine with the headers on.

mod215.jpg


mod217.jpg


Since my last instalment there have been many changes with regards to the rebuild of the Trailer Queen and I have some good news, some not so good news and some bad news.

So, let’s start with the good news, we finally got some Dyno time at Armstrong Brothers in Kentville, NS. They were very helpful and quickly got the 351 mounted and prepped for breaking in and doing the Dyno pull. Once she was all set we crossed our fingers as the engine took its first breath after being torn apart and rebuilt. She started right up, but had to be shut down to adjust the timing, a couple of quick adjustments, a re-start and she ran flawlessly. About 10 minutes into the run oil and exhaust temps were checked, all normal. My wife was extremely happy at how easy the engine started, no more doing the 5 - 10 minute pre-departure “Dance” to get the car moving. The actual Dyno pull went just as easily, after three pulls the results were identical, max horsepower is 337 plus change, max torque is 387 ft/lbs plus change, not too shabby considering she’s not fully broken in yet, had the wrong headers at the time (the shop only had the 2V headers vice the engines 4V set-up) and was running a 650 Edelbrock carb / intake manifold, while not the best performance set-up, it does make for a very streetable cruiser. The only head scratcher is that the engine did not really want to rev above 5,000 rpm. I’m hard of hearing so I didn’t notice anything untoward, but the engine builder said it sounded like the valves were floating, I guess we’ll have to re-check the valve springs. Anyway, seeing how the wife is running a C6 transmission, the engine will probably never get to 5k and the wife is perfectly happy with the results. I have the Dyno sheet but it is very faint due to low ink in the printer, so we’re having someone manipulate the image to make it readable. We also took some video footage that my neighbour is editing for me. Once I get the proof in my hands I will immediately post it for all to view.

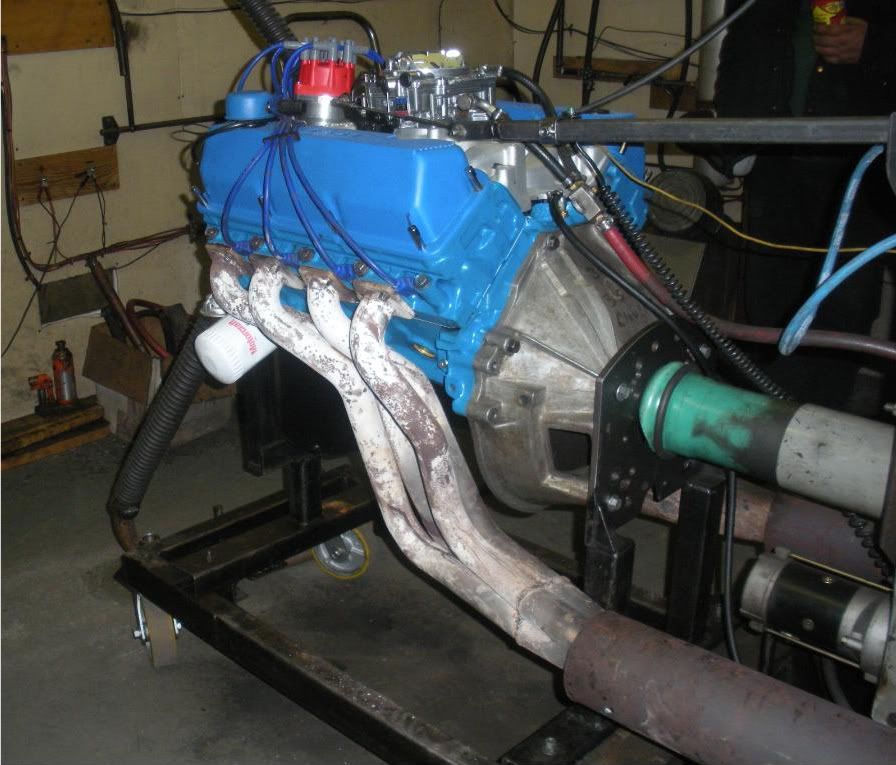
Ready to go on the Dyno.
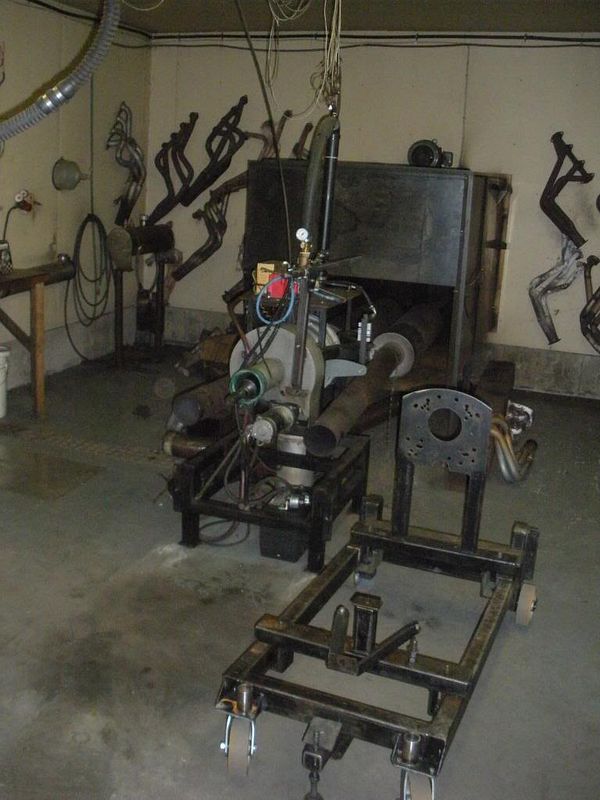
mod209.jpg


The Dyno.

mod210-1.jpg


Engine secured to the Dyno. Those shop headers have the flanges for the smaller 2V exhaust ports.

mod211.jpg


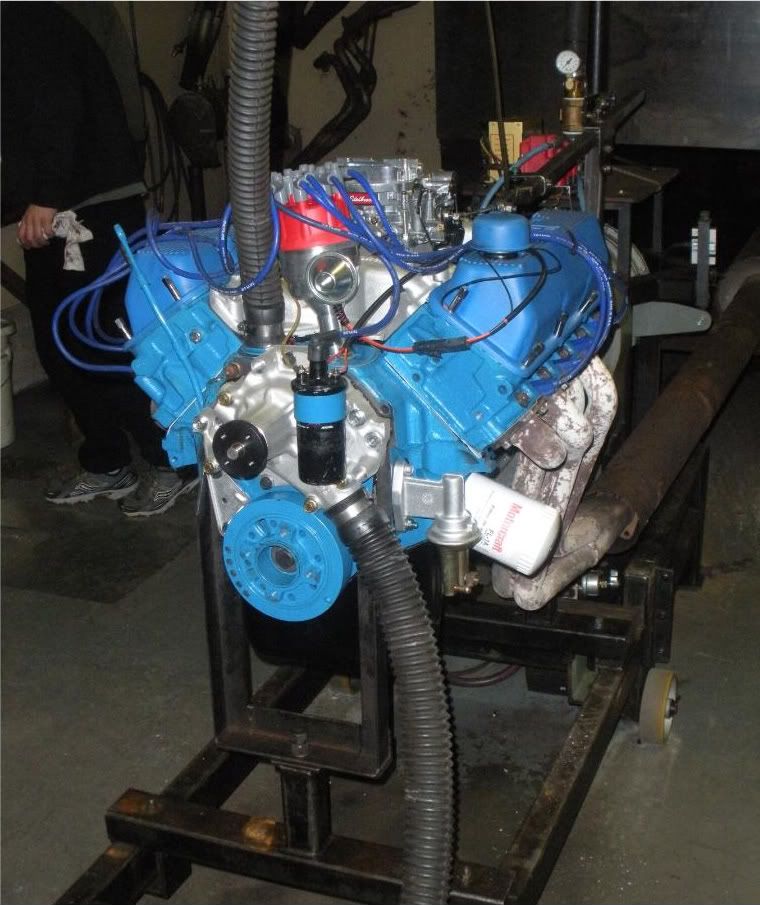
Water hooked up and ready to go.

mod212.jpg


Now for the not so good news, the shop chosen to tear apart and re-assemble the Mach 1 had the car for a little over three weeks after receiving it from the body shop but had not done any of the work he was responsible for. This was due primarily to a lack of manpower and being way behind on many other projects, after a frank discussion it became apparent that he could not give us a firm start, let alone a completion date for the Trailer Queen. After further discussion it was reluctantly decided that we would look at other alternatives in getting the remaining work completed while compensating him for the work that he had done.

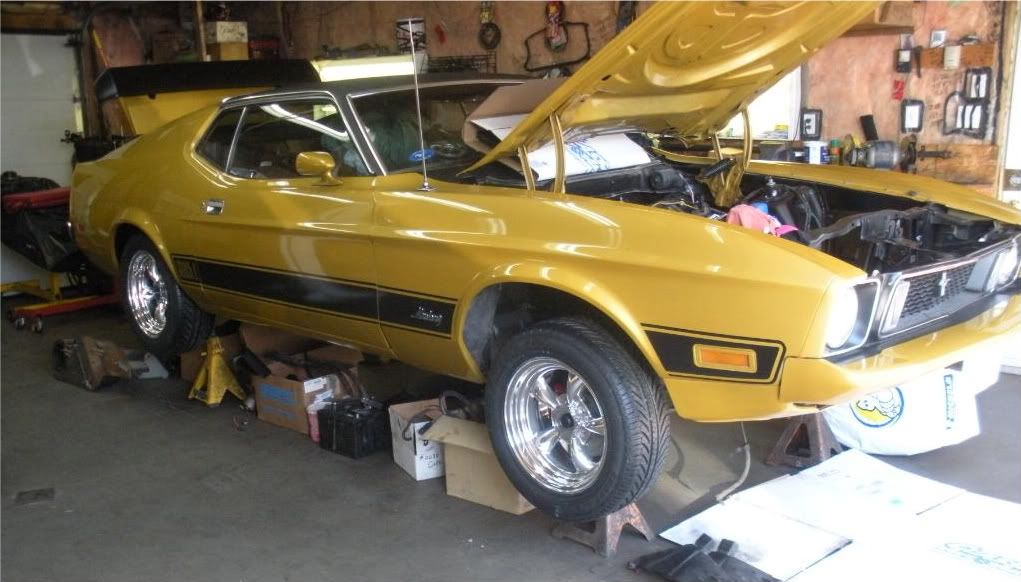
For the bad news, after the car was towed from the assembler we got our first good look at the assembled Mach 1 since it was dropped off at the body shop. The front end looked very much out of whack. The body shop did a superb job of replacing the rotten metal, repainting the engine bay as well as matching and blending the paint on the body, but we don’t know what happened to the front of the car. The shop did replace the front cross member and radiator support bulkhead, we think that it’s possible that the rad support may have been welded in either crooked or twisted. Either way we’re having the problem looked at by an independent body specialist to identify exactly what the problem is and discuss with us what our options are. Hopefully it will only require some tweaking and adjusting, but I seriously doubt it. My fear is that the rad support, and possibly the cross member may have to have the welds grounded off, pieces re-aligned re-welded.

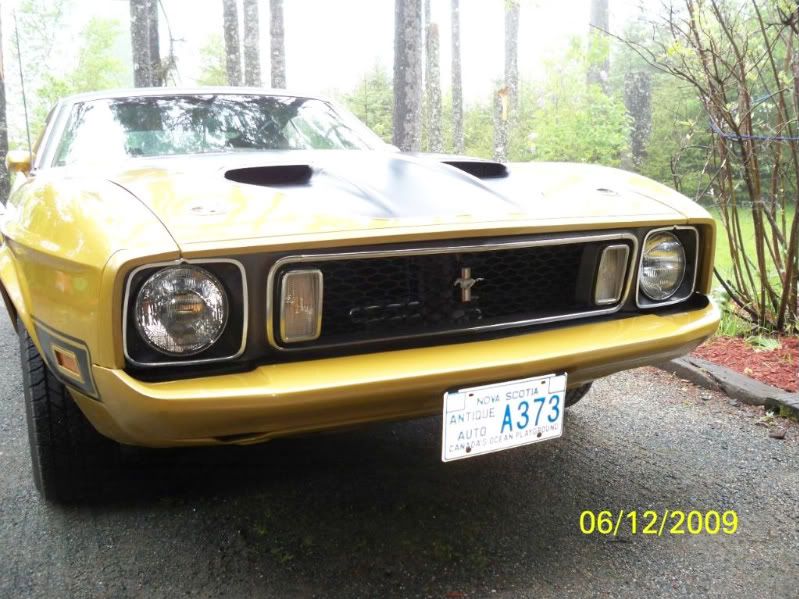
Front end when the car was purchased summer of 2009.

100_3119.jpg


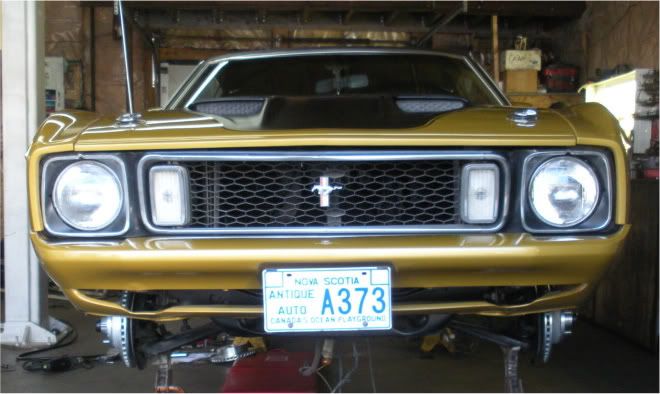
Taken the day the car was loaded on flat bed to start its rebuild.

mod213.jpg


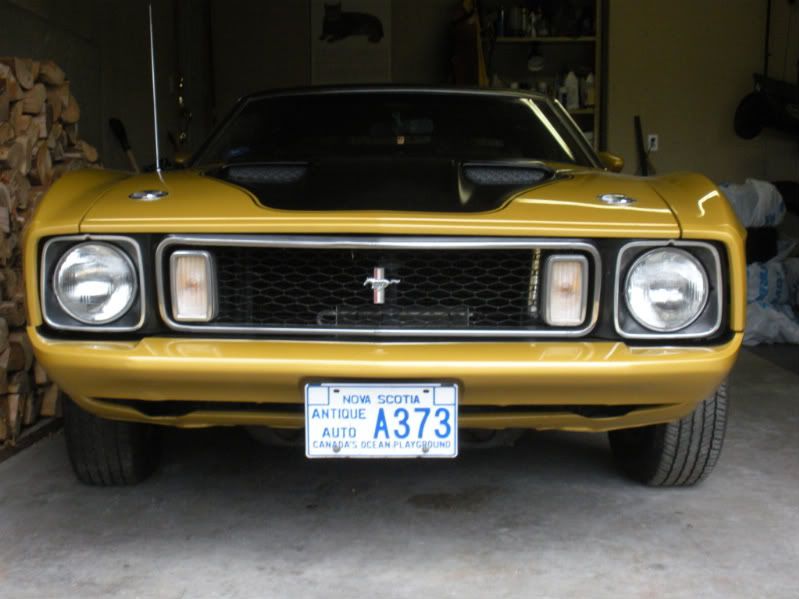
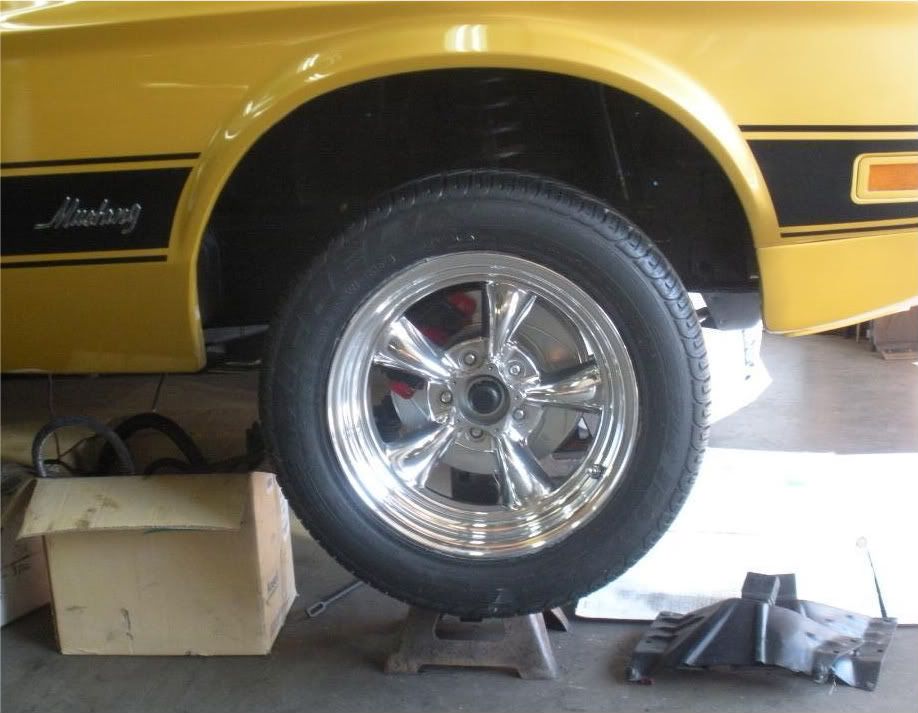
Just back from the body shop. It’s a little difficult to see but the grill is not sitting squarely in the opening and the bumper seems to sit a little higher than normal. When viewed from the side the grill appears twisted, the edges of the parking lamp bezels are not parallel (one side leans back while the other leans forward)

mod255-1.jpg


What are your comments on this?

End of Part 10. Part 11 to follow.

 
Great installment! The grill does look lower on the drivers side and the top stainless grill molding looks deformed on the same side too. I'm sure you have a resolution!

 
Great installment! The grill does look lower on the drivers side and the top stainless grill molding looks deformed on the same side too. I'm sure you have a resolution!
All shall be revealed.

 
Well..Here's my opinion comments as someone with over 25 years in the auto body biz..The fit of the grill..hood..fenders..valance wasn't that great to start with..The hood is sitting down at the front & doesn't sit flush to the tops of the fender extensions..The passenger side fender is rolled in at the front (touching the side of the grill) & was like that in the before picture. The valance in the after picture is totally whacked out...One thing I always stress to people when removing fenders etc is take measurements BEFORE you remove parts & to make your self index marks like so

So unless you paid for this stuff or it was spelled out in the contract you got the best the shop could do with the money you paid. What needs to be done is the nose needs to come off.. the rad support, aprons, cross member measured for square & correct placement..if they are off they need to be loosened up by removing the spot welds.. Then installing sheet metal screws..Then fitting the nose to confirm alignment..Tweaking as required..Removing the nose & welding back in the correct position..A ton of work..Maybe you will get lucky & just be able to move some stuff around.
 
Well..Here's my opinion comments as someone with over 25 years in the auto body biz..The fit of the grill..hood..fenders..valance wasn't that great to start with..The hood is sitting down at the front & doesn't sit flush to the tops of the fender extensions..The passenger side fender is rolled in at the front (touching the side of the grill) & was like that in the before picture. The valance in the after picture is totally whacked out...One thing I always stress to people when removing fenders etc is take measurements BEFORE you remove parts & to make your self index marks like so


You are bang on in your assessment. I can't really comment on the details of the contract as it's my wife's rebuild and she jealously kept things some things close to the chest. Please remember this rebuild was done last winter. And your right the alignment of some of the panels where off to begin with. I will have more information in the next few episodes of the ongoing saga of the "Travails of The Trailer Queen".

 
Part 11 (Originally posted 03 Apr 2011)

So, since my wife took possession back of her Mach 1 she found a willing and skilled mechanic to assist her in re-assembling the Trailer Queen. Although he will be doing the majority of the work, he is so impressed with the wife’s drive, determination and interest in her car that he acceded to her request to put some sweat equity into her own car by doing some of the grunt work and being the shop Gopher. So far she been busy scraping the rear wheel wells, removing the old anti rust coating and dirt etc… The wells where then re-coated with three coats of stone guard and finished with mat black paint. She is also removing, cleaning and replacing the trunk seal, she has also done several runs to various parts stores gathering the necessary parts and pieces. The wife is thoroughly enjoying actively participating in the rebuild and getting her hands dirty.

The current status of the car is as follows:

The engine, transmission and headers have been assembled and temporarily installed in the car. One thing we’ve discovered is that even though vendors may say that their products are direct replacement and/or do not require modification, usually, that is not the case. This is particularly true in the case of the headers. In order to get them to fit properly the driver side engine mount had to be modified to allow for proper clearance. On the passenger side the issue is with transmission, the headers will have to be heated and bent in order for the collector to clear the transmission fluid pan.

With the powertrain in place he made sure that the new AC system had enough clearance around the engine, so far everything is good on that end. All the required holes have been cut and the interior of the car partially gutted to allow easy access for the HVAC system install.

The front and rear disc brake system, with the required master cylinder, is installed and the new wheels and rubber bolted on.

The engine bay wiring harness has been inspected and several wires will need to be replaced.

We’ve had the issue with the front end looked at by an independent body specialist who confirmed my fear that the radiator support bulkhead has incorrectly installed, luckily it is not a serious issue and can be easily removed, repositioned and welded in place, this should take care of all the body panel alignment issues (let’s be clear here that the chassis is straight and true).

Another surprise (this car if full of surprises), I’ve been under the car several times, so has my wife and about three or four mechanics and none of us noticed two spots where rust had eaten through the floor pan until the current mechanic pointed it out to us last week. The spots are on both sides of the car about two – three inches from the rocker panels behind the front seats. Luckily the affected areas are small and will be temporarily patched, the metal will be properly replaced next winter when the wife plans on having the interior gutted and redone/replaced.

And now for some more photographs.

The wife putting in some sweat equity.

mod238.jpg


mod244.jpg


mod243.jpg


The finished transmission.

mod245.jpg


mod246.jpg


Front disc brakes installed.

mod233.jpg


mod235.jpg


mod240.jpg


Rear disc brakes installed.

mod262.jpg


mod264.jpg


The wheels have been cleaned, buffed and polished and are ready to go.

mod256.jpg


Wheels on car.

mod257-1.jpg


mod258-1.jpg


mod259-1.jpg


Wiring harness.

mod271.jpg


Roughing in for the air conditioner.

mod270.jpg


mod266.jpg


mod269.jpg


Odd parts and pieces.

mod230.jpg


mod222.jpg


End of Part 11. Part 12 to follow.

 
Nice progress in this last installment. Coming together nicely.
At this point of the rebuild there was still a lot issues/problems that have yet to mainfest themselves. At one point we didn't think the Mach would ever get done.

 
Great story! I took plenty of pictures of my restoration, but never took the time to document it in writing like you did. Great work.

 
Great story so far, happy to hear the frame was ok and only the support needs to be moved

AJ

 
Shippy ....the paint is purdy... thats southern for pretty. New paint technolog[/align]y has REALLY enhanced the ole paint we thought looked nice back in the day. My wifey says she LIKES that color. Told her to buy her OWN!! :D

 
Shippy ....the paint is purdy... thats southern for pretty. New paint technolog[/align]y has REALLY enhanced the ole paint we thought looked nice back in the day. My wifey says she LIKES that color. Told her to buy her OWN!! :D
Thank you for the compliment on the paint job. It is still largely the paint from back in 1994. I am trying to preserve as much of that work as possible because it was the last car the chap who painted it did. Most people who see the car up close have a hard time believing its an almost 20 year old job. :)

 
Part 12 (Originally posted 17 Apr 2011)

Not much has happened since my last instalment in the ongoing saga, which the “Trailer Queen” has become. The brakes, master cylinder and brake lines are finally installed, filled, bled and tested. Aside from a leaking caliper seal, which was replaced, the system is finished. The engine bay wiring is 100% complete. The AC system is about 50% installed. One unforeseen issue with the air conditioning system deals with the aftermarket radio that my wife had installed about two years ago. The original AM/FM radio no longer worked, so she had a modern aftermarket unit installed in the glove box. Unfortunately the new AC system encroaches into the space behind the glove box, the kit came with a smaller replacement box, but there is now not enough space for the radio. As such my wife has ordered a new reproduction radio (in order to maintain the original appearance) with the ability to play CDs and plug in her Ipod, which will be installed in the original OEM location. Along with the new radio she has also ordered a front lower air dam, a pair of traction bars for the rear end and a set of valve spring shims to keep the valves from floating at 5000 rpm. Also installed last week was a partial set of polyurethane bushings for the front suspension.

Once all of the above mentioned work is complete the car will be sent to a local muffler shop where a custom exhaust system will be manufactured. The wife has decided to go with dual 2-½ inch mandrel bent stainless steel with and H pipe and a pair of Thrush mufflers. After that we’ll get the issues with the body that I have previously detailed rectified.

Definitely dedicated to her car, my wife continues to spend most of her spare time putting sweat equity into the Trailer Queen. Since my last report she has cleaned, scraped and painted the differential, axle tubes and fuel tank. She also replaced the trunk seal.

In part 10 of this rebuild I promised you all that I would post a video of the engine dyno run including the dyno pulls. Unfortunately all I got was 20 minutes of the engine breaking in, for some reason the camera kept shutting off during the actual dyno pulls. I had my neighbour produce a 20-minute show that I have reduced to 2-1/2 minutes, but for the life of me I can’t figure out how to download the video. It’s a 36.2 MB WMV file, I’d appreciate if someone could assist me getting this file posted, as I’m not all that computer literate.

And now some obligatory photographs.

Some of the old parts removed from the car starting with the very heavy intake.

mod294.jpg


mod295.jpg


Old brakes.

mod299.jpg


mod296.jpg


Original ventilation system.

mod298.jpg


Original rocker arms and push rods.

mod297.jpg


The engine is almost fully installed.

mod300.jpg


mod303.jpg


Dirty and clean differential, if you look closely at the first photo you can see how close the passenger side header collector is to the transmission fluid pan.

mod278.jpg


mod283.jpg


mod284.jpg


First coat of silver paint on the fuel tank (it needs a little sanding before the other coats go on).

mod302.jpg


New master cylinder.

mod276.jpg


It’s too bad you can’t hear the mechanic cursing while installing the AC system.

mod293.jpg


Let there be no doubt that my wife is definitely invested in her car.

mod305.jpg


And now, for something completely different.

shelbywarningsticker.jpg


End of Part 12. Part 13 to follow.

 
Great installment! The undercarriage looks great and you can tell your wife put a lot of hard work into it. That's the part I have not done yet. Any special tips from your wife or lessons learned on doing the undercarriage?

 
Back
Top