wiring 3G alternator

7173Mustangs.com

Help Support 7173Mustangs.com:

This site may earn a commission from merchant affiliate links, including eBay, Amazon, and others.

164runner

Well-known member
Joined
Dec 3, 2017
Messages
87
Reaction score
8
Location
US
My Car
73 mach1, medium blue, 351 C-6
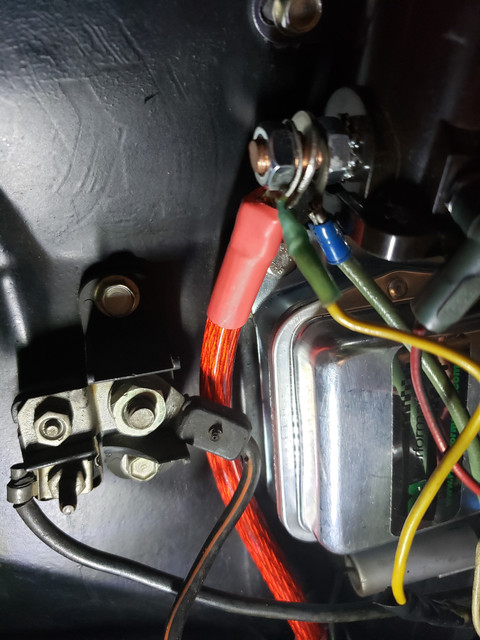
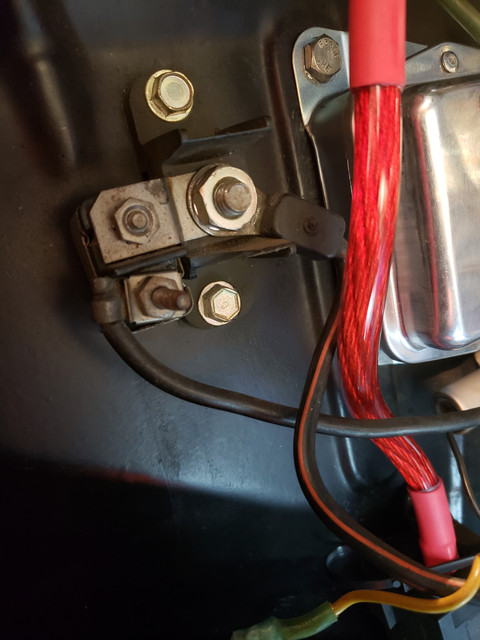
PA PERFORMANCE 3G upgrade. factory alternator wire harness removed. installed 4 GA wire from alternator to starter solenoid, or does it need to go where the factory installed it? from what I have found this is called the starter distribution block { could be called something else }. or do I leave there 4 GA wire on starter solenoid and run a 2nd wire to the distribution block? not showing in picture is factory wire from alternator. the 2 wires on the distribution block, black/orange stripe go to main harness, goes under radiator and back to firewall. smaller wire goes across shock tower brace and in firewall by brake booster. if I only run the 4GA wire to the starter solenoid, I don't see how the main wiring harness will get power

 
If you have an ammeter, you need to use the distribution block.  If you have an alternator indicator lamp, the starter solenoid will be OK.
ok. next question since stock alternator was 60 amp and this new alternator is 95 amp, will the original main wire harness be ok because of the new alternator?

 
If you have an ammeter, you need to use the distribution block.  If you have an alternator indicator lamp, the starter solenoid will be OK.
ok. next question since stock alternator was 60 amp and this new alternator is 95 amp, will the original main wire harness be ok because of the new alternator?
car does have factory gauges, was going to pull ammeter and send to rocketman and have converted to volts

 
If you do decide to run the new alternator cable to the terminal block you should also upgrade the wiring from the terminal block to the solenoid post and battery cable. That wiring was sized for the 42 amp to 61 amp alternators our cars came with. The wiring diagrams in this thread may help you:


To answer your question about other wire harness sizes, those harness wire sizes are sized for the loads on them, and won't be affected by the higher output of the alternator, much higher current is available from the battery, which is why circuits are fused.

You are correct in getting your ammeter converted to a voltmeter, the wiring in the shunt circuit won't handle the new alternator current.

 
Last edited by a moderator:
OK, so, here's a fun one:  My car originally had an ammeter, and I replaced it with a voltmeter (wired independently, bypassing the factory ammeter circuit).  If I swap to a 3G alternator, do I need to keep a factory style voltage regulator in the mix anymore?  If not, what should I do with the leftover (dangling) voltmeter circuit?  (probably just leave it mounted and inert to retain something of a factory appearance, or maybe relocate the Duraspark module to that location)

Just thinking about a future mod.

PS - I grabbed the diagram you posted above - Thanks, Don! ::thumb::

 
It depends on whether you use a Ford 3G or an aftermarket, like Powermaster. If you use a Ford 3G (my preference due to cost and ease of repair or replacement) you will have to use the light green/red stripe wire from the regulator to "excite" the alternator windings. If you use a true one-wire aftermarket alternator you won't use any of the regulator wires. You'll need to remove or isolate the ammeter shunt circuit wiring and isolate the wires from the circuit that run from the shunt to the ammeter and back, and find a key-on voltage source to power the voltmeter. The fat yellow wire from the solenoid terminal needs to be separated from the shunt circuit and supply power to the car's electrical circuits (ignition switch, headlight switch, and fuse block).

 
So I am currently doing the same upgrade and decided to do the Ford 3G upgrade. I have 90% of the wiring done, but as said here, the walkthrough I had said that the alternator wire goes to the solenoid where the original went to that block. My block looks different on my 72 and only has a single post where both the alternator and harness connected. Im guessing I need to just run another wire from the B+ on the solenoid to that little block so it powers everything else. But just thought I would check here first.

Im waiting a bit anyways to tap the adjuster on the alternator since it wasnt threaded and I dont want to have to use a nut and bold. 
20200902_162740.jpg

 
The tach dash compatible headlight harness comes with two battery leads: the fusible link goes to the starter solenoid and the copper standard thick wire goes to the isolation block where it mates with the thick alternator harness.  This allows the ammeter to function.

The standard (non-tach) dash compatible headlight harness comes with only one battery lead: the fusible link which goes to the starter solenoid.  The alternator thick wire also attaches, in this case, to the starter solenoid as well.

 
Mine is the tach dash and has the guages in the center. (the plan is get the ammeter converted to volt guage) 

I looked at the wire and when I removed the original alternator harness the one wire going to that block was gone and only the one wire left. And it looks like it goes down the harness. Maybe I need to take a look at my wiring diagram. There is also that thicker yellow wire that is going to B+. 

 
In both cases, there is only one thick wire coming from the alternator.  For the tach dash version, it goes to the isolation post; for the standard dash, it goes to the battery side of the starter solenoid.

 
OK, so, here's a fun one:  My car originally had an ammeter, and I replaced it with a voltmeter (wired independently, bypassing the factory ammeter circuit).  If I swap to a 3G alternator, do I need to keep a factory style voltage regulator in the mix anymore?  If not, what should I do with the leftover (dangling) voltmeter circuit?  (probably just leave it mounted and inert to retain something of a factory appearance, or maybe relocate the Duraspark module to that location)

Just thinking about a future mod.

PS - I grabbed the diagram you posted above - Thanks, Don! ::thumb::
I have a Ford 3G style alternator and a ammeter-to-voltage conversion as well. I have the thick one wire from the alternator connected to the starter solenoid and the "excite" wire connected to the Lt. Green/Red wire (#904). I removed the voltage regulator and wires just leaving the Lt. Green and red. I added a MSD noise filter in its location between the CDI and battery. I have tapped the Lt. Green/Red wire for various applications that need ignition signal like the CDI.

 
In both cases, there is only one thick wire coming from the alternator.  For the tach dash version, it goes to the isolation post; for the standard dash, it goes to the battery side of the starter solenoid.
So in the case of a new 3G alternator, should it still only go to the isolation post since thats what I originally had? Or would it be better to connect the Alternator to the B+ on the solenoid, and run a short 8guage wire from B+ on the solenoid to the isolation post. Sorry, normally I would have gone with a 1 wire but a friend convinced me to do the 3G instead. 

 
Because of the higher current generated by the 3G alternator I would go directly to the battery terminal on the solenoid. If you go to the terminal block you will be sending all of that current through the existing wiring, which may be more than it can handle, resulting in fried wires  (and maybe car). Your choice to covert your ammeter to a voltmeter is the correct way to go.

The 3G diagram that is included in the diagrams linked in the 6th post above is the correct way to go. The terminal block is used to provide a path for the wiring involved in the shunt for the stock ammeter. The big yellow wire is the only one that needs to be connected (unless you have power windows or a convertible) as it feeds the ignition switch, lights, and accessories.

 
Last edited by a moderator:
The 3G diagram that is included in the diagrams linked in the 6th post above is the correct way to go. The terminal block is used to provide a path for the wiring involved in the shunt for the stock ammeter. The big yellow wire is the only one that needs to be connected (unless you have power windows or a convertible) as it feeds the ignition switch, lights, and accessories.
That post that was linked doesnt want to open for me. But from what you have said and what I found in search while looking for that post, Alt to B+ is all I need. And I can just leave the isolation post with the one wire that is there and not run anything else to it. Im waiting on a set of factory guages for the middle that I bought to arrive. Maybe Im being overboard but I wanted to keep the originals untouched and this way I can send off the Ammeter I get to be converted by rocketman to a voltguage. For now I will likely just unplug the ammeter so that it doesnt turn into a cabin heater if i run the car. 

 
Back
Top