 Or, you could do both
You are using an out of date browser. It may not display this or other websites correctly.
You should upgrade or use an alternative browser.
You should upgrade or use an alternative browser.
1972 Mach 1 Project - FL
- Thread starter ITMike5.0
- Start date


Help Support 7173Mustangs.com:
This site may earn a commission from merchant affiliate
links, including eBay, Amazon, and others.
sequel88
Active member
- Joined
- Jan 5, 2014
- Messages
- 36
- Reaction score
- 0
- Location
- Cocoa, FL
- My Car
- '71 Coupe
-250ci Inline six
-Modded Log Head
-Autolite 2bbl Carb
-Pertronix Ignition
-Super Stock 7mm Plug Wires
-Dual 14" Magnaflow Glass packs
*Currently awaiting a T5 swap!
Looks like a solid start to a good project! Whereabouts in FL are you if I might ask?
jowens1126
Jim
- Joined
- Jan 25, 2017
- Messages
- 733
- Reaction score
- 24
- Location
- Tavares, fl
- My Car
- 71 Mustang Mach 1
302-2v
C4
Any more progress? What part of Florida are you in? I'm up in the Orlando area.
- Joined
- Jan 12, 2017
- Messages
- 269
- Reaction score
- 0
- Location
- USA - Florida
- My Car
- 1972 Mustang Mach 1
2011 Mustang GT
Sorry guys, I had a very busy second half of 2017 with work and travel and not much progress took place. I am in North Port, FL on the west coast approx. 20 mins south of Sarasota.Any more progress? What part of Florida are you in? I'm up in the Orlando area.
Well...I guess I wouldn't say there hasn't been any progress. I've purchased a few parts since my last post and have also invested in an 80gal IR 2-stage air compressor, a blasting cabinet, many different tools including air tools. Some of the parts I have purchased include the rear window hardware from a Grande so that I can convert to the roll down windows, an original spoiler, misc interior pieces that were missing (cigarette lighter, knobs, etc).
Now that I have many of the tools I will need to do the work I will resume with the tear down process and hopefully be able to get the engine and transmission out soon. My biggest fear is trying to remove all of the suspension components since there is a bit of rust on most of those nuts & bolts!
- Joined
- Jan 12, 2017
- Messages
- 269
- Reaction score
- 0
- Location
- USA - Florida
- My Car
- 1972 Mustang Mach 1
2011 Mustang GT
Summers here in Florida are pretty brutal especially since the afternoon sun shines directly into my garage, but I have managed to jump back into this project in the past few days. Sorry for the slow frequency of my posts...you can definitely tell this IS my first rodeo. :")
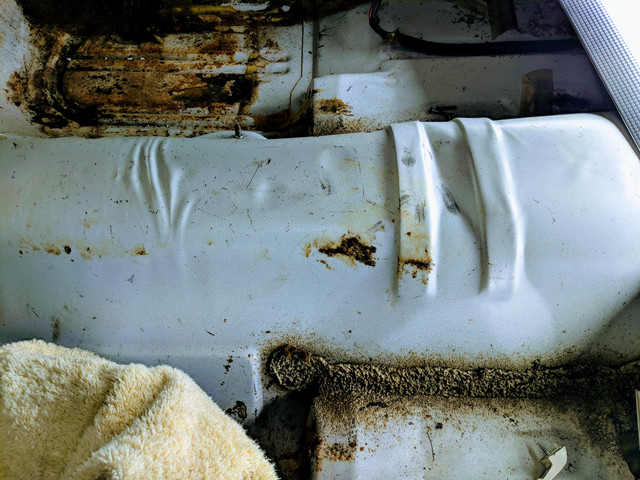
So in continuing the disassembly of the interior I have some questions. As you can see in the picture below the rear interior quarter panels are in need of help and I'm not even sure I can save the passenger side panel. It's pretty rotten for lack of a better word...
Question #1, are replacement panels readily available? Question #2, is the coloring correct where the top section is white and the rest is painted black? My car is equipped with the fold down rear seat so I guess the coloring makes sense in that regard.
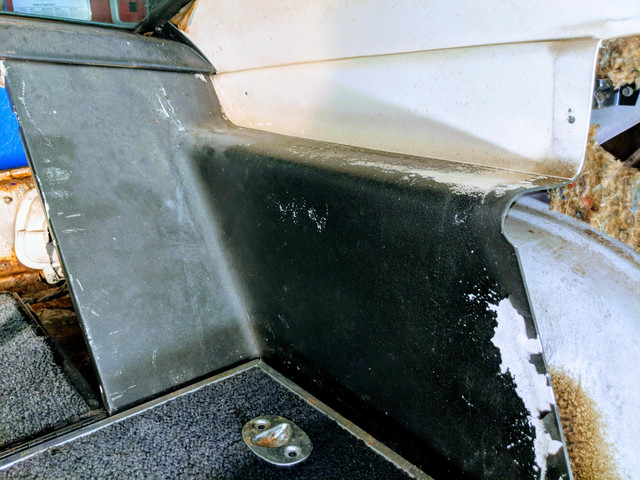

Yes...that yellow disintegrating section in the pic above is my plastic panel (sail panel was also removed on passenger side and trash). :shrug2: :shrug2: :shrug2:
Question #3, is this how the center hump typically looks with the creases/wrinkles and dents in it? Some of them look like they definitely do not belong but some of the others look like they'd be original and from the stamping/forming process.
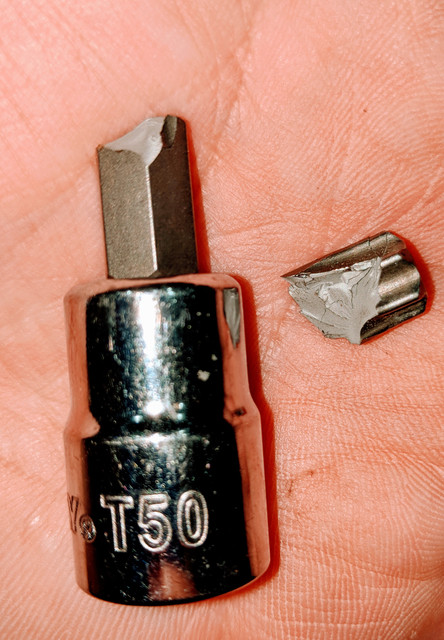
In trying to remove the rear seat belts I cracked my bit in half (Chinese metal rofl ). I'm guessing the bolt is rusted below the floor and that I need to spray it with some penetrating spray and let it sit before trying again.

More updates to come... Anyone have a write up on how to remove the fold down seat pieces and the dash?
So in continuing the disassembly of the interior I have some questions. As you can see in the picture below the rear interior quarter panels are in need of help and I'm not even sure I can save the passenger side panel. It's pretty rotten for lack of a better word...
Question #1, are replacement panels readily available? Question #2, is the coloring correct where the top section is white and the rest is painted black? My car is equipped with the fold down rear seat so I guess the coloring makes sense in that regard.
Yes...that yellow disintegrating section in the pic above is my plastic panel (sail panel was also removed on passenger side and trash). :shrug2: :shrug2: :shrug2:
Question #3, is this how the center hump typically looks with the creases/wrinkles and dents in it? Some of them look like they definitely do not belong but some of the others look like they'd be original and from the stamping/forming process.
In trying to remove the rear seat belts I cracked my bit in half (Chinese metal rofl ). I'm guessing the bolt is rusted below the floor and that I need to spray it with some penetrating spray and let it sit before trying again.
More updates to come... Anyone have a write up on how to remove the fold down seat pieces and the dash?
- Joined
- Jul 12, 2010
- Messages
- 5,555
- Reaction score
- 3,894
- Location
- Killingworth, CT
- My Car
- 71 Mach 1
71 XR-7 hardtop
71 Country Squire
65 hardtop
72 Country Sedan
69 XL sportsroof
Not sure about the two-tone panel, but it makes sense to me and looks fine. Considering how original the interior of the car is and all the goodies you've found, I'd say it could be factory. Look around the surrounding interior parts for signs of an in-car spray job. IIRC, those panels are not repopped yet. Don at OMS will know for sure.
Regarding the color, it's your car and you do as you please. I love the grabber blue on these cars and it'll look sharp with a white interior.
However-
Yours is a very high option and desirable 72 and it might behoove you to keep it original in appearance. Looking at your window sticker, yours is a stripe car, so a lot of that white will be broken up with black. 71-72s look very good in white with black stripes.
Engine performance is easy to upgrade in the 351C. The original Motorcraft carbs are known to be difficult to tune, so they are often best left on the shelf and run with a Holley or Edelbrock carb. Fuel injection is relatively new, but systems like the Holley Sniper are a few steps above a bolt-on and offer that extra reliability.


$39.99
Lucky Ride Ford Hoodie Legend Lives Mustang Pony (Pocket) Full Zip Sweatshirt, Red, Medium
Giftware Shop Usa


$37.95
$39.95
2015-2024 Ford Mustang Bulge Acorn Lug Nuts & Wheel Locks Kit 14 mm x 1.50 Thread (Black)
West Coast Corvette / Camaro


$9.00
2016 Hot Wheels Vintage American Muscle 1970 FORD MUSTANG MACH 1 die-cast 4/10
Cards and Bobbles

$29.70
Ford Mustang, Mach 1, GT, Shelby, & Boss V-8 (64-73) Haynes Repair Manual
Haynes Repair Manuals

$64.98
JH DESIGN GROUP Men's Ford Mustang Collage Black Zip Up Hoodie Sweatshirt (Large, CLG2-black)
Affordable Family Clothing


$18.99
$19.89
Checkered Flag Men's Ford Mustang Cap Tri-Bar Pony Logo Adjustable Black Hat
BS STORE LLC

$24.95
Ford Mustang Pony Racing Stripe 5.0 Muscle Shelby Long Sleeve T-Shirt Front Back Print-Black-Large
Giftware Shop Usa


$13.75
$16.39
Ford Mustang: Trivia & Fun Facts Every Fan Should Know About The Great American Icon!
Amazon.com


$59.98
JH DESIGN GROUP Men's Mustang Logo Hoodie Full Zip Up Black Hooded Sweatshirt (X-Large, Black)
Affordable Family Clothing


$99.99
Polished Rocker Panel Sill Plate Molding Kit with Clips Compatible with 1964-1966 Ford Mustang - Authentic Restoration for Classic Car Enthusiasts
Classic 2 Current Fabrication

$35.00
$49.95
Ford Mustang (2005-2014) Haynes Repair Manual (USA) (Paperback)
Haynes Repair Manuals

$37.17
$55.00
The Complete Book of Ford Mustang: Every Model Since 1964-1/2 (Complete Book Series)
Amazon.com
kusanagi
Active member
With your damaged panel if you cannot get a replacement you could try and do what I did with my damaged panels. First get a plastic welder ( basically a glorified gas soldering iron ) melt In some new plastic to back of the damaged part to give some shape and strength back, then sand off any loose plastic, then fill the remaining missing area's with some flexible body filler ( I used the stuff used to fix plastic bumpers ), sand this smooth then spray it with some texture paint of the correct colour. This will not be a perfect match but it will look better than it did.
- Joined
- Jan 12, 2017
- Messages
- 269
- Reaction score
- 0
- Location
- USA - Florida
- My Car
- 1972 Mustang Mach 1
2011 Mustang GT
Thanks for the info guys. Yeah it doesn't look like they make these panels yet so I'll either have to find them or fix them. Finding used originals seems pretty difficult especially since they are rear fold down seat specific, and the one set I saw on Ebay was over $500 for the pair. :banghead: I have an opportunity to check out a dead project car tomorrow and I'm hoping to find these panels and maybe some other items I'll need or just some spare parts.
If I do have to fix them it's a good thing there was that recent post from you Kusanagi and I could only attempt and hope to do the quality of work that you did.
If I do have to fix them it's a good thing there was that recent post from you Kusanagi and I could only attempt and hope to do the quality of work that you did.
- Joined
- Jul 19, 2016
- Messages
- 2,140
- Reaction score
- 173
- Location
- Omaha, NE
- My Car
- 1971 Mustang Convertible
I had the same issue with one of my seat belt bolts and used a torch to get it out!
- Joined
- Jul 12, 2010
- Messages
- 5,555
- Reaction score
- 3,894
- Location
- Killingworth, CT
- My Car
- 71 Mach 1
71 XR-7 hardtop
71 Country Squire
65 hardtop
72 Country Sedan
69 XL sportsroof
I've broken a number of Torx drivers over the years on the rear seat belt bolts. Snap On, Mac, HF special, they will all break on those bolts. Definitely try soaking them top and bottom in PB Blaster before the next go around.
Similar threads
- Replies
- 16
- Views
- 780
- Replies
- 116
- Views
- 11K
- Replies
- 57
- Views
- 3K