cudak888: 1971 M-code "Soylent Green" - 8/30/14: Shrinking disc time

7173Mustangs.com

Help Support 7173Mustangs.com:

This site may earn a commission from merchant affiliate links, including eBay, Amazon, and others.
You fellows asked that I not skimp on pictures for the trunk corners. I have not failed you, but I'm going to start taking up a collection for a beater camera pretty soon.

Neither have I failed to work an unreasonably long day doing this: 11am to 7:30pm.

First off, to remind everyone as to what the trunk corners looked like when I first got the car:

71_mustang_75.jpg


This is what I started with today. I've already ground off the paint a bit to find out where we have hidden filler. You can see some pink marks in the trunk stop divots (1972+ deleted the divots, maybe earlier), which need to be cleaned up to see what's under the filler.

2upuxhz.jpg


23urfur.jpg


The real problem can be seen from the reverse - these ends were previously patched ages ago by a bodyshop that brazed said patches directly over the rot. All of my cuts have to work past this rot, but - preferably - leave the divots intact.

a1jzi1.jpg


I used the Milwaukee angle grinder with the rotary brush to clean the ends up, but I cleaned up the divots as shown:

(Hmm - shirt is inside-out. Does that mean I'm getting another Mustang? ;) )

vdzv3l.jpg


The RH looks pretty much the same as before, but the left...oh, boy!

23igflt.jpg


2iuqr94.jpg


I shot them in primer to see the damage/repairs better:

2144cph.jpg


1ylhcj.jpg


Now for my not-so-secret, secret trick: Replacement corners...without having proper replacement corners. Coupe guys have it easy because they can chop up a taillight panel for the purpose. Sportsroofs aren't that easy.

Using two ends cut from parts cars (BIG thanks to Eric for the LH section!), I chopped out the lower channels. Problem is, the channels are too short on both, and I don't want to chop up a taillight panel to lengthen them:

1548wue.jpg


juziix.jpg


Enter alternate solution - cut the curved bit that faces upwards:

313hsp2.jpg


And about 1.5 hours later of banging, cutting, bending, and cussing:

fu145g.jpg


The round end of a ball-peen hammer worked to form a rough divot, which I wound up flattening due to not needing it at all:

et9roy.jpg


Repeat for RH side, using the LH panel from Eric's donor:

23m5wgg.jpg


1.5 hours later:

2im81w3.jpg


Another hour later and the channel has been re-shaped (read = beaten and ground) into the proper straight line:

kdk5xe.jpg


Two workable ends. Granted, RH side is a bit nicer, but I'll take whatever I can get:

358cbig.jpg


WATERMELON BREAK!

2hs91k3.jpg


RH corner cut and donor panel cut to fit:

103ybmx.jpg


fedzt4.jpg


140zqmd.jpg


LH was in such bad shape that I had no choice but to cut it short. Enough of the dimple survived to look passable:

wtbn2a.jpg


2808dj5.jpg


These are the original ends, cut out of the car. Get a load of the cut-and-shut rot patchwork. Good old bodyshop work - always dependable, always disastrous.

2na64qo.jpg


Test fitting. A sheet steel section will be placed in the remaining gap on the LH side:

314rq6a.jpg


1i0685.jpg


Welding time.

2j2xb2e.jpg


Welding these ends was a nightmare - wherever I thought I'd cleaned up the brass, I'd find just a bit more, and it'd blow through. Somehow, I got away with this on the RH side:

30nhn34.jpg


LH in progress. Note the copper sheet that I use to ground the MIG welder's electrode (wire) around the larger gaps.

jaapnc.jpg


Corners are freestanding now. They may appear to be at the wrong heights in this picture, which is not the case. They're a bit flexable, and the taillight panel merges with them perfectly and level when pinned in position:

2luswtv.jpg


RH:

2hobtc9.jpg


LH:

307t7d5.jpg


7:30pm and closed up for the day:

9s8h8g.jpg


I'm open to any questions about what I did here, but I dare say the photos should tell the story pretty well.

-Kurt

P.S.: On the note of another Mustang, Eleanor's car cover failed me, leaving a big fat present on the carpet, courtesy of the rotted cowl. That's 1/4" of standing water you're looking at.

2gsn59e.jpg


I finally went ghetto on that car (not that it isn't at that state already) and duct-taped the cowl vents until I can get to it.

 
Last edited by a moderator:
Honestly, I'm shocked at the lack of interest over those trunk corners. I thought that was going to be a topic of reasonable interest...

-Kurt

 
I have done a few of those...now if you can get a complete trunk pan in without taking the taillight panel out, I would like to see that. My quarters, tail panel, and everything is fine but the trunk pan is gone. I really don't want to 2 piece it but I am thinking about it.

 
I have done a few of those...now if you can get a complete trunk pan in without taking the taillight panel out, I would like to see that. My quarters, tail panel, and everything is fine but the trunk pan is gone. I really don't want to 2 piece it but I am thinking about it.
It's said to be doable on the convertible and coupe, due to the size of the trunk opening. Not damaging the taillight panel during removal of the old one is the tricky bit, given that access isn't that easy with it in place.

Welding and fitting the dropoffs is no easy task either - even with the taillight panel removed. Speaking of which, the dropoffs were one piece with the originals, but those lousy Spectra panels do not reflect such, nor do they fit well. Spectra makes good gas tanks, but I avoid their repair panels like the plague if I can.

-Kurt

P.S.: Coupe and convertible trunk corner replacement is often a bit easier, as you can use the junk taillight panel to patch the straight sections. Not really the case here for a Sportsroof body.

 
Last edited by a moderator:
I have done a few of those...now if you can get a complete trunk pan in without taking the taillight panel out, I would like to see that. My quarters, tail panel, and everything is fine but the trunk pan is gone. I really don't want to 2 piece it but I am thinking about it.
It can be done. It's very tight but I did it on my car. I cant find a pic of the finished product on my computer but I do have this pic of it being cut out and the frame rails being prepped. I also installed new drop offs when I did mine. Sorry about the pic quality, it was 3 pics scanned at same time.

23gxlax.jpg


Honestly, I'm shocked at the lack of interest over those trunk corners. I thought that was going to be a topic of reasonable interest...

-Kurt
I'm totally stoked about it! Unfortunately, I can't see the pics at work, and I haven't had a chance to sit down at home since you've done all the work - but I know the pics are gonna be worth the wait... you're a perfectionist and you do good work, after all.

The place where it came up short on my passenger side, I actually had a scrap from an unused drop-off and fabbed a small piece to bridge the gap (just a couple cuts and some 'folding' with the vise). Now that it's all painted up, blends in really well... especially, since the weatherstripping pretty much covers it all up. ;) :D

(I'd ordered the drop-off from CJPP, and it didn't match the other side I'd ordered from OMS - so I got another from OMS and used it)

 
OK - just took it all in after stuffing in a new video card (the GPU fan lunched on the 'old one' - and drove me nuts with all the noise).

SWEET!!! ::thumb::

You got skills, man! Very Nice! I feel like such a hack now. ;)

Keep it up - and I'm glad the piece I sent you worked out.

 
Went out to finish the left trunk corner today. That seemed to go well, but what happened later didn't.

But bad news for last. Here's the good stuff. Rhazbun's '73 parts car keeps on giving - in this case, a bit of sheetmetal to patch the corner:

dzk0oh.jpg


Good fit:

ehdtly.jpg


Before moving the car to weld the patch into place, I figured I'd make use of the shade and repair the bottom of the left quarter as well:

29polso.jpg


asim1.jpg


28saih2.jpg


And here's where things began to go wrong. I found some Bondo at the edge from a dent, so I decided to clean it up, bang it out, and patch if necessary.

14uknkh.jpg


Only the Bondo didn't seem to stop.

15i982e.jpg


"WHERE THE HELL DOES THIS STOP?"

2lsbclj.jpg


An hour and a half later of brutalizing my Milwaukee grinder and my lungs, I finally got the whole area clear. There was a quarter inch of the toughest body filler known to man over the entire quarter:

2igon5t.jpg


That quarter inch of filler became my new paint job, apparently:

2j5ihb7.jpg


Now for the bad news. Once I could primer it to get a look at the damage, it becomes apparent that the schmuck who owned this thing not only smashed the RH quarter panel, he smashed the left - hence the reason for the old taillight panel replacement and the semi-sketchy 1980's-era restoration on this car.

5voufq.jpg


Not much of the bumper area remains intact here. I'm not sure what I'm going to do about it. I'm not keen on the idea of flanged joints, but this may be an opportune time to cut a repop quarter skin (at least they're not that bad at the back) to fit, flange it, and glue it to the original panel.

-Kurt

 
Last edited by a moderator:
Near as I can figure it, if I can hammer and dolly the damage above the marker light, I'll only have to section and replace the lower half. The Spectra panel is pretty lousy for that repair - cutting a complete quarter skin may be a better - if expensive - option.

We'll see.

-Kurt

 
Last edited by a moderator:
I'm going to defer to the bodywork experts here, for I'm not sure if I'm making any notable progress. Almost everything you see here is the result of 3 hours of hammer-off-dolly, and one pass of a 5" shrinking disc (which I suspect doesn't do much in the smaller size).

I worked from the reflector line up, as I'm convinced the bumper recess will be better done by patching the area.

Opinions appreciated.

2lnii5e.jpg


vglu1g.jpg


53jzf5.jpg


The original damage in closeup, for reference:

11jrjg7.jpg


-Kurt

 
Last edited by a moderator:
Kurt, you have to work both sides to get it right. I can't tell much from the pic but what you have to be careful of is not over stretching the metal. The shrinking disk is a great tool for keeping the metal from doing this. I have used a rolling technique with dollie on each side with good results as well, but sometimes heat, and water is required (and you know the dangers of that). Just be patient and keep working it, and I have no doubt you can get it smooth.

 
Kurt, you have to work both sides to get it right. I can't tell much from the pic but what you have to be careful of is not over stretching the metal. The shrinking disk is a great tool for keeping the metal from doing this. I have used a rolling technique with dollie on each side with good results as well, but sometimes heat, and water is required (and you know the dangers of that). Just be patient and keep working it, and I have no doubt you can get it smooth.
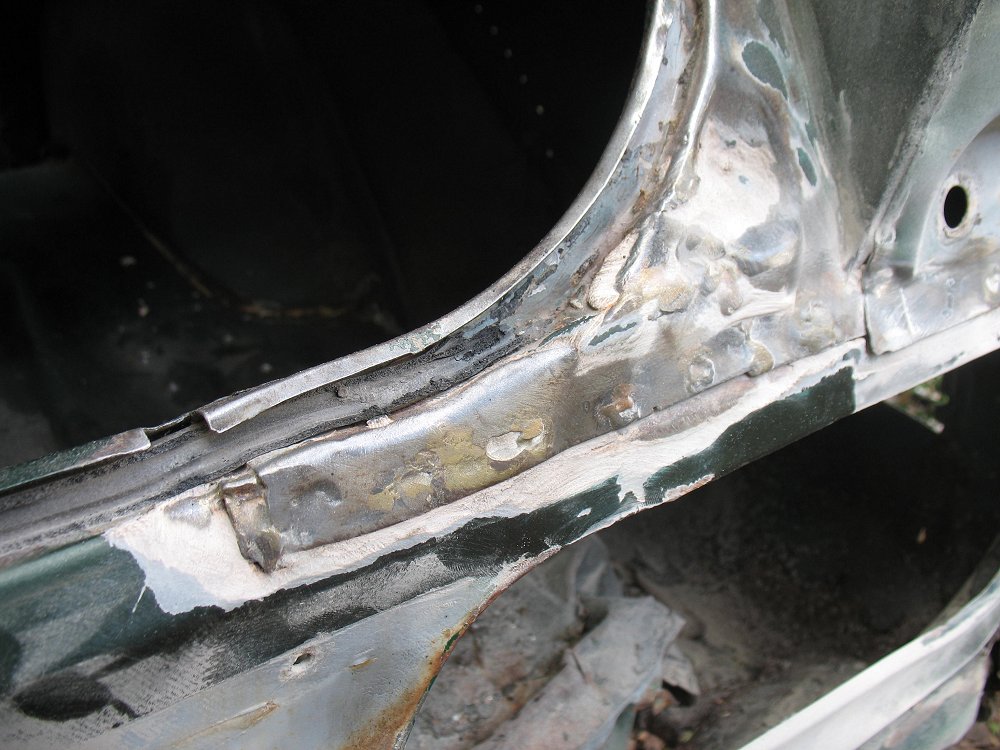
Work both sides, as in hammer from the inside and dolly from the outside, rather than the reverse?

So far, what you have seen above was done with the hammer on the outside and the dolly on the inside.

There may be a high stretched spot or two, but nothing more than 1/8", and gradual. As for quenching - I've heard just as many statements that it works as it doesn't. Frankly, I'd rather not risk hardening the steel by quenching it.

I'm considering going over the high spots with the shrinking disc again and move to a slapper/dolly. That's all I can think of for now.

-Kurt

 
Yes you have to hammer from both sides sometimes to get it smooth. As far as hardening goes, you don't use that much heat (will distort) only use enough to be able to manipulate the metal. The disk does the same thing and you should be able to hit both sides with it so torch may not be necessary.


Latest posts

Back
Top