Fabrice's 429CJ 71 project

7173Mustangs.com

Help Support 7173Mustangs.com:

This site may earn a commission from merchant affiliate links, including eBay, Amazon, and others.
There's a portable sand blasting system that only requires an air compressor and a bucket of sand; it basically is the gun and a vacuum hose going to the sand bucket. I used it quite a bit until I figured out how to fit a whole harness in the blasting cabinet I also had. Unfortunately, it is packed away so i can't get you a model number.

 
@Randy,

thx, yeah found one of these "cylinders on wheels". Was too busy with work this past week to look at this in details.

Really something I need look into...

Weather was great and expected to be too great (30-35c) tomorrow

Planned paint, epoxy..

Nope. Instead, whole afternoon went on swapping the newly restored 73 grille.

Received from OMS few goodies, among them replacement grille screws that were corroded & broken in and heat removed 2 weeks ago, adjustment screws and the plastic clips that were breaking one after the other. All in house to make a clean install.


Fun started with the clips. Affraid to break them, was careful and then the wind liked the idea of spreading the tiny little clips somewhere the grass. Then once got them all back, polished and cleaned these bling bling fragile parts and had some fun installing them. The way they are hold onto the grille is better than for 71 where they need be squeezed, but still bit silly.

Then went to install it, removed the passenger side headlights brackets, which will be the fourth and last head light bracket I'll be restoring for a very long time. I'm developing a light headlights brackets overdosis I think :D

Installed the 71 previously restored ones, plated a few screws missing, replace a few with new ones and got it in at the end of the day.

@Tom, your grille has a new home now! ;)


Very happy with the grille... however was less happy once I've discovered the new grille isn't having the exact same shape and my cover comes too short :( Not related to the heat damages the previous one was having, it's simply the angle of this grille is different than the original one that was OEM. Giving almost 1 inch gap on both ends. So I guess, i'll be fixing that or prolly make a new one soon... which was also not part of the plan...


Another small slowdown:. Are these retainers available? All 4 Ok on this pict of the driver side, the fitting of the adjustment screws were broken, as OMS Don sent me replacements for both sides that'd be fine, but today I saw that 3 of these screws retainers are corroded to death and 2 even have been drilled bigger on pasenger side and must be replaced.

Do I need weld/re-drill them (or a nut to mimic the retainer) or is there a kit available for these?


Just before close the lights, started my 4th and last set for tomorrow's fun...

 
Last edited by a moderator:
What a super weather today. Bit too hot.


Why go on a crowded beach when you can enjoy derust old parts at home??? :D

Under my parasol, managed to get the 73, (now considered as 71) headlight brackets paint free and they are enjoying a phosphoric bath for at least a day. Prolly more days for 2 of them. As the weather is announced to be awesome this week (near 104F), my boss (me) agreed I could take some hours off to plate and paint a few things while temp is ideal and everyone's gone to work.


After some massage (really need to get myself a blasting solution for this kind of parts), gave that old boy a copper layer and plated it with a thick layer of zinc. End of the day it joined the to be epoxied club.


In between activities, gave some attention to these weird looking pieces of plastic.

If you do not know what it is, well that's plastic gold! :) 71 only, ment to close some gaps on the fenders both on front to access the extensions nuts and on the rear.. no idea what they're for :D

There was a thread about them this past week, and turns out these go for $100 or more on E-bay. So gave these a good cleaning, and restored the plastic so my car look expensive when I'll put them back on :D


Time for a break... so nice to be finally be able to have one bbq after weeks of rain.


Then it was time for a very serious matter. Someone in London is in need for an organ transplant, so the surgeons team been busy and went in the super hot attic of the garage and took another piece of the donor 71 grille, (what's left of it) and It will be on its way very soon to save a 72 grille in desperate need for that bit supposed to have same or very near shape for both years at the bottom. I'm sure you'll read about how the operation went on another thread soon :)


Still an open question from last weekend. I've found these from underneath the front bumper, They spend the week in bath and are now rust free and presentable.

Are these 7173 parts? I don't think so. Never seen anything like them before, but what if they are gold as the plastic bits above?? :D

In case these are original parts, what are they for? Guards? xtra lights?


As I didn't have the time to replace these today. I forgot to ask to Don: How are you supposed to install them by the book? Pliers? Press them?

All with all, been another busy weekend. Time to rest and put some cream on that red neck of mine :D

 
[Then it was time for a very serious matter. Someone in London is in need for an organ transplant, so the surgeons team been busy and went in the super hot attic of the garage and took another piece of the donor 71 grille, (what's left of it) and It will be on its way very soon to save a 72 grille in desperate need for that bit supposed to have same or very near shape for both years at the bottom. I'm sure you'll read about how the operation went on another thread soon Smile]

ha, thanks for remembering and reaching out !... I'm in your part of the world this weekend and yes it was very hot today. Much obliged with the part i'll reach out at some point, some work issues have slowed down my progress on the '72, but i will get back onto it next weekend :)

 
Wouahhh Fabrice, amazing all what you did. I know it's not easy to work when you have no room, but you can manage it.

Mr Heisenberg, you cook very well, as well ;)

 
Dammit, where's my weekend fix???

Fabrice: you're fired!

Hope the heat hasn't made your life miserable like almost everyone else in Europa.

 
@Midlife

No, I'm up north in Holland, we get some north sea winds atm and temp is not even near crazy as in south France.

"Only" 35c/95F and sunny here.

Oh and here's your fix :D

Lots on the todo today, parasol installed, weather fantastic...


Yesterday received some genuine rust and dust from the States in the form of a passenger splashgard that I was missing and the hardware from a glovebox. Mine had all kinds of screws used, none the same or even close to the stuff required.

While the hardware is now taking a bath, I've started the day by removing all kinds of stones protection and revived the plastic to a clean and shiny finish.

Thx Dale!


Another candy arrived as well. I've spend so much time finding one in a good condition for my 73 (years), so as my 71 misses it too, when I came across that one on a US shop on ebay, couldn't resist. So you see I can enjoy new stuffs once in a while as well! :D


In between activities, the fourth and last headlights brackets set was cooking... Each de-rusted, zinc and copper plated.


Of course this is the last part of 4 sets, so it couldn't be easy... This poor bracket had the nut/retainers ment to hold the grille with extra drillings next to broken screw (3), a bit that hold the spring cut for some reason and both the adjustment screws retainers broken...

How hard one wants to save a part??? :D

As I've never replaced these adjustements screws before, I've asked Don from OMS where I bought them, how to install them and if he had a kit for the grille retainers: The answer was like:

"Never replaced them, I usually go pick another bracket with good adjustment screws and no sorry, no kit for the grille retainers"...

K, so totally informed and ready, went to work. :D


Removed the old brolen retainers of the adjustement screws, which is basically only a question to bend them the reverse way and spend a few (long) minutes playing with fire. Good plyers and some hammering with a tiny screwdriver later, had the 3 broken screws out and was left with wonderful retainers with 2 holes.


Totally not planned for this, I recall I have this brazing rod kit in house that will be used later this year for the 71.

Ment for all kinds of zinc based alloys and for aluminium in particular. The retainers/nut looking like some kind of brass, it should work.

So I thought I could try set back on of the old screws back in, close the bottom and melt enough metal so it goes inside and close the extra holes. Because the rods are once cold a soft alloy, I should be able to uncrew and be left with a fixed problem..


Lets find out...

Squeezed the bracket with a screw turned in just enough to be flush to the retainer surface on the other side. All sandwiched on a metal block of 2x2x3 make of iron that should not stick.

Brushed first very good, and heated the metal at the screw thread and placed the rod every few secs to see if it sticked a bit without heating it. Once it started melt I've let the flame on the bits set so it would become really liquid and helped with a screw driver to direct into the hole.

(Top right, that was the first one and found out I didn't need so much for the others)

Cooled in water, the fix worked wonderfuly and just needed bits of grinding for the left overs of the brazing soft metal.

Totally happy with the result and it was also a perfect way to test the rods.


It was then time to make a patch and weld it on. Bit tricky as the patch was small, but managed to give it a good enough shape.

Then after a good clean, it was time to plate the part.

Meanwhile, as the welding machine was now "deployed", fixed the light bucket and the suspension plate as I forgot to weld a few extra holes 2 weeks ago...


Once soda wash and soap wooled, installed both new adjustment screws retainers, where its basically on a question of gently hammering them in place, and ended up with a restored bling bling bracket with nice tiny holes and new screws :)

Together with the other parts done today, it joined my now very crowded "to be epoxied" box.

Tomorrow, I need plate the bucket first and could think about spraying something... tho I need change rear brakes on my wife's car too :(

 
Last edited by a moderator:
Not all the time I wanted today and way too much wind to spray anything...


So did little things, like de-rusted/copper/zinc and nickel plated the glovebox hardware. Needed be done anyway.

The little hat nuts for the hood front molding will not be used, but a these are the kind you easy can loose and you can't find these over here.

Having a few spares next to the new ones I have, even ugly but functional is ok to have. For the rest the focus went on the little latch and the screws heads. They should look fine once installed.


Finally finished that plate. Been in my legs for 2 months and wanted have it done. I'll paint it with many other things as son as I have some time and the wind is gone. I've kept the rubber on, its in very good condition but the "brake" nut has a damaged head that make it impossible to unscrew without destroying. As I want be done with this plate, I will have to live with the idea there can be corrosion underneath the rubber! :D


Then started on my next victim... More ugly picts next week :)

To be continued...

 
Did not had a pure Mustang weekend.

Had to handle my wife's Mini...


It needs to go to the tech control and fto pass, I needed renew rear brakes. Change all fluids etc...

The little beast is from 2002 , so as I can't suffer the sight of rust. Also de-rusted/epoxied and painted that german thingy.

End of the day, it ended bling bling and with new brakes.

One thing I hate most on this car is the stupid ass engine oil filter. If someone knows the guy who designed this thing, please, punch him for me, thx.


Sunday was much better! :) Picked my next victim, the driver's side suspension plate. Removed saturday eve so it could pass the night in bath. Comparing the one that is done, its clear there is some work to be done!


Like this other one, extra holes we made at some point and some rust had made some damaged. So fixed and refilled all the metal.

Few bubbles and electrons later, it was ready and because its impossible to plate in the inside, handled both with rust transformer epoxy.

Both and many other parts will then receive a good epoxy probably next week.


In between also finished the light bucket. Just like on many french cars, it had been cut to mount the required H4 headlights.

Now welded and in a thick zinc jacket, I can finally mark the fourth set of headlights brackets as plated.


Another little guy that was waiting for 2 weeks, is the bumper support. Because I don't have a long enough bath for it, I had to work in pieces. Both extremities were alternated in bath where most thick rust was and today did the rest standing in bath...


While the original slop grey looked fairely ok on most of the part and deep rust was not everywhere. I know more than one who would have painted on this after a quick sanding. Well, fact is, everywhere beneath the grey was rusted. So while busy doing other things, I've kept the entire part wet of acid whole afternoon. Helping a bit with a brush on the deepest rust. And at the end of the day, one side was totally rust free, the other 98%.


After a quick sanding and cleaning session I should have this baby as new next weekend. Unfortunately, I can't plate it :(

It also should be epoxied/painted next weekend...

All with all, I wish it was friday, tired of my weekend! But glad I did a least a few things :)

To be continued...

 
Last edited by a moderator:
@Tom

Plating is really rewarding. It's extra work and you can't cheat as for paint yes. But once you done, your parts are really protected or looking as new.

Best part is how easy and cheap that is. Wish I'd tried this many years ago...

You know where to find me if you need get started...

-----------------

Cold and rain whole week. Way bellow season temps.

As today was dry and sunny, did not miss the opportunity! :)


Was again time to see bye bye to all the bling bling parts done in past weeks.

First applied a layer of rust preventive epoxy to the bumper support as I can't plate it due to its volume. Then sprayed a generous epoxy layer and thanks to the sun and a tad more hardener, all was drying pretty fast.


In between, took care of the rubber mount for the suspension plate, its stayed the week in bath and gave it a quick zinc coating hoping it could be ready to go for the other side epoxy pass. Which I did. Also, placed back temporarily the plate for the electrics plated a while back and all the screws plated last week that came from @Dale part car. So I have all in place before I forget where they all go. :) Aside one screw for the latch in need of a j-nut behind, all threads were fine. All will stay there till I handle the dashboard...


The skies were starting to obfuscate the sun, but took my chances and sprayed the other side and by the end of the day, just before it start rain again, all was ready and hard to the touch. If the weather permits it, I might start prime them and may be paint a few tomorrow...


Then while all these goodies were drying,went back to the car to pick my next victims. Came across 2 things. There was this ring with a screw, even had the original green on one side. Obviously this is useless, but wonder what is supposed to be there... anyone knows? On the other side there was nothing, but the little hole is there too.

Also another question, the driver rocker has a deep shock, not very obvious on the pict, but its like bit more of 1/2 inch deep in the middle. What would be best way to get it back in place. I'm thinking about renting some tool to weld some sticks and using a guide with weight to get in back out. But if anyone has some tips, please shoot, as i'm sure the metal isn't thin there...


The other one isn't yet finished that I already start on this one. Way less dents but much more corrosion on this side, tho nothing to scare my acid powa :)

Notice the plastic gold on the lower part of the pict. It's different than the passenger side for some reason... Unlike the other side, I do miss the totally useless and not even visible plastic pieces in the front. Also removed the deco group trim and extensions without problems.

The more I see these thin things, the more I'm thinking about learning fast how to weld stainless steel and made a new set myself. We'll see.


Ah, behind the splashguard that was rivetted for some reason, I've discovered even more how talented the guy who did this was... I know its so ugly I should not post it, but also because its so ugly that I needed post it :)

He used a metal sheet and mixed it with this poo, may be to imagine he actually placed some metal back after butchering the apron... tsss. Pushed all the wires inside, and I'll dive in this misery later on.


Aside a problem on the front, what I took for rust first was just brown dirt. There is only few places where rust starts, but nothing serious. So good news in that regard.

However came across 2 other things that may be one of you knows about.

On second left pict, there is some kind of reinforcement. I there supposed to be something there? Or was it again added to hold the winshield washers tank because may of too big hole???

Also, and that one looks original, there is a thin tube that goes in pair from fuel pump back to tank. Was it some kind of return line or vapour thingy in 71 or specific to 429's ? I'll go EFI, so this will go away, but wondering what it was for.... My 73 doesn't have this and never seen this before.

Anyway, lets hope tomorrow will be nice weather kuz my todo plate is full again :)

 
Last edited by a moderator:
Yes, you can get a stud welder and use a slide hammer to pull it out.

You can also get the glue type dent puller

https://www.amazon.com/Super-PDR-Paintless-Repair-Removal/dp/B079QK1RTT/ref=asc_df_B079QK1RTT/?tag=bingshoppinga-20&linkCode=df0&hvadid={creative}&hvpos={adposition}&hvnetw=o&hvrand={random}&hvpone=&hvptwo=&hvqmt=e&hvdev=m&hvdvcmdl={devicemodel}&hvlocint=&hvlocphy=&hvtargid=pla-4584413735447979&psc=1

And, you can drill 3mm holes and use a hook to pull the dent out, or a slide hammer with a sheet metal screw to pull it out, and the weld the holes shut. The best body man I knew used a L shaped hook with a handle on it and would pull on the dent with one hand while tapping around the edges. The L shape didn't pull cones into the sheet metal the way a sheet metal screw does.

 
Last edited by a moderator:
Yes, you can get a stud welder and use a slide hammer to pull it out.
" I'm thinking about renting some tool to weld some sticks and using a guide with weight to get in back out."


Obviously your english is better than mine :D 


Thats exactly what I ment.


I've seen this in action years ago, and there are no holes made, the extremity of the slide hammer was having a similar head as a drill machine and you could use lots of force on the studs. I'd like very much this above making holes to perform the same.


You mentionned 
the glue type dent puller. Would it be strong enough to pull this kind of metal thickness? I bet the metal is 1.5mm or even thicker on the rocker there no? I recall seen this used on modern cars rear fenders where we all know its cigarette paper thin these days.


Tho, might be worth a try before drill anything if I can't rent the "man" tools. Thanks for the tips Don.


Still no summer temp, but warm enough and dry.


Sanded all the parts where some some remains of ancient pits of rust were and applied primer. Not long after that, did the other side.

Unlike epoxy, this primer dries very fast.


Hard to see these were pieces of rusted junks a few weeks ago! :)

Once the second pass was hard, most of them went back in box for next week black paint as it was too late to start paint and coat.


Did apply my metallic replacement color for the slop grey, as I marries much better to the green I'll be using. Still wet when I took the picts and weirdly reflecting the tree above, These should be coated together with the other black parts next week. Or may be during next week as weather is announced warmer.


As usual, had to do ugly things too :) After a good clean with water to remove all the collected mud and dirt, got to the raw material (read rust). Then applied the first pass of phosphoric acid, notice on lower picts how efficient it works. This is just 1/2 hour keeping the metal wet with a paint brush. When I left the garage to go work in garden, I forgot to take a pict, but only the deepest rust was remaining. The nose very corroded is submerged in bath (as on pict) and should be totally rust free by tomorrow. I'll continue apply during the week and should be able to start on other side next weekend...

All with all, another good mustang weekend :)

To be continued...

 
Last edited by a moderator:
All looking good as usual Fabrice, great to see your progress

Another suggestion for pulling out the rocker panel dent is to tack weld some largish washers along the dent line perhaps 3-5 of them

Weld them vertically and run a bolt or rod through the washers then using a J hook or similar with either a slide hammer or a hydraulic porta-power gradually pull the dent out whilst tapping any high spots along the edge

Once done just twist off the washers and weld up any holes if necessary

I have used this method several times with great results

As much as I would like a stud welder I just can't afford to buy any more fancy tools for a while due to engine/trans problems
Thx for the tip m8. Yes, that's also what I was thinking about if i can't rent one of these things. Thought I might weld a bolt at the deepest and use the thread (thru a bar) to pull it back.

But err, what do I read??? You also have trans probs now?

------------------

Stormy weather past week till yesterday

Couldn't do much, so did small things, especially on the 73.

As the 71 needs to go inside for some serious massage, the 73 needs be "kinda" finished first so I can finally have my cleveland kick whenever I feel I need one :)


Because the 73 needs a new jacket, went to the painter, as I keep the same green, I wanted also to have the new ref number (the system/regulations changed since it was painted). So I could order the exact same color later on for whatever I'd need to repaint, So came back home with tons of green sample cards to test against the paint till I finally found a match. Very hard and time consumming.

Also got myself a new glovebox, well, not exactly ready to be installed, but next time it rains, I could work on making a new one inside from this 1mx50cmx1mm aluminium plate. Just like in my 73, the 71 will receive a nice aluminium glovebox vs some cheapo cardboard.


As I've replaced my 73 grille a few weeks back, found out this repop wasn't having the same angle for the contour as the old one, as a result the cover wasn't really fitting anymore, so played quite a bit on the lights brackets and few measurements later, thanks to some new rivet toy, removed the need to make a new cover. Bought this tool a while back to have proper screws for my mirrors, but never tried it. Very handy, tho, the tool itself isn't really the most friendly to set it to another size. Used M6 size for the bolts and went to shops to buy some in SS with flat allen heads, but all DIY stores in town assume people want either crap material with flat screwdriver heads in long sizes or nice ones but very short. So I'll replace these once I've located new nice ones online, for now, the cover is secured and in place. No need to make a new one!

Next week, i'll have to tune the headlights direction/height and can move on to the next on the todo for this car before go to paint.


Despite the weather, I was able Saturday to start on the 71 fender as well, removed most of the shammy paint work I could and let it rest with paint remover last nite so I could work on it today.


Lots of little things were also waiting for the sun and dry weather, and today painted black all parts primed last week and finished them with a "silk" semigloss coat. These should not see rust again for a very long while! :)

Because my garage is a very crowdy place atm, everything went back into the box it came from. I'll prolly put the headlight brackets back together this week.


Rest of the day was all about exposing the misery of the fender. There is still plenty work todo, as most rust is bellow layers of ancient protection, and of course, the stuff doesn't react to the paint remover...

But so far, the fender is in good condition and found only 3 small dents. This should make my neighbourgs happy as I will not need much hammering to fix them.

Then I could de-rust/prep this baby...

To be continued (if weather permits)...

 
Last edited by a moderator:
I see you have a rivnut tool also, very handy for some applications

Reckon you'll have that beast painted soon and glad you've stuck to the original green

Are you able to paint in your yard/shed or is it a no no in your town?

I can get away with some minor painting but hired a spray booth to do the big job due to bugs having a liking for 2 pack paint!

As for my vehicle I'm awaiting an autopsy on the C4 trans which should determine the cause of the engine failure

Will post a full report later but so far the crankshaft thrust bearing has failed due to the crankshaft being pushed forward

This could be anything from the flex plate backwards but suspect the trans has somehow suddenly increased converter charge pressure and forced the crank forwards

Just one of those unfortunate things that happens

 
@OzCoupe72

Yes, bought that thing for the mirrors. The 73 had only one chrome mirror and needs to have holes properly done for the passenger side. The 71 needs at least one to be replaced. Not a tool you use daily for sure, but always wanted have one.

[Reckon you'll have that beast painted soon and glad you've stuck to the original green]

"Soon" is a very flexible term :) 
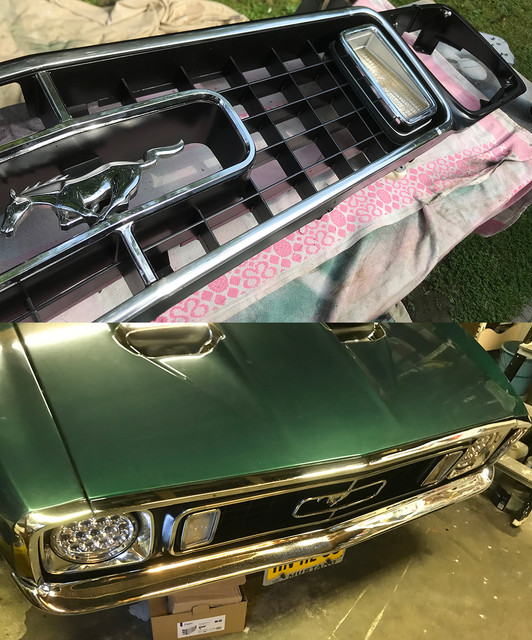
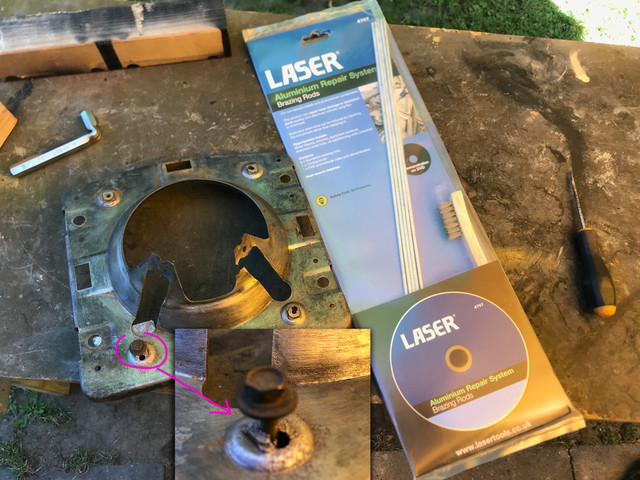
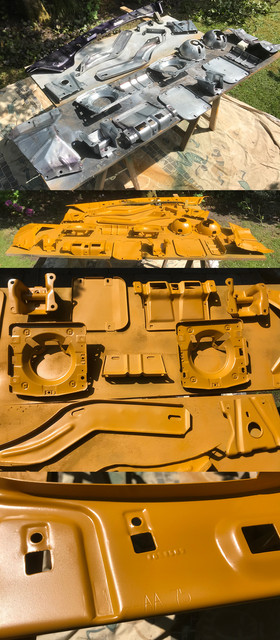
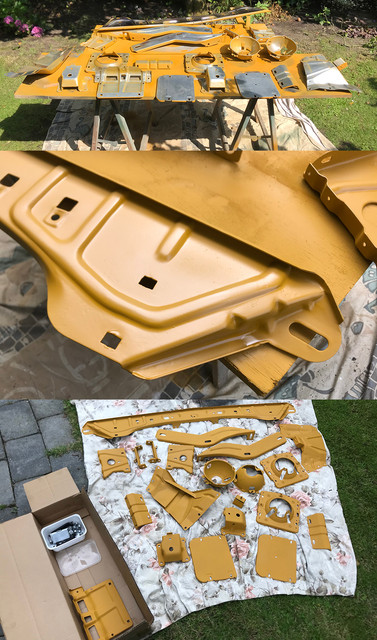
The green I'll use is not the original Ivy green. I've picked a version of it that is bits darker and using smaller aluminum particles.It should "draw" the lines with a greater contrast than the original paint could.

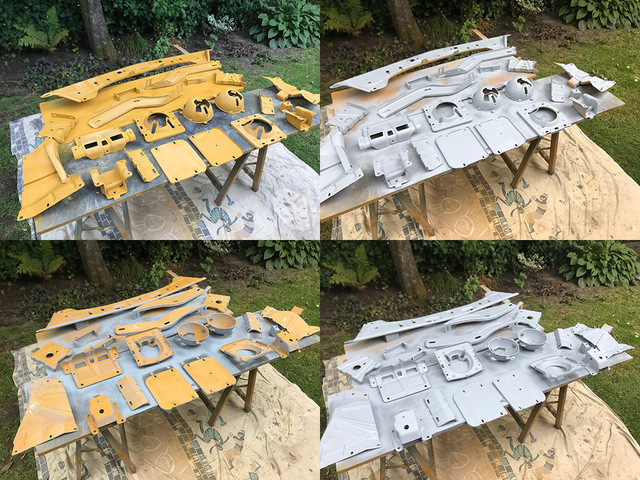
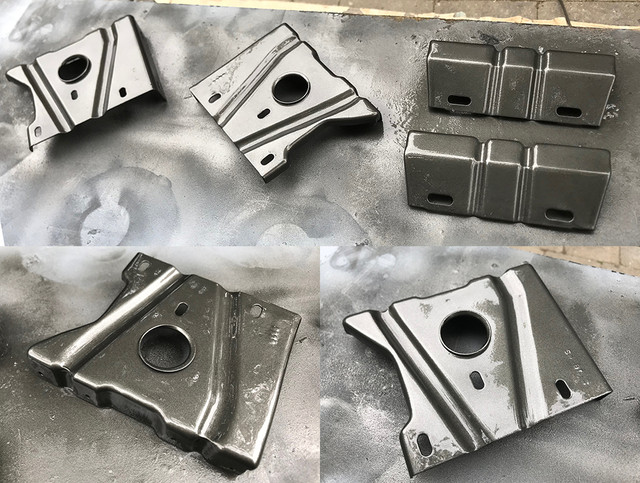
I can paint/finish small parts, and I can prep/prime parts, but the final exterior color+coat will be done at my local paint shop in a heated booth.

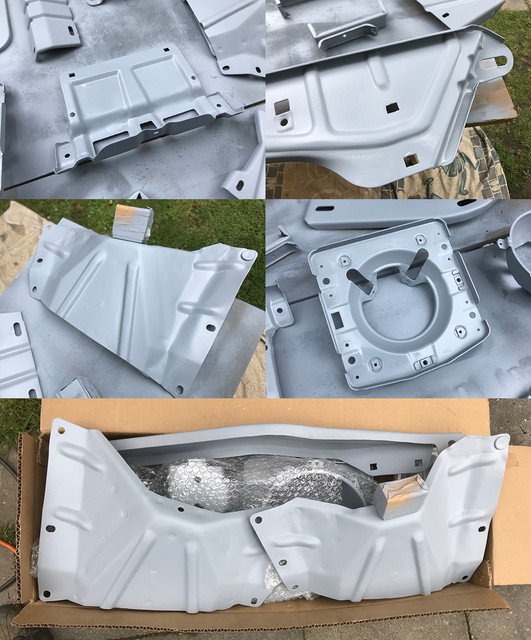
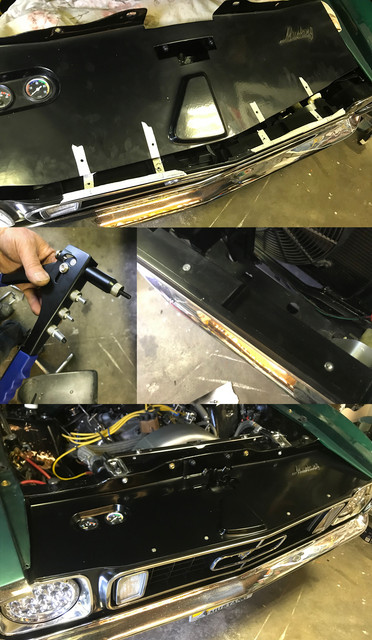
Most, like hood, deck lid etc... will/already have the inside painted by me.

---------------------------

Hot hot hot... whole week till yesterday was +- 38c / 100F

So hot it made me lazy on Saturday and did only little stuffs..


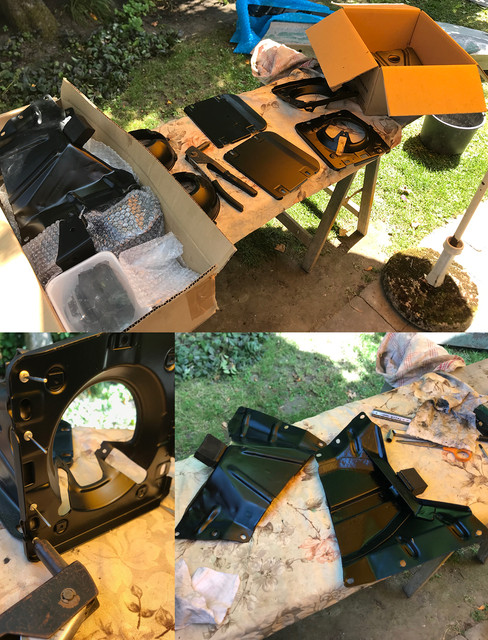
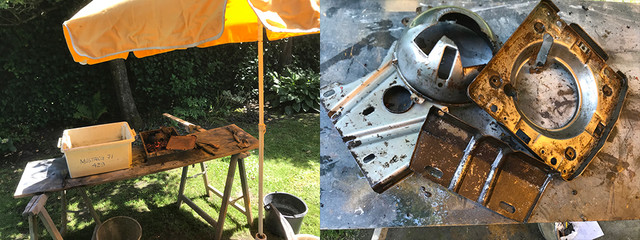
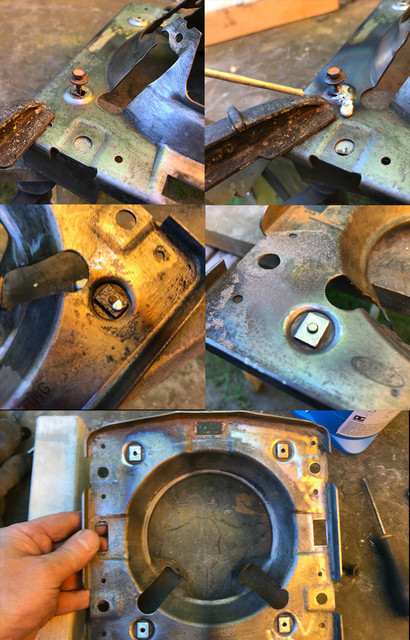
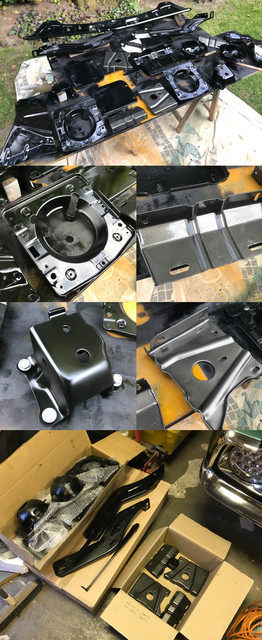
Under a totally must have parasol/umbrella, reassembled some of the parts that were plated and painted during past weeks.


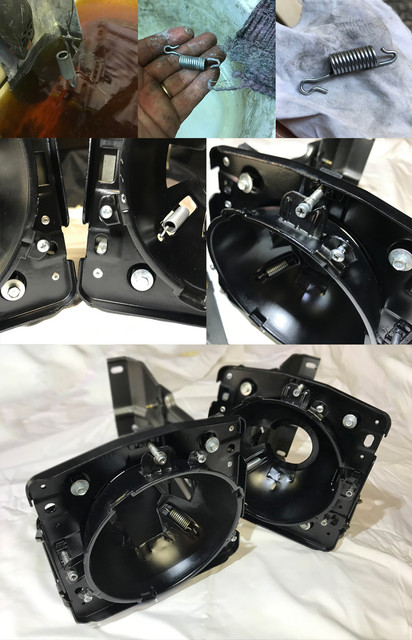
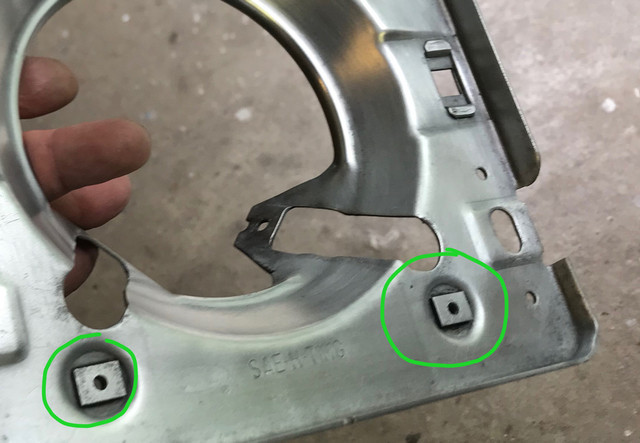
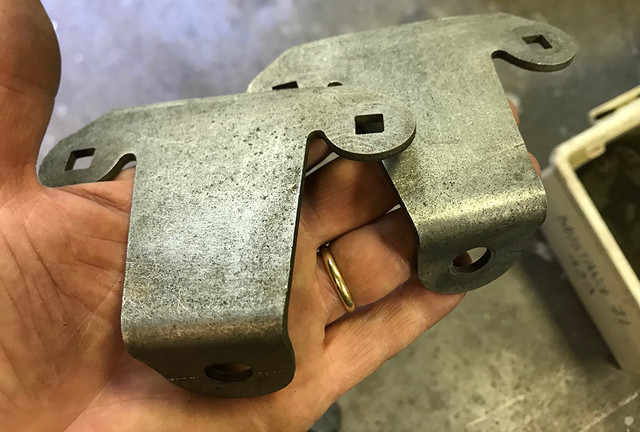
In middle the reassembly of the last set of headlight bracket, I saw I did not have a replacement spring for it as the 2 new ones I bought were already used. I had one spring in good shape, but it was corroded. So took a plating break and restored it.

After each and every bolt or screw was preturned and greased, eventually I was able to complete the last set! Yeeeeeeaaaaah!

After 4 rusty sets, I'm totally OD'd doing these and really do not plan do another set anytime soon!! :)


They might not be perfect, they might show some ancient scars here and there, but knowing the way they were (and knowing what's underneath the semigloss top coat).

I'm very please with the results!

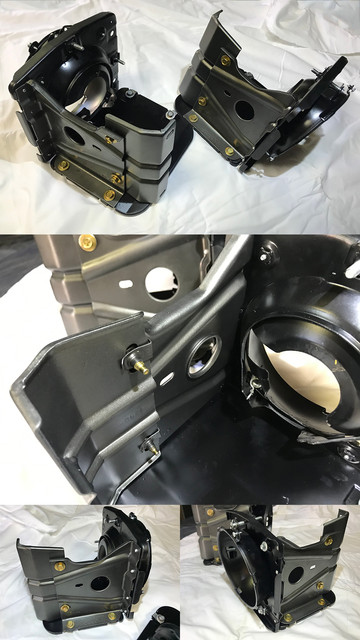
Headlights brackets: DONE! :)


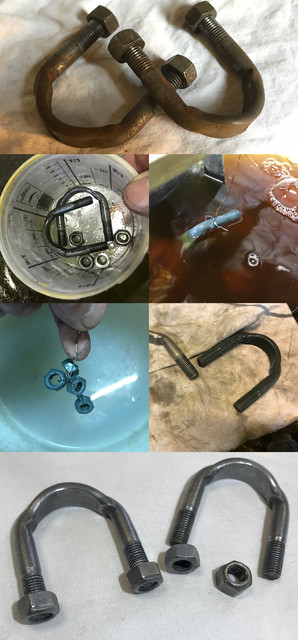
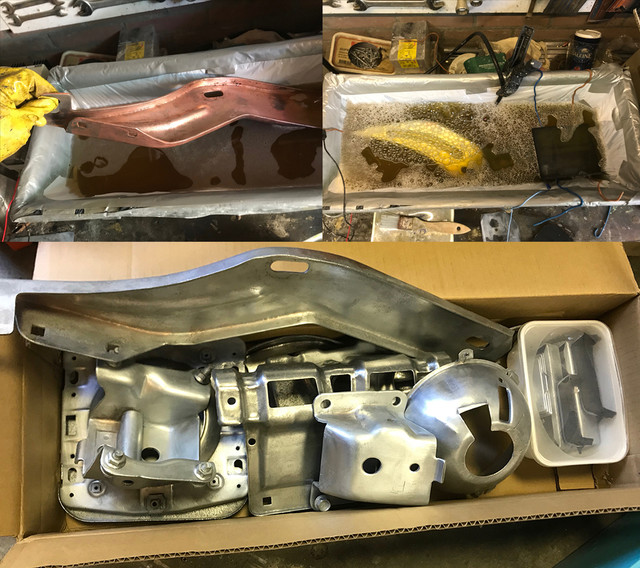
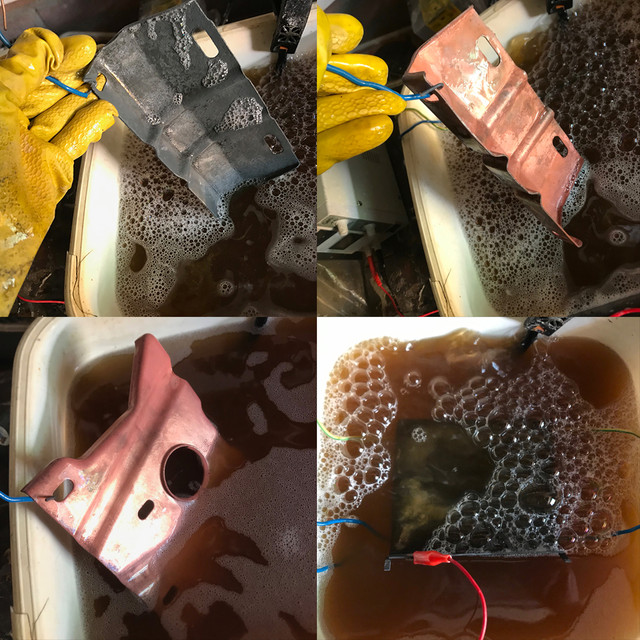
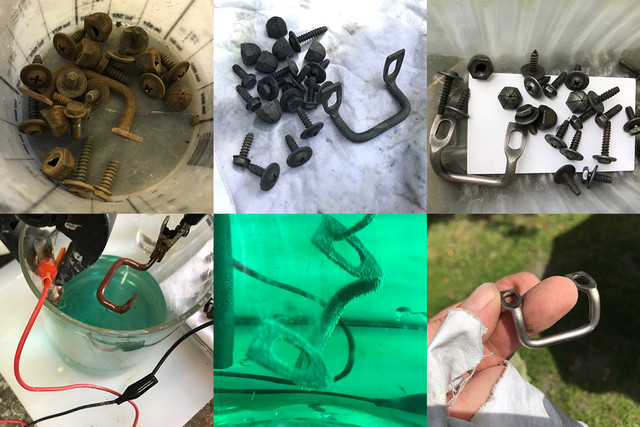
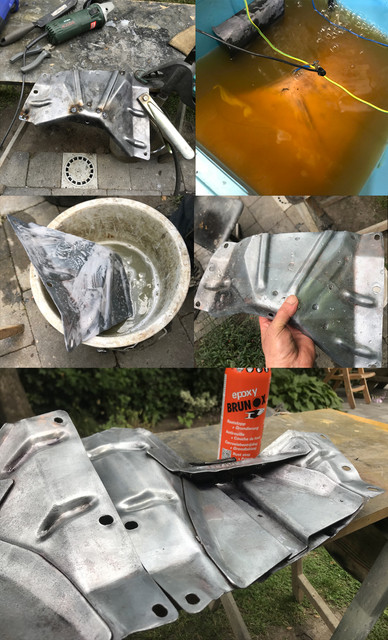
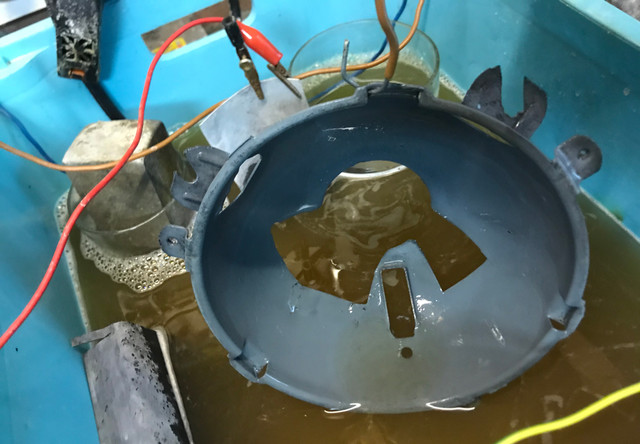
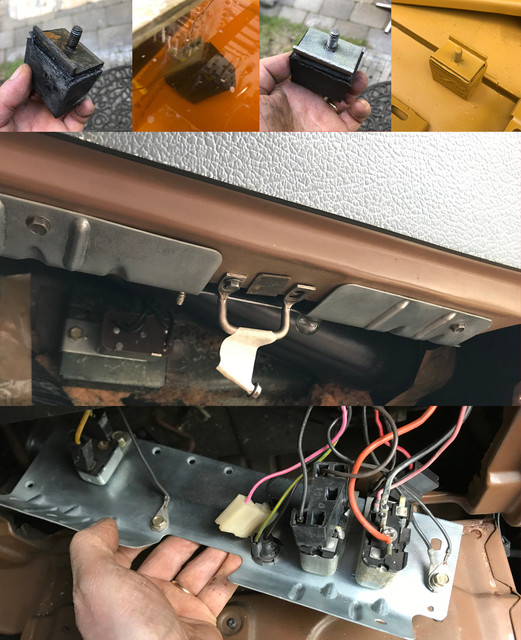
As temperature was unbearable, went looking for a small victim. These little guys, holding the driveshaft, made of high grade metal were just having small corrosion. So gave them some love and few bubbles later, they were as new.


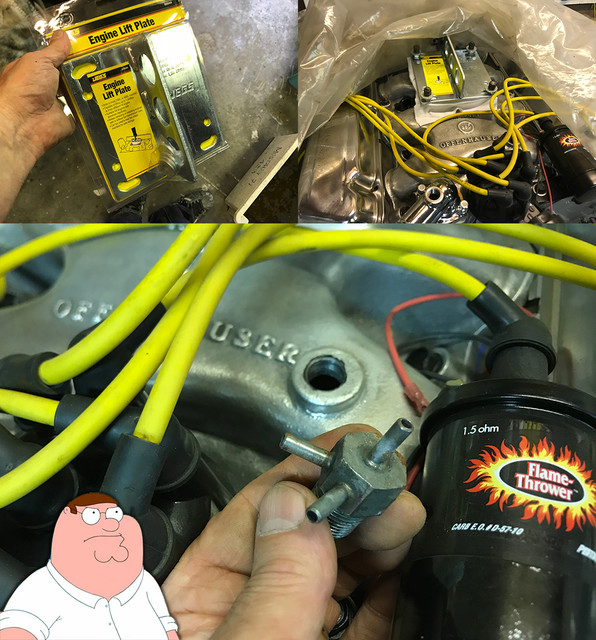
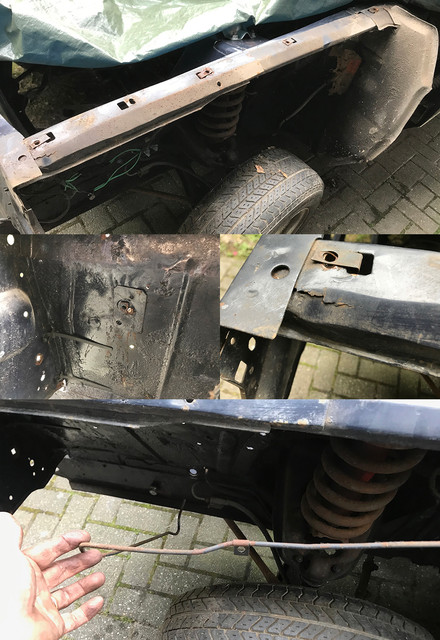
As I can't yet have a 2 tons engine hoist in the garage by lack of space, already ordered some of the stuffs I'll be needed, like a lift plate and some chains... The JEGGs plate was not fitting, so enlarged the holes just a bit and finally got on the engine.

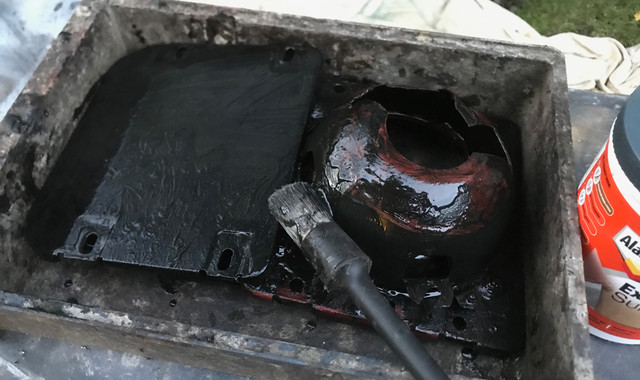
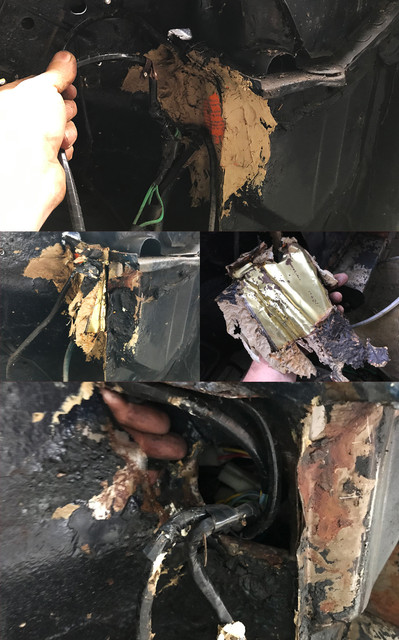
That's when I saw to my horror, that the vacuum tree thingy cleaned up last year, started to show signs of corrosion. Totally unacceptable!! :)

Last year I didn't know how easy it was to plate and painted most other parts on the engine. But for that one, I thought the original protection was still good enough to avoid paint... I was wrong.


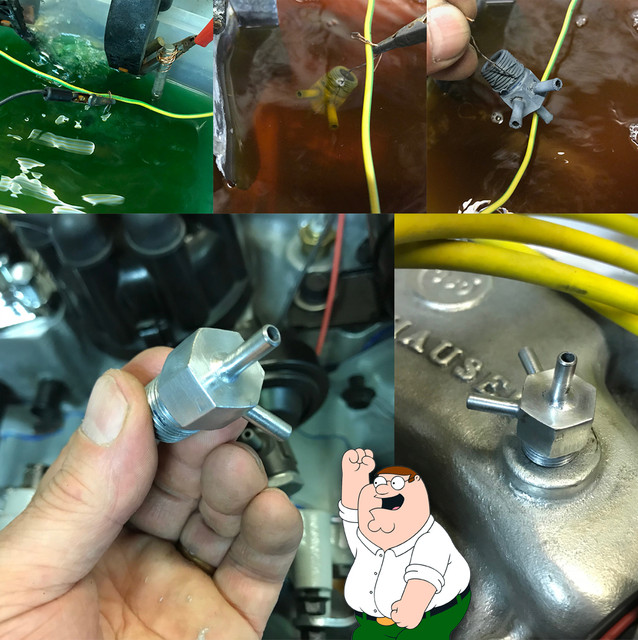
So gave that poor thing the love it needed and after a first layer of nickel, finished it with zinc. Back on the engine it was looking pretty again! :)

Then the sweaty me called it a day and went for a long cold shower.


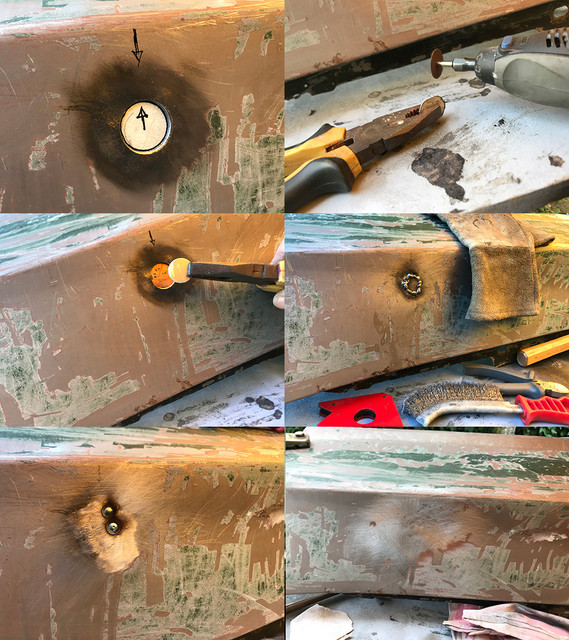
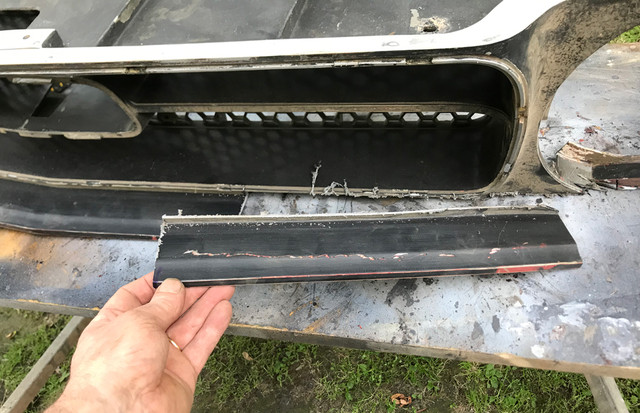
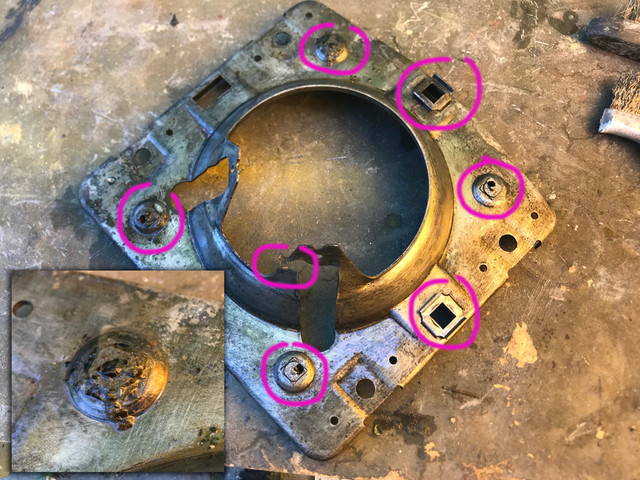
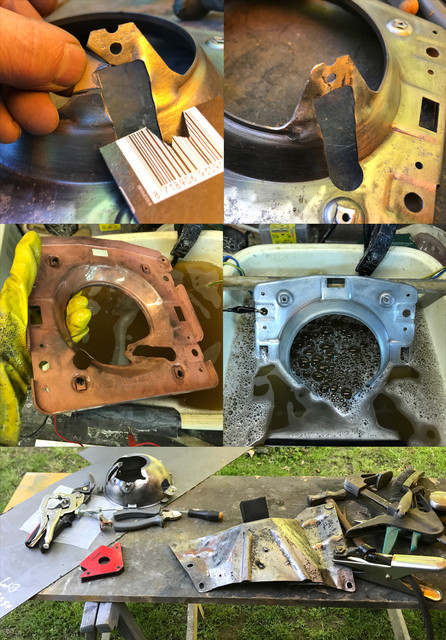
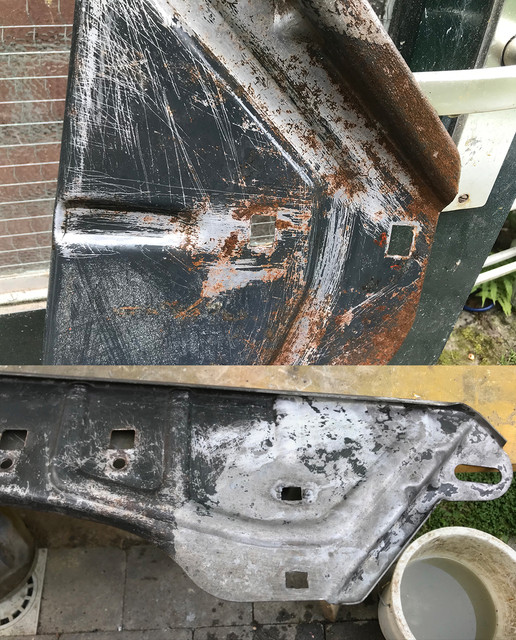
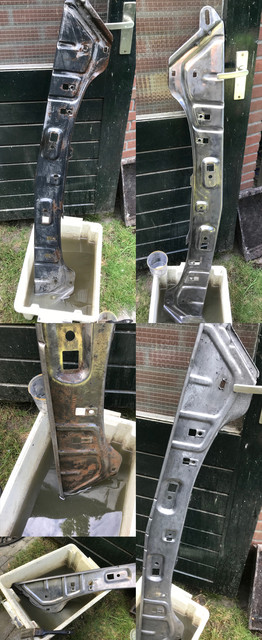
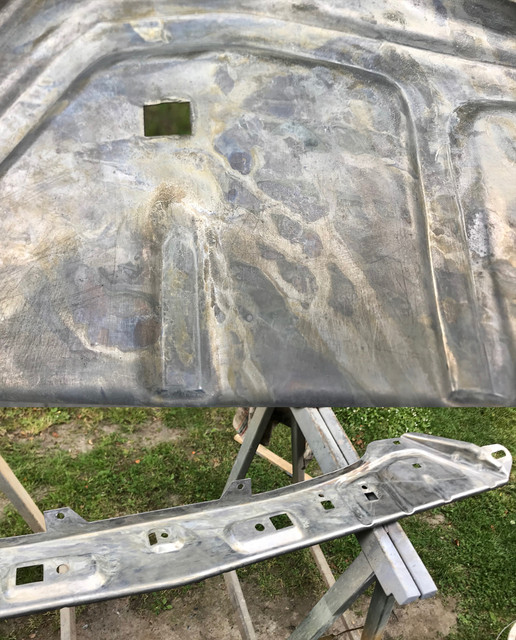
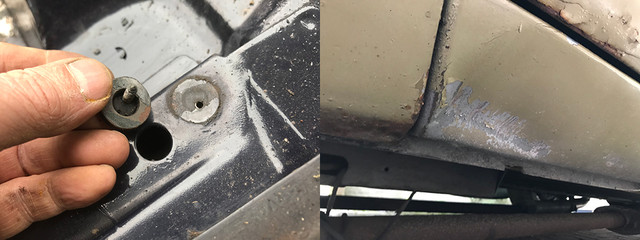
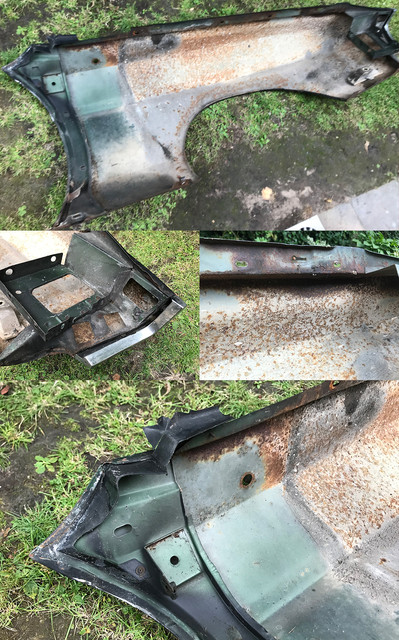
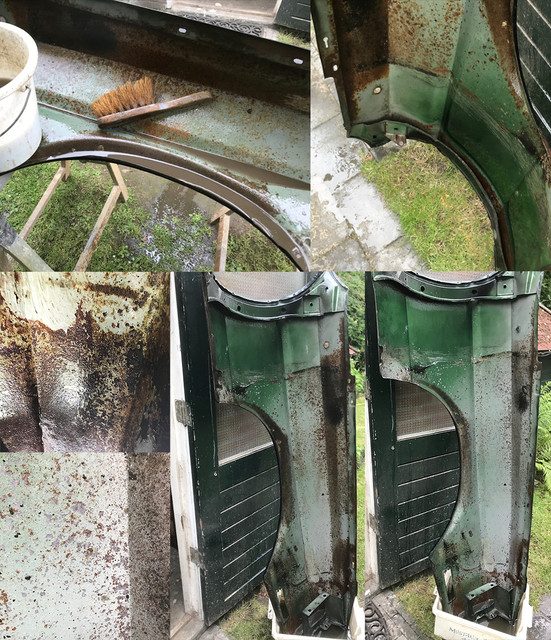
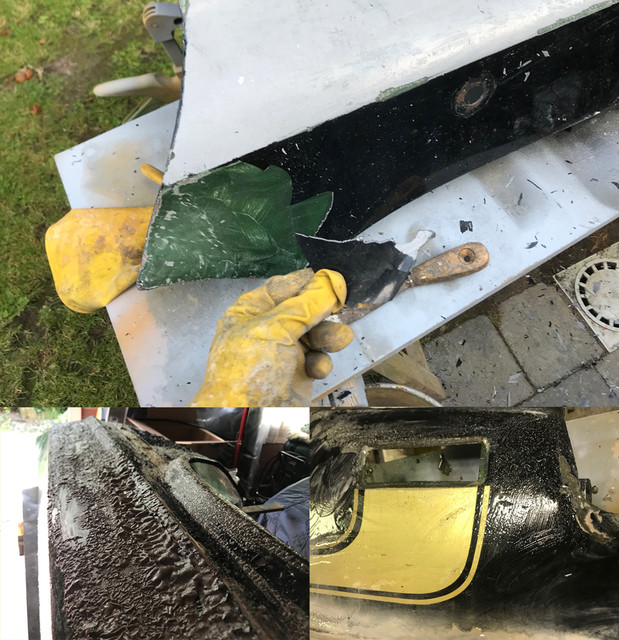
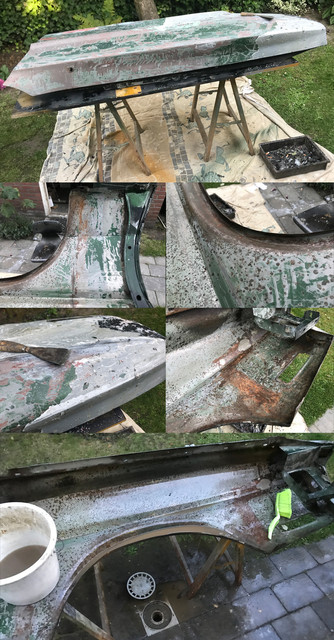
Today's temp was 33c / 89F with bits of wind, so did the work I wanted to do on the 73 yesterday and then went back to the front fender. On the todo: close that "antenna" hole. This fender being the driver side, probably someone installed some extra antenna for some piece of high tech equipment (at the time). All I know is I've close the original one on the passenger side and wasn't planning to put back the rubber thingy that was closing it since at least 1989.

To make a round patch of this scale, I asked Mr Dremmel to help me. 2 tiny discs later, installed it with magnets and a piece of copper behind. Once welded and grounded, fixed two tiny holes that I've missed and dollied the region to have a seamless surface.


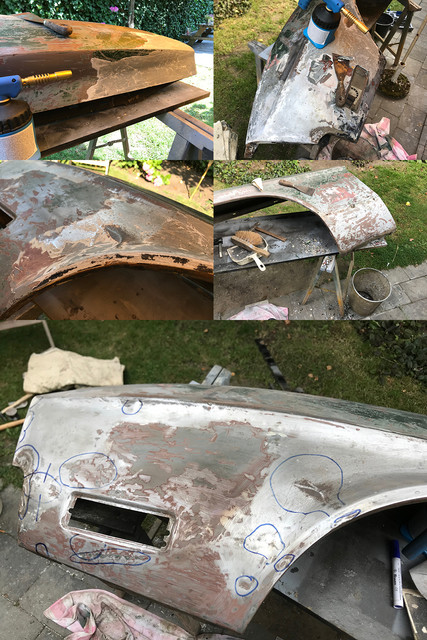
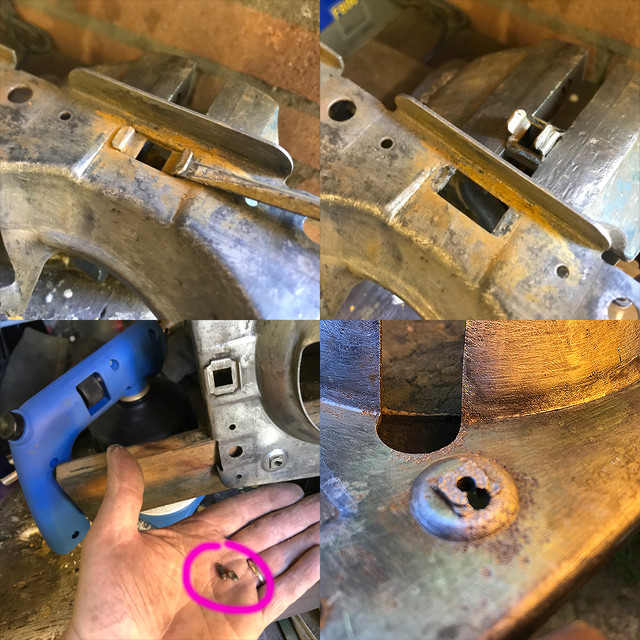
As my paint remover doesn't attack bondo and because I can't transform the garden (and occupants) into a white powdery landscape, sanding is out of order, so just like for the passenger one, I've used heat to remove it all. Discovered that at some point the body guy decided that it needed be done "right" with tin just like he did the hood corner, but he prolly decided 1/2 way that bondo was way faster... Then discovered other nice fixes, like a crease only asking for a hammer, that was instead hidden with 2 kilos of bondo. Same receipt for the region near the bumper, tho for that one, as to access it by behind is very hard when the fender is on, I can understand why he went for bondo vs fix.

Started hammer and dolly here and there, and was reminded by the garden occupants that the entire street population was in own gardens and that hammering could be a tad annoying. I totally disagreed on this, as Mustang metal sounds great! But it was late anyway, so cleaned up the mess... I'll prolly go make some noise this week when everybody's at work. Working home has its plusses :)

And so ended a very hot weekend.

To be continued...

 
Last edited by a moderator:
Back
Top