P
Pastel Blue
Guest
.....
Last edited:


I used a couple of third party units to replace the internals on my actuators. There are many aftermarket units that will work if all you want is the rubber diaphragm and the hook. Some have a longer hook, which I found could be straightened, shortened and re-bent. There are some still available with the yellow chromate caps which can be used to replace the old cap. If you plan on cleaning up and re-plating your old caps and base then you could find aftermarkets with a plastic cap for less $$.
With that said, I attempted to pull them apart. The problem I encountered was I had no way of prying the cap off the base without damaging the lip on the base. It was difficult to get a clean smooth look when folding the base back over the edge of the cap and not damaging the new yellow chromate finish while putting it back together with a new rubber diaphragm. Furthermore, I had a few that leaked (slowly) and had to redo them. In the end I was able to get a working pair, but I was not pleased with their appearance.
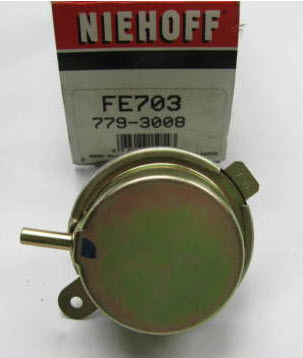
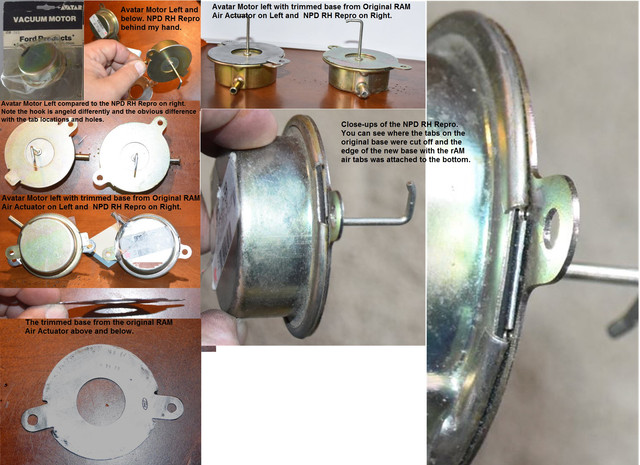
I had the chance to get my hands on an old ram air repro unit originally from NPD, which gave me a idea. So I plan to try again taking a different approach. I have a couple of standard air cleaner snorkel actuators with the ford oval stamped on the cap (although any actuator will work so long as the cap is yellow chromate and the tabs on it are at 11 and 5 o'clock with the vacuum tube at 12 o'clock, and the hook at 3 o'clock). I found Avatar Vm 263 or Niehoff make good donors, although the hook is a bit longer and needs some shortening.
Keeping in mind that the ram air actuators have two tabs with holes at 10 o'clock and 5 o'clock when compared to a typical air cleaner snorkel actuator with a no hole tab at 5 o'clock and a tab with a hole 11 o'clock.
Step 1: Cut the tabs off the new Actuator. Cut the one at 5 o'clock as close as possible to the base. Cut the tab at 11 o'clock leaving just enough of the tab to bend it over the lip, or just cut all off and don't bother bending it over the lip.
Step 2: Disassemble original ram air unit carefully preserving the base with the tabs
Step 3: Trim the original ram air actuator base removing the lip (now mangled from disassembly in step 2). Essentially making it completely flat and slightly smaller than the new actuator base, WHILE LEAVING THE TABS INTACT!.
Step 4: Before you proceed with the next steps, try an fit the the pieces back in to the flapper, inserting the hook and aligning the tab holes to ensure it's going to work. Mark the tab positions on the edge of the cap.
Step 5: Refinish the original base since the tabs on it will be visible and to protect it from corrosion...Optional.
Step 6: Epoxy (or use another adhesive you like) the old original base to the new tab-less cap and base. Orientating the tabs from the original base to your marks, should be at 10 and 5 o'clock.
This approach would preserve the date coded base. If your original base is not salvageable, then a new base with tabs could be cut from sheet metal and yellow chromated.
Disclaimer, I have not attempted to do this yet, but when I do I will provide an update on the results, but from what I saw on the NPD repro that's how
Thanks for the heads up, let me know.Ken, I might have some ram air bits you can you to rebuild your vacuum pods
I see what I have and PM you
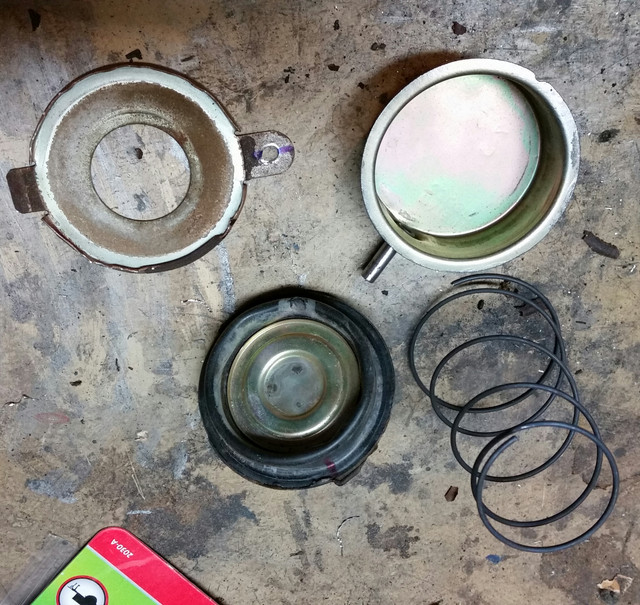
Took mine apart today... Time and much use have caught up with these original pieces. One of the vacuum actuators is not working (will not hold vacuum). Has anyone restored these, taken them apart and rebuilt (I recall reading about somebody doing this somewhere on the internet...). I would appreciate any info. out there as I would like to try and save this original and date coded to my car (1-15-71) piece. Alternatively, is there replacements available? I haven't really seen these kicking around lately (at one time you could buy similar replacements), so I suspect at this time, I will have to try and salvage mine.
The other issue is the flapper housing units, which appear to be made a form of fiberglass and some other like minded material. One of the pictures here shows a crack that I would like to repair, suggestions??? Finally, can these and should these be painted? I will work to clean them off, similar to the under hood large plate assembly that I worked on yesterday. I see replacement large plate pieces out there (originals) ranging from $350-$700. Mine did not turn out too bad. Still debating...
The years spent in the hot Arizona weather and the heat given off the BB engine took a toll on all non-metal parts under the hood on this car. these pieces were no exception... I am trying to save these pieces. Advice from those that have previously done some restoration on the under hood ram pieces much appreciated.
I changed a pair out a few years back (that would have been at least good for parts today...) and I may have inadvertently tossed the old ones :shootself:I also had one of my units rebuilt by Perogie Enterprises back about 15 yrs ago. At that time it was about $125.00. I had partially dismantled the unit to see if I could do the repair, but quickly decided I was better off having them do it. The only change was in the appearance of the rivets holding the actuator to the insert body.
Thanks for the reply David. I will keep all of this in mind moving forward as I am sure others who read this post will also do. i like the idea of the satin clear, will look at this some more. Take care.None of the under hood plastic parts had any type of paint on them. The plate under the hood and the flapper boxes were made by the least cost method at the time. Same for the heater boxes. I cannot tell you the base of the material but it was the same process that they made the old large satellite dishes with. They laid some fiberglass in the mold and shot a liquid two part material in and let it set up. There is a filler in the material just to take up space. It was not a thermoplastic mold process but a reactive process like a two part paint system or epoxy is.
When the parts, especially the big plate that goes on the hood, were new it has a slight semi gloss / satin look to it. I have a NOS one that got cracked years ago and I have NOS flappers I can take some pics of to show the finish.
The best way I have found to replicate the finish it to first strip any paint off using aircraft liquid stripper. Then wash the parts thoroughly in Dawn and hot water. Then to go the blast cabinet and blast at low pressure with walnut shells. This evens out the surface finish but does not remove material like glass beads or sand would.
Same process works great for the front fender splash guards.
Then spray with a satin clear to give it that new appearance again.
At one time I bought a box of the Ford screws for the plate but have no idea where to look for them.
When you are wanting to restore the vacuum actuators and you need the Ford oval logo you can order the stamp and add it yourself. You can do the same for the date codes order the letters and numbers the size you need. There are holders also on the sight. It is legal for you to do it for your use but not legal for you to sell the product, here is link to supplier that I used for years as a stamping supplier to Ford and others. http://www.argontool.com/custom-steel-stamps.php
You can order the Ford oval stamps in any size you want. We supplied stamped parts to Ford for the 1930's until into the 1990's when we became too small to be a supplier. We tossed hundreds of these stamps when the tooling left. I should have kept some of them.
If you have seen the kit Cobras at shows and all the emblems have tape on them that is to abide by the copyright laws and not show the Ford or Shelby names. Once the new owner has the kit car he can show the emblems and be legal.
You will not violate any laws unless you start to repo the parts and sell them they you will need a Ford License agreement to do so and they take part of your profit for each one sold.
My son tells me he is going to get a bar code reader and we are going to put bar codes on all my hoard so that he know where and what everything is, will see, lol.
Let me know if you want pics of the NOS parts.
I am not on very often but should get an email notice if you reply.
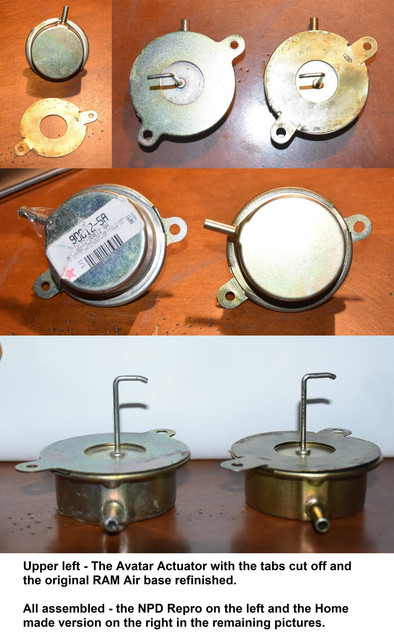
OKay, posting my plan with my next attempt yesterday (on the first page of this thread), motivated me to actually attempt it today. Here is how it went in pictures with captions. I started with an Avatar donor and an original RAM actuator base plate. I then compared it to an NPD RH repro. I think it turned out pretty good if I do say so myself.Took mine apart today... Time and much use have caught up with these original pieces. One of the vacuum actuators is not working (will not hold vacuum). Has anyone restored these, taken them apart and rebuilt (I recall reading about somebody doing this somewhere on the internet...). I would appreciate any info. out there as I would like to try and save this original and date coded to my car (1-15-71) piece. Alternatively, is there replacements available? I haven't really seen these kicking around lately (at one time you could buy similar replacements), so I suspect at this time, I will have to try and salvage mine.
The other issue is the flapper housing units, which appear to be made a form of fiberglass and some other like minded material. One of the pictures here shows a crack that I would like to repair, suggestions??? Finally, can these and should these be painted? I will work to clean them off, similar to the under hood large plate assembly that I worked on yesterday. I see replacement large plate pieces out there (originals) ranging from $350-$700. Mine did not turn out too bad. Still debating...
The years spent in the hot Arizona weather and the heat given off the BB engine took a toll on all non-metal parts under the hood on this car. these pieces were no exception... I am trying to save these pieces. Advice from those that have previously done some restoration on the under hood ram pieces much appreciated.

I wonder if those actuators are still available after all these years. Do you remember who the manufacturer was and a part number?I bought my Mach 1 around '96-'97, and at that time the Ram Air motors were not functional. I called around and found re-built units kinda pricey, for what they are. So....being an "ex-parts counter man", I went into the books and looked up air cleaner vacuum motors, physically ordered a handful, with the blessings of the store knowing I was going to send back what didn't work, found one close enough. I needed only to change the bend on the hook slightly to work, and as shown previously, one ear is positioned slightly different and had no mounting hole, but a drill fixed that.
OK, I drilled two new holes in my inlet plenums and mounted them. They have been working perfectly for 20 years now on a car that gets driven every day. So, sue me that I drilled two new mounting holes, but for ONLY $2.50 each, the car is functional, and while not meant to be concourse, the car is just as nice as anyone's.
Do you have the part number?I bought my Mach 1 around '96-'97, and at that time the Ram Air motors were not functional. I called around and found re-built units kinda pricey, for what they are. So....being an "ex-parts counter man", I went into the books and looked up air cleaner vacuum motors, physically ordered a handful, with the blessings of the store knowing I was going to send back what didn't work, found one close enough. I needed only to change the bend on the hook slightly to work, and as shown previously, one ear is positioned slightly different and had no mounting hole, but a drill fixed that.
OK, I drilled two new holes in my inlet plenums and mounted them. They have been working perfectly for 20 years now on a car that gets driven every day. So, sue me that I drilled two new mounting holes, but for ONLY $2.50 each, the car is functional, and while not meant to be concourse, the car is just as nice as anyone's.
Enter your email address to join: