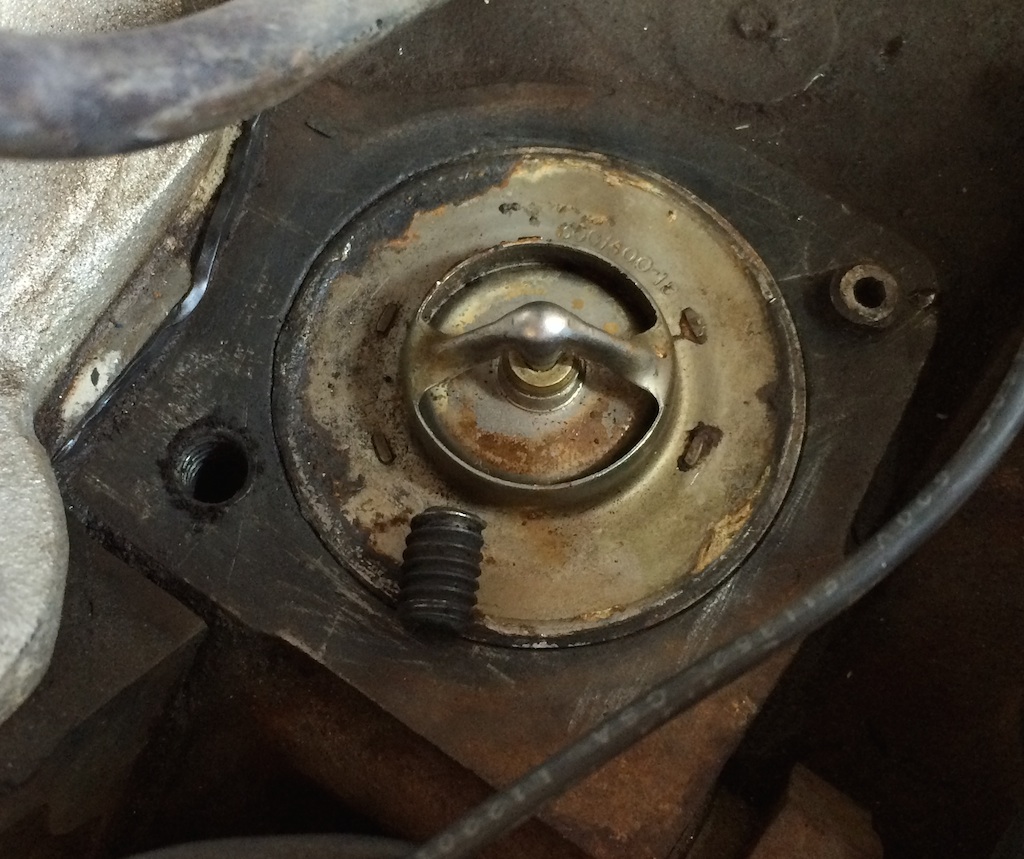
Snapped thermostat-housing bolts

7173Mustangs.com

Help Support 7173Mustangs.com:

This site may earn a commission from merchant affiliate links, including eBay, Amazon, and others.
I drilled a lot of metal while I was in school and uni. Just haven't done so in the past 20 years or so ;-) When I went back quickly 2 days ago I did hit a center in first and then drilled a few mills deep with a 1.5 mm drill bit on not too high speed. It worked but it will take some patience, which i have. The only worry there is that I'm not drilling in straight.

I'll look into hiring MIG welding equipment and maybe I'll give that a go if I can find the guts to do that ;-)

 
Best bet would be to get a friend who is an experienced welder do the welding for you. Welding a nut on will be the easiest fix. Even if you drill them they are still rusted tight and stuck. The easy out will break off in the hole or you will end up messing up the threads. Good luck.

 
Hey guys,

I haven't gotten much further than getting something similar to pb blaster (I think) called Brunox (http://www.brunox.com/website/productpages/Turbo-Spray-en.html).

But I did google a bit and saw these kinds of kits which are not easy outs but come close in a way. I was wondering what peoples experiences with these are:

full34990990.jpg


Thanks,

Vincent.

 
when i had this happen to me i ended up spending 5 hours sitting on top of my engine with the hood removed sprawled across the fenders with a dremel and a carbine cutter.

nothing worked, easy outs, welding a nut, etc...... i had to cut it out and make sure not to penetrate into the water jacket.

i had the thermo hole stuffed with rags and taped over.

so for hours i sat there cutting out 2 bolts until i could just make out the threads, i then i picked the threads out with a pick and vacuumed then finished with a thread maker to touch up the threads and vacuum again.

it was all caused by the weirdest hardware made in china i had ever seen, it was like hardened steel in some spots and butter in others, so the soft areas deformed and the hard areas grabbed and got the bolt stuck and the soft parts just sheared off leaving me in hell. the easy outs didn't work because they would just pull out the soft butter like metal.

it was nerve wracking because i didn't want to screw up and heli-coil my mistake, so i took forever and i had a freind help me hold a flashlight close and with oiled the tool constantly and took turns with the dremel

each time i punched through a hard layer into a soft one my heart sank as i thought i punched into the water jacket.

 
I posted early on in this thread. People do not understand what an easy out is for. They are for getting a broken bolt out that was broken due to over torque. They do not work well on rusted and lock in bolts. You drill the specified diameter hole for the easy out and then you drive it into the hole in the fastener. On fasteners less than 1/2" in diameter you just wedge the bolt in tighter. It is just basically a left hand thread in a spiral. If you break the easy out then you have a much bigger issue. It is usually made from High Speed Steel the same thing a normal drill bit is made from. So drilling it out is not going to happen.

Welding a nut seldom works on a rusty bolt only on one that was broken by over torque. If is broken by over torque the left hand drill will get it out faster than any other solution. Getting the center of the broken bolt is the key. If it is rusted in place grind the face of what is left flat and use a center punch to gently prick punch the center of the bolt. Hammering the center punch hard just swells up the bolt tighter in the hole. Then start with a really small drill say a 1/16" and work your way up to the tap drill size for the bolt. You have to keep the drill straight. It is a good idea to go to a drill press and drill a hole a say a 1/2" thick piece of mild steel that can be used to guide your drill bit and keep it straight. When tapping a hole by hand we always used a tapping block to start the tap straight. Get someone to help hold the guide block and you run the drill. Run the drill to the recommended speed, also charts on the net. Too slow and you will break the drill too fast and you will melt it down. I won't put the tap drill charts here you can get a full chart off the net easily. Like some have said you might have to resort to grinding if you get the hole off center. Patience is the key so what if it takes you a couple hours. It saves the block.

In the shop we actually built an attachment that went on our EDM, Electrical Discharge Machine, that could burn new threads with electricity even in hardened steel. I have used that machine to burn out easy outs before we all learned they just do not work on locked up threads only over torqued ones.

When building a die or mold you might tap hundreds of holes in one job so you learn how to get the job done and not break anything. But you always do so you learn how to fix it.

David
Thank you for this David. It will keep me from reaching for an EZ out when the situation doesn't really call for it.

 
I think you will have to take the time and drill them out. David is spot on with his recommendation. Once the drill gets to a size that you will come close to nicking the threads with the next size, get a left hand drill (drill bit if you prefer the common usage) and the remains will generally back out.

Any type extractor is made of a hard brittle metal and if broken off in the bolt, it will be extremely hard to remove.

It is just going to take time and patience.

 
But what I posted is not an easy out, it's a little different but I dunno the English name. Any thoughts about that?
The link you had on the tool did not work for me. Looks like maybe it is made to drill a hole in the fastener then put the shaped rod in and then the nut on the rod to turn the bolt out?? Just guessing never seen one so I cannot comment on it much.

David


I went looking for the tool you had the link for and found this one. http://www.brokenbolt.com/small-broken-bolt-extractor-demo.php

He somehow got a patent on something we did over 40 years ago. Might be on the way his tool adjusts to fit any size thread and attach to the part.

His idea is the same as I suggest that you drill a guide bushing on a drill press or mill that is straight. That will be put over the bolt in the block to keep you centered and straight. You could get creative and make something that drops into the hole for the thermostat and has the correct spacing for the mounting bolts. This tool uses hardened drill bushing that can be purchased from any supplier of tooling. It has a quick lock shoulder bolt that keeps it in place while drilling but quickly changes when needed.

This would be a great tool to have in an automotive shop that does lots of head work. Header bolts, water pump and thermostat bolts are always breaking.

Watch the videos and you will understand my suggestion. Just a simple drill guide to keep you over the bolt and straight.

David

 
Last edited by a moderator:
I continued the fight with the broken bolts of the thermostat housing yesterday. I now have one out and have the other one drilled 4.5mm. Tomorrow I'm gonna drill 6mm and see if I can peel the remains out...

IMG_9679.jpg


Now I have two questions if you don't mind?

1) I bought a water neck and it came with a rubber o-ring. I didn't think it would so I also bought a gasket. Somehow I'm thinking I should not use both. What should I do?

2) To stay away from air inside the cooling system, what's the best way to fill the car up with coolant again?

Thanks!

Vincent.

 
When I install a thermostat if it does not have an air bleed hole I put one in it. Just a small hole about 1 mm to 1,5 mm is all you need that leaves a place for the air to get out. Some thermostats come with the hole in them. Drill somewhere in the flat area so you do not disturb the spring.

Be sure to use anti seize on the bolts going back in.

 
I continued the fight with the broken bolts of the thermostat housing yesterday. I now have one out and have the other one drilled 4.5mm. Tomorrow I'm gonna drill 6mm and see if I can peel the remains out...

IMG_9679.jpg


Now I have two questions if you don't mind?

1) I bought a water neck and it came with a rubber o-ring. I didn't think it would so I also bought a gasket. Somehow I'm thinking I should not use both. What should I do?

2) To stay away from air inside the cooling system, what's the best way to fill the car up with coolant again?

Thanks!

Vincent.
Good job with the bolt Vinnie! Half the battle is researching the methods and choosing the best technique for your situation. You executed the the proper approach and didn't get into deeper trouble. Damage control. :bravo:

 
Last edited by a moderator:
Thanks guys, I like the studs and nut idea!

What's wrong with the chrome waterneck? Is the o ring a problem?

 
Last edited by a moderator:
Vinnie,

Over the past 10 years I have probably purchased at least four of the chrome w/ o-rings t-stat and they all have been an issue. They look great, but due to inconsistency in castings due to inferior manufacturing processes, I would not recommend them for long term use.

Take the advise of fellows and purchase a stock type steel or cast part and move on.

Thanks, Jay

 
Well, now they're both gone :) In the end I spent most time chasing DIY stores for correct drill bit sizes. I ended up using a 6.4mm drill bit after which the left over threads just fell apart. I was very fortunate coz the owner of the DIY store around the corner of my garage had to check in his secret "old stock" drawer where he actually had 1 6.4mm bit left.

Two things seemed key here: drilling straight and well centered and using the correct size drill bit. If you can do those 2 things it's easy peasy!

I can also confirm that the holes are blind holes. So no worries about crap getting in the water.

So, I'll see if I can find another housing then and I'll also drill a 1mm hole in the thermostat.

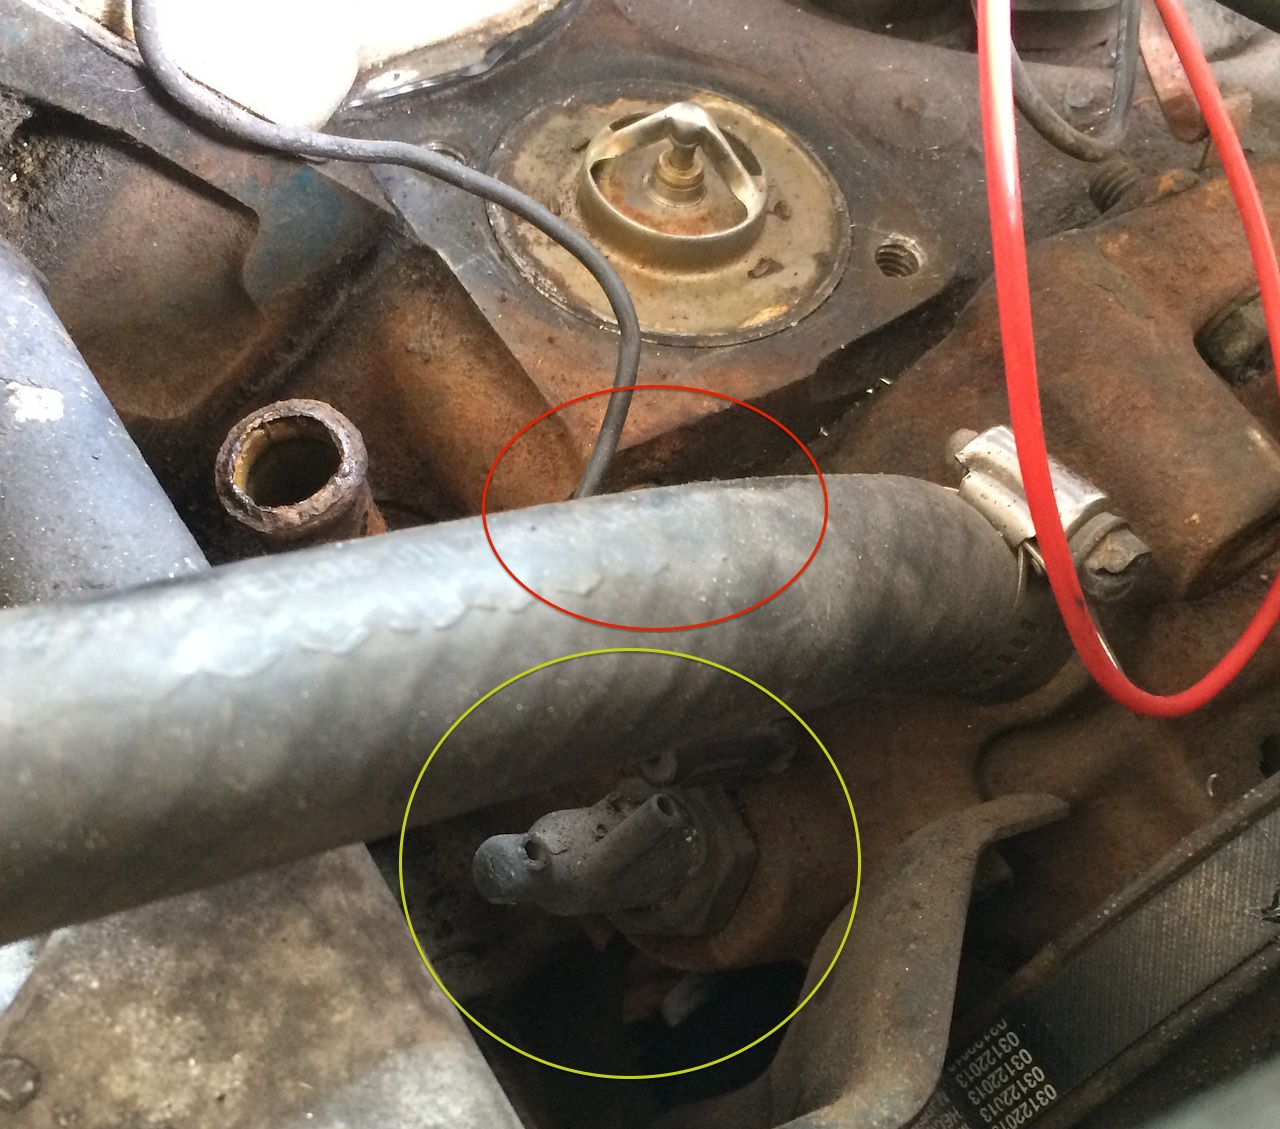
I noticed one thing that you guys might recognise in below picture. There is a sensor in the pump and it is not the temperature sensor I think because that is in the red circle behind the hose with the black wire attached.

Any idea what the sensor in the green circle might be for?

IMG_9698.jpg


Thanks!

Vincent.

 
Back
Top