Timing frustrations

7173Mustangs.com

Help Support 7173Mustangs.com:

This site may earn a commission from merchant affiliate links, including eBay, Amazon, and others.
Isn't this Eddie's (FastE) old Mach? I can tell you from personal experience when he had it... it RAN! I believe there was another owner in the mean time.

Eddie may be a good resource for specifics on the combination.
Yes sir, this is Eddie's old car. I have been chatting with him outside of this site. This is where I've gotten the list of specs that I do have from. He sold the car in 2016 to a "collector" who for the most part just let the thing sit. That's how the story goes, but I dunno. 

What I do know from Eddie is that this car under his care for 42 years, was always in top shape and ran like a scalded dog. So he's been a bit surprised to hear of the issues I've been having. He's a good guy, and a great person to talk to about what the car has in it, but without him here looking at it, he's just guessing like the rest of us. again, he's surprised that it's running poorly at all.
Big red mach 1,

 At this point you will probably get more from FastE than you will get from the rest of us.

Would ask, was cam installed 4 degrees retarded and how much vacuum was he seeing at hot idle.

Intake manifold leak would make sense, as it could have started to leak over time, could just check and see if any of the bolts have worked loose, carb spray (or propane) will only tell you if it is sucking air from external, not internal.

Would not rule out faulty carb work either.

Boilermaster
Yeah, I never thought to ask him that about the cam and whether he installed it that way. I want to say he didn't. He wanted this motor to be very similar to a 71 Boss 351. 


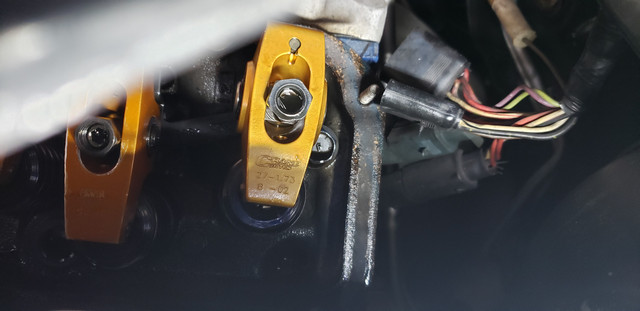
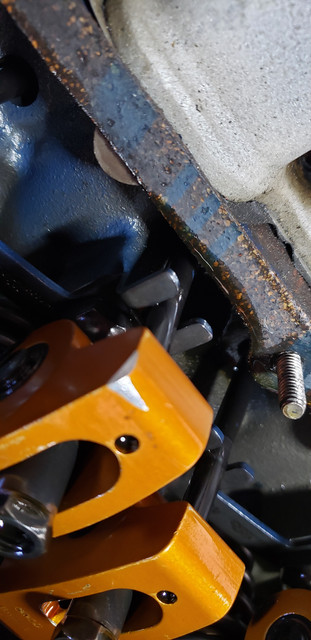
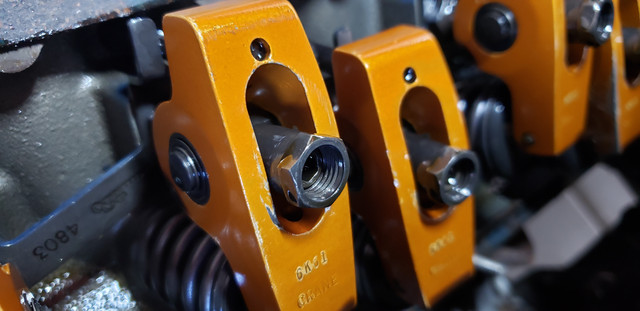
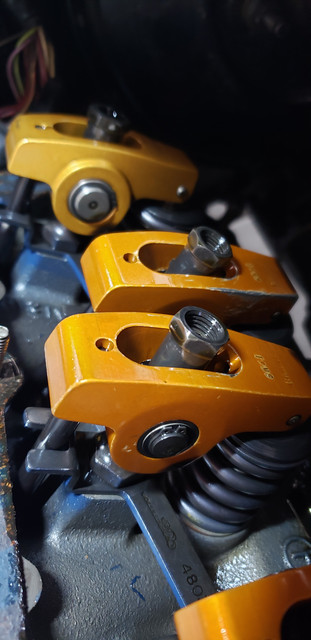
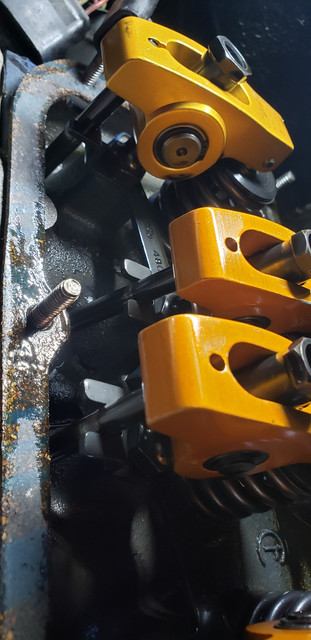
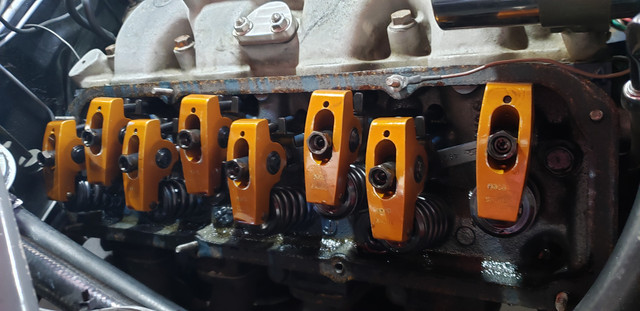
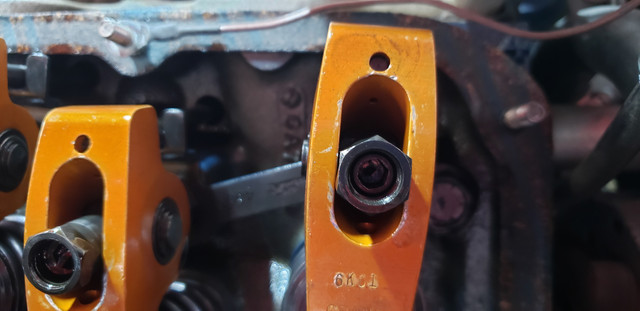
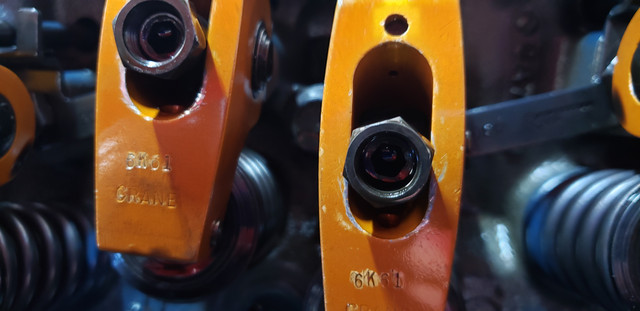
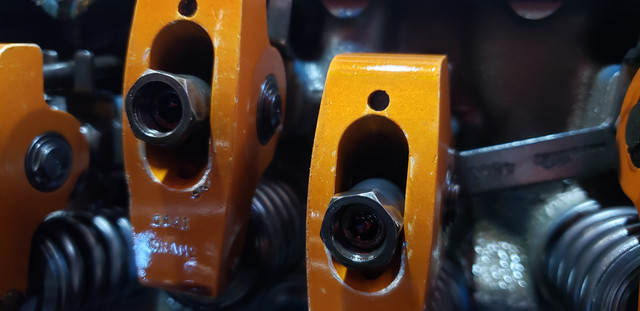
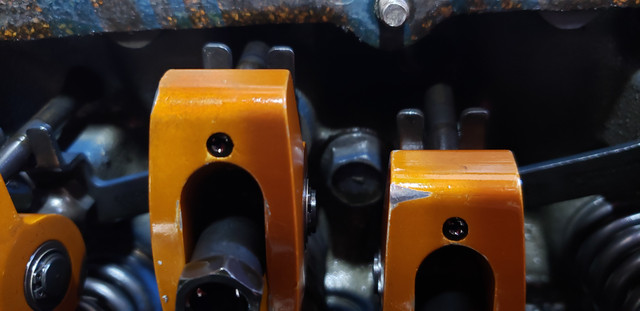
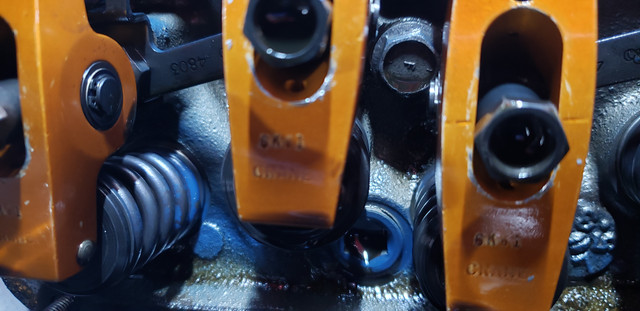
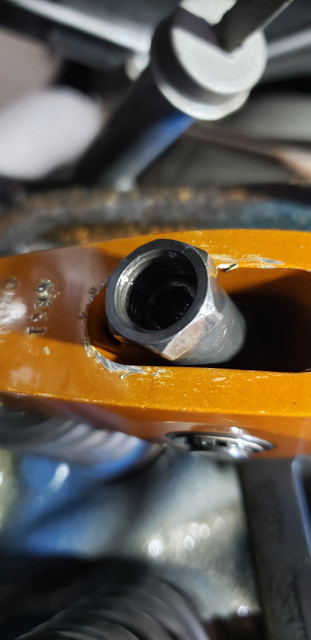
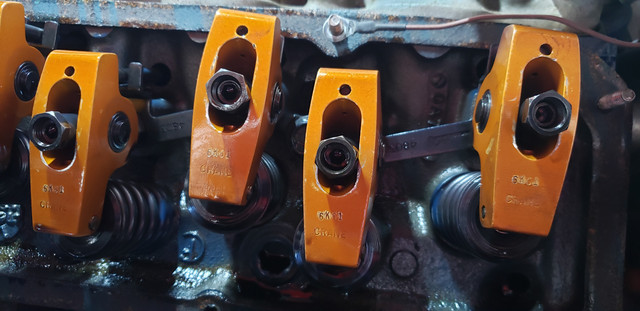
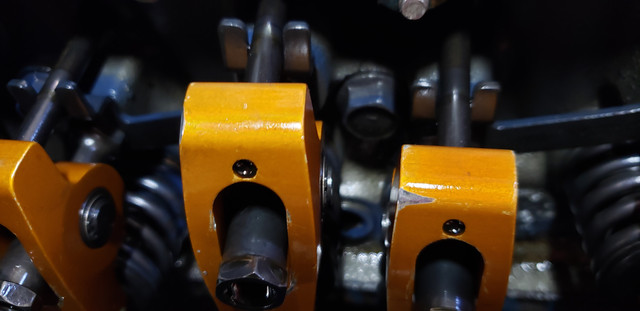
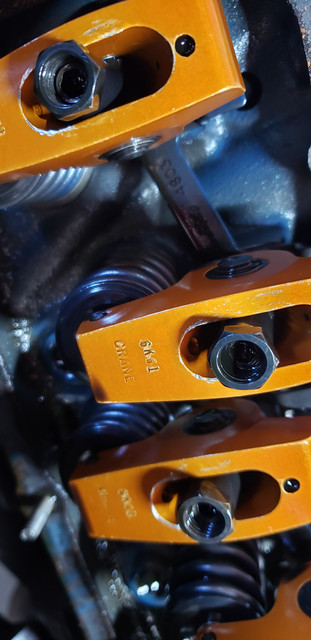
I personally believe that the bulk of my issue is in fact the low vacuum issue. I also believe that the lifter prelaod is probably not correct. Symptoms of improper adjustment are hard starting, very rough abnormal idle, low vacuum. I have all 3. Also, when I brought the car home, everything on this motor was loose. Valve covers loose, intake manifold loose, tree on back of manifold loose. I'm talking all finger tight. All have since been tightened back up and in the case of the intake properly re torqued. I have to believe those nuts on the rockers aren't right also. I think the mission this weekend is to do 3 things. 1. Check for a leak at the intake as you have suggested. 2. Re-adjust the lifter preload, hope for better idle and more vacuum. 3. Compression test as Stanglover suggested. I'll do this after the preload adjustment. 4. I will check fuel pressure into the carb as another member mentioned that I am
 running dual fuel pumps and could be ending more fuel to the carb than the Holley wants.


I'll post my findings. 

 
Last edited by a moderator:
And, that brings up another potential issue. The 351C intakes are very sensitive to proper alignment, and if not sitting square and straight will create vacuum leaks and suck oil from the valley. Installing studs in the four center bolt holes, and using them for aligning the intake during installation really helps. And then torque in three steps, the first one being just above finger tight.

 
And, that brings up another potential issue. The 351C intakes are very sensitive to proper alignment, and if not sitting square and straight will create vacuum leaks and suck oil from the valley. Installing studs in the four center bolt holes, and using them for aligning the intake during installation really helps. And then torque in three steps, the first one being just above finger tight.
Outstanding information right there. I feel like I should just replace it. Will make the preload adjustment go easier with the intake off anyway. Is there a preferred type/style/brand everyone likes best? I have seen the gaskets sold with and without a pan.

 
I don't use the pan. Stay away from Fel-Pro "Print O seal" gaskets they delaminate causing vacuum leaks and oil being pulled into the heads. If you need a special thickness gasket contact SCE or Cometic. Chuck

 
I've used Mr Gasket UltraSeal before with good results, but I also used to use Felpro, hopefully Mr Gasket hasn't fallen as far as Felpro.

Use Right Stuff gasket maker on the ends instead of the cork or rubber end gaskets that come in the set.

 
I just had to re-install my Blue Thunder aluminum intake and used the Mr Gasket #214 gaskets. They are just a plain gasket and I have never had a problem with them. Gaskacinch the head side and nothing on the intake side. I also use The Right Stuff on the valley ends instead of the cork gaskets. My intake is not stock of course, so not designed for use the turkey pan.

I had some lifter issues, so I had to change them. When I removed the intake I noticed that the shop that built my engine recently used those crappy printo seal gaskets. Looked like I had a couple of them failing. I’ve had problems with the seal blowing out like Chuck described.

 
Printo seal translates to Printo leak. The other Fel-Pro gaskets seem to be OK. Chuck

 
Hey all, how tight do you torque your carb down? Mine was torqued to 25ftlbs. which seems like way too tight. Gaskets were gas soaked. I've now read that 80 inch pounds or 6 foot pounds is more like it. What do you prefer?

Also - just FYI, this issue existed before the carb was more recently torqued down to that value. So this is not the source of my issue. But I do want to torque the carb down properly upon reassembly this weekend.

My intake I did 3 passes on. I did a pass at 10, 20 and 25 ft. LBS. I plan on doing that again when reassembling this time also unless anyone has a better suggestion.

I did buy "The Right Stuff" 90 minute variety. I think they had a 1 minute type, but I'm never a fan of things that cure that quickly. I've always been of the opinion that a slower cure time produces a better result.

What do you guys like as far as letting it set up for a few before placing the intake? Do you like to set it on right away, or let it set for 15 or so to where it just starts curing before setting the intake down? I'm sure everyone has their preferred method, and why they like it that way.

 
Big red mach 1,

25 lb.ft. is WAY too much 6 lb.ft. sounds much better.

If it were mine I would remove the carb and check the base for flatness and perhaps draw file it flat again.

also remove the carb studs and check the carb base of intake, (possibly find a raised area at the carb studs)

Please let us know what your valve lash (preload) was and what you re-adjusted it to.

I usually go about 20 minutes on the sealant (Permatex ultra gray) with good results.

then walk away till the next day before starting.

Boilermaster

 
Hey all, how tight do you torque your carb down? Mine was torqued to 25ftlbs. which seems like way too tight. Gaskets were gas soaked. I've now read that 80 inch pounds or 6 foot pounds is more like it. What do you prefer?

Also - just FYI, this issue existed before the carb was more recently torqued down to that value. So this is not the source of my issue. But I do want to torque the carb down properly upon reassembly this weekend.

My intake I did 3 passes on. I did a pass at 10, 20 and 25 ft. LBS. I plan on doing that again when reassembling this time also unless anyone has a better suggestion.

I did buy "The Right Stuff" 90 minute variety. I think they had a 1 minute type, but I'm never a fan of things that cure that quickly. I've always been of the opinion that a slower cure time produces a better result.

What do you guys like as far as letting it set up for a few before placing the intake? Do you like to set it on right away, or let it set for 15 or so to where it just starts curing before setting the intake down? I'm sure everyone has their preferred method, and why they like it that way.
 Personally, I don't actually torque my carb down, I just go diagonally back and forth until 'tight' then go another 1/2 turn. Never had a leak that way. I only use a 1/4" drive socket, but I guess about 70 -80 inch pounds would be about right. Even tightness is important though.

As for using "The Right Stuff" follow the directions on the tube. Also on the ends, go up the heads as well for about 1/2" or so to make sure the corners seal. I clean the surfaces with alcohol first, but that's just me. Use a good 1/4" bead, don't skimp! It can be cleaned up after if needed.

Before long, that baby will be purring like a kitten and you'll be a happy camper.

 
Big red mach 1,

25 lb.ft. is WAY too much 6 lb.ft. sounds much better.

If it were mine I would remove the carb and check the base for flatness and perhaps draw file it flat again.

also remove the carb studs and check the carb base of intake, (possibly find a raised area at the carb studs)

Please let us know what your valve lash (preload) was and what you re-adjusted it to.

I usually go about 20 minutes on the sealant (Permatex ultra gray) with good results.

then walk away till the next day before starting.

Boilermaster
 Really good point on the flatness. Also and I'm sure he knows this, do not screw studs in too tight. They should not bottom out, but maybe a 1/2 turn back from bottom.

 
I didn’t know there’s different set up types for the Right Stuff. As far as I know it can be put into service immediately, but for this I let it set overnight. Like Stanglover said just follow the directions, use a really thick bead and run some up on the heads.

To me, it sure sounds like whoever bought this car from fasteddie tried to do who knows what to this engine. I know you said that this car has mostly sat in a garage since they bought it, but some of the things your finding sure don’t seem like FastEddie would do. He sounded like a great mechanic that knew what he was doing with this car. Just make sure to really look at everything close, everyone here will help you get it sorted out. Good luck!

 
I've never actually "measured" preload before. I'll see what it is this time though.

This is what I've always known to do.

(This assumes all nuts are backed off, or a new build where they have not been tightened down yet.)

1. Put a breaker bar on the crank.

2. Start at number 1 and tighten down as you spin each push rod with your fingers. When they start to make contact/friction with the rocker arm, stop and go to the next one. Do this for each one all the way through. Current valve position does not matter. Just start at the front of each head and work you way to the back.

3. Turn the breaker bar on the crank 90*

4. Repeat Number 2 and 3.

5. Repeat that process minimum of 8 times replicating the engine completely turning over 2 times.

6. Once the engine has been turned over minimum 2 complete times, they should all be essentially at zero lash. None should come loose at any point once the engine has been spun over 2 times.

7. Now put your ratchet on each nut at 12 noon and tighten down 3/4 turn. Do this for all. This represents .030 to .035 preload.

I do have a feeler gauge, so I can and will double check my work.

If you have a different process I'm all ears though.

 
Last edited by a moderator:
Although something tells me this cam may need a different value. I'm going to look up the spec.

EDIT -- Looks like they want .020 -.040 so, I'm going to shoot for .030 dead in the middle.

 
Last edited by a moderator:
I'm assuming you have an aftermarket aluminum intake manifold. Edelbrock recommends 18-20 ft-lbs for the final torque on their manifolds. Due to the different expansion ratios of the aluminum intake and the iron heads there has to be a little movement. The 25 you used for the initial tighten down should be OK, the gasket is likely to compress more than the 5 ft-lb difference.

 
I'm assuming you have an aftermarket aluminum intake manifold. Edelbrock recommends 18-20 ft-lbs for the final torque on their manifolds. Due to the different expansion ratios of the aluminum intake and the iron heads there has to be a little movement. The 25 you used for the initial tighten down should be OK, the gasket is likely to compress more than the 5 ft-lb difference.
Thanks Don, 20 is probably correct. I actually tried to find a torque spec for this Offenhauser 360 dual plane intake and came up short. But typically a 5/16 stud is 20-25ft.lbs. So I just went with the higer of the 2. But 20 is probably correct. 

 
Last edited by a moderator:
Hey all, how tight do you torque your carb down? Mine was torqued to 25ftlbs. which seems like way too tight. Gaskets were gas soaked. I've now read that 80 inch pounds or 6 foot pounds is more like it. What do you prefer?

Also - just FYI, this issue existed before the carb was more recently torqued down to that value. So this is not the source of my issue. But I do want to torque the carb down properly upon reassembly this weekend.

My intake I did 3 passes on. I did a pass at 10, 20 and 25 ft. LBS. I plan on doing that again when reassembling this time also unless anyone has a better suggestion.

I did buy "The Right Stuff" 90 minute variety. I think they had a 1 minute type, but I'm never a fan of things that cure that quickly. I've always been of the opinion that a slower cure time produces a better result.

What do you guys like as far as letting it set up for a few before placing the intake? Do you like to set it on right away, or let it set for 15 or so to where it just starts curing before setting the intake down? I'm sure everyone has their preferred method, and why they like it that way.
 Personally, I don't actually torque my carb down, I just go diagonally back and forth until 'tight' then go another 1/2 turn. Never had a leak that way. I only use a 1/4" drive socket, but I guess about 70 -80 inch pounds would be about right. Even tightness is important though.

As for using "The Right Stuff" follow the directions on the tube. Also on the ends, go up the heads as well for about 1/2" or so to make sure the corners seal. I clean the surfaces with alcohol first, but that's just me. Use a good 1/4" bead, don't skimp! It can be cleaned up after if needed.

Before long, that baby will be purring like a kitten and you'll be a happy camper.
Nothing sounds better to me right now!!!  :D

 
So valve covers off revealed this. I'm not sure what to think. Wasn't what I was expecting to see. All of the rockers have been scarred by the lock down nuts. I have never seen this before.

Additionally, I have had a couple of rockers hitting the baffles inside of the valve covers. Answers my little ticking noise.

One of the rockers at some point actually put a hole in the valve cover and Eddie apparently patched it from the inside.

One of the rockers at some point definitely took some good superficial damage. Looks like something came loose and was bouncing around in there. One was in fact replaced. This was most noticeable by the slightly different color. You can also see it's labeled different.

The valve covers are supposedly OEM Boss 351 Valve covers. I'm sure I can bend the baffle out of the way. Is there a huge down side if I just remove them?


Back
Top