Windage Tray

7173Mustangs.com

Help Support 7173Mustangs.com:

This site may earn a commission from merchant affiliate links, including eBay, Amazon, and others.

Darren 72

Well-known member
Joined
Jul 14, 2010
Messages
237
Reaction score
2
Location
NH
My Car
1972 Mach 1
Hey Guys,

First thing I want to thank you for watching my 1970's video I posted. I appreciate the interest.

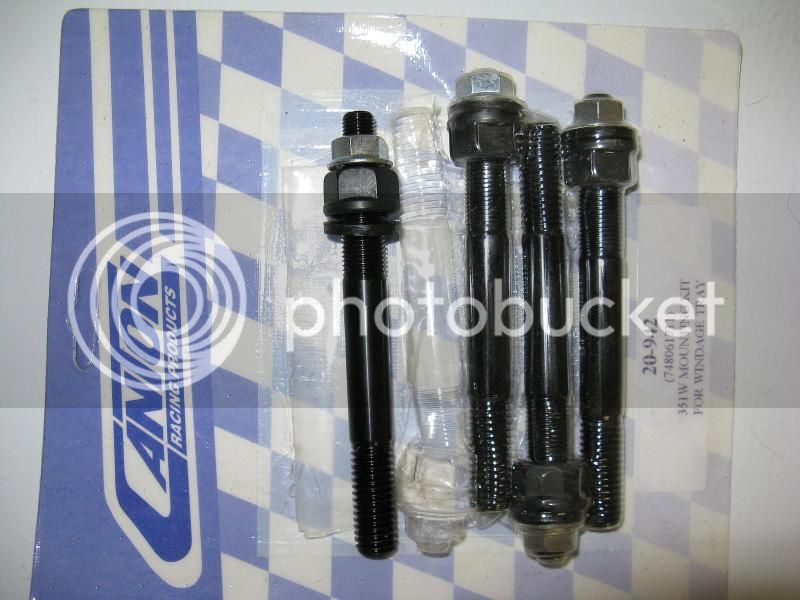
Ok so I bought a Canton Racing windage tray. It said it would fit on stock or after market pans. The tray is going to hit the oil pickup when I install it. Does anyone have any idea of what should be done?

Here's a pic


Hey Guys,
The tray will be 3" higher once the studs are installed which puts it right in the middle of the pickup's elbow.Windage Tray.JPG

 
Last edited by a moderator:
Yeah, that looks pretty much like how mine did after installation. The neck for the oil pump pick-up was pretty close to it, but it did not interfere will installation of either the tray or the pump.

And I fitted a stock [chrome] oil pan back on there as well. Is yours a 351C?

The tray itself should fit flush against the bearing caps - the rotating mass of the crank will clear [barely] with no problems. My understanding is that the whole point of the windage tray is to make sure the oil doesn't splash up and whip itself into a froth at higher RPMs, causing potential oiling problems and parasitic drag on the spinning crank & piston rods.

Make sure to remove that label before the engine goes back together - it might come off on its own and clog up the oil pump and an oil passage or two. ;)

 
Last edited by a moderator:
Hey Guys,

First thing I want to thank you for watching my 1970's video I posted. I appreciate the interest.

Ok so I bought a Canton Racing windage tray. It said it would fit on stock or after market pans. The tray is going to hit the oil pickup when I install it. Does anyone have any idea of what should be done?
Here's a pic


Hey Guys,
The tray will be 3" higher once the studs are installed which puts it right in the middle of the pickup's elbow.
/quote]

I think I figured out what I didn't realize. The studs they gave me are long but I think they drop down farther than I thought. The original bolts now that I think about it has threads 1/2 way down like these studs so they will drop down more than I thought.

Another question though, Do you use the nut on the bottom to crank in the stud and torque stud off that nut? The nut is upside down on the bottom in the pic.

Thanks for the responses guys!


Hey Guys,

First thing I want to thank you for watching my 1970's video I posted. I appreciate the interest.

Ok so I bought a Canton Racing windage tray. It said it would fit on stock or after market pans. The tray is going to hit the oil pickup when I install it. Does anyone have any idea of what should be done?
Here's a pic


Hey Guys,
The tray will be 3" higher once the studs are installed which puts it right in the middle of the pickup's elbow.
/quote]

I think I figured out what I didn't realize. The studs they gave me are long but I think they drop down farther than I thought. The original bolts now that I think about it has threads 1/2 way down like these studs so they will drop down more than I thought.

Another question though, Do you use the nut on the bottom to crank in the stud and torque stud off that nut? The nut is upside down on the bottom in the pic.

Thanks for the responses guys!
There is a cool video somewhere on line that shows two engines with plexiglass fronts. One has a tray and the other one doesn't. You can see the foaming and agitation with out the tray. So much so that the oil begins to foam which means your oil pickup could potentially start sucking oil foam. Also it gets up into the crank which can start to steal HP. Makes sense.

First rebuild. Using the Tom Monroe book which details a 351C rebuild. I would recommend it to anyone rebuilding their 351C engine.

Old school is cool!

IMAG0388.jpg

 
Last edited by a moderator:
No, like this:

IMG_0208_zps49c15922.jpg


Remove the main cap bolt. Install the stud. Then use the large nut and washer on the stud to torque the main cap down. The install the windage tray, and retain it with the small nut on the smaller portion of the stud.

 
No, like this:

IMG_0208_zps49c15922.jpg


Remove the main cap bolt. Install the stud. Then use the large nut and washer on the stud to torque the main cap down. The install the windage tray, and retain it with the small nut on the smaller portion of the stud.
Great Thanks!

 
Hey Guys,

First thing I want to thank you for watching my 1970's video I posted. I appreciate the interest.

Ok so I bought a Canton Racing windage tray. It said it would fit on stock or after market pans. The tray is going to hit the oil pickup when I install it. Does anyone have any idea of what should be done?
Here's a pic


Hey Guys,

Did you hand tighten your studs before torquing down nut on caps?
The tray will be 3" higher once the studs are installed which puts it right in the middle of the pickup's elbow.
/quote]

I think I figured out what I didn't realize. The studs they gave me are long but I think they drop down farther than I thought. The original bolts now that I think about it has threads 1/2 way down like these studs so they will drop down more than I thought.

Another question though, Do you use the nut on the bottom to crank in the stud and torque stud off that nut? The nut is upside down on the bottom in the pic.

Thanks for the responses guys!


Hey Guys,

First thing I want to thank you for watching my 1970's video I posted. I appreciate the interest.

Ok so I bought a Canton Racing windage tray. It said it would fit on stock or after market pans. The tray is going to hit the oil pickup when I install it. Does anyone have any idea of what should be done?
Here's a pic


Hey Guys,
The tray will be 3" higher once the studs are installed which puts it right in the middle of the pickup's elbow.
/quote]

I think I figured out what I didn't realize. The studs they gave me are long but I think they drop down farther than I thought. The original bolts now that I think about it has threads 1/2 way down like these studs so they will drop down more than I thought.

Another question though, Do you use the nut on the bottom to crank in the stud and torque stud off that nut? The nut is upside down on the bottom in the pic.

Thanks for the responses guys!
There is a cool video somewhere on line that shows two engines with plexiglass fronts. One has a tray and the other one doesn't. You can see the foaming and agitation with out the tray. So much so that the oil begins to foam which means your oil pickup could potentially start sucking oil foam. Also it gets up into the crank which can start to steal HP. Makes sense.

First rebuild. Using the Tom Monroe book which details a 351C rebuild. I would recommend it to anyone rebuilding their 351C engine.

Old school is cool!


No, like this:

IMG_0208_zps49c15922.jpg


Remove the main cap bolt. Install the stud. Then use the large nut and washer on the stud to torque the main cap down. The install the windage tray, and retain it with the small nut on the smaller portion of the stud.
Great Thanks!
Not sure how the studs get tightened down. Is it only hand tight and then torque the nut after caps back on?

 
Last edited by a moderator:
Double-nut the studs to install. This will 'lock' the second nut against the first nut to act like the stud has an actual head on it.

Go ahead and remove the bearing caps. Leave plenty of space on the threads to insure the large nut doesn't bottom out while installing the stud. Use thread-lock at the bottom of the stud, and when the stud bottoms out during installation, torque it, then break the two nuts loose from each other and remove both nuts. Then install bearing caps, large washer, and first nut to bearing cap torque spec (unless the instructions say otherwise... it was a long time ago for me).

To break the two nuts apart from each other without extracting the stud, use two wrenches to "tighten" the bottom nut while "loosening" the top nut. Make sure to not just grab the top nut and try to loosen, otherwise it'll start backing out the stud you just installed. It's more important to get the bottom nut away from the top nut when breaking them apart.

Once that's done, drop the windage tray onto the studs, then the small nuts, and torque down to the specs in the instructions.

 
Last edited by a moderator:
You should only install the studs finger tight.

154-5404.pdf


Attachments

  • 154-5404.pdf
    129.1 KB · Views: 15
You should only install the studs finger tight.
Wow - Nice find!

It doesn't make sense to me for "hand-tight only" on the studs to the block, but they're the experts. I've always done the 'double-nut' thing for installing studs - now I guess I'll need to look at the instructions little closer.

Thanks for sharing. ::thumb::

 
Hey, thats what were here for right, glad to help.

 
Yeah, I was gonna say..

Did your studs not come with instructions? I can scan the instructions from mine if you need them.
I have instructions but they say nothing about installing. It does say just finger tight to check clearances and such but then it states pull everything off and use loc-tite and reinstall. So I was like hand tight or crank down. It did say double nut so I assumed it meant use a wrench. I turned until I hit the bottom and left it at that with loc-tite. It doesn't mention what the tightness should be for the actual install. It worked out ok.

I had to drill the holes a little wider in the windage tray because it wouldn't fit over the studs. I also had to bend and create a small flap to get my elbow for the oil pickup to clear. After market stuff...you never know if it will fit or not. I will say Canton racing was responsive. I received several e-mail from them after sending them a pic of my set-up.

I rebuilt the front end including all the metal (aprons, rad support, suspension etc.). It was not easy. Some parts fit...others did not. I'm starting to get use to failure but you always have to come up with a plan...lol! Thanks for everyone's help once again.
Here's a pic of the tray.

Windage tray Above.JPG

 
Last edited by a moderator:
SWEET! Looks just like mine did before the pan went on. ::thumb::

 
Back
Top