Bojo's 73 Project

7173Mustangs.com

Help Support 7173Mustangs.com:

This site may earn a commission from merchant affiliate links, including eBay, Amazon, and others.
3/23/13

Today I removed the fan assembly to replace the blower motor. Glad that I decided to do this as the motor turned but I didn't like the feel when I rotated it. Also found some holes for the flapper rods were cracked and elongated a little. In time the flapper doors would have had enough play that it would start binding at some point. I went ahead and glassed over the holes and tomorrow I will redrill these holes and all should be good. I'll lightly sand this repaired area so it should look better too, it sits way up under the dash so you really can't see the repair but I know it's there.

Still waiting for the replacement AC evaporator core as the other replacement wasn't quite correct so I can't put it back together yet. Some pics of what I did today. In retrospect I should have just pulled the dash and redid everything but I have a second project waiting and I have spent more than I originally intended on this one already.

IMG_2072.JPG

IMG_2073.JPG

IMG_2074.JPG

IMG_2075.JPG

IMG_2076.JPG

IMG_2077.JPG

 
3/24/13

Today, Installed the new fan motor, replaced the foam seals on the flapper doors in this section, drilled the 2 new holes in the fiber patch for the door rods that had elongated and reassembed everything. Also all of the foam seals for the ducting was crumbling so I made my own. Doesn't look too good but you can't see it when the ducting is assembled and they seal everything pretty well. Few pics of what I did today.

IMG_2079.JPG

IMG_2081.JPG

IMG_2082.JPG

 
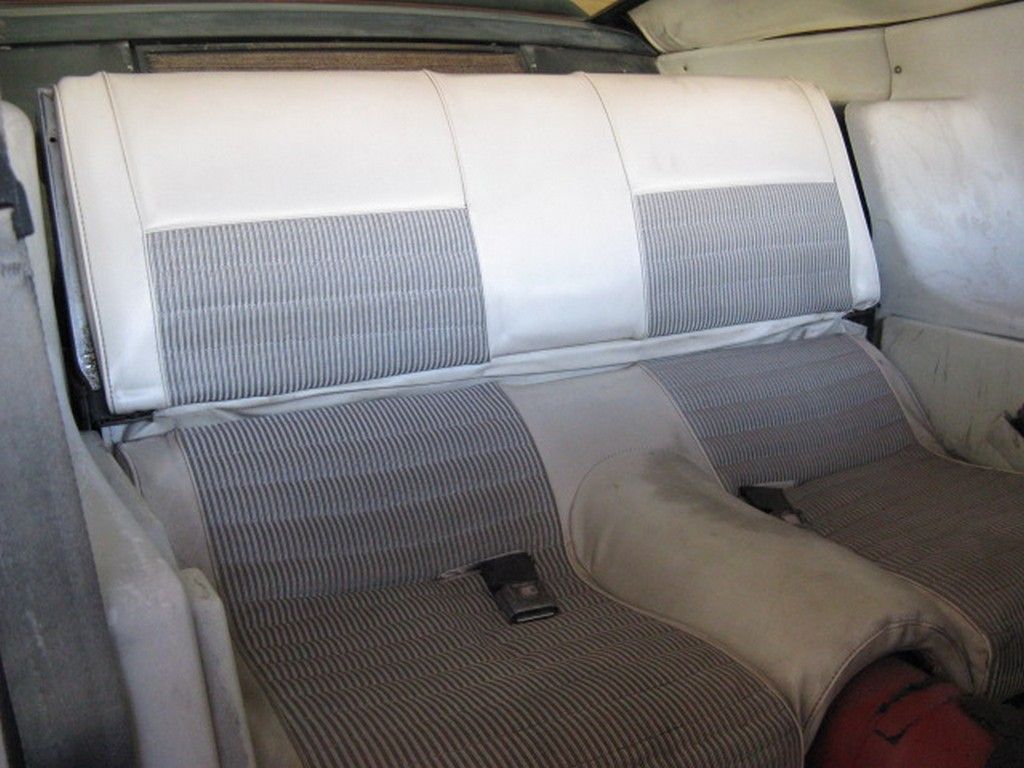
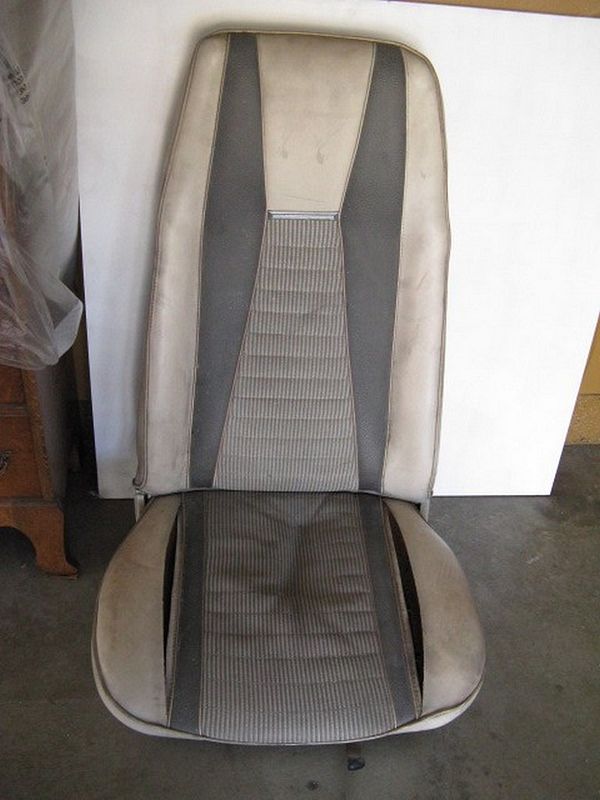
Thanks very much for the pics...here is my front/rear interior pics of original seats with GW code...can't figure out why it is different?

IMG_0062_zps7d231ab7.jpg


IMG_0070_zps68c97bf3.jpg


Thanks very much for the pics...here is my front/rear interior pics of original seats with GW code...can't figure out why it is different?
Jeff,

The back seatbelt buckle appears to look different too. Couldn't really tell though. Here's a closeup of mine so you can compare.

IMG_2088.JPG

 
My seatbelts are different because I have the Deluxe Seat Belt option...

The seats are a mystery though as I have never seen others like mine. I am 99% sure they are original as they still have the unmolested upholstery tags on back side.

I wonder if the fabric was made different because my car was a "marketing car"?? Sure wish someone had an answer but maybe it is not to be. Thanks for all your insight.

Jeff

Thanks very much for the pics...here is my front/rear interior pics of original seats with GW code...can't figure out why it is different?
Jeff,

The back seatbelt buckle appears to look different too. Couldn't really tell though. Here's a closeup of mine so you can compare.
 
4/6/13

Finally got the right AC evaporator and completed the rebuild of the A/C & heater box. I rebuilt the fan section already so I was able to reinstall both sections back into the car. While I was under the dash I put in a Lokar accelerator cable because of the MSD EFI unit that I will be using when I get the motor back in. I am also using the Lokar cable kickdown for the C6 so using their mounting bracket for both acellerator and kickdown this should all work nicely. Lastly I had to repair a broken wire on the stop switch for the brake pedal. When I figured how to remove the terminal from the connector, it was tough to undo the crimped remainder of the wirng but managed to do so eventually. Tomorrow I plan to start putting the ducting back in and then button up the dash. Attached some pics.

IMG_2090.JPG

IMG_2092.JPG

IMG_2094.JPG

IMG_2097.JPG

IMG_2096.JPG

 
Where did you source the a/c core from? Is it the higher efficiency unit for R134?
RacerX,

I got it from Classic Auto Air in Tampa FL. Yes, its high efficiency and for R134. Contact Ron Mineo if your interested. He gven me good support with everything. They carry all the ducting too if you need replacements.

 
72Mach351

Here is a pic of the brake switch. The black connector has 2 wires and the the bottom one broke. I remove the clip from the connector, pryed open the crimps and reattached the broken wire.

Not sure why your thread diappeared on you, you might ask one of the admins.

-jbojo

IMG_2098.JPG

 
4/13/13

Well I am finally done with the heater box rebuild;) The ducting is all installed, vacuum motors tested, vacuum and electrical lines connected. Took much longer that I anticipated but I am happy with the outcome.

Tomorrow I start the next phase of my project. I am going to start to prep the motor for installation. Need some opinions on this part:

1. Should I try to install the motor and tranny as one unit?

2. When I pulled the original motor I had to pull it with the driver side header still in the engine compartment because I couldn't remove it. Should I go ahead and install the new driver side header attached to the motor?

I'll post pics of the motor when I pull it out from storage.

-jbojo

IMG_2101.JPG

 
sir

Like your work great pics

on the a/c unit on that small flapper door on the bottom

i was wondering if you remember when it was closed did it

have a 1/2" gap from the top of the door to the bottom of the

core i have been putting mine back together and did not notice

that gap untill i put it back together and mine has that gap that just

does not look right it looks as if the door should block off the core completly

i am also building a 71 vert. for the 50th party but i plan on heading

east any help is greatly appreashaded

Richard


sorry i tried to insert a pic but lost it i am going to try again

 
Last edited by a moderator:
sir

Like your work great pics

on the a/c unit on that small flapper door on the bottom

i was wondering if you remember when it was closed did it

have a 1/2" gap from the top of the door to the bottom of the

core i have been putting mine back together and did not notice

that gap untill i put it back together and mine has that gap that just

does not look right it looks as if the door should block off the core completly

i am also building a 71 vert. for the 50th party but i plan on heading

east any help is greatly appreashaded

Richard


sorry i tried to insert a pic but lost it i am going to try again

LiftMech

The gap was there when I took it apart. Even the repacement foam was precut to the same size as the flapper door. It was designed to have a little leak by when the door is shut. What you are seeing is normal, hope that this helps you out.

-jbojo

 
4/21/13

Spent the weekend pulling my motor from storage. Been sitting for awhile so I am going to touch up the paint and prep it for installation. I still need to put the roller rockers and pushrods on along with the flywheel and few other things. Hopefully I will have it in the engine bay next weekend.

Engine specs:

10.44:1 forged pistons .030 over (Wiseco flat top)

ARP studs on mains and heads

Forged connecting rods

closed chambered heads 63cc

Cam advanced 2 degrees, Herbert I4N 225/235 @.50/.525/.555 lift 110 lobe center

Rhoades lifters

roller rockers with guide plates

8 qt oil pan

Blue thunder intake

MSD Atomic efi

IMG_2105.JPG

IMG_2106.JPG

IMG_2108.JPG

 
Last edited by a moderator:
5/6/2013

Been busy with house so not much done lately. Spent the last weekend organizing the parts that have come in and deciding what I was going to do next. This coming weekend I will be modifing my C6 for the gear vendors install to give me the 6 speed w/ overdrive to make the car more freeway friendly. The rear is 3.89 and with this setup I will have a final drive at around 3.00 when in overdrive so it should turn lower rpms than I had originally (3.25 rear). It will add about 60 lbs of weight to the weight of the car.

This will be the trans ratio through the gears:

1st 2.46

Over 1.92

2nd 1.46

Over 1.14

3rd 1.00

Over 0.78

I will post pictures of the conversion. Here are some pics of the kit. I attached some shots of the parts, the overdrive unit was oily so I didn't get that one. Looks like a pretty simple conversion. The only hitch is that the drive shaft will have to be shortened but now that give me a good excuse to order an auminum one. More to come this weekend.

IMG_2118.JPG

IMG_2119.JPG

IMG_2115.JPG

IMG_2117.JPG

 
5/19/13

Been too busy with work to really do anything on the project lately. I decided to hold off on the installation of the engine and tranny to do a few other items first. Today I installed the fuel regulator for the efi system and made it a return vice modulated pump system. So instead of running a new return line to the tank I used the line that was originally attached to the evaportor canister. On the 73's (maybe the earlier models too) the return was mounted on the center top of the tank so I thought that this would be perfect for the gas return too. I attached pics of where I placed the fuel regulator and connected it to the hard line that was already in the engine compartment. I will do the same type of connections at the gas tank when I put the new one in. The 3rd pic is the cap for the fuel tank.

-jbojo

IMG_2123.JPG

IMG_2124.JPG

IMG_2125.JPG

IMG_2126.JPG

 
Last edited by a moderator:
Lookin' good! I'm anxious to see how the six speed works out!

 
5/27/13

Got a little more done this weekend. Managed to pull out the headliner and removed the insulation. Then sanded and primered the roof. Found some surface rust but nothing major to worry about, sander took it right off.

Next I removed all the carpeting and found the broadcast sheet which was not in very good condition. It had some tears and the printing was barely visible because the ink had faded. On the driver side the rubber floor pan plug came off sometime ago and moisture got in and started to rust the pan but again it wasn't anything serious so I sanded it all out and primered it. While I was doing this I thought about the insulation for the floor pan and instead of using the thick tar like padding again I decided to use Lizard Skin sound deadner and then follow it up with the Lizard Skin Ceramic heat shield. I remembered that the heat from the headers really came through the floorpan and melted the the rubber mat that was sewn into the carpeting. Hoping that this ceramic coating will prevent this from happening again to the new carpet. It's ordered and should come in by next weekend so I'll be sprayng this on next Saturday.

Lastly I had to repair the passenger side pillar post trim which had a section at the bottom crack and break off at the screw hole. I layered fiberglass matting and was actually able to rebuild the broken section and redrill the screw hole. I didn't take a before pic but I outlined in red the section that I had to fix. Redyed the front and rear trim peices and I am pretty happy the way they came out. The last pic with all the trim peices shows the repaired part (on the right) after it was redyed and the new screw hole drilled. I have attached pics of the items that I worked on this weekend.

-jbojo

IMG_2135.JPG

IMG_2127.JPG

IMG_2128.JPG

IMG_2129.JPG

IMG_2132.JPG

IMG_2134.JPG

 
Last edited by a moderator:
Back
Top