MuscleTang mod project thread (1971 M-Mach 1)

7173Mustangs.com

Help Support 7173Mustangs.com:

This site may earn a commission from merchant affiliate links, including eBay, Amazon, and others.
I closed the vertical gaps between shroud and radiator with an ACDelco radiator seal, p/n 13269462. I had to cut it to fit and use some ingenuity to fasten it, but now the gap is mostly gone.

 
Last edited by a moderator:
Long time no post, but I am still busy completing projects in the Mustang.

What I have worked on in the last few months:

-A/C

-Troubleshooting fluctuation at idle with the EFI. I checked for vacuum leaks, distributor, CDI, butterfly adjustments, shielding wires, and exhaust leaks. I found a small gap between the oxygen sensor bong and pipe that may be the culprit. I will weld this gap now that I have the pipes down.

-Installing a new set of rear disc brakes from Wilwood, p/n 140-11403. I will report on this on a separate post once completed.

-Custom drive axle loop.

 
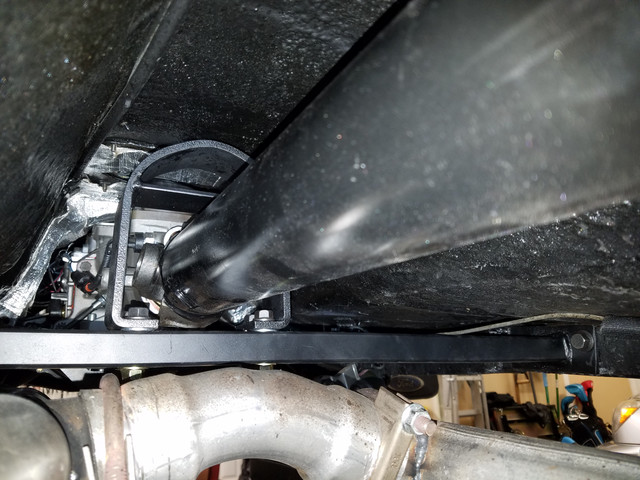
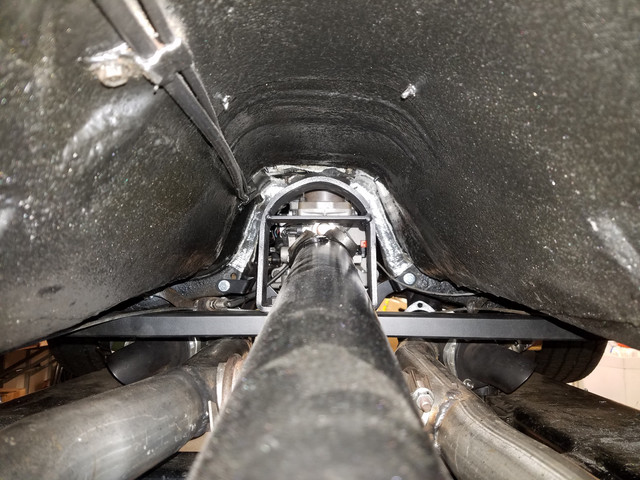
Last night I completed my custom driveshaft safety loop. I based my idea on Tinman's one (https://www.tinmanfabrication.com/index.cfm/page/ptype=product/product_id=122/category_id=60/mode=prod/prd122.htm).

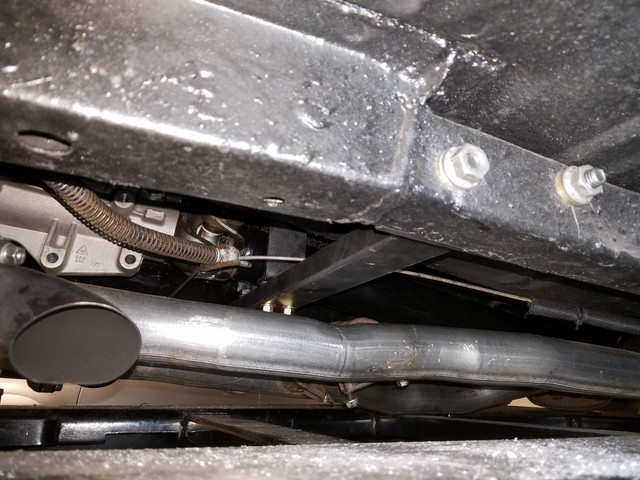
The crossmember is made out of a 2x1 square tube, 1/8" thick. The end flanges are out of a 2" x 3/16 plate. The loop is BMR: https://www.summitracing.com/parts/bmr-dsl012h

It took a lot of measurements, cutting, drilling and welding. The hardest part was drilling the bolt holes through the subframe due to spacing being limited with the exhaust pipes right along the side. I decided to bolt the loop rather than weld just in case it has to be removed in the future. Even though I was using 7/16" bolts through the subframe I had to drill 1/2" holes to allow for alignment. Due to the limited spacing, it was a challenge to align the holes on each side of the subframe's square tube. I know it is not perfectly aligned but satisfactory. Besides the added safety, the loop should add some strength to the Unibody. The BMR loop was too tall for my taste so I ended up welding a 2" plate across the top at a position just below where the rear u-joint of the driveshaft would hit the tunnel. 


Last edited by a moderator:
Wow , very nice Tony, that's some serious safely loop!

I'm planning to add one on both my cars, either a 5mm cable or similar shape as yours hanged from above.

I wonder how broken yoke/driveshaft (under normal operation and no hit/accidents ) are usually looking like.

My little brain assumes the main goal is to prevent the shaft to become a lever and keep it relatively on its place while you come to a stop.

Now that I see this, I wonder if I'm wrong to assume this and that it should be much stronger...
Fabrice,

You are preventing the car to use the broken drive shaft as a vault, you are also insuring your precious investment, and you are reinforcing the unibody, at least with my approach of connecting between subframe connectors. I am assuming that when the u-joints breaks they could cause a lot of damage to your car.

This is from the NHRA rules:


DRIVESHAFT LOOP DEFINITION: 360 degrees of enclosure, 1/4-inch minimum thickness and 2 inches wide, or 7/8-inch x .065-inch welded steel tubing, securely mounted to the frame or frame structure where available (or to the OEM floor or rocker box where a frame does not exist) and located within 6 inches of the front or rear universal joint for support of the driveshaft in event of U-joint failure.


Last edited by a moderator:
I snapped a front u joint and even with a safety loop it did lots of damage to the floor pans and bent the loop up.  Damn glad I had it,  Now I have a sturdier one.

https://photos.app.goo.gl/xPysRTtm3Cc8GfkH9

This was a 1st attempt, but the final was produced out of stainless steel.

https://photos.app.goo.gl/HQWfd9gp9pcoqZ896
Thank you for sharing the picture. I have seen that type of "flat" loop all over and I have not been convinced about its design. Your picture proves my concern. It is a flat plate that has very little stiffness to up/down bending. That's why I decided to go with a square tube. Your round tube solution is also much stronger than the flat plate. However, the loop served its purpose and probably saved you from a lot more damage or injury.

Did that happen with slicks? Were the u-joints 1310, 1330 or 1350? I now have 1350s and those are much more beefier than the original 1310s.

 
Nice one too @Jeff73Mach1

When you say "I snapped a front u joint", did you not get any vibs before that? noises?

Bet you've experienced some intense moment when that took place!

Looking at some picts of shaft failures on gg atm... not pretty indeed.

I was planning to add one but got the message: needs to be much stronger than I thought!

 
Great job on the tailshaft loop

Makes me want to rethink the safety loop I have which is just an aftermarket bolt on loop

Definitely better than nothing but possibly not strong enough in some situations

Another project for a rainy day which for me is a long way away

 
No I sheared it on a 1-2 shift and it just blew. I was on slicks and concrete when it happened and was on the factroy U joints before I upgraded everything to 1350 and chrome moly yoke and slip yoke.

There was lots of damage, from twisted splines at the slip yoke to torn mounts on the rear axle. I hope no one here gets to experience this firsthand.

 
The new rear brake discs from Wilwood are in. I installed the 140-11403 kit to substitute the Right Stuff kit I had. The old kit uses GM calipers that were used in Cadillacs and are widely used for rear disc conversions. The problem I had with them is that the caliper cylinder was too big compared to my front Wilwoods. In theory that was creating issues with balancing from front to rear. I was able to lock the rear tires but not the fronts. I will have to wait until spring to test if the rear Wilwood brakes would make my system work better.

The only issue I had when installing the Wilwood kit is that I had a gap between the bearing retainer and bearing that required searching for a shim (which took a lot of time). You can read all about in here: https://7173mustangs.com/threads/is...-140-11403-brake-kit-with-drum-e-brake.34629/

BTW, I will post the Right Stuff kit for sale soon. They should work well if you have OEM front disc brakes because these also have a large caliper cylinder area.

https://www.getdiscbrakes.com/zdcrd02
 
Last edited:
Where do I start? I just realized that I have not updated my build thread in almost a year. However, I have done a lot of stuff. I have posted here and there but today I decided that I needed to update this thread to have all the information in one place. So here are the major projects I have worked on this year:


For this winter my projects include:

  • Add a new Classic Air A/C system.
  • Upgrade my front suspension with a Meier MOD1.
  • Customize a shock tower cross brace.


Last edited by a moderator:

I am giving the MuscleTang a whole new A/C system from Classic Auto Air as 50th anniversary present. I am done removing the heater/evaporator box, controls, miles of vacuum hoses and all the ducts. Wow. I can't believe how much extra space is there behind the dash. I have laid so much wiring back there trying to get my arms through all those tight spots and sometimes even bleeding. Now I can cleanly see all the wires so I will be rearranging the whole mess of wires so it looks neat. It is also time to stick some good thermal insulation at the top of the firewall.

 
Last edited by a moderator:
Two weeks ago I finally charged the new A/C system from Custom Auto Air. Last weekend it was in the 80s so I was able to test it. It is blowing very cold so I am satisfied with all the work. I bought the CAA system without compressor so I reused the Sanden compressor I had. They supplied the hoses uncrimped so I was able to cut them to length and clock them. Unfortunately, it was hard to find someone in town that had the proper equipment to crimp them until I found a small hydraulic shop where they were able to crimp them.

I followed the post from @trillizo_y_uno


He was very helpful providing pictures. I did contact CAA to ask for longer ducts for the end registers. The ones they supplied are short and they don't allow for proper routing. I thought CAA's customer service was very helpful and timely. I also had an issue where the controls were reversed. They fixed it without an issue.

In my case I needed to modify the CAA box because the refrigerant inlet line was right where I have my fuel pump. My fuel pump location is ideal so I was not going to change it so I modified the inlet line from the CAA box. This was the only real issue I had. I also spent a lot of time cleaning up the wiring between the dash and firewall, plus insulating the firewall while I had the box out.

20210106_233552.jpg

 
Last edited by a moderator:
As I was installing the new A/C box and cleaning the underdash area, I was removing my dash speakers since they were substituted some time ago by the door speakers. Then I realized that I could place a pair of tweeters in there. I bought a not-too-fancy pair of Pyle in Amazon. I wanted to have my own bypass capacitors so I bought two 6.8uf to install in series and filter any low frequencies. Then, I thought how can I control the volume of the tweeters so the whole system is balanced. That led me to an L-Pad attenuator. The nice thing about these, is that you can control the volume without affecting the bypass frequency. As you can see, it is the good old "snowball" effect. I solder the capacitors to the L-Pad and installed them "hidden" under the dash. Now I can easily adjust the level of the tweeters. I am very happy with the results. I can definitely feel the difference with the high frequencies, which are easily lost in the loudness of the car. The combo may not look the prettiest, but it is hidden from view and it works wonderful. I can't think that it would have been properly balanced without the addition of the L-Pad.
 
 
https://www.amazon.com/gp/product/B00079P752/ref=ppx_yo_dt_b_search_asin_title?ie=UTF8&psc=1
https://www.amazon.com/gp/product/B01N5N4HKX/ref=ppx_yo_dt_b_search_asin_title?ie=UTF8&psc=1
https://www.parts-express.com/L-Pad-50W-Stereo-1-Shaft-8-Ohm-260-260
 
 
20210504_194605m.jpg

 
Back
Top