MuscleTang mod project thread (1971 M-Mach 1)

7173Mustangs.com

Help Support 7173Mustangs.com:

This site may earn a commission from merchant affiliate links, including eBay, Amazon, and others.
The car is out for the year until next spring. I have an issue with the rear axle that for some reason I underfilled of oil. I underfilled by 0.6 qt. to be exact. I know I filled it until oil came out from the hole, but when I checked after the insane bearing noise I realized it was underfilled. There was no evidence of leaks or puddles so I can only assume I underfilled it :shootself: . Most likely the pinion bearing is history. 

In any case, I was planing on replacing the center section with 3.50 gears, a Truetrac adn 31-spline shaft this winter. So there is not much lost except a few weeks of cold weather driving.

I want to do couple mods to where the clutch cable attaches to the clutch lever so I can gain a little bit more of travel. I will then test the clutch in my driveway before putting the car away for good.

 
So the project list for this winter is:

-Center section and shaft replacement.

-Throttle linkage review.

-New distributor and recurve.

-Investigate adding a driveshaft loop.

-Fabricate an adapter to relocate the shifter lever. Right now it sits forward about 1"-2" so I will fabricate an adapter to move the lever back slightly. I want it to be center in the hole. A plate with four holes should be enough.

Based on this list I am hoping to drive the car early next Spring as soon as the snow is gone and the salt is cleared off the road. The list is more doable than last winter's list. Last winter list ended up taking a whole year. At least I am happy I was able to drive the car 80 miles so I can work in the fine tuning over the winter.

 
Last edited by a moderator:
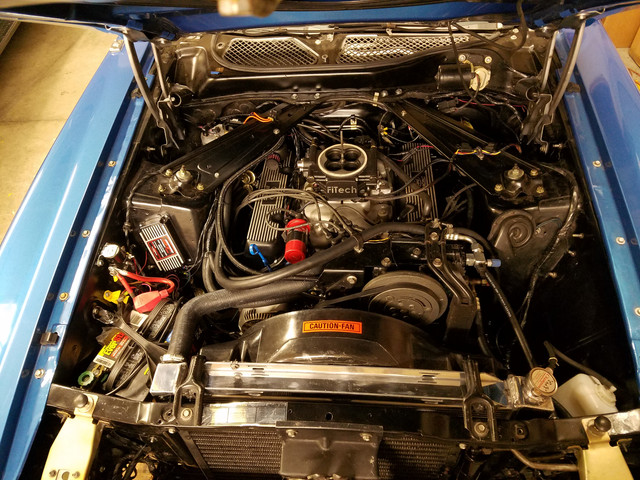
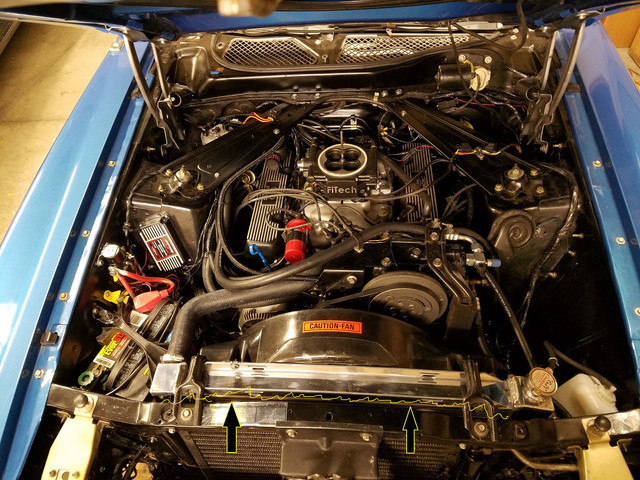
I never posted a picture of the engine in the car. So here is how it looks w/o the air filter. Also absent is the wiper fluid reservoir. Something else I need to take care is to seal the gaps between the radiator and shroud on the sides (not seen in picture), and the gap between the radiator and support.


Last edited by a moderator:
hope that shiny glazy look in your oil was just break in lube of some sort? IDK lol plan on having my Cleveland built for me simply because IDK ENGINES

 
Anyone has a good idea on how to cover the gap between the engine and A/C radiators. I also have a gap between the fan shroud and radiator on the vertical edge on the driver's side. My thought is to get a sheet of plastic/rubber and cut it to fit. However, I am afraid it may not look too good.

Also, another question. As you see this picture of my engine bay, do you think the coil would look better in black, Ford blue or another color besides red?


Last edited by a moderator:
Tony,

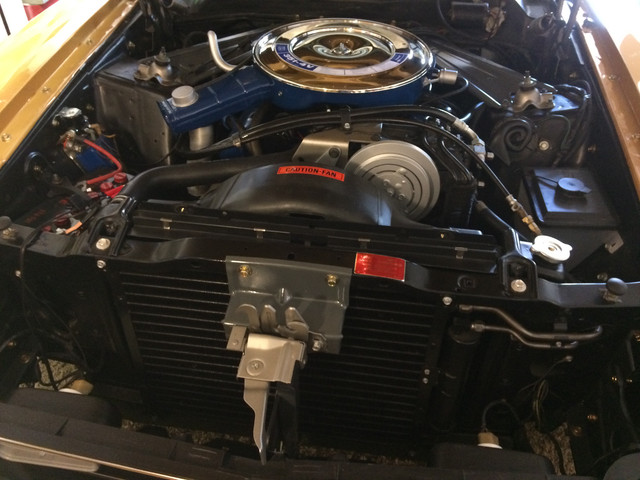
Cars with A/C originally came from the factory with a plastic piece that clipped on the radiator to fill that gap. They are now reproduced and many of the vendors sell them. See pic below from my 72 Q code.


MIG welder not working!

I have not been keeping up with my thread updates but I can tell you that I have been working in the car slowly. I will update at a later time with details.

Edit: ignore post. I went back to the garage after a break and figured out that it was a weak feeder tensioner.... rrrr!

In any case, my post today is to complain that my Eastwood mig welder is not working. I used it last about a month ago to weld the snowblower's auger and it worked well. Trust me, the snowblower has seen a lot of use!

Today I am all setup to box the rear spring perches until I tried welding. The machine turns on, the fan is on, the wire feeder works, and the gas is exiting. However, the power is like dead. It sparks for an instant, enough to melt a little, but then the spark dies. All this while the feeder is still pushing. That said, it seems like an issue with spark energy. I tested the resistance to the wire and to the ground clamp and it looks good. I tried all kinds of settings (including higher voltage), I tried on a simple and clean piece of steel where the clamp was next to the test spot and the same issue occurred. Any clues?

 
Last edited by a moderator:
I was able to "box" one rear spring perch with the welder but I am having trouble with the wire feed. Whenever I need high wire speed it seems that it doesn't have enough "push". The tensioner is tight but it seems that it slips when the wire has some resistance. I am using 3/16" plates to box the perches so I need some good wire speed. I understand that I probably didn't need this much thickness but I had them laying around, plus they were 2" wide and fit very well inside the perch.

 
I was able to "box" one rear spring perch with the welder but I am having trouble with the wire feed. Whenever I need high wire speed it seems that it doesn't have enough "push". The tensioner is tight but it seems that it slips when the wire has some resistance. I am using 3/16" plates to box the perches so I need some good wire speed. I understand that I probably didn't need this much thickness but I had them laying around, plus they were 2" wide and fit very well inside the perch.
Have you changed your wire size lately?  The roller on the wire feed has 2 different size grooves for different size wire. Most common used in doing the body work is .023/.025" and for the bigger structure like spring perches I would use .030"  Just make sure you have the proper grooves lined up for the size wire your using. If you have the wrong grooves lined up you could have trouble with wire feeding slipping even if the rollers feel tight. I usually run my rollers just tight enough that when I hold the wire coming out of the gun with my hand the roller slips slightly.  If you run them too tight the roller wont slip and the wire can bunch up in the machine right in front of the rollers where the wire goes into the liner and makes a huge mess. Definitely check your grooves and make sure your on the proper ones. How old is your machine?? Eastwood has an awesome 3 year bumper to bumper warranty. If there's anything wrong they will send you out a brand new machine.

I had the cooling fan in mine go bad after 3 years and 2 months. I called them up to order a fan. They took my information and sent me a brand new welder. I have used the piss outta mine over the years and that was the only failure I ever had with it. Mine had got to be getting close to 8-10 years old now.

 
I was able to "box" one rear spring perch with the welder but I am having trouble with the wire feed. Whenever I need high wire speed it seems that it doesn't have enough "push". The tensioner is tight but it seems that it slips when the wire has some resistance. I am using 3/16" plates to box the perches so I need some good wire speed. I understand that I probably didn't need this much thickness but I had them laying around, plus they were 2" wide and fit very well inside the perch.
Have you changed your wire size lately?  The roller on the wire feed has 2 different size grooves for different size wire. Most common used in doing the body work is .023/.025" and for the bigger structure like spring perches I would use .030"  Just make sure you have the proper grooves lined up for the size wire your using. If you have the wrong grooves lined up you could have trouble with wire feeding slipping even if the rollers feel tight. I usually run my rollers just tight enough that when I hold the wire coming out of the gun with my hand the roller slips slightly.  If you run them too tight the roller won't slip and the wire can bunch up in the machine right in front of the rollers where the wire goes into the liner and makes a huge mess. Definitely check your grooves and make sure your on the proper ones. How old is your machine?? Eastwood has an awesome 3 year bumper to bumper warranty. If there's anything wrong they will send you out a brand new machine.

I had the cooling fan in mine go bad after 3 years and 2 months. I called them up to order a fan. They took my information and sent me a brand new welder. I have used the piss outta mine over the years and that was the only failure I ever had with it. Mine had got to be getting close to 8-10 years old now.
Thanks Kevin. I have had the 030 wire there for a while since most of my welding these days is thicker body panels. I know the roller you are taking about and I double checked and it was in the thicker groove. I noticed that the steel roller that is above the driver feels greasy. I am cleaning it and then increasing the tension further to see if the drive improves, but keeping in mind not to make it too tight as you suggest. I think it could be a combination of those two issues. As of late I have not used the welder for such thick plates so I have not needed that high of a speed. The problem seems to be with a speed of 6 or higher.

 
Besides the issues described above here is a condensed list of what I have been working on this winter:

-Building a custom vacuum pump and reservoir system for the brake booster. This took way a lot of time but I wanted a system that is partially hidden so it took a lot of work and testing. The tank gets vacuum from the engine as well as from a pump. The idea came from here: https://www.powerperformancenews.com/tech/gimme-a-boost-how-to-build-an-inexpensive-power-brake-vacuum-booster/. I had to use a different vacuum switch since the one recommended there is junk. I ended up using a Superior K058 switch. I located the new vacuum reservoir where the stock one was and the pump underneath. The reservoir now feeds the brake booster and the A/C controls. Once I get a chance to test the system with the brakes I will start a detailed thread. I already tested the vacuum and all connection and it seems to work, but the big test will be with the brakes. The vacuum range is between 17 and 20 mmHg.

-Fitting Duraspark distributor: adjusting the gear depth by removing material from the flange, limiting mechanical advance to 20 deg, and limiting vacuum to 10 deg.

-Rearrange PCV hoses.

-Raise the throttle plate on the manifold so it is aligned with the EFI linkage. Blue Thunder manifold is taller than stock.

-Build adapter for the shifter.

-In the process of completing a custom built driveshaft safety loop.

-Getting ready to replace leaf springs with Maier 4.5 leaf springs. Hence the last post about boxing the spring perches.

-Getting ready to replace third member and axles with Strange components.

Edit: added vacuum switch infomation

 
Last edited by a moderator:
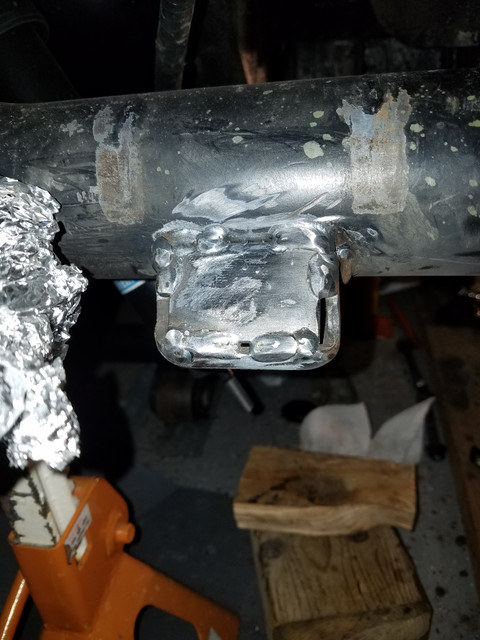
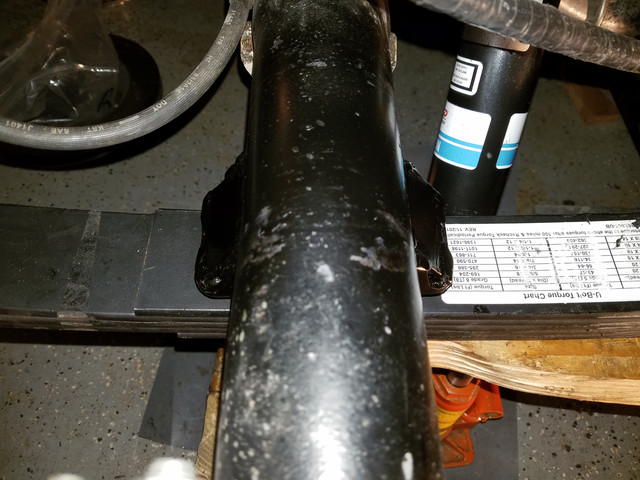
Last night I finished boxing the leaf spring perches and installed the Maier 4.5 leaf springs & Bilstein shocks.

Here is a thread that I started asking questions about the U-bolts (https://7173mustangs.com/threads/leaf-springs-u-bolt-recommendations.32765/). I used the Dayton 361-450 U-bolts that are 1/2" in diameter. This involved drilling the spring plates to 1/2".

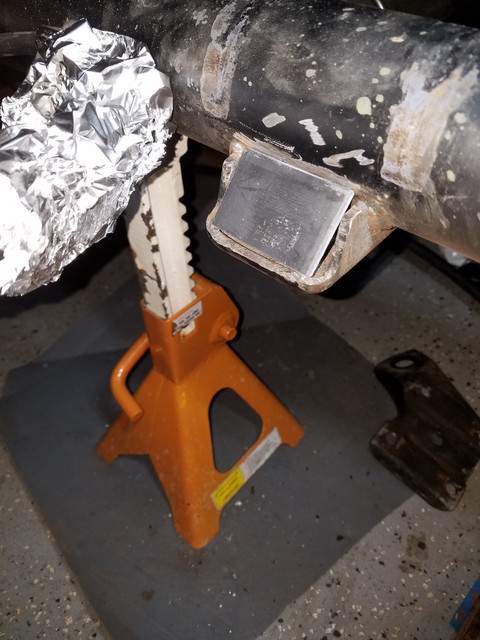
In that thread it was suggested to box the perches. After some searching online I saw pictures of what can happen to the perches when a lot of torque is applied to the axle during launch. I didn't feel I had to weld the whole reinforcing plate. The weld is a bit sloppy, but I also did it in steps - not continuous. I didn't want to overheat the axle too much. I also did alternating between the front and back sides of the perch always cooling with compressed air. It still got hot, but I don't think it gets hot enough to create any major warping. The plates were 3/16" thick.


Last edited:
Great build thread Tony, with lots of sub-threads to navigate through. Well done ! Your persistence and patience shines through so kudos for you for having a plan and sticking to it. Hope i can demonstrate the same level of commitment even when it gets tough for my rebuild.

On the welder front if you're not seeing any power check the obvious, the fuse (s). Don't know enough about Eastwood products but should be similar for all welders. I've had to replace mine a couple of times previously probably due to the household wiring.

 
Thank you. After cleaning the rollers that drive the wire it improved. I also incresed the torque of the tensioner. I was able to weld with no problems at a "7" speed.

Sent from my SAMSUNG-SM-G930A using Tapatalk

 
Today I went for a very short drive and all is looking good. The car feels a bit rough so I still have to work on timing and check total advance, adjust EFI idle, adjust rear brake proportioning valve and other adjustments. Since I am braking-in the differential and transmission the recommendation is to drive "not aggressive" for the first 500 miles, and not driving more than 50 miles without letting the differential oil to cool down.

I have a goal of attending a local car show this weekend, if weather permits. I still have to clean the dust from the exterior and clean the inside.

 
Back
Top