Saginaw 800 Power steering Box rebuild

7173Mustangs.com

Help Support 7173Mustangs.com:

This site may earn a commission from merchant affiliate links, including eBay, Amazon, and others.
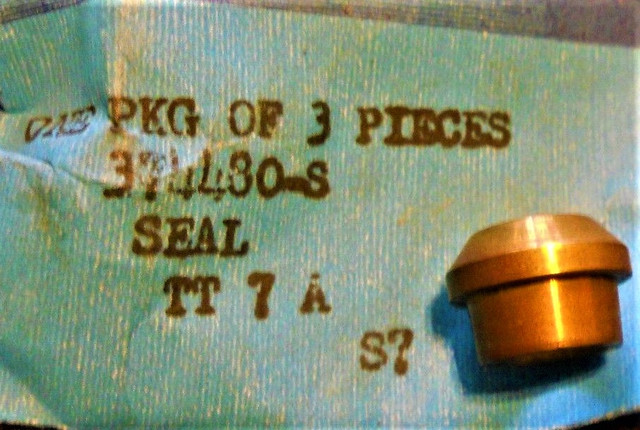
For those following this post, I just received the NOS seat kits I ordered, C5AZ3D728-A from Green Sales in Cincinnati Ohio. I was surprised to find it contains not only the inlet seat and check valve components, but also the outlet port seat. There are actually 2 different ones of these to replace an older style, depending on what the box had in it. I also ordered 2 x 374480-S seats for the outlet separately, so now I have spares.

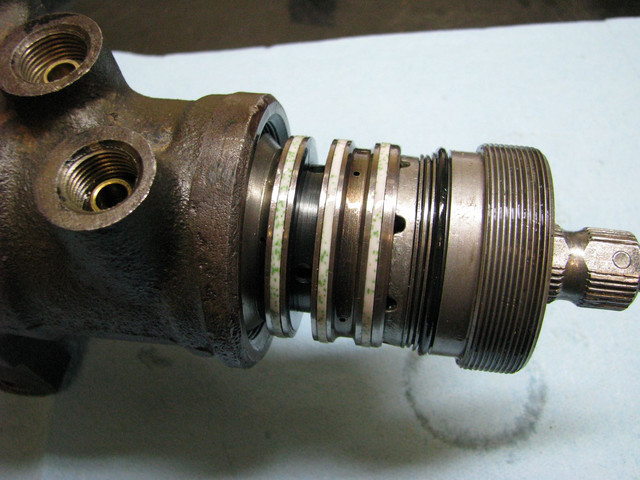
Now I have all the components I need to rebuild both my PS boxes (or PS gear). I will regrind the sector shaft next week. Lucky me got called in to work for a week!!

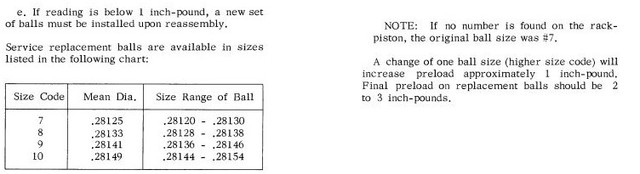
I will be trying out different ball size combinations from .2805" to .2814" (and in between) to find the best preload as specified in the Ford manual. When done, I'll update my findings, but for now, it's on hold until it I get inspired to work out in the cold workshop...……. or wait for spring!

The other thing I'm pondering is to rig up a test stand, but for that I'll need a PS pump and an electric motor. Any thoughts?

Geoff.

 
I'm curious how the ball combo turns out. The way I understand ball screws to work the backlash adjustment is that it is solely a product of the diameter of the balls, and that you could have free space between the balls themselves with no ill affect whatsoever until you get to the point where the load isn't shared between enough of them. The piston (nut) should have even wear because the balls always ride in the same place, and the screw itself will have more wear in the middle, since 90+% of steering is just correcting a bit here and there and not sharp turns. My wild guess is that you would just go with the largest ones you could that did not bind when you were at full travel left or right to put you above that inch pound spec you got out of the Ford manual. I got to get a copy of the manual next time I order up something from one of the parts houses. I'm curious if the underside matte finish balls were just a cost saving measure, Saginaw could use 50% matte balls, and the other 50% would be the high grade tight diameter specification ones that were the best match for the screw and piston combo…. Who knows.

Can't wait to see the results!

 
I'm curious how the ball combo turns out.  The way I understand ball screws to work the backlash adjustment is that it is solely a product of the diameter of the balls, and that you could have free space  between the balls themselves with no ill affect whatsoever until you get to the point where the load isn't shared between enough of them.  The piston (nut) should have even wear because the balls always ride in the same place, and the screw itself will have more wear in the middle, since 90+% of steering is just correcting a bit here and there and not sharp turns.  My wild guess is that you would just go with the largest ones you could that did not bind when you were at full travel left or right to put you above that inch pound spec you got out of the Ford manual.  I got to get a copy of the manual next time I order up something from one of the parts houses.  I'm curious if the underside matte finish balls were just a cost saving measure, Saginaw could use 50% matte balls, and the other 50% would be the high grade tight diameter specification ones that were the best match for the screw and piston combo…. Who knows.

Can't wait to see the results!
 Steer & Gear told me that 99% of the time when remanufacturing a Saginaw 800 PS gear, they use ALL ,2814 balls. I thought that was interesting.

 Calculating the "chain length" using mean diameters, and don't forget I'm working on a variable ratio box which uses 24 balls, (fixed ratio use 22) it theoretically measures 6.7404". The chain length of 24 x .2814 balls is 6.7536", therefore a difference of.0132". That to me is quite a large difference, so I have calculated all the scenarios I can for the various size balls I have. The intent is to load the rack piston / worm screw assembled in the housing and measure the preload. If necessary, I'll use a magnet to remove said balls and reload a different combo and try again. That's the theory at least, will it work, who knows till I try. I'm still learning and figuring this all out. It'll be trial and error I'm sure.

Stay tuned, but don't hold your breath!!

Geoff.

 
Geoff,

What I was trying to say (not very well) in my last post was that I don't think the chain length has anything to do with backlash, only ball diameter will change backlash. I'm 99.999% sure you will find that to be true, that you could load the box with 23 new balls and the backlash would be the same, or reuse the matte balls as every other ball and your new ones as the other 50%. The backlash would be the same as if you filled it with 24 of the .2814.

After pushing keys for a few minutes I have not figured out a good way to explain it with words, but I will try anyway. The only way the chain length could affect backlash would be if the balls were so tight against each other that they were not linear, one would have to be offset a little bit one way, then the next the opposite way, and so on and so forth. This would give the appearance of no backlash, but as soon as the ball-screw had any load on it the balls would be pushed to one side of the nut and the opposite side of the screw, and the chain length would increase a but, just pushing the stamped steel ball return "U" out enough to allow for the additional chain length since it is pretty flimsy. Having the balls this tight would be bad anyway, since the balls in a ball-screw roll as the screw functions. If you had the chain length tight it would cause ball to ball friction as they were rolling.

That is my difference of opinion, that being said I think the larger ball option is awesome. I'll call up and order some, and try them in my spare box.

 
Geoff,

What I was trying to say (not very well) in my last post was that I don't think the chain length has anything to do with backlash, only ball diameter will change backlash.  I'm 99.999% sure you will find that to be true, that you could load the box with 23 new balls and the backlash would be the same, or reuse the matte balls as every other ball and your new ones as the other 50%.   The backlash would be the same as if you filled it with 24 of the .2814.  

After pushing keys for a few minutes I have not figured out a good way to explain it with words, but I will try anyway.  The only way the chain length could affect backlash would be if the balls were so tight against each other that they were not linear, one would have to be offset a little bit one way, then the next the opposite way, and so on and so forth.  This would give the appearance of no backlash, but as soon as the ball-screw had any load on it the balls would be pushed to one side of the nut and the opposite side of the screw, and the chain length would increase a but, just pushing the stamped steel ball return "U" out enough to allow for the additional chain length since it is pretty flimsy.  Having the balls this tight would be bad anyway, since the balls in a ball-screw roll as the screw functions.  If you had the chain length tight it would cause ball to ball friction as they were rolling.

That is my difference of opinion, that being said I think the larger ball option is awesome.  I'll call up and order some, and try them in my spare box.
 I get what you're saying..... I think. I definitely agree that we don't want the balls to be so tight that they don't roll freely, hence the need to try them out before buttoning it all up. I think we're on the same page, just not communicating it very well. Even the Ford manual is a bit vague, to me anyway, and without all those "special tools" they say you need, we cannot do it the same way, hence I'm going to do it IN a spare casting. That way I can play with it without screwing up my good parts, i.e. use the old Teflon seals etc.

In these, it's not so much the balls that ware, but the grooves. It's very slight, but the bigger balls will take up that ware, deeper and wider grooves equal a longer chain length if that makes sense. Anyway, I'm getting more interested in working on this little project, so I might just get started on the weekend.

I'll send a PM with some other info.

Geoff.

 
Today's update;

2 steps forward, 1 back. Typical when working on our cars.

I got the sector shaft seal area reground and even that was not as I'd hoped. When I measured the rough hard chrome, there was not enough deposited to allow for the desired diameter of 1.250", it cleaned up at 1.245". I don't see any problem with this as the two seals have an uncompressed diam. of 1.170". I hate it when people don't give what was asked and that was a build-up to 1.260" diam. min. Anyway, I assembled the seals and inserted the shaft to do a gravity leak test.

The next 'issue' was with the brass inlet and outlet inserts. Getting them out was easy. I followed the Ford manual method using a 5/16 tap, a bolt, washer and nut. See pics. The problem was the kit I bought, C5AZ3D728A which is what I believe to be correct for the 71 Saginaw 800 box, proved not to be. I also bought a couple of 374480S seats for the outlet. These were correct. All is not lost with the kit. I measured the diameter of the inset area on both the inlet and outlet seats, they were .010" bigger than the originals I took out. Just means I have to turn off 10 thou, more pissing around!

After that, it should be plain sailing to get that VR box back together...……… well maybe! That's when I'll be finding out just what size balls I actually need to set the correct preload and remove the backlash. I did find out from a Saginaw instruction sheet, that the reason for the two sizes of ball is to achieve the correct preload. I'll try to get better info on this later.

So, till my next update, stay tuned!

Geoff.

 
Finally done work for a while, so I had time to play with the PS box today. I took a few pics as I went through the rebuild.

Briefly, I installed the rotation valve assembly and took an initial drag reading. With the adjuster plug tight, the reading was about 10-12 in/lbs. Backed off 1/2" the reading was 2-3 in/lbs before movement could be seen. That's about where it needs to be.

Next I installed the rack piston. Care must be taken as there is a sharp hole that will screw up the Teflon seal in an instant. Use a thin piece of plastic from a package to cover that hole while inserting the piston. Use some grease on it too and make sure the entire lot is coated with type F trans fluid. I also wrapped the Teflon seal with electrical tape, a thin strip of cardboard and a 3" gear clamp. I let it sit for a few days to compress the seal, makes it way easier to install.

Next was to start inserting the balls. I decided to try using all 24 at .2814" diam. Start with the piston tilted as seem. I just work it back and forth to drop 16 balls in. When they can be seen in both holes, it's time to install the remaining 8 balls in the tube thingy and fit that making sure the two screws with lock washers are tight!! Don't forget, I'm working on a variable ratio box with 24 balls. Fixed ratio only have 22. (mine did anyhow)

After realigning the piston and installing the end cap, I took another reading which was at 8 in/lbs total. What I did find is the total number of turns was 2 3/4 not the 3 1/8th a VR box should be. With some marks on the sector shaft (loosely fitted) and housing, I notice that there was a bit more travel to the left than the right. I'm thinking that as the casting I chose to use was from the fixed ratio 17.5:1 box, the inner stop ring is thicker than the VR and that would cause the difference. Should have checked that!! Another possibility is the fact I used all the same size balls, or dropped 1 ball off the end of the screw.

Hey, I got all winter to play with it. I can easily pull it apart and check that. Problem is I only have one piston Teflon seal and if I break that, I'll have to buy yet another rebuild kit. What's another 35 bucks!

Anyway here are a few pics;

Geoff.

 
Last edited by a moderator:
Okay, it's done...…… pending actual on-car testing next spring.

Perhaps I should have been a bit more "scientific" by removing and reloading the 24 .2814 balls to verify the number of turns LTL. But as I'm sure that the piston was hitting both ends of the travel stops, I feel confident the balls were the reason.  I did however check there was only 2 3/4 turns LTL. Next I stripped it down removing the piston. As this casting is from a fixed ratio box, I needed to check the stop ring thickness at the valve end and compare it to a V/R casting, they were the same thickness, These are removable and different applications apparently use different thickness rings to change the travel (and turns). There were also different plugs used in the piston to do the same thing.

I decided to try using 12 balls at .2814 and 12 at .2810 i.e. the stock 9/32 balls I bought. After a bit of trail, error and frustration, I managed to load the 24 balls alternating between them. Now I know why the originals are different colors!! This combination resulted in the 3 1/8 turns it is supposed to have and an equal amount left to right. Was it the balls size difference or some other reason? The pre-load was about 8 in/lbs, or as close as one can tell with the tool I have. Next was to install the sector shaft and cap. Once done and with the adjuster screw backed off, I reset the preload by turning the screw downward until the preload went to over 12 in/lbs, then backed it off until it read approx. 8 in/lbs. Spec calls for 4-8 in/lbs, but I feel the 8 will be good. The input shaft turns easily by hand and the sector shaft is seen to move immediately, so there ought not be any free play or backlash, I hope saying that with my fingers crossed!!

I'll catch this back up when I install this box in spring, too cold to work on it here now. If it's all good, I'll redo the one currently in the car the same way.

Thanks for all the interest in my little saga.

Here are pics to show the stop ring and end plug.

Geoff.

EDIT; corrected a couple of minor typo's.

 
Last edited by a moderator:
Okay, just one more addition to this.

Curiosity got the better of me today and I decided to play around with the junk parts I have from the fixed ratio box. My intent was to prove or disprove why there was only 2 3/4 turns on the V/R box prior to changing the balls to 12, .2814 and 12, .2810, which seemed to result in gaining back the 3 1/8 turns it is supposed to have.

The junk box is a fixed ratio and only had 22 balls in it. Also the tube thing is smaller by about 1/8" across. I put it all together minus the sector shaft and loaded 22 .2814 balls. This box @ 17.5:1 is supposed to have 4 turns LTL, it came up just shy of that. Next I removed all the balls then loaded 11 of each as before. Guess what, just shy of 4 turns! Proved nothing. Another "thing" I found was I could still load 8 balls in the tube. It should be only 6 with the remaining 16 in the piston. So I loaded it with 24 balls. Now, this is weird. Why could I load 24 balls in a screw that is supposed to be for 22? That indicates that there could be a gap in the "chain"  without issue. That doesn't make sense to me. However I did find it would bind up, so 24 is not a good thing. Learning nothing, I put it all away in a box.

Next, I wanted to recheck the over center preload on the V/R box. I did not strip anything down other than back off the adjuster in the sector shaft. Rechecked the base preload at about 3-4 in/lbs and then tightened the adjuster screw 1/4 turn at a time until it bound up, i.e. could not turn the input shaft by hand, then backed off a 1/4 turn and bingo, a total of about 8in/lbs. Spec is 4-8 in/lbs over the base preload. It all turned smoothly and I could neither see nor feel any free play so I hope that relates when it's in the car. After all that's the goal, no slop at the steering wheel.

Geoff.

 
Geoff, I don't have a lot of pre 1965 info. The 61-64 T-Bird only part (C5AZ-3647-A R/B C5AZ-X) evidently picked up the 1965 level part number when the 60-64 MPC received it's final revision in 1969. The only size related number I see for the "X" ball is .25" diameter.

The inlet (pressure) and outlet (return) brass seats have Ford hardware numbers and not the typical Ford  formatted part number.

The pressure seat is 374309-S It is 7/16" dia,    top orifice is 9/32" with a 5/16" seat

The return seat is 374480-S     It is 3/8 dia,        top orifice is 9/32" with a 3/8" seat

If you have a favorite parts supplier you may want to check with them. I have have used Green Sales (1-800-543-4959) a few times and they show stock on the 374480-S. The 374309-S I have seen on E-Bay and is still available from Ford. So you may want to check with your local Ford dealer to see what he has. I believe Canadian dealers may be on a different parts locator system from the US dealers so I cannot verify what they may have.

Let me know if you have any problems with the numbers.    :)

 Steve and all,

  I finally found a NOS 374309-S. Unfortunately, I have no idea what casting it's for. Not a Saginaw 800 for sure.

As Steve noted the diameter is 7/16" base 3/8". It falls into the hole of the smaller outlet!

Here are pics of the correct size ones. It's my bad, I should have double checked the size before jumping on ordering this smaller seat.

The 374480-S is correct for the outlet, but as I noted before, the 'kit' C5AZ3D728 -A, is also incorrect. The seat diameters are good, but the insert portion is 10 thou bigger dia. than the ones taken out. For me, no problem, I was able to turn them down and also with a 1 deg. taper. These must be a tight press fit or they'll leak past the fitting.

Pic of all three left to right. Pressure seat, outlet seat and 374309-S

So, if anyone needs the smaller 374309-S, PM me. $5 plus mail. That's what I paid.

 
April 30 2019.

Last Thursday, I had a buddy come and help install the rebuilt PS box. It's just easier with two and besides company's always nice when working on cars I find.

As I've mentioned before, dumb-ass me deleted all the attached pictures mentioned in the thread. I'm not going to replace them, but I can attach pictures if required by readers. I finally found out how to resize them to take up less of the 1Gig allowance !!

To recap, this PS box was built using 12 balls at .2810" and 12 at .2814" with an over center preload of about 8 in/lbs according to my cheapo in/lb torque indicator ( can hardly be called a torque wrench!)  Also installed was a new Lares 201 coupler.

Without going into all the numbers, what I found and learned was that Bentworker was right. The ball size, not the chain length so much, controls the backlash. With the combination I installed and with the preload, there appeared to be zero backlash with a dry screw and piston. The sector shaft started to turn immediately when the input shaft was rotated in either direction.

So finally in and with all connections tightened, the motor was started and fluid slowly added while my 'helper' turned the steering wheel lock to lock, wheels off the ground of course. Then I was able to test drive the car. Once everything was warmed up, I topped of the fluid in the pump. Still seemed like some air trapped, but otherwise good. There will always be some free-play (movement) on the steering wheel and that's a result of a rubber rag joint. A couple of thou down there will result in a 1/2" at the top of the steering wheel. A second test drive got all the air out and the result was satisfying, 70 mph, hands off, no wandering. I don't think it could be any better. I did however turn the sector shaft adjuster screw the 1/4 turn down that I had previously backed off. 

Another 'thing' I noticed was with this casting that showed no ware in the rotation valve seals area, the lock to lock rotation was much smoother than in the box I took out.

So, at some point I'll rebuild the other box, but both the castings I have show ware grooves at the first Teflon seal of about .005" deep. I do have the possibility of buying yet another box and pump later in the year, so my hope is it will be better in that area. A leak between the 3 Teflon seals will cause loss of power as pressures increase turning lock to lock. I wish I could find original Saginaw drawings of these casting that show dimensions and tolerances between the rotation valve and bore, which seems quite large measuring the parts I have. It is simply not worth having these casting bored and sleeved as would be done by a professional rebuild company if required. I'm as sure as I can be that the box I just put together will last as long as I own the car. Job done!

Thanks for all the interest, advice and comments given .

Geoff.

5/03/19 EDIT; I just noticed a typo. small ball diam. is .2810" not .2800".

Picture of the rotation valve and three Teflon seals. The "first seal" as I call it, is closet to the adjuster nut.


Last edited by a moderator:
I'm in the process of rebuilding a variable ratio box code SPA AF, on inspection the box is good with minimal wear except for the 24 recirculating balls, they are pitted and lost there chrome finish due to water ingress probably

I'm finding it hard to tell the chrome from the black balls,  I've been searching this thread regarding ball diameters it seems that 0.28125 or 9/32 is the standard size, the black balls i think are .28141 from reading this thread.

I did a Google on .28141 and found a Cadillac 1963 power steering pdf, below is a snip from it. 


 the full pdf is from here https://4door.com/manuals/cadillac/1963/1963_Cadillac_Manual/05%20-Power%20Steering.pdf

You would think they would offer the dimensions of both colours?

Regarding the image above under NOTE, my rack piston only say 282 no other markings, do you think that this means standard size 7 balls. 

what is the type/hardness for these when buying replacements?

Are the black balls the same material or are they any different, I'm in the UK, i can get hold of the 9/32 0.28125 easily enough but the .28141 are much harder to come by .28141 seems to equate as a fraction 28141/100000 that's a whole different level of ball size.

I'll try to measure them but I feel my cheap ebay digital verniers are not going to be accurate enough.

 
Last edited by a moderator:
Back
Top