Tired with my engine...

7173Mustangs.com

Help Support 7173Mustangs.com:

This site may earn a commission from merchant affiliate links, including eBay, Amazon, and others.
thanks for explaning that guys. I'll look into the electronics first, might take while so don't hold your breathe ;-)
You need to reassess your priorities. ;)
haha, that requires a chat with:

1) The missus

2) My boss

In regards to the timing, I read that some Harmonic balancer needs to be checked first. Is that where the timing mark is on? I don't even know where that thing lives in my engine. I'm guessing at the front somewhere... And actually resetting the timing, that means losening the distributor and with the engine running spinning the distributor a few degrees?

EDIT: I found some useful videos on youtube. If I'm correct I should be able to find the timermark somewhere at the front. Seemed easy to do with the right equipment (which I need to get first...).

 
Last edited by a moderator:
thanks for explaning that guys. I'll look into the electronics first, might take while so don't hold your breathe ;-)
You need to reassess your priorities. ;)
haha, that requires a chat with:

1) The missus

2) My boss

In regards to the timing, I read that some Harmonic balancer needs to be checked first. Is that where the timing mark is on? I don't even know where that thing lives in my engine. I'm guessing at the front somewhere... And actually resetting the timing, that means losening the distributor and with the engine running spinning the distributor a few degrees?

EDIT: I found some useful videos on youtube. If I'm correct I should be able to find the timermark somewhere at the front. Seemed easy to do with the right equipment (which I need to get first...).
Vinnie

I am new to using a timing gun as well but once you have it in hand and connect it (plus review of the you tube videos) you will find it easy to understand. My balancer had a white mark at 0 degrees and we used nail polish to make a red line at 10 degrees advanced so we could see it clearly.

One thing, you want to go easy moving the distributor. Small corrections if needed.

You should also purchase a vacuum gauge and see what your car is doing there and what happens when you make any timing changes. You may also need to adjust the idle once you make those changes.

Check the timing and vacuum now for reference and then install the Petronix II. Keep in mind that I think you need 12 volts to make that unit work correctly (although some people have used the stock wire) and you may have only 7 or so going to your coil right now. Check that. There are threads about the Petronix install here and how you can pull the 12 volts if you need to. You may notice a real change once you install the module and then you can make adjustments.

Good luck.

 
Good advice from Twins. Look up info/video's on reading a vacuum gauge. It can help indicate an issue (like a misfiring cyl) and can help you set your timing and idle.

Also keep a note book (or spread sheet) of readings and changes and how it impacts drivability.

Your engine is basically stock correct? If so, once you have recorded your current timing/vacuum and replaced your points you can start with the factory timing setting. Record the vacuum value and take it for a spin. Next, try advancing the timing, normally you will see a higher vacuum. Advance it until adding additional advance has no impact on vacuum OR vacuum starts to decrease. Take it for another test drive. Make sure to put a load on the engine and listen for pinging. If you get pinging then reduce the advance a degree or two and drive again, repeat this until the pinging can no longer be heard. This will be your best initial setting.

Now you can set the idle mixture using the vacuum gauge as well (highest steady vacuum). First adjust the RPM to the factory spec. Then turn the idle screws, just a small amount, until you achive the highest vacuum reading.

This should get you pretty close.

 
The harmonic balancer should have the timing marks embossed on it, much like this:

pb1082stba45.jpg


On the passenger side of the engine, down low by the alternator, there will be an indicator that extends over the harmonic balancer. You'll be 'shooting' the timing gun at it while the car is running. The light will strobe as the numbers are passing by under the indicator - this happens several times per second at idle. If you can't see the numbers, ensure the balancer is clean, and use something bright (like chalk, white shoe polish, a laundry pen, etc.) to fill in the marks and numbers so they can be seen better under the strobing timing light (push the material into the marks, then carefully wipe away the excess).

When you are ready to adjust the timing, you'll loosen the retaining bolt at the base of the distributor slightly (just enough to allow movement), and adjust accordingly. You should have the vacuum advance disconnected/blocked, and the idle where it's happiest (around 650). You may have to adjust the idle speed and timing several times to find the sweet spot.

There is a lot of advice out there regarding where the timing should be, but the common consensus among the 351C-2V owners (on this site, at least) is that the Clevelands like to have the base timing set around 16* BTDC (idle), with the advance running up to 36* at peak power/rpms.

When it's firing on all 8 cylinders and the timing/idle are set properly, it'll feel like a whole new car when you take it out for a spin. Make sure to record the settings for that sweet spot, so you can quickly get things back to that point the next time you need to do a tune-up.

As Mike (will e) mentioned, things may work out a little differently regarding the engine's performance sweet spot - every one starts out the same, but over time, things change and variances occur between the major components. The big thing is to adjust idle and timing according to where your engine is happiest.

Hope this helps!

 
Thanks for all the advice guys, really appreciate it! When I get my next pay-check I'll invest in the neccesary equipment. I've found a timing light (https://www.conrad.nl/nl/equus-stroboscoop-met-controle-instrument-dis-857336.html) that lets you also read rpm and some other things. Since I have no tach that would be very welcome.

I'll do some tests before I replace my points and then test again.

I also remembered that last time it was in the garage for it's checkup the mechanic adjusted the idle screws of the 1406 but he adjusted the drivers side half a turn more than the pass. side. I guess I need to read up on adjusting that myself as well. Probably better to set them to base-specs? Ideally I figure they should be set the same...

 
That is a nice timing light.

One great option it has is it will offset the advance. This is a very cool option and makes setting the timing a bit easier. It will also allow you to determine your total advance.

 
Well. I went to look for the balancer and I found it but sheesh it's not easy to see from above! I cleaned it a bit and there's a mark at 6 for some reason:

IMG_2236.JPG


Don't have a light yet so didn't do much more in regards to the timing.

For some reason I took the aircleaner off to see if it was clean inside. But the inside of the cap had stuff on it:

IMG_2244.JPG


It's yellow sticky stuff. Oil is black. Fuel is yellow like this. Uhh?

IMG_2246.JPG


The carb looked clean though...

I also took the PCV cap out of the drivers side valve cover and it didn't look very clean inside. I remember when I removed the other cover a while ago it looked a lot cleaner there. I wonder if this has anything to do with the low temp of the exhaust on the drivers side...

 
Well. I went to look for the balancer and I found it but sheesh it's not easy to see from above! I cleaned it a bit and there's a mark at 6 for some reason:

IMG_2236.JPG
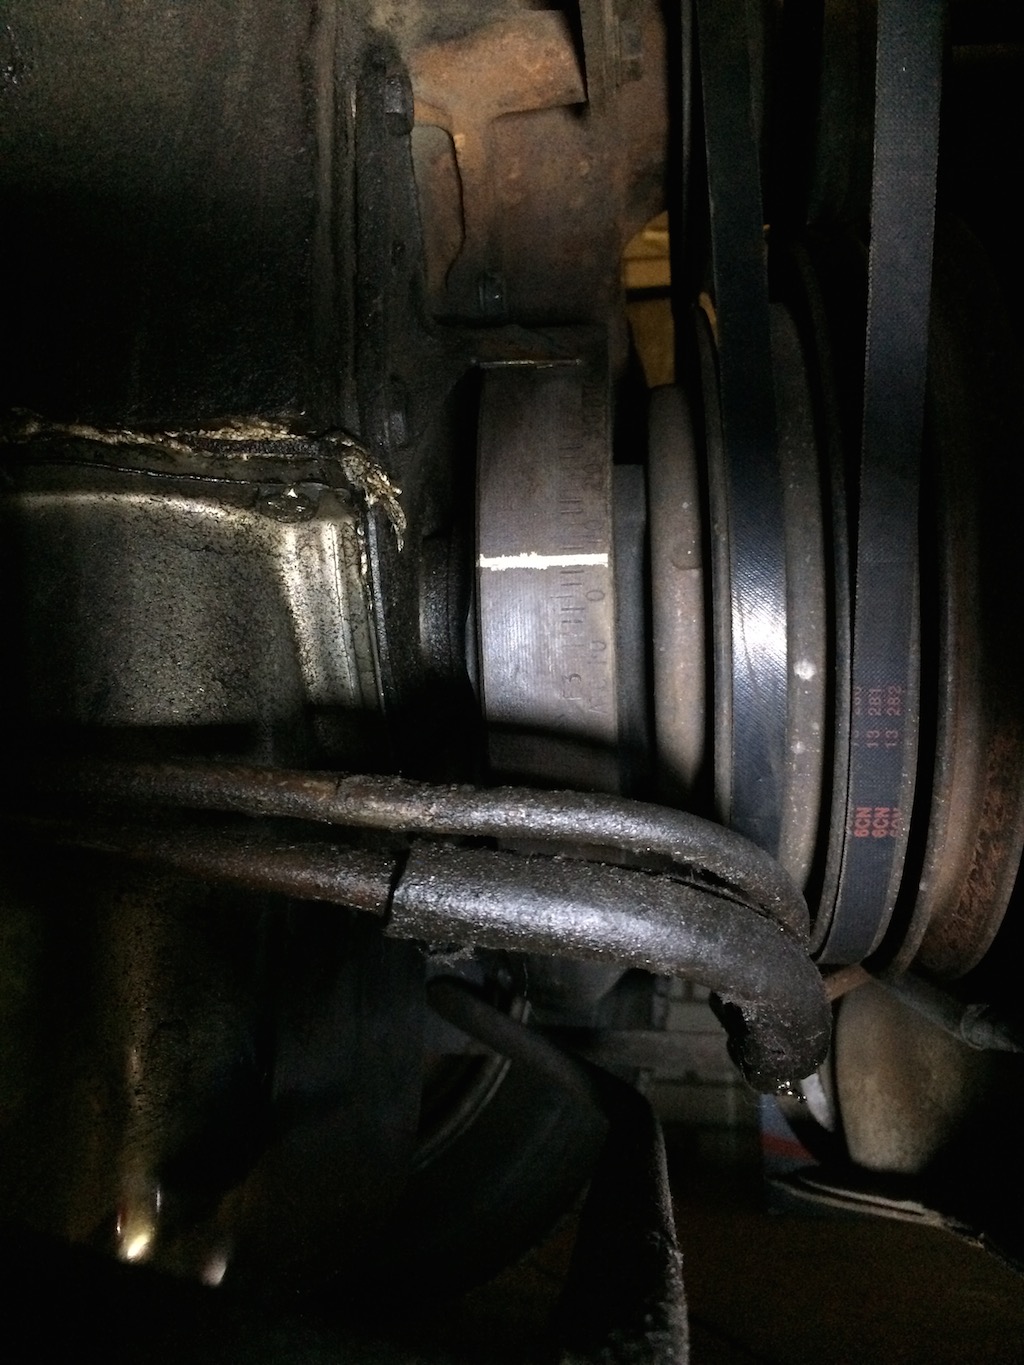
Chances are, the previous owner figured the timing is best set to 6* BTDC (just like every other 'hot rodder wanna-be'), and put the white mark on the balancer so as long as the mark is lined up with the indicator, the car is timed properly.

That would be fine, if only the engine was intended to run at 6* BTDC. I know mine initially ran pretty "meh" at 6* BTDC shortly after I first fired it up, but then I did some reading and reset my base timing to 16* BTDC (based on information I found here at this site), and it's been WAY happier ever since.

Of course, results may vary, depending on various things. so you'll need to get it running and discover that for yourself, since your engine's "sweet spot" might be something different - probably only off by a few degrees either way... but still.

I would probably just ignore that mark unless it winds up lining up with the indicator when you get it running at its best.

If you can get a silver Sharpie in there, you might consider coloring in the timing marks and immediate wiping them with a damp rag - that will leave some of the silver in the divot, while cleaning up the main surface (and will show up a little more brightly when the timing light strobes.

And yep - that looks like it could be old, icky gas. Probably puked up through the carb's throat, splashed the underside of the air cleaner lid and the icky stuff in it was left when it evaporated. If the car sat for a long time, it started breaking down (especially, if you have any organic additives - like ethanol, etc.).

 
Yep Someone marked that based on the suggested ford timing on the valve cover decal. Factory set was 6* BTDC (not a great set) Mine pings when set at 16*, I ended up at 12* with current set up but I am guessing that will change soon.

 
If you get the fancy timing light you can just mark zero. The light will offset for you. For example, you set the light to 12 and when you are at 12 BTDC it will flash right at the zero. They are very cool.

 
I've been reading and reading watched a dozen timing videos. Most of them go like this:

1) Find TDC

2) Set timing at idle

3) Set timing at 2500-3000 rpm.

I have 2 questions about this procedure:

1) Do I need to perform step one if I leave the distributor on and only replace points with Pertronix?

2) When performing step 3 (set timing at high rpm by rotating the distributor *again*), aren't you changing what you have set in step 2? I'm puzzled by this...

 
You should check the timing after installing Pertronix. It will probably have changed slightly with the more efficient process.

Step 3 is to 1) check that the total advance is reached at your target rpm and 2) that the total advance has not exceeded 'xxx' degrees for optimum performance. You will not have to reset the distributor position if everything reads within normal parameters.

 
That means that basically, eventually setting the total advance "overwrites" the initial timing. With an engine that is starting and running (all be it not as good as it should), why not skip step 1 and 2, install the Pertronix and set total advance?

Please don't think I'm disregarding all the advice you guys have been giving me, I'm just trying to let it all make sense to me :)

 
If you get the fancy timing light you can just mark zero. The light will offset for you. For example, you set the light to 12 and when you are at 12 BTDC it will flash right at the zero. They are very cool.
That's what I've never really understood about the 'fancy' timing lights with the variable offset built-in. I've always had/used a standard timing light that didn't have that ability. Thanks for explaining that. ::thumb::

OK - so you want to see what your timing is set to just for a benchmark before you mess with anything. After that, you need to ensure you have TDC when you start pulling the distributor's guts to ensure the position of the rotor inside the cap. See where it points when you first pull off the cap - it should point to #1. After you make the Pertronix swap and you reinstall the cap & rotor, things should still be pointing directly at TDC. If they're not, you can adjust the distributor if you need to, to ensure the rotor is pointing at #1 when the engine is at TDC. Without that - you got nuthin'.

Then, check your timing and make adjustments based on engine specifics.

I think Step 3 should read "check timing at 2500-3000 rpm, and adjust as necessary." If you have your idle timing set, and it runs great, you should be very close to the full advanced timing. If not, adjusting your timing at 2500-3000 rpms will only minimally affect your timing at idle.

The key is getting the engine timing to be optimal while you're driving (not stumbling or having dead spots where it feels like you're losing power) - you can usually fix most idle issues with the adjustments of the carb, anyway.

 
Both are important. You don't want your idle timing set too high, as you will likely run into pinging issues, which can damage your engine. You check total timing to make sure the mechanical (centrifugal) and vacuum advance are working, if not, resulting in too low total advance, or too high. If everything is functioning properly and your total advance still isn't where you want it you'll have to modify your distributor curve, a subject that has been discussed several times on our forum.

Ideally the spark and combustion takes place when the cylinder pressure is at its highest, or at the top of the compression stroke. Because there is a slight delay between the time the spark is initiated and combustion takes place you set the ignition timing slightly advanced. This delay is fairly constant, which means that as the piston speed increases the spark has to occur sooner to achieve efficient and complete combustion, so the total advance is also important, but can't occur too soon.

 
Last edited by a moderator:
... After that, you need to ensure you have TDC when you start pulling the distributor's guts to ensure the position of the rotor inside the cap.
A, but I'm not pulling it out, I'm just replacing my points and I think I'm going to assume TDC has been set correct for now I think. Or would that be reeeaaaalllllly stupid of me? :-|

Both are important. You don't want your idle timing set too high, as you will likely run into pinging issues, which can damage your engine. You check total timing to make sure the mechanical (centrifugal) and vacuum advance are working, if not, resulting in too low total advance, or too high. If everything is functioning properly and your total advance still isn't where you want it you'll have to modify your distributor curve, a subject that has been discussed several times on our forum.
Thanks for clearing that up! Yes, one video explained about influencing the curve by fiddling with little springs inside the distributor, which makes complete sense to me.

Cheers guys! Have a great weekend :)

 
... After that, you need to ensure you have TDC when you start pulling the distributor's guts to ensure the position of the rotor inside the cap.
A, but I'm not pulling it out, I'm just replacing my points and I think I'm going to assume TDC has been set correct for now I think. Or would that be reeeaaaalllllly stupid of me? :-|
Pulling the points IS pulling the distributor's guts - or a good part of them, at least. ;) Modern solid-state distributors don't have points. You are converting your distributor from points to a modern solid-state distributor by swapping in the Pertronix module.

The rotor shaft is keyed, so the rotor only goes on one-way. What's the hurt of finding TDC before taking anything apart? At least you'll know where you're starting from... not to mention, if everything somehow goes south (which it won't), you'll know you're at least at TDC and can put it all back if you must before starting over.

Remember the old adage: Never Assume anything. :whistling:

 
The old adage I know is "assume makes an ass out of u and me" ;-)

I'll look into finding tdc but all those folks saying I should put a finger into nr one cyl to "feel" tdc don't sound too right. My finger ain't theirs...

 
Pull the #1 spark plug, put a drinking straw into the spark plug hole, and use a big 1/2" drive breaker bar on the crank pulley nut, and turn the engine by hand. When the straw reaches the top of its travel, that's TDC for the piston... then check under the distributor cap to ensure the rotor is pointing at #1 spark plug wire - if it's 180* the other direction, then rotate the engine until the straw is up to the top of travel again, and the rotor is pointing at #1. Remember, the pistons cycle twice for each firing of the spark plug.

I'm a pretty big guy, so there's no way any of my fingers are fitting into a spark plug hole... that's my excuse. But I'm with you - I wouldn't use my fingers even if they did fit. :whistling: :D

 
Back
Top